Tag: browser

  • Vodafone Qatar Internet Data Plans – Internet Packs & Recharge Codes

    Vodafone Qatar Internet Data Plans – Internet Packs & Recharge Codes

    A compilation of Vodafone Qatar recharge codes for daily, weekly and monthly internet data plans

    Just moved into Qatar? Here is a list of Vodafone Qatar internet pack activation and deactivation codes. We have selected all the offers in place and grouped them into daily, weekly and monthly plans.

    With this page, you will be able to get started with Vodafone QA internet. We will show you how to configure your device for internet access, list of internet plans available and how to check your data balance. Note that when you use all your data allowance or do not have a data plan, you’ll be charged on a standard rate of 55Dhs/MB

    Vodafone Internet Settings

    If you need internet settings for you phone send the word “Internet” to 802. In less than 2 minutes you will receive the settings to your device

    Vodafone Online Recharge

    First, you need to know that Vodafone QA has setup a nice platform online for Qatar users to directly recharge their data packs and purchase call credits online. The website accepts payments via Visa & MasterCard.

    To purchase a call credit visit https://www.vodafone.qa/go/en/online-top-up?prepaid=100#voicePacksContent

    To purchase a Vodafone internet pack visit https://www.vodafone.qa/go/en/online-top-up?internet=60

    The Vodafone QA online payment platform is pretty easy to use and free to access. However, if you prefer to recharge your internet plans directly from your dialing pad, keep scrolling.

    Vodafone QA Daily Plans

    The daily 24 hours internet plans are suitable for those with small internet demands.

    Internet Plan Data Allowance Price Activation Code Validity Period Description
    Daily Pack 1 10 MB QR1 Dial *100# or *200*302# Same Day till Midnight Auto-renewed when internet is used.
    Daily Pack 5 250 MB QR5 For Prepaid Dial *200*500# and Postpaid Dial *110*120# 24hours (1 day) Data plan is not auto-renewed

    Vodafone QA Weekly Internet Plans

    Spending a week vacation in Qatar? The weekly internet pack is probably what you need. It offers data allowance ranging from 75 MB to unlimited bandwidth.

    You can also use the weekly plan to download unlimited amount of movies and musics to watch during the weeks. If you are a heavy internet user, I suggest you use the weekly internet plan.

    Internet Plan Data Allowance Price Activation Code Validity Period Description
     Weekly Pack 6 75 MB QR6 Dial *100# or *200*306#  7 days Can be auto-renewed on days when internet is used.
     Weekly Pack 10 150 MB QR10 Dial *100# or *200*710#  7 days Can be auto-renewed.
     Weekly Pack 20 1 GB (1,000 MB) QR20 Dial *100# or *200*720#  7 days Can be auto-renewed.
    Weekly Pack 100 Unlimited QR100 Dial *100# or *200*600#  7 days  Can be auto-renewed.

    Vodafone QA Monthly Internet Plans

    If you are an average internet user, here is a list of monthly internet plans you can choose from.

    Internet Plan Data Allowance Price Activation Code Validity Period Description
    Monthly Pack 20 250 MB QR20 Buy from the store

    https://www.vodafone.qa/go/en/online-top-up?internet=20

    30 Days (1 Month) Auto-renew is enabled.
    Monthly Pack 60 1 GB QR60 Buy from the store

    https://www.vodafone.qa/go/en/online-top-up?internet=60

    30 Days (1 Month) Auto-renew is enabled.
    Monthly Pack 80 3 GB QR80 Buy from the store

    https://www.vodafone.qa/go/en/online-top-up?internet=80

    30 Days (1 Month) Auto-renew is enabled.
    Monthly Pack 100 Recurring 6 GB QR100 Dial *100#, Call 111 30 Days (1 Month) Auto-renew is enabled.
    Monthly Pack 100 6 GB + 1.5GB bonus for Falla Club. QR100 Buy from the store

    https://www.vodafone.qa/go/en/online-top-up?internet=100

    30 Days (1 Month) Data plan is not auto-renewed
    Monthly Pack 200 12 GB QR200 Buy from the store

    https://www.vodafone.qa/go/en/online-top-up?internet=200

    60 Days (2 Months) Data plan is not auto-renewed

    My Vodafone App

    My vodafone app is a mobile application that lets you manage your Vodafone account straight from your smartphone. My Vodafone app gives you ability the view all the details about your mobile line as well as recharge your voice credit and data plan.

    The app is available for Android and iOs devices and it’s completely free to download and install.

    Smart Data Rate

    Vodafone Smart Data Rate is a fall-back alternative when your data plan is depicted.

    With Smart Data Rate, once you finish the data in your monthly Postpaid plan or the data in your Prepaid Internet Pack, you’ll be charged a discounted rate up to 95% for the additional data you use rather than the standard data rate of 99Dhs/MB (effective 22 April, 2016).

    How it works:

    Once a customer is subscribed to Smart Data Rate, the additional data is added in steps after they have finished all the data in their plan or internet pack as shown below:

    Postpaid Smart Data Rate Steps Additional Data Charges Validity
    Step 1 0 – 200MB QR 20 End of bill period
    Step 2 200 – 400MB QR 20 End of bill period
    Step 3 400 – 600MB QR 20 End of bill period
    Step 4 600 – 800MB QR 20 End of bill period
    Step 5 800 MB+ 10 Dhs/MB (100QR/GB) End of bill period
    Prepaid Smart Data Rate Steps Additional Data Charges Validity
    Step 1 0 – 150MB QR 3 Until Midnight on the same day
    Step 2 150 – 300MB QR 3 Until Midnight on the same day
    Step 3 300 – 450MB QR 3 Until Midnight on the same day
    Step 4 450 – 600MB QR 3 Until Midnight on the same day
    Step 5 600 – 750MB QR 3 Until Midnight on the same day
    Step 6 750 MB+ 2Dhs/MB Until Midnight on the same day

    Smart Data Rate Activation/Deactivation:

    Smart Data Rate is free of charge for both Postpaid and Prepaid customers!

    Postpaid: Dial 110111# to activate for FREE and Dial *100# and follow the menu to deactivate

    Prepaid:Dial 200111# to activate for FREE and Dial 250111# to deactivate

  • How to Stop New Versions of Mozilla Firefox from Hanging and Lagging

    How to Stop New Versions of Mozilla Firefox from Hanging and Lagging

    COMMENT: If you find your Firefox very disappointing and even considering a change, EwtNet is offering you something that might keep you longer on the Mozilla internet browser.

    Is your Firefox lagging, hanging or extremely slow to start?

    Are you currently thinking of quitting Firefox for good? Here is something that might help you change your mind.

    Statistics by W3school shows that Mozilla Firefox has only an average of 28.2% overall desktop users in 2013 while Google Chrome in the same year had an overall average of 52.6% desktop users. Comparing the browsers stats in 2010 Mozilla Firefox comes up with an upper hand with 46.4% of overall desktop users, while Google Chrome can only boast of 15.9%. Meaning that Firefox has lost 18.2 of it’s users to Google Chrome and other browsers since 2010.

    If you are the next Mozilla faithful who is planning to Jump ship due to the slow response of your browser, resetting Firefox might change everything.

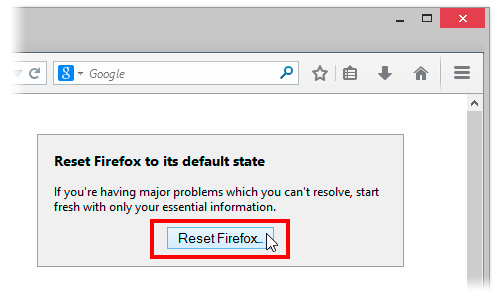
    The reset feature fixes many issues by restoring Firefox to its factory default state while saving your essential information like bookmarks and open tabs. All of your Firefox settings and personal information are stored in a profile folder. The reset feature works by creating a new profile folder for you while saving your important data.

    Resetting Firefox will remove your Extensions and themes, website-specific preferences, search engines, download history, DOM storage, security settings, download actions, plugin settings, toolbar customizations, user styles and social features.

    How to Reset Firefox to It’s Default State

    Resetting Firefox can be done through the Troubleshooting information page.

    1. Click the menu button New Fx Menu and then click help Help-29 .
    2. From the Help menu choose Troubleshooting Information.
    3. Click the Reset Firefox button in the upper-right corner of the Troubleshooting Information page.Reset 29 Lin
    4. To continue, click Reset Firefox in the confirmation window that opens.
    5. Firefox will close and be reset. When it’s done, a window will list the information that was imported. Click Finish and Firefox will open.

    Another way of accessing the Troubleshooting Information page  is by entering about:support in your address bar. Hit enter to bring up the troubleshooting information page. Follow step 3-5 above to reset your browser.

    What if Resetting Does Not Work

    If after resetting your browser you still find Firefox lazying about, you might consider doing any of the following:

    • Start Firefox in safe mode to see if there are any changes.
    • Disable all plugins and extensions  one-by-one to see if any took up a lot of memory usage. Firefox memory usage sometimes can reach over 400 Mb
    • If your browser often lag while watching YouTube videos, try installing a freeware program called Firemin which apparently stops memory leaks when used to launch Firefox.
    If none of this worked, the ultimate solution is to wipe Firefox clean from your computer and installing a fresh copy of the application.

    Note: It is essential to print these steps or view them in another browser.

    1. Download the latest Desktop version of Firefox from http://www.mozilla.org and save the setup file to your computer.
    2. After the download finishes, close all Firefox windows (click Exit from the Firefox or File menu).
    3. Delete the Firefox installation folder, which is located in one of these locations, by default:

    Windows:

     
    C:Program FilesMozilla Firefox 
    C:Program Files (x86)Mozilla Firefox

    Mac:

    Delete Firefox from the Applications folder.

    Linux:

    If you installed Firefox with the distro-based package manager, you should use the same way to uninstall it – see

    Install Firefox on Linux

    . If you downloaded and installed the binary package from the

    Firefox download page

    , simply remove the folder firefox in your home directory.
    1. Now, go ahead and reinstall Firefox:
    2. – Double-click the downloaded installation file and go through the steps of the installation wizard.

    – Once the wizard is finished, choose to directly open Firefox after clicking the Finish button

    If you have a lot of Bookmarks you wish to preserve, there is nothing to fear. You can Export Firefox bookmarks to an HTML file to back up or transfer bookmarks and restore them whenever you want to.

  • Chrome beta users get an assist from Google Now

    Chrome beta users get an assist from Google Now

    IDG NEWS SERVICE – Google Now is moving out of the lab and onto the desktop in the beta version of Chrome.

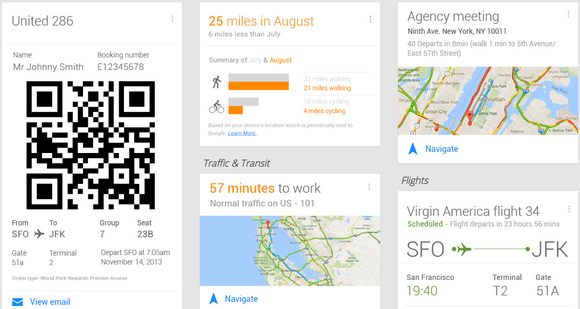
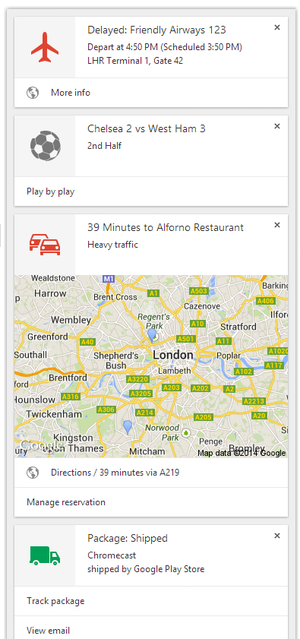
    Starting this week, Chrome beta users can view Google Now “cards” within the notifications area on Windows, Mac, and Chrome OS. The cards should show up automatically if you’re already using Google Now on Android or iOS, and have signed into Chrome with the same Google account.

    Google Now is a virtual assistant that tries to anticipate the information you want, such as the weather, traffic, travel details, and upcoming reservations. Much of that information is based on activity from your Google account. For example, Google Now can detect flight confirmations in Gmail and notify you about any delays; it can also look at your Web searches to infer what breaking news topics you’d be interested in.

    The service first launched for Android in 2012, making its way to the iPhone last April as part of the Google Search app. There have been hints of a desktop version since early last year; last month, it finally launched as an experimental feature—not enabled by default—within Chrome Canary. While the feature rolls out to the Chrome beta channel this week, it’s already available through theChrome dev channel.

    The arrival of Google Now is the search giant’s biggest step yet toward a convergence of Chrome and Android. Google has said that it won’t merge the two platforms anytime soon, but that it wants to have a more consistent experience across both platforms. Along that line, Google recently started letting Chrome developers create standalone Web apps for Android.

    Having Google Now in Chrome could be useful for certain things, such as traffic on your upcoming commute or reminders of when to leave for your next appointment. But it could also be a nuisance for less important things such as sports scores.

    If you’d rather not see Google Now notifications, click the bell icon in your notification area (lower-right corner in Windows, upper-right on Macs), then click the gear icon in the Notifications Center and uncheck the “Google Now” box.

    View original source.

  • How to Create and Manage Multiple User Accounts in Google Chrome

    How to Create and Manage Multiple User Accounts in Google Chrome

    The recent versions of Google Chrome will let you synchronize your Google account with Chrome so that you don’t have to login again to each Google products (e.g. Google Drive, Gmail, Blogger, Google Play, etc) website you visit. This will also mean that anybody who has access to your Google Chrome browser can easily explore your email and other Google products without your consent.

    How do you ensure that no intruder can have access to your Google account without you logging off? If you share a PC at home, other family members can start searching the web as you by simply opening Chrome.

    Luckily, Chrome’s multiple profile support can help, providing an easy-peasy way for multiple people to use the same browser without worrying about intruders or having to constantly sign in and out of Google profiles.

    How to Add a New User

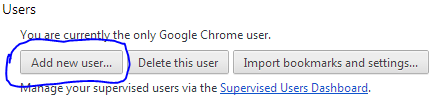
    First off, open Google Chrome’s menu—the icon with three horizontal lines in the upper right-hand corner—and open the Settings option. Towards the bottom you’ll see a “Users” section >> Simply click on Add new user.

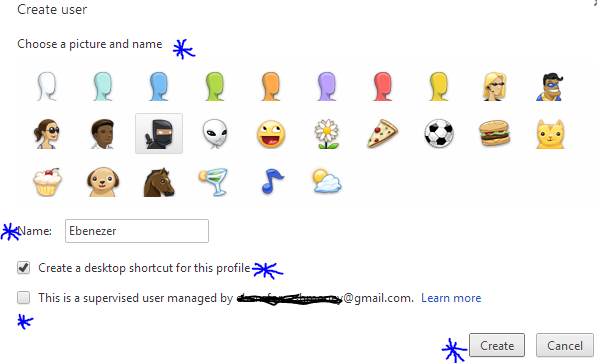
    A pop up window will appear with a bunch of user icons and new user account configuration. Choose an icon and name for your profile, you will have to decide whether you want to create a desktop shortcut icon for the profile, and then tap the “Create” button. Viz.. In a few seconds, a new window will open with the new user profile.

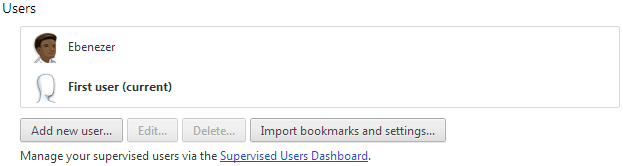
    Notice that the first time you create a new user profile, Chrome will actually create two profiles: One called “Default Profile” for the person who is currently signed in to Chrome, and one for the new profile that you just created.
    So the first time you add a new user, you are actually creating two profiles. To change the name of the default profile to something more user friendly, go back to the Chrome settings tab. Highlight the default profile in the “Users” section and the click the “Edit…” button to change the name.
    That’s pretty much it. Just follow the same process as many times as you need to create a user profile for each member of your household.

    Create User Profiles for Kids

    If your kid is less than 16 years old. You need to be weary of what he/she does on the internet. The most reliable, easy and cheap way to achieve that is with Google Chrome. The browser allows you to supervise a particular profile. You can block the profile from visiting certain websites, view website histories by that user profile, delete and add bookmark.
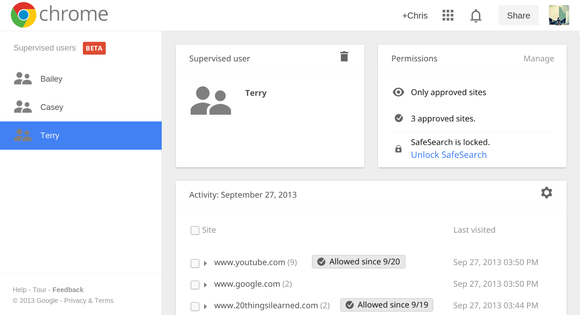
    To be able to monitor your kid internet activities, you will need to create a special kind of profile called a supervised user, a beta-grade profile type Google added to Chrome earlier in January.
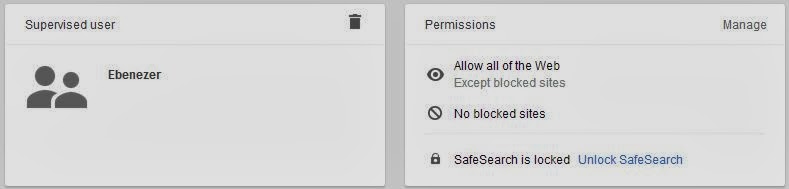
    To make a supervised user, simply click the checkbox next to “This is a supervised user managed by [email address].” Parents of supervised users can block specific websites, check out the websites they’ve visited, and lock kids into Google’s “Safe search.” If you block a website that your child thinks they should be allowed to view, they can even send you a request to unblock it, and you can manage settings for your supervised users via the dashboard at chrome.com/manage.
    You need to be weary of the fact that user profiles are not password protected, however, so Chrome’s supervised users feature is far from fool proof. You will still have to keep an eye on your child’s surfing habits to make sure they are using their profile and not switching over to yours, or—if you’re really worried—create separate user accounts as the operating system level .

    How to Switch between Profiles

    To switch between users, just click the user icon that appears in the upper left corner of the browser window. The other created users will appear in a drop down menu. Select the one you want to switch to and a new window will open for that user profile. If that’s too much trouble, you can also use the customized desktop shortcuts Chrome offers to make when creating a profile to open the browser as a particular user.
  • Latest Google Chrome Release Officially lets you Mute Noisy Tabs

    Latest Google Chrome Release Officially lets you Mute Noisy Tabs

    IDG News Service – Few things are worse than when you’re trying to get some work done with your headphones on and all of a sudden, a loud, obnoxious advertisement yells at you to “come try this out!”

    It’s terrible, but Google seems to empathize with this. Back in November, the search giant launched an update to its Chrome beta browser that included a helpful little feature that silences these noisy tabs. This helpful feature is now available in the latest stable release of Google Chrome.

    Just look for the little sound icon in your tabs.

    The feature allows you to track down noisy tabs with visuals: scan your tabs and look for the speaker icon to see which one is the disruptor. You’ll also be able to tell which tabs are using your webcam or are being cast to your TV via Chromecast.

    The new Google Chrome update also comes with the stronger Safe Browsing feature that blocks malicious files from downloading, while Windows 8 users will appreciate the new “Metro” mode look.

    Supervised users is a lot like multi-user accounts.

    Lastly, if you’ve got a family computer, you can now try out a beta preview of supervised users, which helps out those family members who need some help getting around the Internet. Once you’ve set up the accounts, you can visit a specific page to review each member’s browsing activity and determine their restrictions. It’s like Android’s multi-user profiles, but for Chrome.

    If you’d like to try out the new features, you can update the Chrome browser from the Help menu under the browser settings. To try out the beta features, you’ll have to download Chrome Beta.

  • How to erase YouTube clutters with AdBlock Plus

    How to erase YouTube clutters with AdBlock Plus

    The introduction of AdBlock Plus add-on has brought about some level of sanity to the nature at which most pages are being rendered. The popular browser add-on is set to extend it’s tentacles a little beyond the blocking of online ads (except for the whitelisted ones) to bringing sanity to popular social networks.

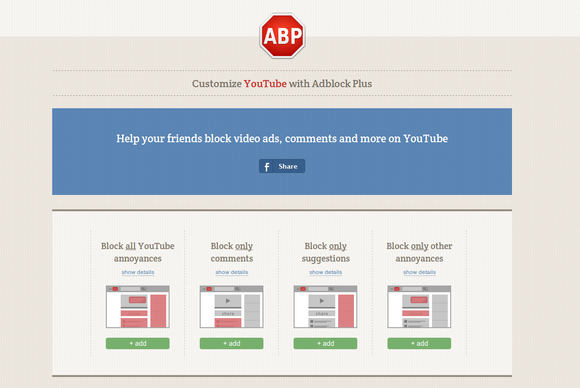
    You Tube of late, has been really annoying; prompting ABP’s editorial pen to introduce YouTube Customizer site, a feature that helps you banish all the bits of the video site that annoy you, while keeping the ones you enjoy.
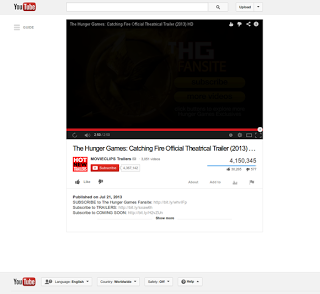
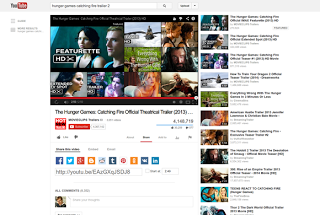
    YouTube Customizer site allows you to control which youtube component you want your browser to render. If you’re generally annoyed with the current state of YouTube you can block everything but the video you’re watching. The list of banished items includes comments, suggested videos, featured and recommended videos in the end screen, the sharing tab in the description, in-video annotations, and channel recommendations.
    Just for the record, that’s a breathtaking list of YouTube cruft and dumping it all may be a step too far for most of us. What good is YouTube, after all, if you can’t waste the afternoon following an endless stream of recommended videos.

    Instead of blocking everything, ABP includes options to only block comments, or only suggestions and recommendations, or only the sharing tab and in-video annotations.

    Getting Started

    To get started, make sure you have AdBlock Plus installed on your browser. If you do not have the add-on installed on your browser, simply download it by clicking on your browser link below.
    Next, just visit AdBlock’s YouTube customization page to start blocking YouTube’s various “features.”
    You could also block some mixture of the above—for example, blocking comments and annotations but leaving recommendations intact. If you have any YouTube pages open after you add AdBlock’s customizations you may have to refresh the page for your changes to take effect. And if you ever want to return YouTube to the data buffet it once was, check out ABP’s instructions on how to remove your customizations.
    Note that your changes only work on the browser where you have AdBlock Plus installed and first added the YouTube filters.
  • New Release: Opera 16 Browser Has Been Launched

    New Release: Opera 16 Browser Has Been Launched

    The biggest news today is probably the introduction of shared photo album in Facebook. But opera has yet another thing to say in the technology world.

    Today, Opera Software ASA has released a new version of Opera browser just a few months after they released version 15.

    Opera 16 has better performance and improved support for HTML5 than any previous version of the opera browser. This release is also based on Chromium 29.

    Opera twitter update on the 23/08/2013

    The new release will introduce some interesting features such as:

    Feature of Opera 16 Browser

    • Jump List for Windows: Jump lists are now supported on Windows. Jump lists allow quicker navigation from the task bar, like getting an overview of your Speed Dial. 
    • Support for W3R Geolocation API: The geolocation API lets you share your location with trusted websites. When you visit a location-aware website, like foursquare, the browser will ask you to share your location. If you accept, Opera can tell the website where you are located.
    • Presentation Mode fo MAC: Browse the web with presentation mode to get a full-screen experience. Quick tip: you can go straight to presentation mode by pressing shift+CMD+F
    • Form Filler: Save time with the form filler. Simply input your information in the settings and then use to it to auto-fill forms on the web. 

    In  a browser reliability test last week, Mozilla Firefox 23 was flawless. What do you think of the new opera release? You can share your views in the comment section

    Download Opera Browser

    The latest opera release can be downloaded from their official website.   Download Opera 16 for Windows
    Download Opera 16 for Mac