Tag: Lock

  • Lock and Protect your Computer with a Secret Key

    Lock and Protect your Computer with a Secret Key

    With so many cracking tools coming up to break windows password, it’s very difficult to protect your personal computer from unauthorized access. Even BIOS passwords is easy to crack. Nothing is secure and safe these days.
    Now no more worries, I just found a simple trick by which you can easily protect your windows from unwanted usage. This really cool and hidden feature of Windows lets you maintain your privacy of data on your computer even if you are not around.

    What it does is that it adds an extra secret key along with your windows password. So when your computer is started, it first asks for the secret key and then the windows password. Windows password can easily be hacked but you cannot get around this secret key which we will be going to store in a removable devices such as USB drive etc.
    Here goes the step-by-step procedure for achieving an extra level of protection.
    1.) Open run dialog box.
    2.) Type SYSKEY and click OK.
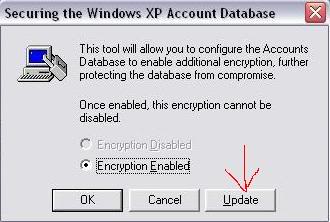
    3.) Check the Encryption Enabled radio button.
    4.) Click on Update.
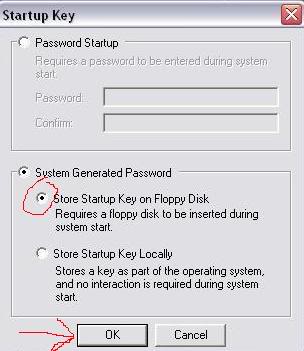
    5.) Under System Generated Password choose Store Startup Key on Floppy Disk.
    (Now many of you must be thinking that this tutorial is waste. Where in the hell should be get Floppy no? Don’t worry; you don’t require any Floppies for this. Just insert your USB device and change its Drive Letter to A:. I am using my IPOD shuffle for this purpose. You can use your Pen Drive. Read further to learn how to change Drive Letters.)
    6.) After you have inserted your USB device, right click My Computer -> Manage -> Storage -> Disk Management.
    7.) Now you will see all storage volumes there. Choose your USB volume, right click on it and select option Change Drive Letters and Paths…
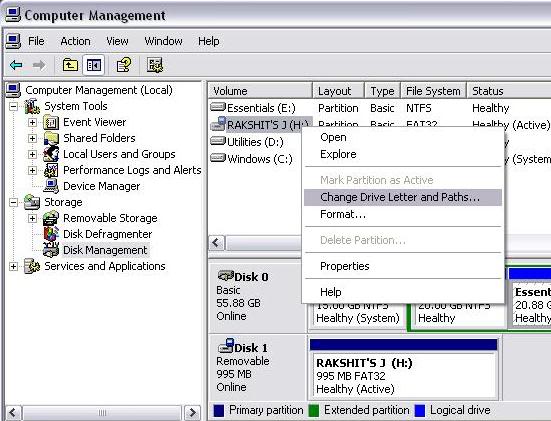
    8.) From the long list of available drive letters choose A:.
    9.) Now return back to SYSKEY, choose Startup Key on Floppy Disk and click OK.
    10.) No 10th Step. You are done.
    The next time you start your computer, you’ll have to insert this USB device when asked and then only you can login to your account. You can also see a registry file named StartKey stored in your USB device.
    I am still looking for the possible ways to login to my personal computer just in case if my IPOD (USB device) is broken or unavailable. If you have idea to break this protection, please share that with us. It will be useful as well.
  • How to Lock Files and Folders without any Software

    How to Lock Files and Folders without any Software

    Each one of us must have tried many softwares for locking their private files and folders. Few must have bought a licensed copy of one while others are better of using a free version. However, you can achieve the same level of privacy without any software. This tutorial will make things crystal clear of what I am trying to say.
    Few months back, Madhur had written a similar article on locking folders without any software but this article is a step forward to what he has described at that time. The trick which I am going to tell here will make a virtual folder by the name “Locker” where you can put as many files and folders you want and after locking, this “Locker” folder will disappear.

    Here is step-by-step guide to achieve that.
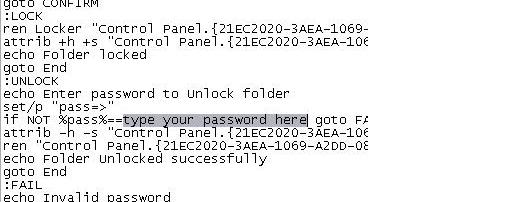
    1. Download or Copy the following text file which contains the program code:-
    Text File -> LockCode.txt
    2. Paste the above code in notepad or create a new text document by right clicking on your desktop and selecting New->Text Document.
    3. Replace “type your password here” with your password in the code you just pasted on the notepad. DON’T FORGET THIS.

    4. Save the above file as BATCH file (by extension .bat). Choose any filename but make sure that it ends with .bat
    (Open My Computer. Goto Tools -> Folder Options -> View. Scroll down and UNCHECK Hide extensions for known file types. Now rename your file with .bat extension)
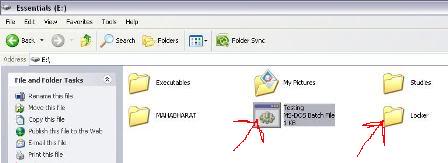
    5. Now you can see a MS-DOS BATCH file you just created. See the picture below:-

    6. Double click on it to create a new folder named “Locker“.
    7. Now put all files and folders you want to protect in to this new folder “Locker“.
    8. Double click that BATCH file again to lock the folder “Locker”. It will disappear as soon as it gets locked.
    9. If you want to unlock that folder, double click the BATCH file again. You will be prompted for the password, enter the correct password and that folder “Locker” will then be appear which is easily accessible by you.
    That’s it. You are done. You have just learnt how to protect your important files and folders without any software. Isn’t it amazing? What’s your take on this? Do you know any other technique?
    Update:- As pointed out my Mayank in the comment section, the safety of that BATCH file is also very important. So it’s better that you store it in some other directory or completely remove it. Then later on when you want to unblock your files and folder, just copy that batch file to same directory as your “Locker” folder and follow the above mentioned process.