Tag: Howto

  • How to Export Chrome Bookmarks To Another Browser

    How to Export Chrome Bookmarks To Another Browser

    We all have those important websites we frequent regularly on web browsers like Google Chrome for online updates. And we employ different methods to keep track of some of the information on these websites for future reference. Since it’ll be stressful committing all the URLs to memory or scribbling them down each time we visit, the most convenient way to save them is by bookmarking.

    By bookmarking these websites, Chrome users can easily access them whenever they want, and these bookmarks can be synchronized across multiple devices. While bookmarking these sites on Chrome is a breeze, importing, and exporting bookmarks from google chrome can present a challenge of its own.

    Export Chrome Bookmarks

    If you wish to transfer your Chrome bookmarks to another computer or browser, you have the option to export it as an HTML file on a Flash or hard drive. OR you can use third-party Google Chrome extensions (available on Chrome Web Store) to share them. Or even transfer bookmarks using Google Collections on the Google app. Another alternative is to send the HTML file as an attachment to your personal email.

    Let’s export your bookmarks from Google Chrome as a HTML file:

    1. Open Chrome and access the browser menu by clicking the icon with three dots in the top-right corner.
    2. Navigate to the Bookmarks section in the pop-up menu.
    3. Open the Bookmark Manager by selecting it from the options that pop up.
    4. In the new tab that opens, locate the icon with dots next to the Bookmarks search bar, below the Chrome address bar.
    5. Click on the icon and choose the Export Bookmarks option.
    6. Click on the icon and select the Export Bookmarks option.
    7. Select a name and location you want to save the bookmarks(flash drive, desktop, etc).
    8. Click Save to finalize the process. The bookmarks are saved as HTML files.

    Import Bookmarks From Chrome

    After successfully following and completing the above steps to export your bookmarks, the next thing is to import those bookmarks you saved as an HTML file into the browser of your choice. It could be Mozilla Firefox, Safari, Brave, Microsoft Edge, etc.

    1. Below are the steps to import Chrome bookmarks:
    2. Open the Google Chrome browser
    3. Locate the menu icon with three dots at the top-right corner of the Chrome window.
    4. From the menu that appears, go to “Bookmarks” and select “Bookmark Manager.”
    5. In the Bookmark Manager, find the three-dot menu icon located next to the search bar, below the Chrome address bar.
    6. Select the three-dot icon, and a drop-down menu will appear.
    7. From the menu, choose “Import Bookmarks” and your computer’s Open File dialog box will pop open.
    8. In the dialog box, navigate to where you saved the HTML file containing your exported bookmarks.
    9. Select the file and hit “Open.” This will initiate the import process, and all your bookmarks will be imported into Chrome.

    For your Chrome to work faster on mac and android, check out our article on how to maximize the speed and performance of your Chrome browser.

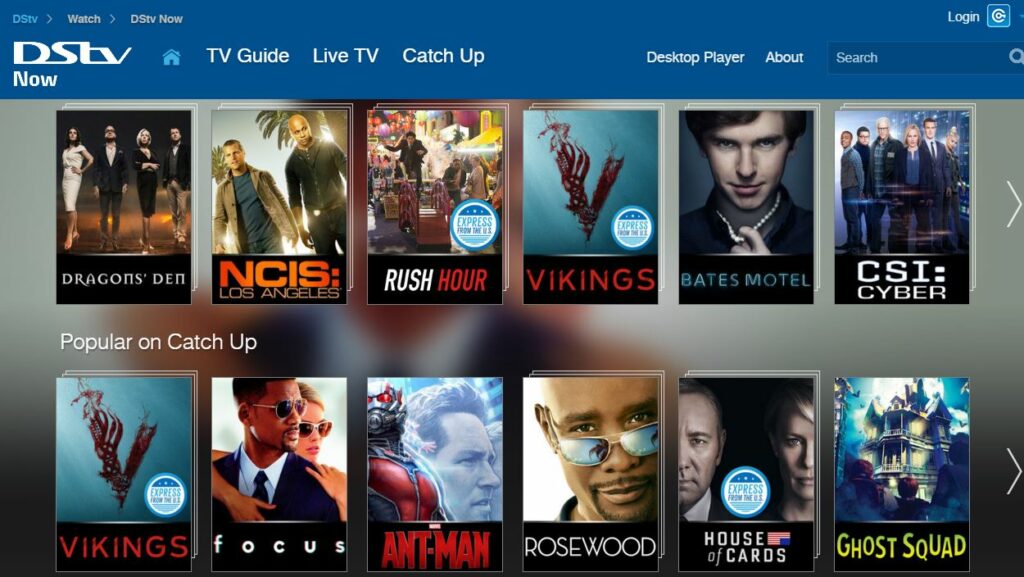
  • How to Connect and Watch DSTV on Your Mobile Device

    How to Connect and Watch DSTV on Your Mobile Device

    Being able to connect and watch DSTV on your mobile device with your Dstv decoder has a lot of advantages. You will be able to keep up with your favorite programs without being glued to your TV.

    Thanks to intuitive thinking, the DSTV Now platform lets DSTV users pair their mobile device, laptop, or smart TV to their DSTV decoders. In this article, we explore a comprehensive tutorial on how to connect your DSTV decoders to your mobile device, laptop, or smart TV using DSTV Now.

    Connect and Watch DSTV on Your Mobile Device

    Requirements to Connect and Watch DSTV on Your Mobile Device

    Before connecting your decoder to your mobile device, laptop, or smart TV, ensure you meet the following requirements:

    • An active DSTV subscription
    • The DSTV Now App
    • An Android device (smartphone or tablet)

    Steps to Connect and Watch DSTV on Your Mobile Device

    1. Download the DSTV Now App

    • Visit the Google Play Store or the Apple App Store on your mobile device.
    • Search for “DSTV Now” and download the app.

    2. Register and Sign Up on the DSTV Now Platform

    • Open the DSTV Now app.
    • Register for an account if you don’t have one, or sign in if you already do.

    3. Insert Your Smart Card Number

    • Navigate to the settings or account section within the app.
    • Enter your DSTV smart card number to link your decoder with the app.

    Streaming

    Once you’ve registered on the DSTV Now platform and inserted your smart card number, you can start streaming. You’ll have access to all the channels included in your DSTV subscription.

    Features of the DSTV Now App

    • Reminder Feature: Syncs with your phone’s reminder app to notify you when your favorite programs begin.
    • Kid Access Feature: Allows you to set a PIN for certain channels to restrict content you don’t want your kids to watch.
    How to connect your DSTV Decoder to your phone

    The DSTV Now app has a reminder feature, that syncs up with the reminder app on your phone. It provides you with accurate reminders when the program begins. The DSTV Now app also has a kid access feature that lets you set a pin on certain channels, that contain content you do not want your kids to watch. 

    There you have it – a comprehensive tutorial on how to connect your DSTV Decoder to your Android device. 

  • How to fix a corrupted video file on windows movie maker

    How to fix a corrupted video file on windows movie maker

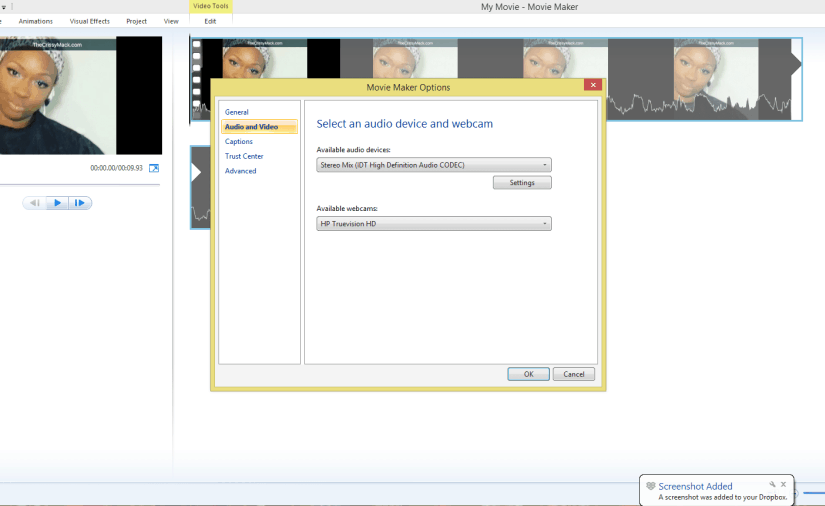
    As you might already know, the Windows Movie Maker is a video editing software developed by Microsoft. It lets users create and edit videos, it also lets them publish videos created directly to OneDrive, Facebook, Vimeo, Youtube, and Flickr. The Windows Movie Maker software is very efficient in performing the task it was created for, but just like other software, there are times you experience glitches. In this article, we explore a tutorial on how to fix one of the popular glitches you might experience when using this software. Here you learn how to fix a corrupted video file om Windows Movie Maker.

    There is no exact cause facilitating the corruption of videos files on the Windows Movie Maker. Corruption of these video files is caused by different things. Since there exact cause of video corruption, you would have to troubleshoot the problem using different methods, which will be listed in this article. Apart from these methods for troubleshooting video corruption on the Windows Movie Maker, there is third-party software that solves the fixes corrupted video files, with few clicks, we also explore a tutorial on how to fix corrupted video files using this third-party software. Before we dive into the tutorial proper, here is a list of potential facilitators causing Windows Movie Maker videos to get corrupt.

    Potential Causes of Movie Maker videos getting corrupted

    • Corruption in the hard drive
    • Virus or malware
    • Faulty video codecs
    • Outdated video card drivers
    • Use of unreliable video converter
    • Media player not supporting Movie Maker video file
    • Abrupt computer shutdown while saving/working on Movie Maker video

    How To Fix A Corrupted Video File on Windows Movie Maker Using Remo Repair MOV Tool

    As mentioned earlier, there is third-party software, that helps fix corrupted video files, with just a few simple steps. The Remo Repair MOV tool is an example of such third-party software. Here are the steps to fixing a corrupted video file using the Remo Repair MOV tool:

    How to fix a corrupted video file on windows movie maker
    1. Download and install Repair MOV software to your Windows machine.
    2. Run the Remo and follow the on-screen
    3. Browse and open your movie file to be repaired as well as a healthy reference file using Healthy File option.
    4. Click Repair option, to begin movie file repair
    5. After the file has been repaired, the tool shows the fixed MOV video file along with its component details. The software also allows you to preview the fixed file using “Preview Repaired File” option.
    6. Save Repaired Movie Maker File using the SAVE REPAIRED FILE option

    Troubleshoot: Repair Windows Live Essentials

    If you are unable to get access to any third-party video file fixer, you can go ahead to doing manual troubleshooting. The first thing to look out for, when troubleshooting this problem, is Windows live essentials.  Corrupt file error messages can

    Corrupt file’ error messages can also pop up when your Windows Movie Maker program has corrupted. To fix it repair Windows Live Essentials and then access your video file in Movie Maker to edit.

    Steps to repair Windows Live Essentials:

    · Press Windows + R Keys to open Run command

    · Type Control Panel. Click on OK

    · Under Programs, Click on Uninstall a program

    · Go to Windows Live Essentials and right click on it

    · Click on uninstall/change

    · Select option repair all Windows Live Essentials

    Repair corrupt videos with VLC Media Player

    VLC Media Player can often repair corrupt or damaged video files. You can try this method to fix minor video corruptions while for severely corrupt video files seek Stellar repair software.

    Upgrade Your Ram

    Setting aside the already mentioned potential causes of corrupt videos, insufficient RAM may also facilitate the corrupt video error. Insufficient RAM facilitates slow computer speeds and can lead to corruption of videos. This holds sway if your videos are stored in MOV or.WMV. You are advised to consider getting a higher RAM. 

    Install a Codec Pack

    An incompatible Codec may also lead to this error. If your media player is using an Incompatible code, the Video will not play. You are advised to install a codec pack on your PC. Here you will video formats, that will make your computer compatible with all file formats.

    Update Video Drivers

    Out-dated video drivers is another common facilitator of the corrupted video error. There is very high chances that the video won’t play on your computer If your drivers are outdated. So if you have tried all the steps listed above, and none of them worked. There is a high chance, that the problem is caused by outdated drivers. 

    Be rest assured that one of the fixes listed in this article on how to fix corrupted video file on windows movie maker, will fix the corrupted video file on your computer. All you have to do is test these fixes, one of them is the solution to your problem. 

  • Embed Facebook Posts into your Blog Post

    Embed Facebook Posts into your Blog Post

    Facebook has been improving over the recent years, from the introduction of Video Recording On Instagram to the amazing Recommendations Bar for Bloggers making facebook the leading social network in this present world.   We do not intend to keep our loyal blog readers on the dark, so we try as much as possible to keep our loyal blog readers updated with developments of this magnitude.

    Why do I need to Embed Facebook Post to my Blog Post?

    First of all, I think that’s a question you need to ask yourself, considering the fact that you issued this search on google :-), but if you are reading this tip because you find it interesting, here are a few answer that was put together by me.

    Embedded Posts are a way to put public posts – by a Page or a person on Facebook – into the content of your web site or web page.

    The embedded post will show any media attached to it, as well as the number of likes, shares, and comments that the post has. Embedding posts will let people using your web site see the same rich information that is shown on Facebook.com, and they will enable people to follow or like content authors or Pages directly from the embed.

    What Platforms are Supported?

    Are you really that inquisitive? Well, it’s good news for all, because the facebook embeddable post does work on every platform (All platforms include wordpress, blogger, oxwall, joomla, even your simple html site).

    Special note:
    You need to add the following code to any place in your <body> section

    <div id=”fb-root”></div>
    <script>(function(d, s, id) {
    var js, fjs = d.getElementsByTagName(s)[0];
    if (d.getElementById(id)) return;
    js = d.createElement(s); js.id = id;
    js.src = “//connect.facebook.net/en_US/all.js#xfbml=1&appId=401349173297461”;
    fjs.parentNode.insertBefore(js, fjs);
    }(document, ‘script’, ‘facebook-jssdk’));</script>

    If you are using a site built with either dreamweaver, blogger or oxwall.

    Embedding your Facebook Post into your Blog Post!

    There are two ways of doing this, but each method depends on where your source post is located on facebook.

    Embedding Code from a Facebook Post

    This method is applicable, if you are embedding a post from your profile newsfeed or in the case of embedding photos and items.
    To embed a post, first check if the post is public by hovering over the audience selector (you’ll see a globe icon). Only public posts from Facebook Pages and profiles can be embedded.
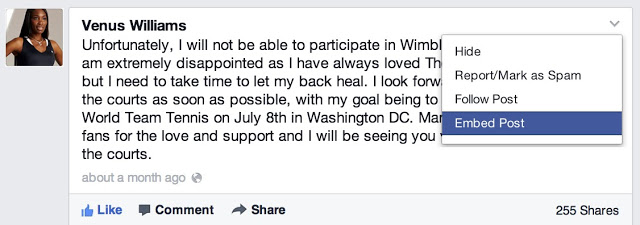
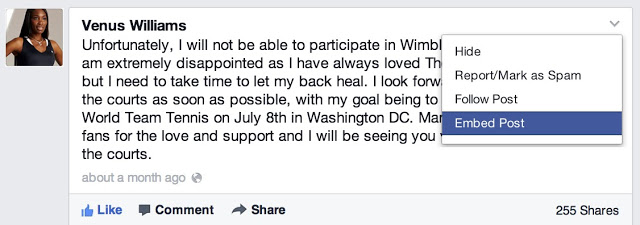
    If the post is public, click on the icon that appears in the top right corner of the post on Facebook:

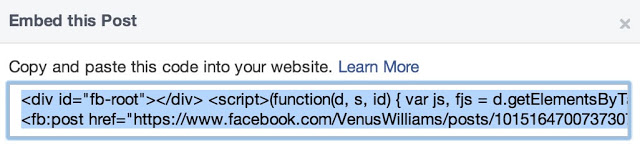
    Choose ‘Embed Post’ from the drop down menu that appears. You will see a dialog appear with the code to embed your post in it:

    Copy and paste this code into your web page in the place where you want it to appear.

    Embedding Code from a Facebook Page

    Assuming you have a Facebook page and you would like to share a content from your page to your blog readers,  here is the way to go:
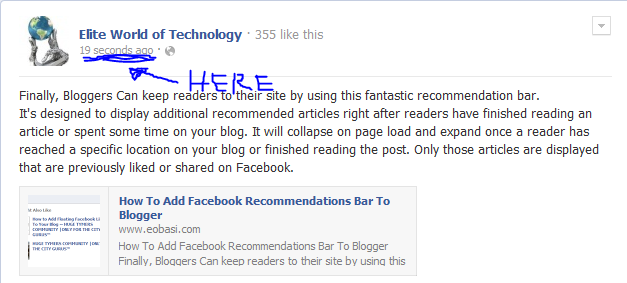
    Simply, goto your page and grab the URL of the Facebook post you want to embed. For photos, you can easily get the URL by clicking on them. But for other media, it is a bit complicated, at least for newbies. To get a post’s URL, simply click on its timestam

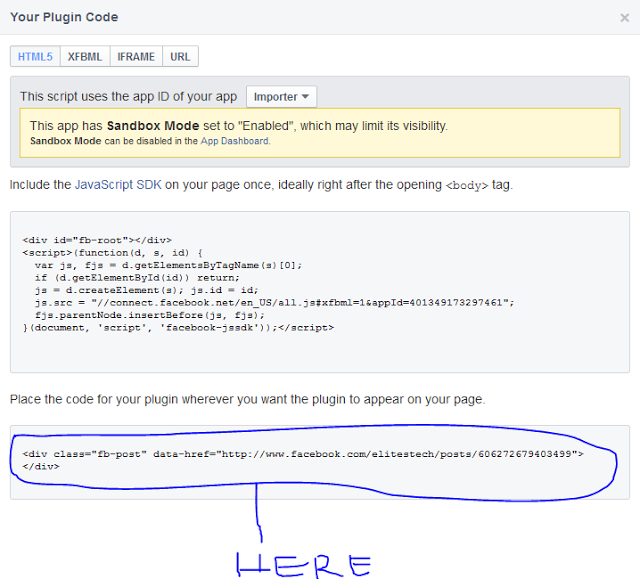
    Copy the link on your address bar and go to Facebook Configurator. Paste your URL in the field provided. Once your story loads in the tool, click on Get Code. You will get two codes similiar to the image below

    Simply copy the second code and paste it where you want it to appear…..

    Looking for Demo?
    Here is a post I published some months ago, try it out and see how it goes   Remember to ask your questions here and also share your testimonies with others with the aid of our comment sections.