Category: PC Hacks

  • How to Lock Files and Folders without any Software

    How to Lock Files and Folders without any Software

    Each one of us must have tried many softwares for locking their private files and folders. Few must have bought a licensed copy of one while others are better of using a free version. However, you can achieve the same level of privacy without any software. This tutorial will make things crystal clear of what I am trying to say.
    Few months back, Madhur had written a similar article on locking folders without any software but this article is a step forward to what he has described at that time. The trick which I am going to tell here will make a virtual folder by the name “Locker” where you can put as many files and folders you want and after locking, this “Locker” folder will disappear.

    Here is step-by-step guide to achieve that.
    1. Download or Copy the following text file which contains the program code:-
    Text File -> LockCode.txt
    2. Paste the above code in notepad or create a new text document by right clicking on your desktop and selecting New->Text Document.
    3. Replace “type your password here” with your password in the code you just pasted on the notepad. DON’T FORGET THIS.
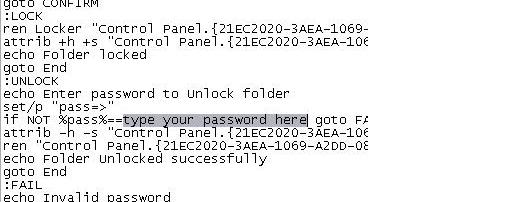
    4. Save the above file as BATCH file (by extension .bat). Choose any filename but make sure that it ends with .bat
    (Open My Computer. Goto Tools -> Folder Options -> View. Scroll down and UNCHECK Hide extensions for known file types. Now rename your file with .bat extension)
    5. Now you can see a MS-DOS BATCH file you just created. See the picture below:-
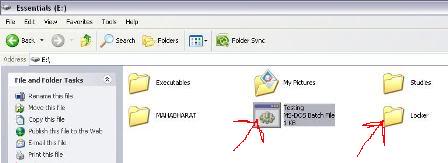
    6. Double click on it to create a new folder named “Locker“.
    7. Now put all files and folders you want to protect in to this new folder “Locker“.
    8. Double click that BATCH file again to lock the folder “Locker”. It will disappear as soon as it gets locked.
    9. If you want to unlock that folder, double click the BATCH file again. You will be prompted for the password, enter the correct password and that folder “Locker” will then be appear which is easily accessible by you.
    That’s it. You are done. You have just learnt how to protect your important files and folders without any software. Isn’t it amazing? What’s your take on this? Do you know any other technique?
    Update:- As pointed out my Mayank in the comment section, the safety of that BATCH file is also very important. So it’s better that you store it in some other directory or completely remove it. Then later on when you want to unblock your files and folder, just copy that batch file to same directory as your “Locker” folder and follow the above mentioned process.

  • How to configure Firefox address bar with Search Engines

    How to configure Firefox address bar with Search Engines

    Your Firefox address bar can not only be used for opening websites but also for searching as well. Yes, you can configure the Firefox address bar with various search engines like Google, Yahoo, Microsoft’s Live, and Wikipedia etc.
    By default, whenever you type anything in address bar and hit enter or press the GO button, Firefox checks whether the entered string is valid address or not. If it’s a valid address Firefox tries to load corresponding site for you. Now, if the entered string is an invalid URL, it will be submitted to Google Search and search results are returned.

    What if you want to change the Default search engine? Of course, Google is everybody’s first choice search but having said that it depends on person to person. Or, if you have Google Toolbar (that provides inbuilt google search box) installed then you may want to configure the address bar with some other Search Engine.
    The following steps will guide you how to configure your Firefox address bar with Search Engines of your choice.
    1- Open Mozilla Firefox and type in the address bar about:config.
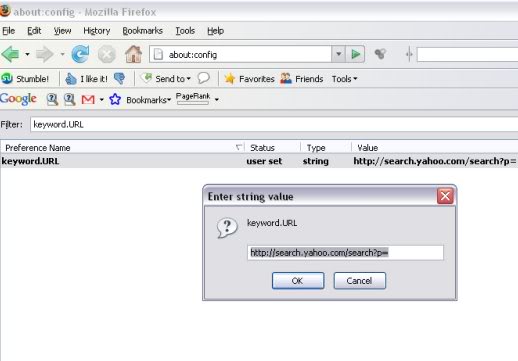
    2- Next type keyword.URL in the Filter box which is appeared after the first step is completed successfully. As you type the above text, the long list will be trimmed down to one line. (You will see only 1 entry (keyword.URL) under the Preference Name section)
    3- Now right click that single entry and select modify. A box will appear. Refer the image given below.
    4- Choose your Search Engine type and accordingly enter the string value of various Search Engines given below.
    5- There is no 5th step.
    Enjoy!!!

    List of Various Search Engines is as follows:-
    (Copy any of the below strings and paste it into the box that appear in STEP 3 above)
    Default Google Search

    http://www.google.co.in/search?btnG=Google+Search&q=

    Google Search with I’m Feeling Lucky

    http://www.google.co.in/search?btnI=I%27m+Feeling+Lucky&q=

    Yahoo search

    http://search.yahoo.com/search?p=

    Microsoft’s Live Search

    http://search.live.com/results.aspx?q=

    Wikipedia
    http://en.wikipedia.org/wiki/Special:Search?fulltext=Search&search=

  • How to Recover Deleted Pictures and Files from Memory Cards

    How to Recover Deleted Pictures and Files from Memory Cards

    Few days back, a friend of mine has accidently deleted quite a few recent pics from my Nokia N97 Memory Card and she was feeling pretty much disgraced about that. We recently went for an excellent trip, captured all those fun moments in the camera and yes if those memories get deleted, everyone will feel disgusted about that. It is at that time, I googled and finally found a recovery software that not only recovered ALL THE PICTURES from my memory card but also it was absolutely FREE to use as well. Amazing right?

    PC Inspector Smart Recovery is just the right software that can do wonders for you. Believe me, it works perfectly fine although takes a bit of time (when I say “bit of time” that means hours and hours…) to recover all those accidently deleted pictures and files. The software is very easy to use and even if you are not a computer savvy person, you can use it without much discomfort.

    PC INSPECTOR Smart Recovery works with Flash Card™, Smart Media™, SONY Memory Stick™, IBM™ Micro Drive, Multimedia Card, Secure Digital Card or any other data carrier for Digital Cameras. I have tried this software on my Phone Memory Card as well and it recovered all the pictures that got accidently deleted.
    If you have unintentionally deleted or formatted pictures, videos or sound files on your data carrier or have pulled it out during a write operation, no matter – PC INSPECTOR smart recovery can easily, quickly and absolutely reliably reconstruct the lost data. It supports the following picture formats: .jpg, .amr, .tif, .bmp, .gif, Canon .crw , Fuji .raf , RICOH .raw, Olympus .orf (E-XX), Olympus .orf (C5050), Nokia 3gp, Kodak .dcr, Minolta .mrw, Nikon .nef (D1H/D1X), Nikon .nef (D2H/D2X), Nikon .nef (E5000/E5700), Sigma – Foveon .x3f, mp4, QuickTime .mov (Konica Minolta). Video files in .avi, QuickTime .mov format and audio files in .wav, .dss format can also be recovered.
    A Word of Caution – If you have deleted the files by mistake and want to recover most of those, PLEASE STOP TAKING ANY MORE PICTURES from your digital camera or mobile phone. That’s because the more you write new data on your memory card, the chances of recovering old and deleted data becomes less.
    Please let us know if you face any problem in using this software or if you are aware of any other better software for recovering lost data from memory cards, please share that with us in Comments Section below. Also, if you are the one among many who got benefited by this great little utility, please share your thoughts as well.  Awaiting reply…
    Download it for FREE (File Size – 5.8 MB)

  • How to Mount USB Drives to a Windows Folder

    How to Mount USB Drives to a Windows Folder

    After a great success of my previous article about setting background images to the USB drives, here comes another USB related tutorial which I am sure many would love to try.
    So many times we encounter a situation when data once deleted from a USB drives cannot be recovered back simply because the deleted data does not move into the Recycle Bin instead it is deleted permanently.

    But don’t worry I got a solution to this problem. If we can mount our USBs to a windows folder then not only all deleted data can be recovered easily but also it will be lot easy to organize multiple USB drives.
    Just follow the simple steps described below:-

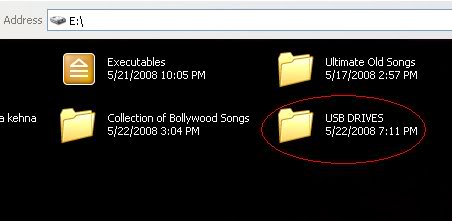
    1. Create a folder named “USB DRIVES” in any of windows partition (Desktop is the best option).


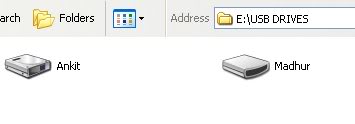
    1.) Next create any number of subfolders inside the main folder “USB DRIVES” and give them proper names. Suppose you want to mount two of your USB drives, so it advisable to create two subfolders with the exact name of your USB drives.
    3.) Press Win+R to open the Run window or alternatively go to Start->Run.
    4.) Type in the location field diskmgmt.msc and hit enter to open Disk Management.

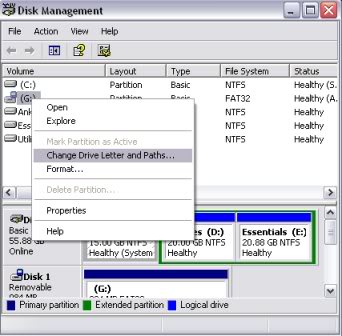
    5.) Select your USB drive, right click on it and select Change Drive Letter and Paths… from the menu.
    6.) Click on the Add button, select Mount into the following empty NTFS folder and click on browse. Now navigate to the subfolder that you want to assign the USB drive to and confirm the process.
    That’s it you are done.

    From now on, the USB drive will be accessible from the folder “USB DRIVES” as well when it is connected to the computer.
    Hope you liked the tutorial. Any feedback is whole heartedly appreciated.
    P.S. – When moving data around the mounted USB in folders setup will completely move the data, not copy it to your USB device. Make sure to copy and paste if you want source data to remain on your PC.

    PLEASE LEAVE YOUR COMMENTS…………

  • How to give your USB devices a Background Image

    How to give your USB devices a Background Image

    USB (Universal Serial Bus) is an industry standard that allows data exchange and power delivery between many types of electronics. Wikipedia

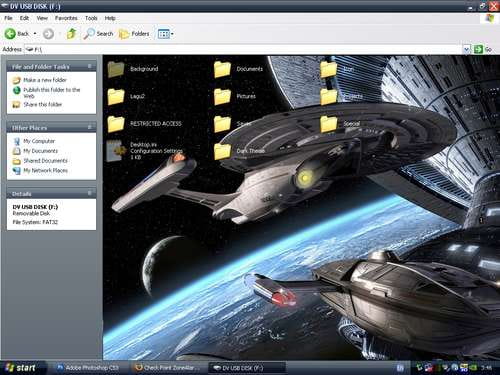
    I suppose we all have tried to give background images to our desktop folders. How about setting the same background to our USB devices (Pen drive, Portable Hard Disks etc.) as well? That background image will be seen on every computer you plug in that USB device.
    It’s really a 3 step process. Let’s begin:-

    Steps in changing the background of your USB device:

    • 1.) Open a Notepad.
    • 2.) Paste this code and save it as desktop.ini


    Code:

    [.ShellClassInfo]
    IconFile=%SystemRoot%system32SHELL32.dll
    IconIndex=127
    ConfirmFileOp=0

    [{BE098140-A513-11D0-A3A4-00C04FD706EC}]
    Attributes=1
    IconArea_Image=”your_picture.jpg”
    IconArea_Text=”0xFFFFFF”
    VeBRA sources –
    [ExtShellFolderViews]
    {BE098140-A513-11D0-A3A4-00C04FD706EC}=
    {BE098140-A513-11D0-A3A4-00C04FD706EC}
    {5984FFE0-28D4-11CF-AE66-08002B2E1262}=
    {5984FFE0-28D4-11CF-AE66-08002B2E1262}

    [{5984FFE0-28D4-11CF-AE66-08002B2E1262}]
    PersistMoniker=Folder.htt
    PersistMonikerPreview=%WebDir%folder.bmp

    • 3. Place the file desktop.ini and your picture

    (named your_picture.jpg) in your USB device and refresh it….

    Leave your comments here…