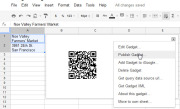
Inside Google Docs’ spreadsheet component, you’ll find gadgets that endow the app with powers thatTurn text into a QR code.even Excel users will envy. Included are tools for creating animated pie charts, producing QR codes, generating organizational charts, and more. You can also plot data in color by country on a map, and you can publish a map with your office location marked on it. All of these tricks are easy to pull off–I’ll show you how.
1. Make Your Own QR Codes
QR codes are ubiquitous these days. They’re a great way to share contact details, URLs, product information, and other brief amounts of text. To create a QR code in a Google Docs spreadsheet, first type the text for the code into one or more adjacent cells in a column of the spreadsheet. Choose Insert > Gadget >All,locate the QR Code gadget, and click Add to spreadsheet. When the Gadget Settings dialog box appears, drag over the cells containing the text for the code, click OK, and then clickApply & Close. The generated QR code will display in the gadget dialog box. You can drag the gadget dialog box–as you can all gadget dialog boxes–and place it anywhere on the spreadsheet. To see the options for working with any gadget, click the down arrow in the top corner of the gadget dialog box. The options for the QR Code gadget include using ‘Publish Gadget’ to obtain some code that you can use on your website to display the QR code. You can also use Print Screen on the code and then insert it into a document or other publication.
2. Make Your Own Custom Google Map
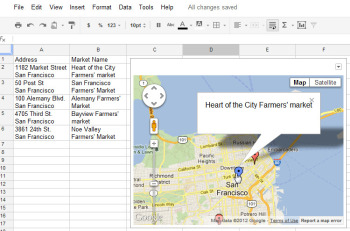 The Map gadget uses content from Google Maps to display the addresses you have entered as markers on the map.Pictures convey more information than words do, and a map offers the easiest way to show people where your office and other places of interest are located. The Map gadget lets you create a custom Google Map with pointers to the places you want to highlight, and it’s simple to use. To begin, type a list of addresses, one per row down a single column. If you want a tooltip to appear over the map location when someone hovers over the marker, type the text for this item in the cell to the right of the address. For example, to produce a map of local farmers’ markets, type each address in one cell and the name of the farmers’ market in the adjoining cell to the right. Choose Insert > Gadget >Maps, and click Add to Spreadsheet. Now select the range of cells containing your address and tooltip data, and then enter a title for the map in the Title box. If your data includes tooltips, select the Last Column as Tooltips checkbox, and then click theZoom Using Mouse Wheel checkbox. From the ‘Map type’ list, select the type of map–Normal is a good choice–and then click Apply & Close. The gadget dialog box will now show a map with the addresses plotted on it. As with the other gadgets, you can publish the Map gadget for use on your website to show your business locations or places of interest to your customers.
3. Create Quick and Easy Organization Charts
Organization charts are handy for describing how your business is set up, but they also work well for diagramming website designs and displaying any other data in a hierarchical arrangement. 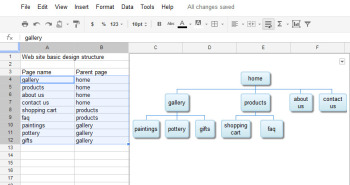 The Organization Chart gadget can create a hierarchical chart showing the design for your website or the management structure of your business.
4. Produce an Interactive Table
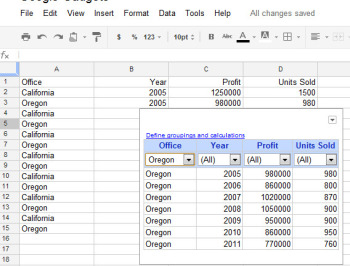 At its simplest, the Table gadget lets you filter data to see a subset of it.The Google Table gadget allows you to analyze data by creating a table that supports filtering, grouping, and even totaling. Insert the gadget by choosingInsert > Gadget > Tables > Add to spreadsheet. Select the range containing your data, including the heading row, and click OK. Click in the Title box and type a title for your tables. Select the checkboxes for Show Filters and Enable Grouping, and then click Apply & Close.To group the data by the contents of column A, for example, click the Define groupings and calculations link, select that column’s heading, and click the arrow to add it to ‘Group by Box’. Click Next, and select a column to calculate. To sum Profit, for instance, set the Profit entry to Total. You can apply calculations to multiple columns, if you desire, or to none at all if you just want to group the data.You’ll see a table appear in the gadget dialog box, with the headings over each column. Use the filter box at the top of each column to filter that column of data. Click OK, and the gadget will show you the grouped data, with any calculations appearing in the row above the appropriate group. You can collapse and expand the groups as necessary to see the values in the table.
5. Create a Gantt Chart From Project Data
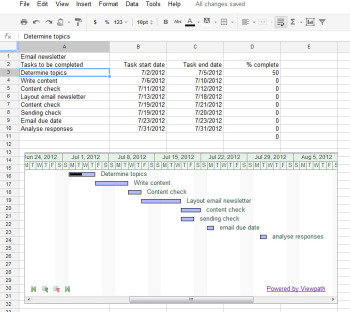 The Gantt Chart gadget illustrates the tasks in a project and the time allotted for each of them.You can use a Gantt chart to display projects involving tasks that must be performed over time. To make this type of chart, you need three columns of data (with an optional fourth column). In the first column, place a list of the individual tasks in the overall project–the steps needed to create and publish an email newsletter, for example. In the second column, place the start date for each task; in the third column, insert the end date for the task. If you wish, you can add a fourth column containing the percentage completed for that task. To produce the Gantt chart, chooseInsert > Gadget > Charts. Locate the Gantt chart and click Add to spreadsheet. Select the data for the tasks, the start and end dates, and the completed percentage, and click OK. Set the Name column to the column containing the task names. Set the Start column, Finish column, and % Complete column to the column letters containing that data (typically columns B, C, and D), and click Apply & Close. The Gantt chart will present the tasks to be completed, their start and end dates, and the progress made toward their completion to date.
6. Plot Data as Colors on a Map
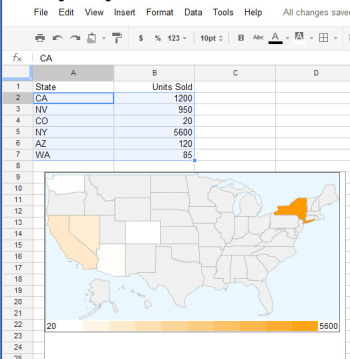 The Heatmap gadget shows relative values as colors on a map.You can plot data related to states or countries on a heat map, with small values indicated by light colors and larger values rendered in darker and more saturated colors. To plot the data correctly, you must use ISO country codes (or, for U.S. states, the usual two-letter state codes). Place the data to plot in the cell to the right of each relevant state or country. Choose Insert > Gadget > Map > Heatmap, and then click Add to spreadsheet. Select the data–including the locations and the data to plot, but not the column headings–and click OK. Type a title for the heatmap in the Title box, select the map type from the Region box (click USA to plot data on a United States map), and click Apply & Close. The map will appear with the regions colored appropriately for the value of the data associated with each.
7. Create an Animated Pie Chart
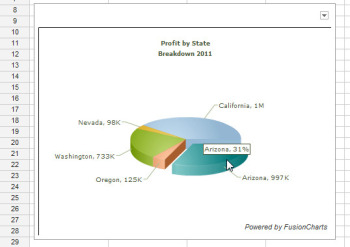 Drag on a pie slice in the animated pie chart to offset it from the chart itself.Interactive charts are more interesting to look at than static graphs. You can create animated pie charts in a Google spreadsheet using a gadget. For this chart, you need only the categories and one set of data, because pie charts can plot only a single data series. Insert the gadget by choosing Insert > Gadget > Charts. Locate the FusionCharts Pie & Donut Widget, and click Add to spreadsheet. Click in the Range box, select the data to plot–omitting the column headings–and click OK. Now select the chart type, such as Pie 3D. Type a caption and subcaption for the chart to inform the viewer as to the information the chart is intended to convey. Enable the Animate checkbox, and, if you prefer, enable Values On and Labels On to show both labels and values for each pie slice. If you enable Tooltips, the mouse pointer will show a tooltip if the user hovers the mouse over a given slice. Select Format Number and set Decimals to No Decimal so that numbers will be constrained in size. Enabling Shorten Values will ensure that the chart presents large values legibly. Click Apply & Close. When the chart appears, you can drag on a pie slice to explode it from the chart. Right-click the chart and click Enable Rotation so that you can then rotate the chart with your mouse. Gadgets such as these add a range of extra functions to Google spreadsheets, allowing you to do new things with your data and display it in ways that can help your business.
The first step in producing an organization chart is to create the data on which it will be based. In one column, type each employee’s name, or whatever other text should appear in each box in the chart. In each adjoining cell to the right, type the corresponding manager’s name, or whatever information you wish to display in the box at the next higher level in the chart. Don’t put any top-level information–such as the highest manager’s name or a website’s home page–in the first column, because they have nothing above them in the hierarchy. If you want two lines of text in a box, type one line and press Alt-Enter to start a second line. Confirm that the spelling of each name or box label is identical wherever you use it, or the chart won’t render correctly. If necessary, copy the contents of a cell rather than retyping it to make sure that each entry that should be identical–such as “home” in the example illustrated here–remains so. Now choose Insert > Gadget > Diagrams > Organization Chart, and click Add to spreadsheet. Select the cells in the two columns containing the data, and click OK. Type a title in the Title box, and click Apply & Close. The organization chart will appear in your spreadsheet.












You must be logged in to post a comment.