Category: Technology

  • How To Install IntenseDebate Comment System In Blogger

    How To Install IntenseDebate Comment System In Blogger

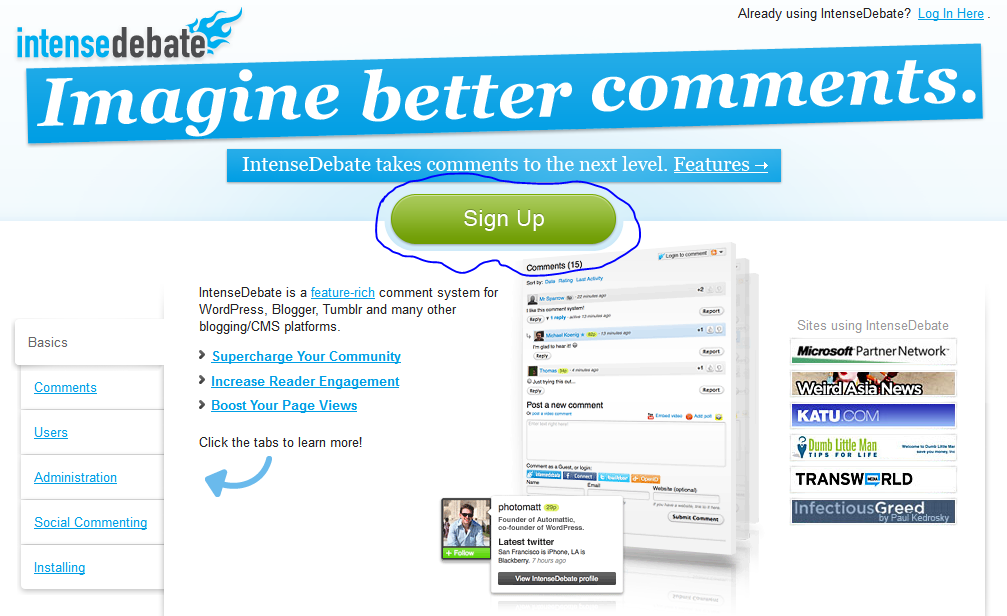
      Last week I wrote an article on Why You Must Quit Blogspot Comment System. As expected  many of you contacted me, asking me how to change your default blogger comment system, in regard to that I want to start by telling you how to install IntenseDebate comment system on your Blogger platform.

    CommentLuv
    One of the most popular used 3rd party comment system on Blogger.com is IntenseDebate. What attracts most people is the ability to use the Plugin CommentLuv.
    In a way, it is to encourage and also as a reward to commentators who took their time to comment on one’s blog. CommentLuv rewards your readers and helps to discover new and interesting posts by automatically adding a dofollow titled link to the comment authors last blog post when they comment.

    HTML Formatting
    You can also customize your links and add some photos to your comments. IntenseDebate supports the following HTML tags: <a>, <b>, <i>, <u>, <em>, <p>, <blockquote>, &lt;br&gt;, &lt;strong>, <strike>, <img>
    Gravatar
    Intensedebate offers full Gravatar support. If you have a Gravatar they will automatically upload your Gravatar when you signup for IntenseDebate. You can choose to use your Gravatar or upload a different profile pic.
    In this tutorial, I’m going to show you (with pictures) on how to install CommentLuv on your Blogger blog.Note: You will not loose your old comments when you install IntenseDebate
     Features Of IntenseDebate:

    IntenseDebate is one of the most popular feature-rich comment system for WordPress, Blogger, Tumblr and many other blogging/CMS platforms.In this tutorial I am going to explain how to add IntenseDebate comment system to Blogger blog.
    With IntenseDebate,you can do many things than your default comment system.These are some main features of IntenseDebate comments.

    •  Commentluv
    • Comment Threading.
    • Reply-By-Email.
    • Email Notifications.
    • Commenter Profiles.
    • Moderation/Blacklisting.
    • Reputation Points & Comment Voting.
    • Plugins API.
    • OpenID.
    • Widgets.
    • Twitter Connect.
    • Facebook Connect.
    • RSS Readers & Tracking.

    HOW TO INSTALL INTENSEDEBATE ON BLOGGER PLATFORM Follow the following steps below to Install IntenseDebate On Your Blogspot. Before you start this process,you must backup your blogger template first.Save the backup template file on your hard drive.

    Step 1 – Download your Blogger blog template

    1. Signin to your Blogger account
    2. Navigate to Template
    3. On the top right hand corner, select Backup/Restore
    4. Select Download full template and save it on your computerHow To Add IntenseDebate's CommentLuv To Blogger

    Step 2 – Create and setup your IntenseDebate account

    1. Open a new browser tab and sign up for an account on IntenseDebate here How To Add IntenseDebate's CommentLuv To Blogger
    2. After confirming your account, sign into Intense Debate
    3. On the top bar menu, under Sites, select Add blog/site or use this link: http://intensedebate.com/install How To Add IntenseDebate's CommentLuv To Blogger
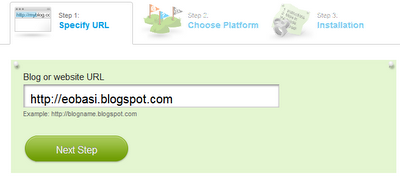
    4. Fill in your blog’s URL and select Next Step
    1. Select the Blogger platform How To Add IntenseDebate's CommentLuv To Blogger
    2. Next, you’d need to choose how you want to display your IntenseDebate comment. To keep your old Blogger comments, choose All new posts (IntenseDebate will only appear on new posts and posts without comments). To start your comments from scratch, choose On all blog posts (IntenseDebate will hide your previous comments). How To Add IntenseDebate's CommentLuv To Blogger
    3. Scroll down and upload the Blogger template that you’ve downloaded in step 1 and select continue How To Add IntenseDebate's CommentLuv To Blogger
    4. You will be brought to a page where a new set of template code is created
    1. Copy the codes 

    How To Add IntenseDebate's CommentLuv To Blogger
    Step 3 – Install IntenseDebate comment system

    1. Return to the Blogger tab in step 1
    2. Navigate to Template
    3. Select Edit HTML and then Proceed
    4. Select Expand Widget Template
    5. Replace all the template codes with the new codes that you’ve copied previously Select Savetemplate


    Step 4 – Install CommentLuv plugin

    1. Return to the IntenseDebate tab in step 2
    2. Select configure this IntenseDebate accountHow To Add IntenseDebate's CommentLuv To Blogger
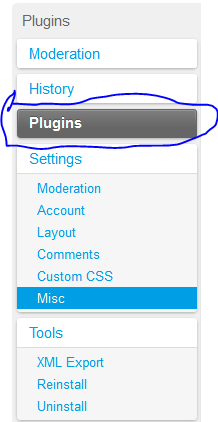
    1. On the left hand side menu, select Plugin

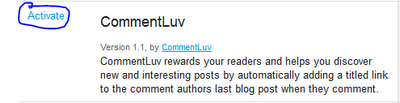
    Scroll down till you find CommentLuv and select Activate

    Done!

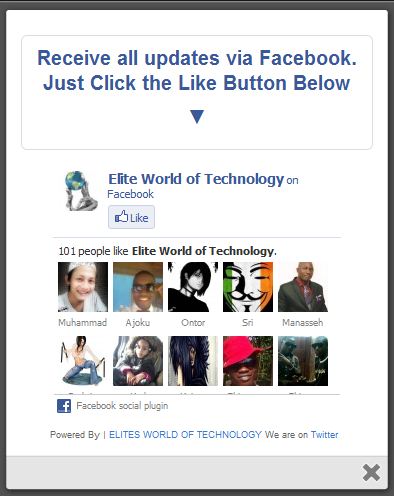
  • One Time Pop-Up Or Slide-Out Facebook Like Box With Cute Subscription Form.

    One Time Pop-Up Or Slide-Out Facebook Like Box With Cute Subscription Form.

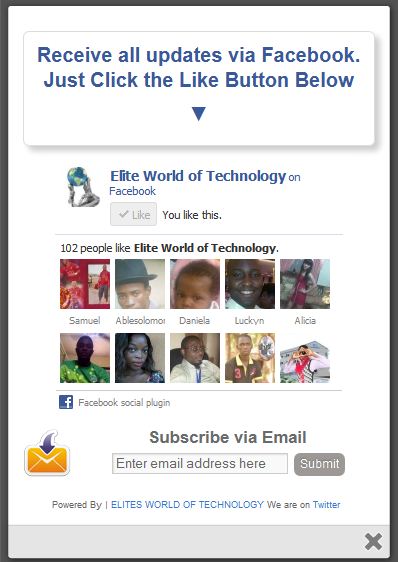
    With Subscription Form
    Without Subscription Form

    I got this trick  from an old friend -Helltrick.

    It’s such a fantastic widget to force your site visitors to subscribe to your updates via email, like your facebook page or follow you on twitter.

    Not only do we acquire the services of an amazing facebook like page we have yet another but extremely beautiful and easy to edit subscription form dozed with new CSS effects. This widget will keep pop-up/slide-out neat and clean and will surely attract visitors to subscribe.


    Demo

    To see this widget in action kindly our demo page to see a live preview on how it works.

    HOW TO ADD A ONE TIME POP-UP / SLIDE-OUT FACEBOOK LIKE BOX WITH CUTE SUBSCRIPTION LINK TO YOUR BLOG.


    In Blogspot:

    1. Login to your blogger dashboard
    2. Select Layout from your blog menu
    3. Add a new Javascript/html Gadget.
    4. Copy and paste the following code
    <style>

    /*
    ColorBox Core Style:
    The following CSS is consistent between example themes and should not be altered.
    */
    #colorbox, #cboxOverlay, #cboxWrapper{position:absolute; top:0; left:0; z-index:9999; overflow:hidden;}
    #cboxOverlay{position:fixed; width:100%; height:100%;}
    #cboxMiddleLeft, #cboxBottomLeft{clear:left;}
    #cboxContent{position:relative;}
    #cboxLoadedContent{overflow:auto;}
    #cboxTitle{margin:0;}
    #cboxLoadingOverlay, #cboxLoadingGraphic{position:absolute; top:0; left:0; width:100%;}
    #cboxPrevious, #cboxNext, #cboxClose, #cboxSlideshow{cursor:pointer;}
    .cboxPhoto{float:left; margin:auto; border:0; display:block;}
    .cboxIframe{width:100%; height:100%; display:block; border:0;}
    /*

    User Style:
    Change the following styles to modify the appearance of ColorBox. They are
    ordered & tabbed in a way that represents the nesting of the generated HTML.
    */
    #cboxOverlay{background:#000;opacity:0.5 !important;}
    #colorbox{
    box-shadow:0 0 15px rgba(0,0,0,0.4);
    -moz-box-shadow:0 0 15px rgba(0,0,0,0.4);
    -webkit-box-shadow:0 0 15px rgba(0,0,0,0.4);
    }
    #cboxTopLeft{width:14px; height:14px; background:url(http://1.bp.blogspot.com/-FiJ_Xz7txEg/Txrt0sy1TiI/AAAAAAAAFWk/Llzvkeyy_J8/s1600/controls.png) no-repeat 0 0;}
    #cboxTopCenter{height:14px; background:url(http://1.bp.blogspot.com/-TcJGMnSfOCY/TxrtzzHDLVI/AAAAAAAAFWc/mdndgrisRuA/s1600/border.png) repeat-x top left;}
    #cboxTopRight{width:14px; height:14px; background:url(http://1.bp.blogspot.com/-FiJ_Xz7txEg/Txrt0sy1TiI/AAAAAAAAFWk/Llzvkeyy_J8/s1600/controls.png) no-repeat -36px 0;}
    #cboxBottomLeft{width:14px; height:43px; background:url(http://1.bp.blogspot.com/-FiJ_Xz7txEg/Txrt0sy1TiI/AAAAAAAAFWk/Llzvkeyy_J8/s1600/controls.png) no-repeat 0 -32px;}
    #cboxBottomCenter{height:43px; background:url(http://1.bp.blogspot.com/-TcJGMnSfOCY/TxrtzzHDLVI/AAAAAAAAFWc/mdndgrisRuA/s1600/border.png) repeat-x bottom left;}
    #cboxBottomRight{width:14px; height:43px; background:url(http://1.bp.blogspot.com/-FiJ_Xz7txEg/Txrt0sy1TiI/AAAAAAAAFWk/Llzvkeyy_J8/s1600/controls.png) no-repeat -36px -32px;}
    #cboxMiddleLeft{width:14px; background:url(http://1.bp.blogspot.com/-FiJ_Xz7txEg/Txrt0sy1TiI/AAAAAAAAFWk/Llzvkeyy_J8/s1600/controls.png) repeat-y -175px 0;}
    #cboxMiddleRight{width:14px; background:url(http://1.bp.blogspot.com/-FiJ_Xz7txEg/Txrt0sy1TiI/AAAAAAAAFWk/Llzvkeyy_J8/s1600/controls.png) repeat-y -211px 0;}
    #cboxContent{background:#fff; overflow:visible;}
    #cboxLoadedContent{margin-bottom:5px;}
    #cboxLoadingOverlay{background:url(http://1.bp.blogspot.com/-PPvu-446sn4/Txrt1QsGH1I/AAAAAAAAFWw/_jWYVoR1HX8/s1600/loading-background.png) no-repeat center center;}
    #cboxLoadingGraphic{background:url(http://1.bp.blogspot.com/-31strss_1-E/Txrt1J6NThI/AAAAAAAAFWo/4P12CJPj924/s1600/loading.gif) no-repeat center center;}
    #cboxTitle{position:absolute; bottom:-25px; left:0; text-align:center; width:100%; font-weight:bold; color:#7C7C7C;}
    #cboxCurrent{position:absolute; bottom:-25px; left:58px; font-weight:bold; color:#7C7C7C;}
    #cboxPrevious, #cboxNext, #cboxClose, #cboxSlideshow{position:absolute; bottom:-29px; background:url(http://1.bp.blogspot.com/-FiJ_Xz7txEg/Txrt0sy1TiI/AAAAAAAAFWk/Llzvkeyy_J8/s1600/controls.png) no-repeat 0px 0px; width:23px; height:23px; text-indent:-9999px;}
    #cboxPrevious{left:0px; background-position: -51px -25px;}
    #cboxPrevious.hover{background-position:-51px 0px;}
    #cboxNext{left:27px; background-position:-75px -25px;}
    #cboxNext.hover{background-position:-75px 0px;}
    #cboxClose{right:0; background-position:-100px -25px;}
    #cboxClose.hover{background-position:-100px 0px;}
    .cboxSlideshow_on #cboxSlideshow{background-position:-125px 0px; right:27px;}
    .cboxSlideshow_on #cboxSlideshow.hover{background-position:-150px 0px;}
    .cboxSlideshow_off #cboxSlideshow{background-position:-150px -25px; right:27px;}
    .cboxSlideshow_off #cboxSlideshow.hover{background-position:-125px 0px;}
    /*———————————————————————————–*/
    /* Facebook Likebox popup For Blogger
    /*———————————————————————————–*/
    #subscribe {
    font: 12px/1.2 Arial,Helvetica,san-serif; color:#666;
    }
    #subscribe a,
    #subscribe a:hover,
    #subscribe a:visited {
    text-decoration:none;
    }
    .box-title {
    color: #3B5998;
    font-size: 20px !important;
    font-weight: bold;
    margin: 10px 0;
    border:1px solid #ddd;
    -moz-border-radius:6px;
    -webkit-border-radius:6px;
    border-radius:6px;
    box-shadow: 5px 5px 5px #CCCCCC;
    padding:10px;
    line-height:25px; font-family:arial !important;
    }
    .box-tagline {
    color: #999;
    margin: 0;
    text-align: center;
    }
    #subs-container {
    padding: 35px 0 30px 0;
    position: relative;
    }
    a:link, a:visited {
    border:none;
    }
    .demo {
    display:none;
    }
    </style>

    http://ajax.googleapis.com/ajax/libs/jquery/1.5/jquery.min.js
    http://yourjavascript.com/11215013191/jquery.colorbox-min.js
    <script type=”text/javascript”>
    jQuery(document).ready(function(){
    if (document.cookie.indexOf(‘visited=true’) == -1) {
    var fifteenDays = 1000*60*60*24*30;
    var expires = new Date((new Date()).valueOf() + fifteenDays);
    document.cookie = “visited=true;expires=” + expires.toUTCString();
    $.colorbox({width:”400px”, inline:true, href:”#subscribe”});
    }
    });
    </script>
    <!– This contains the hidden content for inline calls –>

    <div style=’display:none’>
    <div id=’subscribe’ style=’padding:10px; background:#fff;’>
    <h3 class=”box-title”>Receive all updates via Facebook. Just Click the Like Button Below<center><p style=”line-height:3px;” >▼</p></center></h3>
    <center>

    //www.facebook.com/plugins/likebox.php?href=http%3A%2F%2Fwww.facebook.com%2Fspan%20style=

    </center>
    <style>
    .mbt-email{
    background:url(http://4.bp.blogspot.com/_MbejYjGokMM/TSeZHmWJ6oI/AAAAAAAAALE/93ELYyzmi64/s1600/email.png) no-repeat 0px 12px ;
    width:300px;
    padding:10px 0 0 55px;
    float:left;
    font-size:1.4em;
    font-weight:bold;
    margin:0 0 10px 0;
    color:#686B6C;
    }

    .mbt-emailsubmit{
    background:#9B9895;
    cursor:pointer;
    color:#fff;
    border:none;
    padding:3px;
    text-shadow:0 -1px 1px rgba(0,0,0,0.25);
    -moz-border-radius:6px;
    -webkit-border-radius:6px;
    border-radius:6px;
    font:12px sans-serif;
    }
    .mbt-emailsubmit:hover{
    background:#E98313;
    }
    .textarea{
    padding:2px;
    margin:6px 2px 6px 2px;
    background:#f9f9f9;
    border:1px solid #ccc;
    resize:none;
    box-shadow:inset 1px 1px 1px rgba(0,0,0,0.1);
    -moz-box-shadow:inset 1px 1px 1px rgba(0,0,0,0.1);
    -webkit-box-shadow:inset 1px 1px 1px rgba(0,0,0,0.1); font-size:13px;
    width:170px;
    color:#666;}

    </style>

    <div class=”mbt-email”>
    Or Receive Updates via Email
    <form action=”http://feedburner.google.com/fb/a/mailverify?uri=blogspot/XylXo” id=”feedform” method=”post” target=”popupwindow” onsubmit=”window.open(‘http://feedburner.google.com/fb/a/mailverify?uri=blogspot/XylXo‘, ‘popupwindow’, ‘scrollbars=yes,width=550,height=520’);return true”>
    <input gtbfieldid=”3″ class=”textarea” name=”email” onblur=”if (this.value == &quot;&quot;) {this.value = &quot;Enter email address here&quot;;}” onfocus=”if (this.value == &quot;Enter email address here&quot;) {this.value = &quot;&quot;;}” value=”Enter email address here” type=”text” />
    <input type=”hidden” value=”XylXo” name=”uri”/><input type=”hidden” name=”loc” value=”en_US”/>
    <input class=”mbt-emailsubmit” value=”Submit” type=”submit” />
    </form>
    </div>
    <p style=” float:right; margin-right:35px; font-size:9px;” >Powered By | <a style=” font-size:9px; color:#3B78CD; text-decoration:none;” href=”https://ewtnet.com” rel=”nofollow”>EWT</a> Pop-Up Box <a style=” font-size:9px; color:#3B78CD; text-decoration:none;” href=”https://ewtnet.com/2012/08/one-time-pop-up-or-slide-out-facebook.html” rel=”nofollow”>Get This Widget</a></p>
    </div>
    </div>

    Website

    If you need to use this widget on any website platform other than the blogger platform, simple copy the above code to anywhere in the <body></body> section of your website.

    Make The Following Changes :

    Change Green to custom text or leave it as default, Pink with your facebook username, Blue with your RSS feed Title.


    Finally, Save your widget and you are done! Enjoy!
  • Blogging Tips: Tips on Becoming a Successful Blogger

    Blogging Tips: Tips on Becoming a Successful Blogger

    By: Joseph Onyemakonor

    Tips on Becoming a Successful Blogger: The internet has been one of the widest sources of knowledge and income, and blogging is one of the ways to make some good cash. There are over 10 million blogs and this number increases every day. Blogging is very good and interesting, especially when you are not going into it because of the money you could make. It allows you to share your opinion with the world at large and also reach out to people in need of help and advice. Some people will just rush into blogging without knowing what it involves. You must read this article and know why you shouldn’t start blogging. Here are some facts about blogging you should know and have in mind Tips on becoming a successful blogger

    THE GOOD Tips on Becoming a Successful Blogger

    Blogging has its advantages and is interesting once you get it started fully. Some of the advantages of blogging are

    • You get to share your opinion and ideas and meet people with similar views
    • You can build a steady audience and sell products to them which also serves as a source of income
    • You will make a good amount of money from it through advertising.
    • In some countries, you can win awards of best blog of the year.
    • Blogging is a major investment online.

    Blogging gives you the advantage of extra income to support your earnings and with time it can grow into a steady source of income. I know a blogger who earns $300everyday through advertisement and adsense. Once you have a blog and have successfully build a steady audience you can sell your blog and make over $10,000. Now isn’t that a very good investment?.

    THE BAD

    As good and profitable a blog can be, it has its disadvantages as well. Some of the disadvantages includes;

    • Blogging is highly time demanding and can affect your daily life and routine. Most successful bloggers know the great deal of work they put to get their blog when they first started before they could become freelance bloggers.
    • It requires new and interesting contents constantly: If you want your blog to grow fast, you should never copy and paste content from another site, you have to create new and unique contents. This is very difficult to do and most bloggers hire writers constantly. Now if you do not have the fund or resource to hire a writer then you might find it difficult running a blog
    • Once you start blogging you will spend a long time facing a Screen, this can damage your eye sight and even cause headaches. You have to be ready to face this. I will advice you do not blog if you already have any eye defect.

    THE UGLY

    There is also a very ugly part of blogging. After you must have put much effort into your blog, and also spend time on it, you may not succeed. You may constantly continue to loss money without making any profit. Do not give up on blogging. This should give you an idea on what you are going into if you decide to choose blogging as your way of making money online

  • Why You Must Quit Blogspot Comment System.

    Why You Must Quit Blogspot Comment System.

    Google over the years has brought a lots of amazing  features to improve Blogger platform but they seems to forget about the comment system (is probably one of the worst comment system in existence) or probably they consider it unimportant.

    Like most of you I have always admired the comment system of other blog platforms like wordpress, but has waited (I’m still waiting though!) patiently hoping to see a better comment system one day. (Looks like we are not going to see one in the future either).

    Why You Need To Quit  Your Blogger Comment System??

    One of the most effective ways of retaining readers to your blog is by building a little community in your blog, like I mentioned before; Blogger has one of the most crappy comment system in existence; which is the area I think they still need to improve. On my cause of making my blog convenient for you I went for a journey, With a little research (Google Of-course 🙂 ) I managed to grab some Ideas I think I should share with you. My Discoveries!Ouch: This is a very unusual title to give to reason 🙂 but honestly I can’t think of a better title to give to it (you probably should suggest one for me). While I was still using the blogger comment system, I made a very crucial error while posting a long reply on a user comment, that was when I voiced the word “ouch” what do I do? There was no Edit or Preview Option, I had to delete and re-write the entire comment (so bad I guess?). The worst is coming……   No Threading Comments: In other comment system you might have seen a  REPLY  button or link attached immediately after or below each comments; this is known as threads comment. This all important feature enable you and your readers to reply directly under each comment (Not the ‘@’ trash we normally use), Without having to do some advance xml editing.    Now, this is a very important feature for any blog comment system,  our dear default blogger comments system do not allow you to reply directly to a comment, this can lead to confusion and Ioften see bloggers having to use ‘@’ to specify which person the were replying to for example ‘@quoyo’ ‘@gotmelsh’ I can now post a reply and it will be attached to the bottom of each comment.   Enticing Comment Form: The comment form you probably have seen on wordpress comment system allow users to comment as a guest with their Name and URL, This feature entice your readers to comment on your blog post. ‘Would you want to comment on a blog that doesn’t give user the privilege to share there own blog/site?’ ‘Other people probably won’t like to either’ (that’s the devil’s tempting offer you can’t reject’) or if they have a wordpress account they can comment with that profile.But they can also comment with their social network and online profiles like *Twitter *Facebook *Yahoo *OpenId (Did You Know Your Blogger URL is an open Id?).    When you leave a comment you can also add an image or video to your comment instead of adding an image or video URL that will take users out of your blog. Now that’s is a good example of a good comment system.We have ‘that devil’s tempting offer’ but please do not spam us 🙂   Email Options: This is probably the most important feature that blogger comment system lack. ‘Ask me why?’ This is becourse these option allows your readers to choose if they want to receive new comments or replies posted to the posts they have earlier commented on directly to their email whereby helping the user to know when a reply is posted to his reply… What you probably don’t know is that this feature help you a great deal to maintain a good number of returning visitors. please, remember to choose this option while commenting here becourse I would love to see you again.   Ratings: Many of you know that I’m on bloggers, most time what really takes me to bloggers is to check how many people that voted (Rate) for my talks (comment). If there are so many people who does the same thing out there, then you can imagine how many returning visitors who will often come back to your blog to check if anybody voted for them. Our blogger comment system lacks this feature too… “You are beginning to realize how much features you are missing” Hold on I still need to tell you something and please do not forget to tell me something too 🙂 Your comment is very valuable to me.
    Moderate Options:  Most Comment system other than blogger comment system allows you to reply your post comments directly from your dashboard and email. You receive an email when a new comment or reply is posted on your blog post, the same as with Blogger comments however the options to reply to a comment are much more versatile.

    When I’m away from the computer for a few hours if I have received for example fifty comments I can go to my Intensedebate dashboard to manage the comments.From here I can read the comments and see which posts the comments were posted on.I can click on each comment and reply or delete the comments from the dashboard, now i can reply to comments on one page without the need to go to the blog.
    I Have Heard Enough! Give Me Alternative? Well I have that too, I will be lying if I said I did it all my own but I can assure that about 60% of them are actually my on Idea and please, before I share mine with you promise me you would share yours with me, ‘Ok Deal!’ Lets ride on…. I will be providing you with my idea source,. With this lets move on to our next topic.       Top Five Alternatives To Your Blogger Comment System If you want to get rid of default blogger commenting system and get a better commenting interface, then you can opt for any of these commenting systems.

    intensedebate-

    Intense Debate – I don’t know why I mentioned this first, maybe becourse I’m currently using it on this blog, but what ever the reason might be I want to assure that this is one the best comment system in existence ‘don’t know if it is the best, you will tell me???’  Though most bloggers complain that it does not have the option to export your old blogger comments to your Intensedebate data base, this is true as you might have noticed that most of our posts still have that ‘archaic’ blogger blogger comment system. This is due to we choose to install intensedebate only on new post. I will be publishing an article soon on how to add intensedebate comment system on your blogger blog so make sure you subscribe to our update via email, twitter or facebook. (I promise I won’t spam you; I hate spam too).  This is now owned by  Automattic, the makers of WordPress and is totally free!Features:

    • Comment Threading
    • Reply By Email: Respond to and moderate comments with ease via email
    • Commenter Profiles: Special Profiles for commenters so that there is more interaction between people.
    • Moderation/Blacklisting
    • Reputation Points & Comment Voting
    • Twitter: Tweet your comments
    • Widgets: widgets like blog’s comment stats, the most recent comments made on blog, most popular posts and the most recent comment
    • FriendFeed:(Best Feature)When comments are made in the context of a blog on FriendFeed, IntenseDebate will republish them back on the blog.
    • Plugins API:Developers can enhance the comments by plugins like Seesmic video comments, PollDaddy polls, YouTube videos, smileys.
    • Gravatar support.
    • Facebook Connect and Twitter Sign-in: People comment via their facebook and twitter profiles and can further broadcast the content.
    • Commentluv: This is not a new name to wordpress users, just incase you don’t know; this ‘luvly’ feature automatically put the latest post of your readers to their comments. (You can choose to deactivate it)

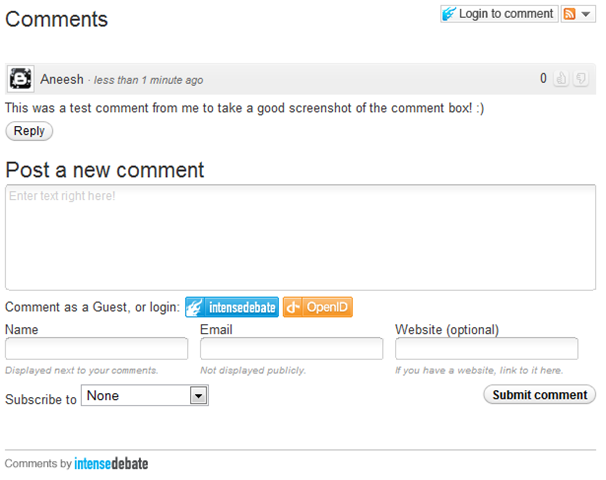
    IntenseDebate In Action

    intensedebate-commenting-system
    disqus

    DISQUS  -While on my re-search journey, I happen to read some user reply and discover that this is really the bloggers choice ‘– It is the same thing that Mashable.com uses for its comments.’ (I’m not saying is the best; you still have to me which is the best) I once used it on my blog ‘not this one’ but had to remove after I learned about the commentluv (yes, there is no option for commentluv). One Interesting feature of disqus is the option to export old blogger comment to your disqus comment system database: By so doing you will not loose any of comments.Features:

    • Social Media Reactions: (Best Feature) Display mentions and comments about post from other services around the web (e.g. Twitter, FriendFeed, Digg, YouTube).
    • Trackbacks
    • Seesmic Video Comments
    • Pagination
    • Threading
    • Facebook Connect and Twitter Sign-in: People comment via their facebook and twitter profiles and can further broadcast the content.
    • Widgets like Popular posts and top commenter’s widgets.
    • Blacklisting as well as whitelisting people.

    Disqus In Action

    disqus-commenting system

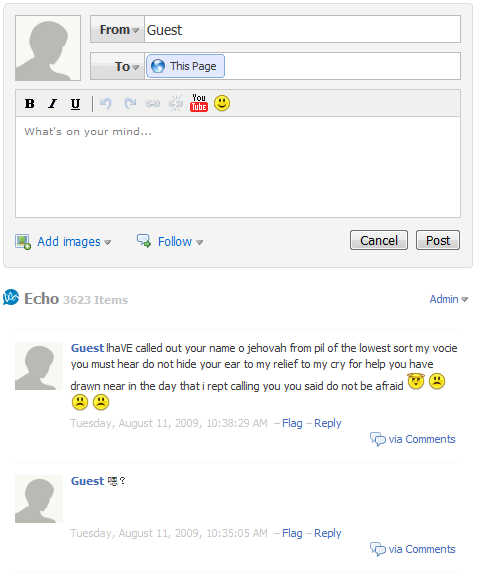
    JS-Kit (Echo) This is also another JavaScript based commenting system.Echo offers both free and paid packages!The free package comes with threaded comments and an interface where the commenter can add videos,images,similes, etc.The commenter can also format his comments using a simple WYSIWYG comment editor. I really don’t know much about this system (and couldn’t quite link to the source page) as I have never tried them before but I do hope that their a some of you out there that do know one or more things it ‘I honestly hope you share your ideas with me; I’m very Interested’ Or you could as well try it and share your experience with us.Features:

    • Spam control with Akismet
    • Banning : Ban a person by the user name or by IP address
    • Gravatar Support
    • TrackBack/PingBack: Trackbacks/Pingbacks can be automatically be included in comments.
    • Comment Ratings and Karma: Users can rate comments.
    • Blogger Comment Sync: (Best Feature) Transparently switch back and forth between native Blogger comment system and JS-Kit Comment system with no loss of comments because comments are always synchronized with Blogger.
    • Emoticons: 16 emoticons are available.
    • Threads: Threading is also available
    • Pagination: Comments can be paged.
    • Commentluv a feature to give love to your commenter is available to only this commenting system
    • Photo as well as video comments.

    JS-KIT (ECHO) IN ACTION

    js-kit-commenting system

    Important: Please make sure to backup your blogger templates before trying any of this system so as to remain on the safer side.

    These are the three most popular commenting systems.They come with threaded commenting with Gravatar based profile images,which can make you commenting system look more professional.I personally prefer Intense Debate over the others.

    Note: These comment forms come with an option to show the comment form on new posts only(means posts with 0 blogger comments)!That means your old comments will stay intact and will use the old blogger comment form.(This is optional.. you can also revert all posts to use the new commenting system.But in that case, you cant display the existing comments easily..)

    These are nothing  but my own lame idea and re-search, I know there hundreds others but it’s your turn to tell me about them (Remember the promise you made to me earlier). ‘to share with me’ 

  • Your Recipe For Long-Term And Targeted Traffic: Generating Traffic To Your Website!

    Your Recipe For Long-Term And Targeted Traffic: Generating Traffic To Your Website!

    Generating traffic to your website can be easy if you know the little secrets about how to drive massive volumes of traffic at no cost.
    This article presents some secret ways through which you can easily boost traffic to your website.

    • Have your own website’s discussion board or forum, and invite people to visit and participate on your forum. This generates traffic to your website and all the posts on your website’s forum will help to improve your search engines position, which will boost traffic to your website. People who visit your forum will also visit your website, hence driving massive amounts of volume to your website.
    • Offer an e-zine on your website and invite people to subscribe to your free e-zine. When people subscribe, they will give in their email address. Every time they read your e-zine, it will remind them to return to your site since you will have your website URL in your e-zine.
    • Invite people to bookmark your website. This is particularly effective if you have high quality content on your website which makes people want to spend more time reading all the useful content on your site. Give away free content to other web masters for them to add on their websites. By allowing your visitors and other webmasters to use your articles on their own web site or in their e-zine, including your resource box, you are effectively advertising your website through their web sites. In addition, allow your visitors to give away your online freebies, and these will include your website URL, thus effectively multiplying your traffic.
    • You can also ask your website visitors to refer your web site to their friend(s) who may benefit from visiting your website. This will increase traffic to your website.
    • Invite your visitors to sign your guest book. When people sign your guestbook they may give you valuable feedback that will help you to improve your web site. This in turn will help you increase traffic to your web site by providing a useful website.
    • Offer an affiliate program. Having hundreds of affiliates advertising your website is an effective way of generating traffic to your website.
    • Give some testimonials or product reviews including your website URL to websites that get high volumes of traffic. By having a testimonial on a website that is visited by thousands of people, you are getting free publicity and free advertising and traffic for your website.

    Use the secret tips outlined above to easily generate high volumes of traffic to your website and boost your online profits.

  • Essential Tips For Generating Traffic To Your Website For Free

    Essential Tips For Generating Traffic To Your Website For Free

    Promoting your website does not need to cost you a lot of money. There are various ways through which you can drive traffic to your website for free.

    If you have no money or if you have a small budget for driving traffic to your website, you can use tips outlined in this articles to generate traffic to your website for free.

    • Exchanging links with other webmasters is a powerful way of generating traffic to your website for free. All you have to do is to identify webmasters with websites that complement your website and exchange website links with them. This means that traffic can be driven to your website through the websites where you have your link.
    • Arrange a joint venture with other webmasters and list owners so that they can advertise your website to their list. This does not cost you anything and all you need to do is to contact some list owners and present your request. By doing this, your website can be advertised to a huge list of people which will drive traffic to your site.
    • Write articles or free reports for other webmasters to publish and put your website address in the author’s resource or biography. If your reports and articles are of good quality, your articles will be published and many readers who will read your article will also visit your website.
    • Include your website address in your business email signature. Anyone you communicate with can potentially be your prospect, so you can therefore be promoting your website every time you send an email.
    • Create RSS feeds for your site and submit the feed URLs to the major RSS feed directories online. This will generate traffic to your website.
    • Have a blog to your site and ping your website on a regular basis when you add new content. When you ping your blog, you make search engines robots index your website, which ultimately drives traffic to your website. It is also very effective to submit your blog address to blog search sites and directories.
    • Include your web address to your forum profile signature. This means that every time you post or respond to questions on the forum, your website URL is seen by all the people in the forum.

    By following these tips, you can generate a steady flow of traffic to your website without spending a lot of money. All you need is to have some time to carry out the steps presented in this article and you will see an increase in traffic to your website.

  • How to Avoid Facebook and Twitter Disasters

    How to Avoid Facebook and Twitter Disasters

    Who knew your boss could see so much of your Facebook page–including the pics from your wild weekend? Oversharing can lead to underemployment. Take some practical steps to control what others see about you. The power of social networks like Facebook and Twitter comes from their ability to quickly share information about your life with other people. But along with that ability comes the risk of sharing sensitive information with the wrong people, and that risk increases as your network grows well beyond your core circle of friends.
    Using Twitter and Facebook effectively takes more than discretion; you should know how to tweak the settings for these services so that you have full control over who sees what on your Facebook page or on Twitter. In the two stories linked below, and in others to come, we’ll cover both sides of the coin: how to use the tools at your disposal to keep your profiles in check, and how to handle the etiquette side of the equation, as well.

    The garden-variety freshman may not have much to worry about, but it’s a different story if you–as many people are increasingly doing–are using Facebook and Twitter not for updates about your meals, pets, and drinking binges, but for professional purposes. So we’ve outlined here a handful of common disastrous scenarios in which one (or both) of these social networks was misused, as well as the best way to prevent or remedy the problem.
    But in the end you’ll find that the fundamental lesson is invariably the same, and that’s to remember the golden rule of all social networks: Never forget that the whole world is watching.
    Now go on to:

  • Send Email Like a Pro

    Send Email Like a Pro

    Email often straddles a fine line between help and hindrance. It’s an invaluable tool, no doubt about it, but sometimes it can be a stubborn, unwieldy, and intrusive monster—maybe even a security threat.
    So who’s in charge around here—you or your inbox? With the right tools, services, and knowledge you can tame the unruly email beast. It’s time to evolve from email user to email power user, and we’ve got just the six tips you need. Start by learning how to add a snooze button to your inbox, then wrangle Gmail to make it smarter and more cooperative. Keep your inbox free of spam with disposable email addresses, then check to make sure your primary addresses haven’t been compromised by hackers. Finally, become a master of email signatures, and learn how to send giant files that would normally choke a mail server.

    Set Your Email to ‘Snooze’ So It Comes Back Later

    Here’s how to make messages bubble back to the top of your inbox—on your schedule.
    A crowded inbox can be a productivity killer, if for no other reason than that important messages can get pushed out of sight by newer ones. What you need is a kind of “remind me later” button for email, a way to defer selected messages to a later date or time before they drop “below the fold.”
    Outlook and Gmail users should check out Baydin’s Boomerang, which lets you reschedule email with just a few clicks. Or, if you’re not a fan of plug-ins, services like Followup.cc and NudgeMail work with any email system: You just forward a message to a specialized address ([email protected], for example, or [email protected]), and you’re done. The email will reappear in your inbox at the designated time and date. And if you’re still not ready to act on the message, just click one of the embedded “snooze” options and go back to sleep—er, work.
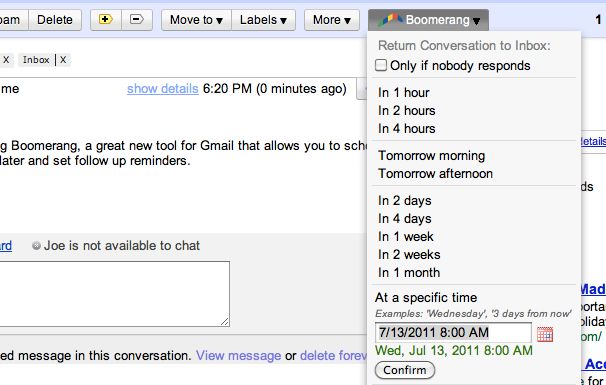
    Boomerang for GMailBoomerang for GMail can help keep important messages you can’t read right away from getting buried by newer mail.
    Both Followup.cc and NudgeMail are free. Boomerang for Outlook costs $30, though you can try it free for 30 days. Boomerang for Gmail offers its Basic plan (ten messages per month) free of charge; you can upgrade to a Personal plan (unlimited messages) for $5 monthly.

    Tame Gmail With Priority Inbox and Dethreaded Conversations

    GMail Priority InboxPriority Inbox is Gmail’s answer to email overload. By evaluating your reading and replying habits, it predicts which messages are most important and “floats” them to the top of your inbox, corraling the less-important stuff for later viewing. (You can tweak the prediction accuracy by clicking a “plus” or “minus” button for any given email.) It’s kind of like having a personal assistant who separates the email wheat from the email chaff.
    To enable Priority Inbox, head to your Gmail settings, click the Inbox tab, and then choose Priority Inbox from the “Inbox type” drop-down menu. Then click Save Changes and return to your inbox.
    Alternatively, while you’re in the settings area, consider turning off one of Gmail’s most controversial features: Conversation View, which groups together messages with the same subject line. The longer a message thread gets, and the more people who participate in it, the harder it becomes to find the newest addition—or to review earlier replies. In other words, these “conversations” can quickly turned into muddled, incomprehensible, frustrating messes.
    To turn off Conversation View—which will make messages appear one after another (as in most traditional email systems)—click over to the General tab, then set Conversation View to off. Click Save Changes when you’re done.

    Protect Your Privacy With Disposable Email Addresses

    You know the routine: There’s some new service, promotion, or online freebie that requires your email address–but you don’t want the inevitable deluge of ads, updates, and other inbox spam. How can you sign up without actually sharing your email address?
    Mailinator is simple and free to use.What you need is a disposable address, one that won’t negatively impact your inbox. Suppose you’re staring at a registration form and don’t want to use your regular email account. Just make up an address (like “ihatespam”) and tack on @mailinator.com. Then head to the free Mailinatorservice and sign in using the address you just created; you’ll find a Web-accessible inbox you can use to retrieve your promotional code, download link, or whatever. All Mailinator mail gets deleted within a day.
    Mailinator isn’t the only disposable-email game in town. Services like 10 Minute Mail, Humaility, and YopMail offer similarly convenient registration-free addresses. And if you’re a Firefox user, Less Spam, Pleaseintegrates with these services, generating a disposable, reusable email address when you right-click in an email field and choose Insert a temporary mail address. Doesn’t get much easier than that.

    Instantly Paste Your Choice of Email Signatures

    An email signature is a great way to share snippets of contact information: your phone number, Facebook/Twitter addresses, website, and so on. But with most email systems and programs, it’s an all-or-nothing affair: signatures are either “on” or “off,” and you’re limited to just one appended block of text. What if you want to add your signature to some emails but not others? And what if you want to share different contact blurbs with business associates than you do with friends and family?
    The solution: an “autotext” or macro program that quickly and automatically turns abbreviated text into expanded blocks of text.
    For example, you could create a custom signature that you’ll use only with clients and customers, and designate it “bizsig.” Then, when you’re done composing an email, you just type bizsig at the end. Presto: The autotext program instantly inserts your full business signature.
    You could take the same approach for a more generalized signature, designating it “sig1” or the like, then just paste it in as needed. And that’s the beauty of this approach: You apply a signature when you want one and skip it when you don’t.
    A number of programs afford this kind of macro-powered convenience; two of the most popular are AutoHotKey and PhraseExpress. Both are free, but the latter is definitely the more user-friendly of the two. (AutoHotKey requires a bit of scripting.)

    Find Out If Your Email Account Has Been Hacked

    It seems that every day we hear about another email database being compromised by hackers. The “good” news is that these petty thieves often post the stolen databases online. The bad news is, there’s no way to know for sure if your email address has been compromised.
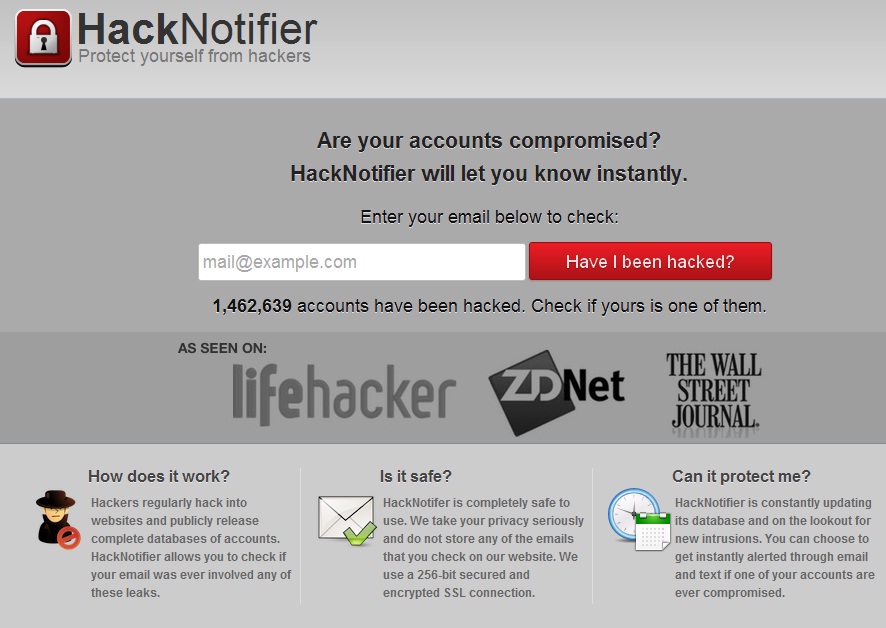
    There is now: HackNotifierchecks your email address against the growing number of publicly available “hacked” email databases. Just type in your address and click Have I been hacked? If the results are negative, you can rest easy–though you should continue to be diligent about using strong passwords and varying them from site to site.
     
    Verify that your e-mail account hasn’t been hacked with HackNotifier.
    If the news is not good, HackNotifier will tell you which accounts were compromised and provide more information about the leaks. The service also offers 24/7 account monitoring for $5 per year ($7 if you want instant notification via text message). What it doesn’t do is offer any instructions on how to safeguard your email security if an account has been hacked. Check out numerous ways of Creating an effective password

    Send Super-Huge File Attachments

    As a general rule, mail servers don’t like large file attachments. While some can accommodate files as large as 25MB, others balk if they exceed just 5MB. In these days of mammoth videos, photo libraries, PDFs, and the like, that doesn’t always cut it.
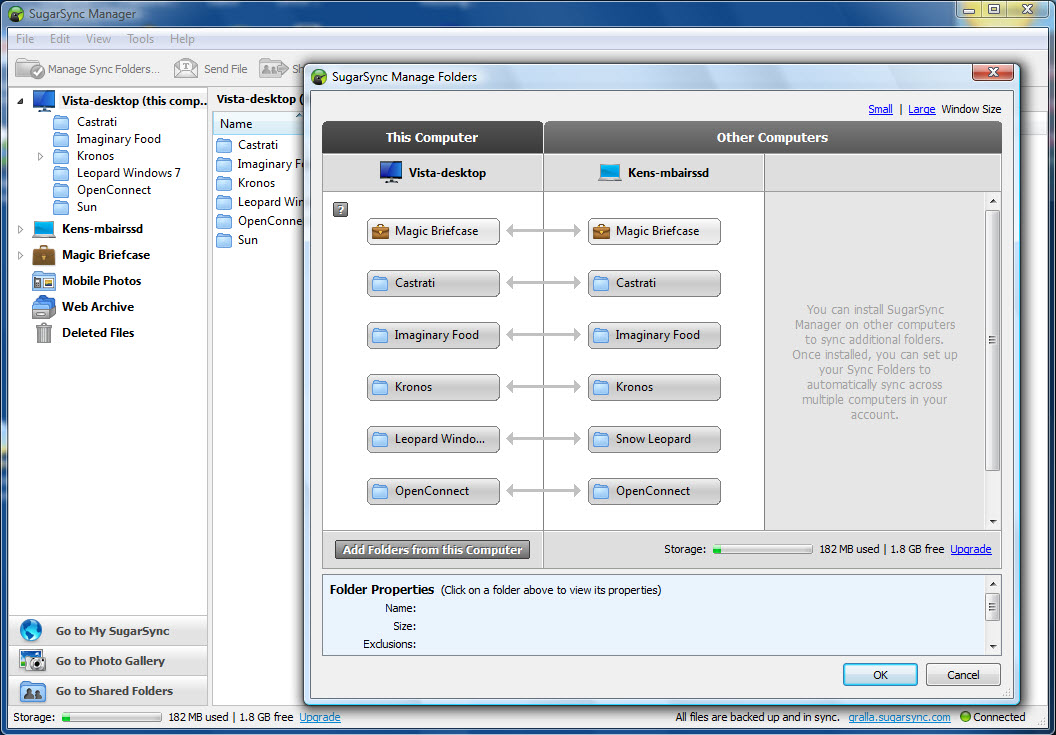
    What you need is a file-sharing service that bypasses your mail server. Countless options are available, including such cloud-storage stalwarts as Dropbox and SugarSync(which give you 2GB and 5GB of free space, respectively). You simply upload your file(s) to a public folder, copy the “share” link, and paste that link into an email. The recipients will be able to download the file(s) via the link, effectively taking mail servers out of the equation.
    SugarSync is a perennial favorite for storing and sharing files online.
    If you’d rather not sign up for yet another service, or you just want a more straightforward way to share your big files, try Ge.tt. In about the time it takes to read this sentence, you can upload a file and get a link to hand out—no registration, software, or plug-ins required. Files remain available for 30 days, or 90 if you elect to sign up for an account (which is free). That account also gives you real-time sharing statistics, something you definitely can’t get from email.
    On the other hand, if you prefer the traditional (some would say easier) email-attachment method, file-sharing service YouSendIt offers a free Microsoft Outlook plug-inthat does an end run around your mail server, while still making big-file sharing as simple as creating an attachment. Note, however, that the maximum file size is 50MB unless you sign up for a Pro account ($10 monthly or $50 per year), which raises the maximum to 2GB.
    With these tools in your arsenal, it won’t be long before you’re sending and sorting email like a pro.

  • Windows 8 Leaked in Final Form

    Windows 8 Leaked in Final Form

    A final copy of Windows 8 leaked to the Internet on Thursday, just a day after Microsoft stamped the new operating system as finished.
    Identified as Windows 8 Enterprise N — the “N” marks it as aimed at European users — on several BitTorrent file-sharing websites, it was unclear yesterday whether the leaked build was legitimate.
    Although some who downloaded the leaked copy asserted it was an invalid build, the consensus early Friday was that it was the real deal.
    “Legitimate. It works. Looks real,” said one commenter on a popular file-sharing site. Numerous downloaders posted screenshots to back up their contention that the leak was the actual Windows 8.
    Others vouched for it as well, including “Canouna,” the nickname used by an administrator of the WinLeaked forum.

    The copy is an English-language version, but according to the file-sharing sites is non-booting, meaning pirates must create installation media. Instructions for generating a DVD- or USB flash drive-based installer were posted on some of the file-sharing websites, and available elsewhere on the Internet.
    Microsoft’s N editions omit Windows Media Player, and are distributed throughout most of Europe as part of the mandate by European Union antitrust regulators after a 2004 decision that concluded Microsoft’s bundling of the player program was anti-competitive.

    Prerelease with Precedent

    Leaks of upcoming Windows releases are not uncommon. In the run-up to Windows 7’s launch three years ago, pirated copies appeared regularly, from the October 2008 leak of an “alpha” version Microsoft meant only for developers to Windows 7 Release Candidate, which went public about two weeks before Microsoft officially launched the preview.
    The company has avoided much of that with Windows 8, although a Chinese edition of the operating system made it to the Internet three days before Microsoft shipped the Release Candidate, the final public preview, in late May.
    Previously, Microsoft has warned users not to install leaked builds, claiming that they can be infected with malware.
    Some customers can obtain a non-pirated copy of Windows 8 as soon as August 15, when the RTM, or “release to manufacturing” milestone — the same code as will be installed on new PCs — reaches the MSDN (Microsoft Developers Network) and TechNet services.
    Enterprises with Software Assurance licensing plans — Software Assurance is essentially an annuity that gives companies the right to run any version of a product — will be able to grab Windows 8 starting August 16, as will members of the Microsoft Partner Network.
    Windows 8 will launch October 26, with two editions in retail — Windows 8 and Windows 8 Pro — and another, the Enterprise edition that leaked yesterday, targeting corporations with volume licensing agreements.
    Credit:
    For more enterprise computing news, visit Computerworld. Story copyright © 2011 Computerworld Inc. All rights reserved.  

  • Don’t Tell the Boss: You Tweet from Work Like a Maniac

    Don’t Tell the Boss: You Tweet from Work Like a Maniac

    A new study by network security firm Palo Alto Networksshows “explosive” growth in the use of social networks in the workplace, with a 300 percent increase in social media activity in the latter half of 2011 compared with the same period of 2010.
    Twitter usage, in particular, showed a dramatic increase in popularity at work, growing by more than 700 percent year over year.
    Employees are flocking to other social sites as well. Since October 2010, bandwidth consumption for social media postings, Facebook apps, and other social plug-ins jumped significantly. When measured as a percentage of total social networking bandwidth, usage rose from 5 percent in October 2010 to 25 percent in December 2011, the study shows.
    Browser-based file sharing is way up as well. File sharing sites appeared on the networks of 92 percent of participating organizations in the survey.

    Security Risk

    The ability of browser-based, file-sharing apps to evade detection means that they often operate undetected on corporate networks, a situation that represents a security risk for businesses, the study says.
    The Palo Alto Networks Application Usage and Risk Report analyzed application traffic from more than 1,600 businesses between April 2011 and November 2011.

  • How to Send Your Boss an Anonymous Email

    How to Send Your Boss an Anonymous Email

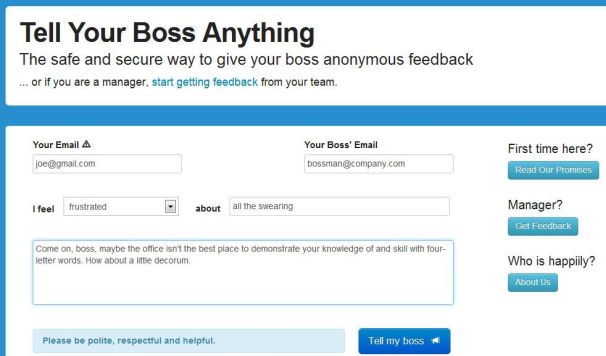
    What’s the best way to communicate with your boss? Open, honest, face-to-face conversation, of course.That would seem to fly in the face of Tell Your Boss Anything, a Web site designed expressly for sending anonymous messages. But it’s not really about giving ol’ Scrooge a piece of your mind; rather, the site appears to have constructive motives.
    To get started, you enter your own “trusted” email address (more on that in a bit), then your boss’ address. Next, you create a subject line by filling in the blanks: “I feel ____ about ____.”
    Within that first blank, you can choose words like happy, frustrated, irritated, confused, and proud. The words that go in the second blank are up to you.
    Then you compose your email. When you click Tell my boss, your message gets delivered anonymously. But here’s the thing: Your boss can reply, and that reply will come to your aforementioned email address — all the while keeping your identity private.

    The site cautions you to be “polite, respectful, and helpful,” and indeed nothing about Tell Your Boss Anything suggests that it’s aimed at telling a person off. The idea is more to express yourself in a way that you might not feel comfortable doing otherwise.

    That could prove valuable if your boss is the type who doesn’t typically welcome open, honest, face-to-face communication. On the flipside, I think most bosses would likely be ticked off by an anonymous email from an employee, even one that was positive. What’s more, there’s always the risk that the boss will somehow “know it was you,” which might land you in hot water.
    The real value here is for bosses themselves, who can use Tell Your Boss Anything to invite anonymous feedback from employees. It’s like a digital version of the suggestion box, a way to let the team know they can communicate with you without fear of reprisal.
    Personally, I have no use for Tell Your Boss Anything, because my bosses are all awesome, and I have no qualms about telling them to their faces. Or, you know, by way of a blog post.
    But what do you think? Would you ever use a service like this, either as a boss or an employee?

  • How Microsoft Surface Stacks Up Against Its Tablet Competition

    How Microsoft Surface Stacks Up Against Its Tablet Competition

    How do the specs for the upcoming Microsoft Surface for Windows RT and Surface for Windows Pro compare with the Apple iPad? Here’s what we know. Surface will change your expectations of what you can do with your tablet. First and foremost, you are no longer buying into a dedicated mobile OS and its corresponding app ecosystem. Instead, you’ll be able to buy one app and use it on both a tablet and a Windows 8 laptop or desktop PC.

    While the Metro face of the two Surfaces will be the same, the hardware flavors are fundamentally different. Surface RT will compete most directly with Apple’s iPad and the current crop of Android tablets, all of which run on power-efficient ARM-based processors. And Surface Pro—though still a tablet—targets Ultrabooks and other ultraportable laptops.
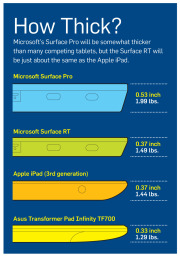
    Click on the chart below for a comparison of the two Surface models with other tablets.

    Surface RT vs. the iPad and Android Tablets

    surface chartTech specs: Surface RT comes with a USB 2.0 port standard (critical for connecting external storage and peripherals), along with a MicroSD card slot and Micro-HDMI video out. Most Android tablets have a MicroSD card slot and a Micro-HDMI port as well, but very few have a full-size USB port. Apple’s iPad famously has no ports, with the sole exception of its proprietary dock connector.
    At the chip level, Nvidia’s Tegra 3 ARM processor powers the Surface RT. Most Android tablets run a version of the Tegra 3, as well, or they use another ARM-based processor. The iPad carries Apple’s own processor, which is also based on the ARM architecture.
    Click for a full-size view of the chart.Storage on the Surface RT is similarly upscale, with a minimum of 32GB. The iPad and most Android tablets start at just 16GB. Among Android tablets, Asus’s Transformer Pad Infinity TF700 and Acer’s Iconia Tab A700 are the two exceptions, with 32GB baseline models.
    Screen and resolution: Microsoft lists the RT’s display as “HD” rather than as “Full HD,” which likely translates into a resolution of just 1366 by 768 pixels. That won’t compete with the iPad’s Retina display, or even with those of Android tablets such as the Transformer Pad Infinity TF700 and the Iconia Tab A700 (both with resolutions of 1920 by 1200 pixels). The Surface RT’s optically bonded display, which eliminates the annoying air gap between the screen and the glass, should help overcome its resolution shortfall. Microsoft does cite its ClearType font-display technology, but we won’t know how much ClearType can compensate for the gap in pixel density until we have the Surface tablet in hand.
    Click for a full-size view of this chart.Physical specs: Microsoft didn’t supply complete numbers, but it did say Surface RT should be about 0.37 inch thick—thinner than many competing tablets and in a dead heat with Apple’s iPad. Current estimates put the Surface RT’s weight at 1.49 pounds, or 0.05 pound heavier than the current iPad. That’s a negligible difference, but the iPad itself got heavier this year, while Android tablets are consistently moving in the other direction, as consumers have come to expect. At 1.49 pounds, the Surface will be about 0.2 pound heavier than the Toshiba Excite 10 or the Asus Transformer Pad Infinity.
    The Surface tablet’s design is unique. It features a comfortably angled bezel created with ergonomics in mind; a balanced arrangement of internal components that make Surface feel lighter; and a built-in kickstand for conveniently using Surface in a variety of scenarios.
    Productivity: In this respect Surface RT is likely to shine. Unlike Apple’s iOS and Google’s Android, Microsoft’s Windows 8 provides the ability to view two apps at a time on one screen, as well as having additional apps multitasking in the background. This flexibility is closer to what users are accustomed to having on a desktop or laptop computer. Plus, Surface RT will include Office Home and Student 2013 RT (with Word, Excel, PowerPoint, and OneNote).

    Surface Pro vs. Ultrabook Laptops and Windows 7 Tablets

    Tech specs: Surface Pro will come with 64GB or 128GB of storage and an Intel Core i5 CPU (Microsoft has not yet re­­vealed the clock speed). By contrast, Ultrabooks have anywhere from 128GB to 320GB of solid-state or hard-drive storage, and feature Intel Core i3, Core i5, or Core i7 CPUs. Microsoft hasn’t disclosed how much memory its Surface Pro will have; Ultrabooks average 4GB of RAM, comparable to what you’d find on an ultraportable or all-purpose laptop. Surface Pro outdoes most Ultrabooks, though, with a Micro­SDXC card slot, a USB 3.0 port, a Mini DisplayPort for video output, and a dual digitizer for digital inking with a stylus.
    An example of a Surface screen; click for a full-size view.Screen and resolution: Preliminary specs simply state that Surface Pro has a “Full HD” 10.6-inch display, which would suggest a display resolution of at least 1920 by 1200 pixels. That minimum spec would put it on a par with the best Android tablets from Asus and Acer, but those displays are half an inch smaller, so they have a higher pixel density. And none of the Android models compares with the 9.7-inch Apple iPad at 2048 by 1536 pixels. Like Surface RT, Surface Pro will also feature Microsoft’s ClearType (standard in Windows 8).
    surface screenPhysical specs: Surface Pro’s overall physical design is the same as Surface RT’s; but this model will be thicker, at 0.53 inch. Nonetheless, Surface Pro looks more stylish and snappy than current Windows 7 slates, and it’s thinner than many Ultrabooks. Surface Pro’s weight is estimated at 1.99 pounds, which is significantly lighter than the average 3- to 4-pound Ultrabook and comparable to current Windows 7 tablets.


    Productivity: Intel’s Core i5 is powerful enough to let you tinker in Photoshop, handle complex spreadsheets, or play games. Surface Pro won’t come with Microsoft’s Office apps, though. Still, with digital inking plus one of Microsoft’s keyboard cover options, Surface Pro could be the ultimate ultraportable. If you can make do with a 10.6-inch display, then you can benefit from Surface’s inherent flexibility.

  • How to Choose a New PC Case

    How to Choose a New PC Case

    We’ll show you how to find, buy, and build in a brand-new PC chassis.

    How To Find A PC Case

    If you aren’t a dedicated PC builder, the last thing you probably think about is your PC case. But there are a number of good reasons for moving to a new chassis: You might need space for more components; you might want more cooling; you might long for some fancy features such as clear side panels or glowing fans and lights; or you might be interested in upgrading your front-panel connectors to support the latest and greatest connection types.
    Whatever your reason for considering a new shell, we’ll walk you through the process of selecting one–and we’ll look at how to move the parts and pieces from your old case into your new case smoothly and efficiently.

    Choose a Suitable Case

    PC cases fall into three broad categories: Budget, Midrange, and High-End. But a relatively inexpensive case isn’t necessarily worse than an expensive one.
    Budget Bonanza

    Upgrade Your PC Case: Budget Case

    A typical budget case is inexpensive ($20 to $40), rectangular, and featureless. In other words, it’s a nondescript replacement case with few special features to help you fit more components into your rig, tidy up your cables, or installation your system’s current components easily.
    Budget cases tend to be plain, functional, and utterly ordinary.
    If you want the barest possible enclosure for your PC’s parts, have no interest in expanding your case’s features or available connections beyond what you currently have, or want to spend as little as possible on a new case, you go budget. You’ll get what you pay for with these models in this price range.
    Midrange Medley
    In this category, prices run from $75 to $200, and you’ll find considerable variation in design and construction.
    Midrange cases typically offer handy features such as soundproofing, cable channels for routing wires, and extra connection ports.

    Upgrade Your PC Case: Midrange case

    These cases may have (or lack) a number of features that suit your needs. The most important variable to consider is case dimensions, since you’ll want to know at the outset that your new chassis can hold all of your system’s components without difficulty. Problems may arise if, for example, you have an extralong video card that won’t fit into a case because of its internal layout. If you have multiple cables, liquid cooling tubes, or huge CPU coolers to accommodate, triple-check that your PC parts will fit comfortably within a prospective new case before buying it.
    Also, make sure that your new case can support all of your 3.5-inch and 5.25-inch devices. And don’t buy a three-bay case if your system uses a four-drive RAID array.
    In appraising the raw design of the case, consider whether its accouterments–such as a big door covering the front panel, lighting effects that you can’t turn on and off manually, or a manual cooling bar that falls out of the case whenever you pop off the side panel–contribute more nuisance than neatness.
    Will the case’s overall design be practical six months after you purchase it? If you buy a soundproof case in the winter, will your system be able to handle the hotter interior temperatures that occur during summertime? Keep the big picture in mind, and don’t let eye-catching details lead you astray.
    Here are some other important questions to ask: What kind of connections come built into the case’s front panel (or sides, depending on its design)? Does the case deliver true internal headers for its connections or just pass-through cables? Are the case’s USB ports upside-down? Is the case screwless? Does it come with fans preinstalled? How loud are they when you fire up a system? What other fan configurations could you mount?
    For liquid cooling enthusiasts, what size radiators does the case support? How easily could you mount one externally or internally? Does the case come with motherboard standoffs, or are they built into the motherboard tray? Can you remove the motherboard tray separately from the case? Can you install or tweak the backplane of a CPU cooler without having to remove the entire motherboard? What options does the case provide for managing the system’s cables?
    High-End Heaven

    Upgrade Your PC Case: High-End Case

    Once you break the $200 barrier, you have to deal with manufacturers who sometimes let their imaginations run wild, resulting in PC cases that may be flashier than they are functional. So don’t let an expensive case’s ingenious design blind you to potential shortcomings in its usefulness. A manufacturer may go to great lengths to craft a killer yet functional design for its unique chassis, or it may slap an outlandish design or a few gimmick features on a case that is unpleasant to work with.
    The Lian-Li PC-P80NB is an ATX full-tower case roomy enough to hold every component you could dream of.
    Cases at the high end of the spectrum may come with a ton of cooling, fan controllers, and other switchable features built directly into the chassis. Some may cover every inch of the inside surface with soundproof acoustic foam; others may come with water-cooling loops built into the chassis, like the Logisys CS8009BK. And finally, some cases may be expensive simply because they’re huge: The Lian-Li PC-P80NB, for example, can support 11 PCI devices and 10 hard drives, and comes with six preinstalled fans (five 14-centimeter fans, and one 12-centimeter fan). If that meets your PC building needs, buy it; otherwise, steer clear.
    Next: Transfer your PC’s components to the new case.

    Move Your PC Components From the Old Case to the New One

    The process of transferring components from one case to another is in some ways simpler than the process of selecting the new case. Start with the components that you can easily uninstall, move, and install without affecting any others.
    In a typical system build, I like to start by disconnecting all of the wires and power cables in my existing chassis so that I can get the rat’s nest out of the case before I try to remove individual components. Pull out the SATA cables and the power supply, and disconnect other wires inside the system. Then pop off your system’s side panels, remove your case’s front panel (if applicable), and remove your 5.25-inch optical drives. Depending on the design of your new case, you might be able to load these components into the new shell immediately–one reason I love tool-free case designs. Hard drives come next, and they merit the same treatment.
    Many tool-free cases let you slot your components into place without using screws or removable case fixtures.
    Next, remove your PCI devices, which might consist of a single discrete video card in some instances. Assuming that you aren’t running some fancy water-cooling setup, your old case should be empty of practically everything but the motherboard by now. Unscrew it and gently remove it from the case, gripping it by the edges.
    If your new case doesn’t come with motherboard standoffs, screw them in–and install your motherboard’s I/O shield–before attempting to install the motherboard itself.
    Once the motherboard is in place, I usually attach the system’s PCI devices, especially the video card; however, this approach may make for trickier access to SATA ports or other connectors, depending on the motherboard’s layout. On the other hand, waiting to install the video card can pose a bit of a challenge if the power cables on the power supply barely reach the top connectors on the motherboard.
    Try to route as many cables as possible behind the motherboard, to keep them from cluttering up your case interior and restricting airflow.
    Once all of your components are in place and you’re ready to start connecting cables, try to use your case’s built-in cable management options to maximum advantage. In most systems, the goal is to route as many cables as possible behind the motherboard (mashed up against the right side panel). For this purpose, cases that provide multiple routing holes around the motherboard tray or fasteners (for twist ties/Velcro strips/twine or the like) behind it can be immensely helpful. Minimizing clumps of cables in the middle of your PC will give the system better airflow.
    Next, examine your case layout and verify whether you need to install the power supply at this stage. I recommend waiting until the last possible moment to install your power supply, to avoid having to deal with a bunch of loose power cables. Unfortunately, some cases make it hard to install your power supply after the motherboard is in place, so plan accordingly. Once you’ve installed the power supply and finished connecting all of the system’s cables, you should be finished.
    Transferring components from one case to another isn’t especially difficult, even for computer newbies. For most people, the most time-consuming part of the operation involves cable management–unless you’re migrating a relatively tricky system build (such as one featuring a liquid cooling loop) to a case that may require some creative thinking to achieve the desired results.
    Don’t be afraid of cases. Buy one. Build a system in one. You’ll be amazed at the options that await your consideration–including plenty of builder-friendly features–on today’s market of well-priced, well-designed chassis.

  • RIM Unveils Its New 4G BlackBerry PlayBook Tablet

    RIM Unveils Its New 4G BlackBerry PlayBook Tablet

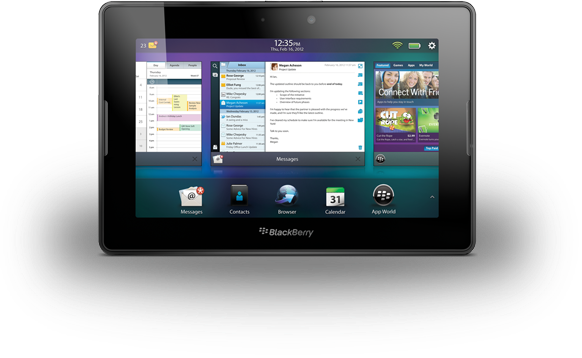
    Is this new PlayBook RIM’s last hurrah in the tablet competition? A new 4G BlackBerry PlayBook will go on sale next week, a year after Research In Motion introduced its first tablet. The updated 7-inch PlayBook will include 4G connectivity and 32GB of storage, but RIM has yet to name a price or a U.S. availability date.
    The first in line to get their hands on the new PlayBook will be Canadians from August 9, via carriers Bell, Rogers, and Telus. “In the coming months” RIM also expects cellular-data enabled versions of the PlayBook to reach the U.S., Europe, and other countries. But even with the Canadian availability date coming up so quickly, RIM still hasn’t said how much the new PlayBook would cost.
    If there’s no 4G LTE connectivity available in your area or carrier, RIM says the 4G LTE BlackBerry PlayBook tablet can automatically adjust to connect on a HSPA+ network.
    Otherwise, there’s very little changed hardware-wise between the original PlayBook and the 4G model. The tablet still has a 7-inch 1024-pixel by 600-pixel resolution display, dual HD video cameras, HDMI capability, and stereo speakers. The processor is bumped up to 1.5GHz from 1GHz in the Wi-Fi-only model, there’s still 1GB of RAM on board, and you only get one storage option: 32GB.

    One Last Chance?

    RIM’s 4G BlackBerry PlayBook TabletThe 4G LTE BlackBerry PlayBook tablet could be the make or break device for RIM. Due to key software omissions at launch, such as the lack of a native email client, the PlayBook suffered from lackluster sales. In fact, RIM had to take a $485 million hit last year because it was sitting on a huge inventory of unsold tablets.
    The arrival of much cheaper 7-inch tablets from the likes of Amazon did not help either, as they undercut the PlayBook by up to $300 (Amazon’s Kindle Fire is $199 while the PlayBook launched at $500, and then began to be heavily discounted).
    There’s still hope for Research In Motion though. After several delays, the anticipated BlackBerry PlayBook OS 2.0 will ship with the new tablet. All the features you would expect are now there, including email, calendar, contacts, and video chat. But given the lack of any substantial improvements to the tablet (for example the $200 Google Nexus 7 has a higher-resolution display), adding 4G connectivity to the PlayBook might still be too little, too late for RIM.

  • Put an Old Phone to Good Use–Make it a Lego NXT Telepresence Robot

    Put an Old Phone to Good Use–Make it a Lego NXT Telepresence Robot

    Aww, how cute. [Credit: Wolfgang Beer]Do you have an old Android phone stored away that you keep only for emergencies–or just aren’t sure what to do with it? You could breathe new life into the semi-retired handset by strapping it up to a Lego Mindstorms NXT set and turn it into a household security robot.
    Wolfgang Beer developed the telepresence robot as a way of monitoring his home while he was
    away. The robot cruises around the house and gathers images, and uses an HTC Magic phone connected to the NXT robot kit. The Android phone works as a controller for the robot, which can receive signals over the Internet and transmit the commands via Bluetooth to the NXT microcontroller.
    The actual robot part of the build is pretty straightforward–it’s made up of a few bricks that holds the phone and and battery in place.
    The robot picks up the commands through a small nanohttpd server, which also serves a HTML5 controls page. The controller page displays the on-board camera, and simple up, down, left, and right buttons for driving the robot.
    http://www.youtube.com/embed/-z-3-gJjvxE?feature=player_embedded
    Of course, while this is a good project to try out for yourself if you have an Android phone handy, it does require a fair bit of coding. Fortunately, Wolfgang has most of the code you will need available on his blog, or useful links to help.
    Still, this is one pretty cool way of seeing what the cat is up to while you’re gone, or, if the worst does happen, at least startle a burglar into leaving your property.  

  • Facebook Unveils New User-Generated Feature: Facebook Stories

    Facebook Unveils New User-Generated Feature: Facebook Stories

    The nearly 1 billion users (fewer, of course, if you don’t count all those bogus accounts) who use Facebook every day sure share a lot of stuff. However, a lot of it gets lost in the shuffle.
    Mayank Sharma used Facebook to rebuild memories lost due to contracting meningitis.Not anymore thanks to a new feature called Facebook Stories.
    The new site launched Thursday, and aims to showcase how Facebookers use the site in compelling ways. Each month features a different theme–the theme for August is “Remembering.”
    This month’s feature tells the story of 27-year-old Mayank Sharma, from New Delhi, India, who lost his memory after contracting a rare form of meningitis. Sharma used Facebook to rebuild the memories he had lost due to contracting the disease. He credits Facebook with helping him “rebuild” his life.
    While Sharma’s story is an extreme case, it shows the type of stories Facebook is looking for.

    What Facebook Looks For

    Other showcased features include a group of residents in Guelph, Ontario using civic pride and the town’s collective memory to save an important local building, a selection of books to read, musical playlists courtesy of Spotify, and selected articles from the New Yorker Magazine.
    Facebook says the books, playlists and New Yorker features will be updated on a monthly basis.
    Highlights on Facebook Stories
    Another monthly feature is the Infographic, which is updated each month to match the theme. This month’s edition looks at what we share most. According to Facebook, the most common story shared on the timeline is on travel, which makes up 42% of such stories.
    That was followed by stories on moves, posted 18 percent of the time, and the ever-popular relationship change, which appeared 10 percent of the time.
    These first stories were handpicked by Facebook, but future editions will include submissions from users. Those who think they might have an interesting story to share with the world via Facebook Stories can submit theirs through an online form.

  • Avoid Facebook Disasters

    Avoid Facebook Disasters

    Ignoring Facebook’s privacy options can trip up users in a number of ways.   Avoiding Facebook and Twitter Disasters

    Take some practical steps to control what others see about you on Facebook and Twitter.Ignoring Facebook’s privacy options–some of them fairly new and not well known–can trip up the social-networking site’s users in a number of ways. Here are some that everyone who has a Facebook account should be aware of.

    Oversharing With the Boss

    The disaster:Ann played hooky from work, calling in sick, and spent the day sunbathing, updating her Facebook status on her laptop all the while. The next day, her boss confronted her with the evidence that she wasn’t really ill, causing severe embarrassment and a reprimand (plus a day of docked pay).
    The solution: In this day and age, professional and personal lives often be­­come intertwined, and Facebook can be ground zero for this. You might momentarily forget that you have “friended” your boss, and that he has the same access to your ramblings on Facebook as do your real-life drinking buddies. But you can change that.

    Using Facebook’s Lists settings might have made the most sense for Ann. Lists, one of the newer features of Facebook, allow you to organize people into groups and then assign each group different levels of access to your information on Facebook.

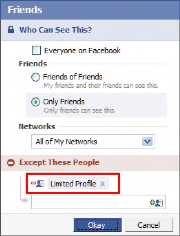
    Facebook's 'Limited Profile' option: Click for full-size image.

    ‘Limited Profile’ is a default group for less-wanted contacts, but you’ll see need to specify what rights those who are in it should have.Lists let you set who can see what on your profile. For example, if you’ve added someone as a friend but aren’t sure about them, you can relegate them to a list that you name “Limited Profile,” which will limit how much of your profile that person may view and interact with. You can also create lists for work, school, special projects, or anything else, but by default the lists don’t change how your profile displays.
    To work with Lists, click the Friends button (top bar) and +Create in the left column under Lists-or just put people on any list by using the ‘Add to list’ drop-down menu next to their name.
    Next, you need to specify how much of your information on Facebook members of each list can see. To do this, visit the Privacy Settings page (hover over ‘Settings’ in the top right of the screen, and click Privacy Settings inside the box that pops up; or go to www.facebook.com/privacy), then select Profile. Here, select Customize…from the drop-down menu next to whichever section you’d like, and type the name of the list in the box under ‘Except These People’. For Ann, dropping her workmates into a “work” list and dialing down that group’s access to the bare minimum would have saved her a lot of trouble. Specifically, she should change the ‘Status and Links’ setting so as to exclude the Limited Profile list. (Note, however, that updates to your profile from third-party applications are generally not blocked by these privacy settings.)
    UPDATE (4PM 6/24): With Facebook’s just-announced status publisher upgrade (now in beta), you will (or will soon) see an option (a gray lock with a dropdown menu) letting you control who sees these updates on an individual basis. For broad posts, “Everyone” will let the whole world (including Google and other off-Facebook locations) see the update. For more sensitive posts you can change the setting to “Friends” – or use fine-grained control through “Custom,” restricting the post to be visible only to certain friend lists.

    He Knows Where You Live

    The disaster:Getting far away from ex-boyfriend Bob wasn’t the main reason Mary moved to Pittsburgh, but it was one of the main benefits. So when Bob showed up at her new job, she was naturally disturbed. How did he find out where she was, she asked. “It was on your Facebook profile,” he replied.
    The solution: All users have extremely fine-grained control over what gets on their Facebook page, but few take full advantage of these features.
    The entry to all Facebook privacy settings is on this page. But thoroughly exploring all four of its subpages can take hours. (In this article, we’ll point you to some of the most important settings.)The controls are found in the Privacy Settings page under ‘Profile’, reachable as outlined above. Here you’ll find a list of ten items on your profile that you can turn on or off, each to a different group of Facebook users.
    ‘Profile’ lets you choose whether to block people from seeing anything beyond the most basic information (name and network) on your profile page, while ‘Basic Info’ allows viewing of gender, birthday, relationship status, and the like. ‘Personal Info’ opens the door a little wider-to your “about me” section, interests and favorites, and so on; ‘Status and Links’ controls who can see your latest status update. Most of the categories are self-explanatory (just click the question-mark icon if you need help) and can get pretty detailed. But this is also an advantage: If, like Mary, you don’t want to advertise where you work, you can turn off that detail here.
    Also, click Save Changes at the bottom of any Facebook settings screen, or your settings will not be updated.
    What should you change these settings to, then? Facebook offers numerous choices for each category: Everyone, My Networks and Friends, Friends of Friends, Only Friends, and Customize. Everyone is self-explanatory; My Networks and Friends is less inclusive, limiting profile viewing to anyone you’re friends with or with whom you share a network; Friends of Friends essentially gives you two degrees of openness instead of one; and Only Friends is exactly how it sounds.
    The Profile settings under Privacy allow you to control which Facebook users can see your profile and which ones cannot.The Customize option gives you complete command over your network settings: You can limit viewing of your profile to certain networks and, in some cases, subsets of that network. Current students, for example, can prohibit faculty or other undergrads from viewing their profile. How much to lock things down is up to you. In Mary’s case, making her Profile visible to ‘Only Friends’ would have prevented an unpleasant surprise visit.

    The Stalker Problem

    The disaster:Jessica is worried about the creepy messages and Wall posts being left by some guy she doesn’t know but whose friend request she accepted. She doesn’t want to delete her account, but she does wish to get rid of the stranger and set her profile to be discovered only by those people she allows.
    Illustration by Mick Wiggins The solution:First, Jessica should add the possible stalker to a Limited Profile list, as outlined earlier. If you have a hostile stalker, you can remove and/or block them: Go to the person’s profile page and then click the Remove from Friends option at the bottom of the left column.
    If the person persists in friend re­­quests, you can block the stalker altogether by going to the Privacy page and typing their name in the search box in the ‘Block People’ region. Standard Facebook-style search results will pop up; just click Block Person next to their name, and they won’t find you in a search, or view any part of your profile.
    For a stronger level of privacy and se­­curity, you can temporarily “go dark” by making your profile virtually invisible. Go to the Privacy settings page and click Search. Set the Search Visibility drop-down selection to Only Friends. This tells Facebook not to show your profile in public searches on the site.
    The Search Result Content section lets you choose whether to show photos or lists of friends and links. If you don’t want to be contacted at all, re­­move the check marks by both options.
    You can also use the Public Search Listing op­­tion to allow or prevent your profile from appearing in major search engine results such as those of Google.

  • Avoid Twitter Disasters

    Avoid Twitter Disasters

    As a social networking tool, Twitter is even more open than Facebook–which is all the more reason to employ what safeguards you can on its network.   Avoiding Facebook and Twitter Disasters

    Take some practical steps to control what others see about you on Facebook and Twitter. The use, and uses, of Twitter seems to grow daily. Its role as a source of news on Iranduring that country’s current unrest has been widely reported, for example. For most people, however, Twitter is simply a convenient social networking tool, but as such, it is even more open than Facebook–which is all the more reason to employ what safeguards you can on its network. (Note: This article doesn’t cover such issues as the growing problem of spam on Twitter or reports of its use in phishing-like attacks.)
    At the end of this article, we’ll also offer a brief guide to Twitter commands.

    Twitter Never Forgets

    The disaster:Nelson knows everyone who follows his Twitter feed and didn’t think much about trashing a coworker on the service. Months later, long after he’d forgotten about it, the coworker began to follow his tweets–and, with a little digging, found Nelson’s insult, creating an awkward office environment.
    On Twitter, check the ‘Protect my updates’ box (highlighted above) to prevent your future tweets from being seen by anyone not approved as a follower. (Old tweets will still be accessible.) The solution:Unlike Facebook, Twitter has no mechanism for ap­­proving who follows you on the service, and anyone can read your full tweeting history. That is, unless you protect your updates: Click Settings and check the Protect my updatesbox. Your tweets now won’t be visible to anyone not approved as a follower. However, anything you’ve al­­ready sent out will stick around, especially on third-party Twitter interfaces.

    Locking Out the Twitter Twits

    The disaster:Vicky regularly tweets (nastily) about a former friend, and naturally doesn’t want that person to follow her on Twitter. How does she keep that person out before it becomes an issue?
    Illustration by Mick Wiggins The solution:First, your account must be marked as ‘Protected’, as described in the preceding item. Then, assuming you know the person’s user name, simply block that user on Twitter. This op­­tion is on the profile page, in the ‘Ac­­tions’ section. It removes you from their Following list and prevents your updates from showing up on their page and from adding you to their Following list again. But your current friends can still copy and paste your tweets, or save them through screen captures.
    The real lesson: It’s probably best not to bash anybody on Twitter if you’re afraid they’ll find out about it.

    Linking Twitter With Facebook Can Be Trouble

    The disaster:Dan thought he was being a good Web citizen and killing two birds with one stone by linking his Twitter account to his Facebook profile (visit apps.facebook.com/twitterto set it up for yourself–but finish reading this item first). The idea is sound enough: Update your Twitter status, and your Facebook status updates along with it, automatically. However, a Facebook connection isn’t always a good idea. If you’re live–tweeting, say, a sports event or a conference, you might post 20 tweets or more in an hour. That may fly on the rapid-fire Twitter, but on Facebook it’s over the line since it clogs up your friends’ news feeds.
    The solution: In Dan’s case, a Twitter/Facebook link may not be appropriate, and he may be better off simply unlinking the two networks.
    The best way to unlink is to browse to Facebook, click the Applications button on the bottom-left corner, and then select Applications. Find Twitter on this page and click the X to delete the app from your Facebook profile. (If you use a third-party application like TweetDeck to access Twitter, you’ll have to unlink your profile through that app.)

    Be Careful What You Link To

    The disaster:In one of his daily tweets, David linked to an article expressing a strong view on a controversial issue. Before he knew it, David was being bombarded with tweets rebutting the article. David found many of these statements to be factually lacking, but still felt compelled to counter them in tweets of his own. Hours passed. Soon the afternoon was lost, and David was left frustrated by the challenge of making cogent arguments in 140 characters or less (Twitter’s limit).
    The solution:David didn’t want to ‘Protect’ his tweets because he believed that the openness and public nature of the service are central to the Twitter concept. David should have considered that this openness means people he knows nothing about can see his tweets and the things he links to.
    Second, when it became clear that David had become involved in a protracted debate with another Twitter user who wasn’t making much sense, he should have blocked that user by going to the person’s profile and clicking Block next to the person’s user name. Problem solved. Afternoon saved.

    The Story of ‘Cisco Fatty’

    The disaster: Unlike the hypothetical examples in this story, this one is true (see ciscofatty.com). Connor was offered a job at Cisco, the big networking company. While weighing her op­­tions, she idly tweeted to her followers that she now had to decide whether the “fatty paycheck” she’d draw from Cisco would justify her “hating the work.” Problem is, a Cisco employee saw the tweet and called her out on it, prompting an outpouring of scorn from the Twitter community, as well as a lot of embarrassment for poor Connor.
    The solution: Connor obviously should have protected her Twitter account via the ‘Protect my updates’ check box, as described in “Twitter Never Forgets,” above.
    But here’s the larger lesson: Many people keep tabs on Twitter using filtered keywords, especially company names–and the use of the term “Cisco” in her tweet was what killed Connor’s job prospects. A better ap­­proach would have been to leave the company anonymous, or–better yet–not to tweet about her job offer at all.

    Twitter Commands Reference Guide

    Here’s a guide on how to use and understand Twitter’s special commands.
    @username The basic building block of conversations, for public replies to a tweet by the user noted after the @ sign.
    D username For a “Direct message” to only the user in question. “DM” also works.
    RT @username For “Re-Tweet,” or a tweet you want to rebroadcast. Prefaced with the original twitterer’s user name.
    The following commands ask Twitter for information or tell it how to behave:
    ON username or OFF usernameTurns mobile phone notifications on or off for a single user. STOP and QUIT will cut off all Twitter SMS messages for all users. Only cell phone notifications are affected.
    FOLLOW username and LEAVE usernameTo see-or stop seeing-the tweets of a user. Twitter displays a drop-down message saying it has carried out your command. However, to truly take them off your list, go to their Twitter profile and click Remove next to ‘You follow username’.
    WHOIS username Pops up a brief amount of information about the user.
    GET username Retrieves a particular user’s most recent tweet.
    STATS Tells you how many followers you have and how many are following you.

  • Google Adds Site-Filtering Feature to Search  Google Search: Block Sites

    Google Adds Site-Filtering Feature to Search Google Search: Block Sites

    Google Search: Block Sites

    Ever wish you could keep certain sites from showing up in your Google search results? Thanks to a new feature being rolled out right now, you can. Google announced the debut of a site-blocking search tool via its official company blog on Thursday. The tool is simple to use: When you click on a site in a Google search and then go back to Google — presumably because you weren’t satisfied with what you found — you’ll see a new option on the results page to block the site from future searches. All you have to do is click it, and the site will never show up for you again.
    Your search site-blocking preferences are saved in your Google account, so you’ll have to be logged in for the feature to work.

    Google Search Results: Block Sites
    And don’t worry: Your search-blocking changes aren’t set in stone. Anytime a site is omitted from a search because of your blocking, Google will display a small message letting you know something’s been removed. You’ll have an option to unmask the hidden results, if you’re so inclined. You can also manage your virtual blacklist via your Google search settings.
    The Google search-blocking feature will become available to everyone over the next few days. As of now, it’ll function only in English and only for users on Chrome 9 or higher, Internet Explorer 8 or higher, and Firefox 3.5 or higher.

    Google Search Filtering: The Bigger Picture

    If this whole thing has you feeling a sense of déjà vu, don’t worry: You aren’t losing your mind. Google announced a similar search-filtering feature about a month ago in the form of an extension for the Chrome browser. The extension did almost the same exact thing as this new feature, except for the fact that it worked on the browser-level instead of on Google’s own servers.
    It’s all part of Google’s steady efforts to combat the presence of search spam — a fancy term for low-quality entries that show up in search results. Google has increasingly come under fire for search spam in recent weeks, with some bloggers and pundits saying the company’s level of search-result junk is spiraling out of control. The concerns revolve largely around so-called “content farms,” or sites that generate lots of pages with little real value. Many of these sites monitor popular search queries and create pages for the sole purpose of attracting traffic, even though they have no original or relevant content to offer.
    Google also recently adjusted its search algorithm to try to keep those sites from cluttering up results. The change, announced in late February, is designed to reduce rankings for low-quality sites and give higher rankings to sites with more original and in-depth material.

  • Hands on with Google Handwrite, Google’s new search feature

    Hands on with Google Handwrite, Google’s new search feature

    Newton fans, rejoice: If you like writing your queries on a screen rather than typing them on a virtual keyboard, Google’s new project, Handwrite, should awe and delight.

    Announced on Google’s blog Thursday morning, the company’s new beta project aims to make it easier to search, no matter where you are or what you’re doing. Handwrite allows you to block print or handwrite letters, words, and punctuation on the screen, where it will be instantly analyzed and converted into a search term.
    The feature is pretty simple to turn on: On an iPhone, scroll down to the Settings link on Google.com (on an iPad, click Search Settings from the Gear icon), enable Handwrite mode, then return to Google.com. Tap the new button in the lower right corner—it resembles a cursive lower-case g—to turn Handwrite on, and just start scribbling.

    On an iPhone or iPod touch, I found Handwrite a little finicky due to the small screen. (See my hands-on video, below.) The service will intelligently try to guess at your letters and words, though, so if you only write “dowag” before you run out of room, you can continue with “er” and it will put the letters together to make “dowager”—and suggest you might be looking for the Dowager Countess from Downton Abbey, at that.http://www.youtube.com/embed/iwZOhhul0YU?feature=player_embedded
    On an iPad, using Handwrite is a dream, especially if you use a stylus. There’s no worry of real estate crunch, and you have much more freedom in forming your letters.
    Unfortunately, I found that Google’s recognition engine was much poorer at analyzing cursive lettering than it was at block printing. I’m not sure whether that has to do with my own messy style of cursive or the engine itself, but I often found it dropping letters (it didn’t know what to do with a lower-case s or r) or misunderstanding words entirely. Luckily, Google’s search engine is good enough to more or less pick up the slack (turning “teasures” to “treasures,” for example), but it’s still a little annoying.
    For a beta feature, though, Handwrite is great fun, and something I could actually see myself using pretty often. My handwriting’s slow—but not as slow as my virtual keyboard touch-typing.
    Post Credit:
    For more Macintosh computing news, visit Macworld. Story copyright © 2011 Mac Publishing LLC. All rights reserved.