Tag: windows

  • How to Install Third-Party Windows 8 Themes

    How to Install Third-Party Windows 8 Themes

    When it is down to the customization of your Windows PC, it goes beyond the changing of icons and wallpaper. Windows 8, 7, XP and those before them, allows you to install custom themes of your preference, however, due to the fact that most of the themes developed by third-parties developers may contain malwares which are harmful to your PC; Microsoft has disallowed the ability to install themes from third-parties developer, hence, this tutorial.

    With this tutorial, you will be able to install any third-party theme on Windows 8 PC, however, it is essential to only install themes from trusted websites and developers (Check out 25 best themes for Windows 8 from trusted developers).

    Image

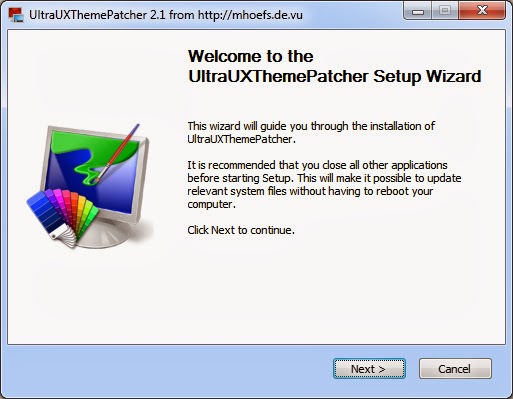
    Among our numerous contenders, Ultra UXTheme Patcher stands out as the best Windows 8 Themes application program. All you have to do is install it on your system and it will automatically modify the required items.

    Once you have installed the program you can then use any custom Windows 8 themes on your PC . Just download any custom windows 8 themes  and copy it over to this directory in your windows PC:

    C:WindowsResourcesThemes

    Note: Some themes might require a few additional instructions to install . Check the description of the themes  for any addition instructions .

  • Windows 8.1 Ready for Release

    Windows 8.1 Ready for Release

    On Tuesday, Microsoft announced that Windows 8.1 has reached its final “Release to manufacturing” stage and has, well, been released to manufacturers for inclusion in the annual blitz of holiday hardware. News of Windows 8.1’s RTM status first broke this weekend. What does this mean for you? Nothing, yet. While manufacturers have their paws on the final version of Windows 8.1 today, the free update won’t appear in the Windows Store until October 17, with boxed discs and third-party hardware appearing on physical store shelves the day after.

    Curious computer users do have a way to scratch their Windows 8.1 itch, however. A preview version of Windows 8.1 is still available for download, complete with new apps, new features, numerous new highlights, and yes, even a plethora of new (and killer) hidden secrets. One of those hidden features comes in especially handy for traditional PC lovers: The ability to boot directly to the desktop.

    Think hard before you install the Windows 8.1 preview, though. If you opt for the preview available in the Windows Store, your apps—though not your personal data—will be wiped when you install the final build in October. Since that’s just a couple of months away, you’d probably be better off grabbing the ISO files of Windows 8.1 that Microsoft has made available and running it in a virtual machine, instead. Microsoft deserves big props for delivering an RTM version of the Windows 8.1 update just 10 scant months after the official release of Windows 8.1, especially when you considerjust how expansive the update is. Windows 8 was and is far from perfect—and its mixed reception might have even cost Microsoft CEO Steve Ballmer his job—but the company’sshift towards rapid-fire releases is already paying off. Article Source: pcword.com

  • Download Windows Repair 1.5.3 “great freeware for fixing windows registry error”

    Download Windows Repair 1.5.3 “great freeware for fixing windows registry error”

    This great windows software works with all recent windows version both X86 & x64 bit in a “nutshell”
    Windows Repair is an all-in-one repair tool to help fix a large
    majority of known Windows problems including registry errors and file
    permissions as well as issues with Internet Explorer, Windows Update, Windows
    Firewall and more. Malware and installed programs can modify your default settings.
    With Windows Repair you can restore Windows original settings.
    Windows Repair can do the following:
    Reset Registry Permissions
    Reset File Permissions
    Register System Files
    Repair WMI
    Repair Windows Firewall
    Repair Internet Explorer
    Repair MDAC & MS Jet
    Repair Hosts File
    Remove Policies Set By Infections
    Repair Icons
    Repair Winsock & DNS Cache
    Remove Temp Files
    Repair Proxy Settings
    Unhide Non System Files
    Repair Windows Updates
    Repair CD/DVD Missing/Not Working
    and more…
    Windows Repair:
    When you first run the program you will be introduced to 4 steps before the
    repair options. These steps are highly recommend to do before attempting any
    repairs.
    Step 1. Clean Your System Of Infections.
    Trying to fix a system that is currently infected is obviously a very bad idea
    and can make things worse. An infection can hijack a machine and keep part of
    the repairs from running correctly. Since only part of a repair will work the
    other part that failed could end up causing problems. Rule of thumb before
    working on a system is to make sure it is clean. Even if you think your system
    is clean doing a scan before hand is a good idea.
    Step 2. Check File System
    Doing a check disk on the hard drive is a good idea. This will have Windows
    check the file system on the drive fixing any problem it finds. Corrupt files
    can break a lot of things, including the repairs. So making sure the file system
    is good is a must.
    Step 3. System File Check (SFC)
    The built in Windows system file checker is a tool that checks that the Windows
    files are intact, the correct versions and not corrupted. This is a good idea to
    do before doing repairs as if a file is corrupt and we try a repair that needs
    that file then the repair will fail.
    Step 4. System Restore
    Doing a system restore point is a great idea to do before doing any repairs. If
    any unforeseen problems happen after any repair than a system restore can put
    the system back to the way it was before the repairs. This is highly
    recommended.
    Start Repairs
    In this final step you can choose between 3 modes.
    Basic Mode: This will run only the most basic, safe repair options. Extra
    advanced repairs are disabled.
    Advanced Mode: Runs more advanced repairs while leaving a few disabled.
    Custom Mode: Every repair is available. The program will remember your repair
    choices the next time you choose custom mode.
    Download Windows Repair 1.5.3 from this link

  • How to activate Windows Defender in Windows 8

    How to activate Windows Defender in Windows 8

    Like every new Windows release, Windows 8 is more secure than the operating systems that came before it. That’s due in large part to three major enhancements: An increased emphasis on UEFI Secure Boot optimizations, the extension of the SmartScreen Filter across the operating system, and the default inclusion of a more robust version of Windows Defender, which now protects against all kinds of malware—not just spyware.
    Windows Defender’s increased scope doesn’t sit well with computer manufacturers, however. OEMs make beaucoup bucks by installing those trial versions of McAfee, Norton and other security suites you’ll find bundled on boxed PCs. Windows Defender’s default installation threatens that gravy train.

    Microsoft tossed its partners a bone by allowing OEMs to deactivate Windows Defender in order to ship boxed PCs with alternative security solutions installed. That’s all well and good from a “variety is the spice of life” perspective, but one side-effect that isn’t so hot is what happens when you fail to register that third-party security software: Windows 8 doesn’t automatically reactivate Windows Defender by default. In other words, your pretty new prepackaged PC is wide open and vulnerable to all the nasties of the ‘Net.
    Fortunately, activating Windows Defender is a snap. Here’s how to do it.

    Activate Windows Defender in Windows 8

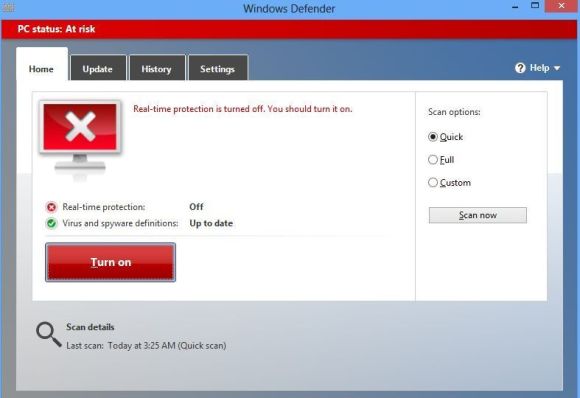
    Windows Defender isn’t subtle about being deactivated.

    First, head to the modern-style Start screen and type “Windows Defender” to have Windows search for the program, then click on the Windows Defender icon when it appears in the results. A Windows Defender window will appear on the classic desktop. If Microsoft’s security software is disabled, you’ll seen a lot of scary red tones alongside an “At risk” warning and an image of a computer screen with a big X on it. Subtle, eh?
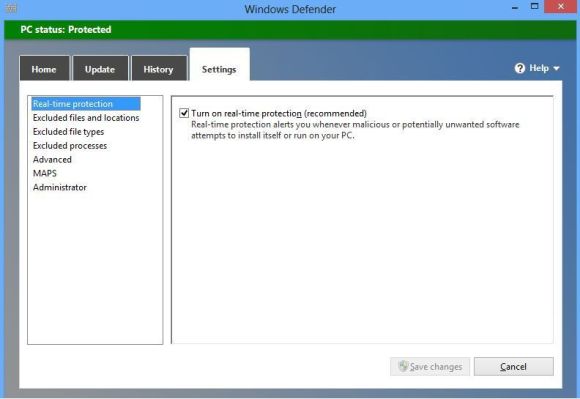
    Next, click on the Settings tab at the top of the window. Make sure “Real-time protection” is selected in the left pane, then check the box next to “Turn on real-time protection (recommended).” Finally, click Save Changes at the bottom of the Window.

    How you want your Settings tab to look!

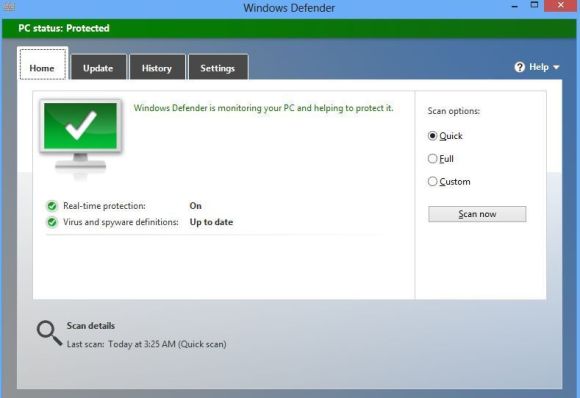
    You’ll know it worked when the terrifying red “At risk” bar at the top of the Windows turns a much more soothing shade of green and switches to “PC Status: Protected.”

    Check for leaks

    You’re not quite done yet. Now it’s time to make sure your PC is actually malware-free! Click the Update tab, then click on the big Update button in the middle of the Window to download the latest malware definitions Microsoft has on file.
    Next, open the Home tab and select the “Full” radio button in the Scan Options list. All you have to do now is click Scan Now, then sit back and wait while Windows Defender checks the nooks and crannies of your PC for any hidden baddies. Grab a cup of coffee; it may take some time. While you’re waiting, we recommend checking out your Windows 8 antivirus options.

    Ah, you have seen it right?.
  • What if Windows 8 flops?

    What if Windows 8 flops?

    What if windows eight doesn’t meet our expectations?


    Microsoft launches Windows 8 later this month after a year of gradually making the new operating system more and more available, hoping for a big hit that will drive sales this holiday season and beyond, and giving the company new hope of grabbing a bigger share of tablet sales.
    But what if Windows 8 flops?
    For businesses, the problem won’t be that dire, says Paul DeGroot, principal consultant at Pica Communications. Businesses that are Microsoft shops already have an operating system, likely Windows 7, but if not, Windows XP with a plan to adopt Windows 7 soon before support for XP ends next spring.

    If Windows 8 is a complete bust, enterprises can stick with Windows 7 and wait until Microsoft picks itself up and does a better job with Windows 8 service packs or Windows 9 (or whatever it calls the next major release), he says. After all that’s what happened with Windows Vista, says Matthew Casey, an analyst with Technology Business Research, and Microsoft can handle a disappointing Windows 8.
    In fact that is a likely scenario, DeGroot says. “Most of the companies I work with are standardising on Windows 7. They are not going to be migrating to Windows 8.” He says many businesses will license Windows 8 but end up reimaging their networks with Windows 7, similar to how many enterprises licensed Vista but installed XP.
    Casey says a Microsoft stumble with Windows 8 will be handled by businesses the same way the performance of Windows Vista was handled. “If that’s the case we’ll see a similar reaction from Microsoft,” he says “It’s not going to be them closing their doors.” The company will press on with Windows 8 and its fundamental architecture.
    The impact on consumers won’t be that great, either. If Windows 8 doesn’t catch on a big part of the reason will be that consumers are buying some other tablet platform they like better, so they’ll be happy. But according to Gartner, Microsoft will be missing a big opportunity to make its mark in mobile devices if the Windows 8 gamble doesn’t pay off.
    “It is a risk that Microsoft must take to stay relevant in a world where mobile devices with new modern experiences are becoming the norm,” Gartner says in a research note “Is Windows 8 in Your Future?”
    The popularity of smartphones and tablets has Microsoft playing catch up, particularly with Apple, whose iPad dominates in tablets and whose iPhone holds down big large chunk of smartphones. “With Windows 8, Microsoft tries to address the excitement of the tablet market by adding a tablet interface to Windows,” Gartner says.
    If Windows 8 does become popular with consumers and finds its way into enterprises via the bring-your-own-device phenomenon it will still have hurdles to clear with IT departments.
    Ultrabooks and tablets still need to establish themselves in the corporate world where their use raises questions, Casey says. Who will pay for them? How will they be secured? “These are pieces that need to fall into place in the enterprise planning cycle,” he says.
    It’s also questionable whether they will gain traction as platforms for business applications, DeGroot says. “I think that is going to be a very tough sell,” DeGroot says, because the apps have to be vetted by the Microsoft Store before they will be allowed on closed Windows 8 devices. Businesses won’t want to leap that hurdle nor will they want to side-load apps on devices to get around the restriction that Windows 8 apps must be reviewed by and sold through the store. “I have some difficulty imagining many organizations are going to want to do that.”
    Beyond that, developers are not prepared to write for Windows 8; their training and experience leans toward traditional enterprise applications for conventional desktops without touch capabilities, DeGroot says. Touchscreen can actually be a barrier.
    With Windows 8 Microsoft is overhauling the underpinnings of its operating system with the introduction of Windows Runtime, a new architecture that gives a common footing to applications across a range of devices. Such applications can support both x86 and ARM hardware, potentially opening up the possibility of writing apps once that can run on any device. Microsoft hopes it can write its next major chapter with Windows 8 and Windows Runtime, Gartner says, and that is what makes a Windows 8 success – and avoiding a flop – so important. Windows 8 is simply the biggest turning point for Microsoft in decades.
    “Windows 8 is not your normal low- or even high-impact major release of the OS,” the research firm says. “We believe it’s the start of a new era for Microsoft, the Windows RT era, which follows the Windows NT era that began in 1993 and is just starting to wane.”

  • Windows Server 2012 embraces the data center

    Windows Server 2012 embraces the data center

    Microsoft has taken its server OS a giant step forward with Tuesday’s release of Windows Server 2012, making this version the first that can be controlled remotely so it is more suitable for data centers.“Microsoft has delivered on the promise of an operating system that can be completely managed from the command line,” said Don Jones, an author of a series of Windows 2012 instructional videos that have been released by the training firm CBT Nuggets. “The technologies are in place to manage 100 servers as easily as you can manage one server.”
    The first major upgrade since 2009 features a bevy of new features, most designed to make it more suitable for large-scale data-center deployments. Satya Nadella, Microsoft president for Server and Tools, has touted this release as Microsoft’s “Cloud OS.”
    Microsoft’s Hyper-V virtualization can now support up to 64 virtual processors and 1TB of memory for guests, a marked improvement from the old limit of four virtual processors and 64GB of memory. The Server Message Block (SMB) network communication protocol has been updated to handle faster data transfers and the OS’s Server Manager has been updated to handle multiple servers at once.
    But perhaps the most significant enhancement is one that may not be noticed among these flashy new features. Thanks to the inclusion of the PowerShell, first introduced six years ago, this will be the first version of Windows Server that can be completely controlled through the command line, making it controllable remotely.

    PowerShell provides the Windows similar capabilities that chief competitor Unix has long offered, such as the ability to forward, or pipe, the output of one process to the input of another process. It even adds a few new tricks, such as the ability to handle software objects, which have come about from studying Unix’s limitations. “It is an incredibly well-designed shell,” Jones said.
    Of course, the GUI is still available for those who require it, but “you can remove the GUI and it will be a fully functional server,” Jones said. Doing away with the need for a GUI (graphical user interface) means that servers can be managed more efficiently in multiple numbers, Jones said. “If you are still using management techniques where you are still physically touching the server, you need to move to the 21st century and managing it like a server in a data center.”
    For instance, an administrator may now have to execute a routine task on a server once a week — such as backing up data — by clicking through a series of options on a graphical program. With the command line, the administrator can write a script in PowerShell to run though all of those steps automatically and that script can run against multiple machines.
    PowerShell may require some studied learning for those used to GUIs, but it is time well invested, Jones said, adding that his videos were designed to help give users an introduction to the technology. In addition to PowerShell, Windows Server 2012 also features a data-center-friendly installation method called Server Core, which provides a way to install the OS over the network.
    One hardware partner, Dell, has wasted no time in updating its line of servers to run Windows Server 2012. The company designed its PowerEdge 12th generation (12G) servers around Windows Server 2012. The new blade, rack and tower servers run Intel Xeon E5-2600 processors and feature extreme memory density, hot-swappable hard drives and solid state drives, and a range of advanced features to support networking.
    Microsoft “engineered the Windows Server 2012 for the private cloud. Our part of the equation is to deliver hardware and systems that are enabled for virtualization,” said Brian Payne, executive director of Dell PowerEdge servers. The 12G was designed to host the many multiple virtual machines that Hyper-V can host, he noted. Dell also designed software to take advantage of Windows Server 2012’s ODX (Offload Data Transfer) protocol, which allows data to be moved among different server nodes without the need of the server CPU.

  • Windows 8 Leaked in Final Form

    Windows 8 Leaked in Final Form

    A final copy of Windows 8 leaked to the Internet on Thursday, just a day after Microsoft stamped the new operating system as finished.
    Identified as Windows 8 Enterprise N — the “N” marks it as aimed at European users — on several BitTorrent file-sharing websites, it was unclear yesterday whether the leaked build was legitimate.
    Although some who downloaded the leaked copy asserted it was an invalid build, the consensus early Friday was that it was the real deal.
    “Legitimate. It works. Looks real,” said one commenter on a popular file-sharing site. Numerous downloaders posted screenshots to back up their contention that the leak was the actual Windows 8.
    Others vouched for it as well, including “Canouna,” the nickname used by an administrator of the WinLeaked forum.

    The copy is an English-language version, but according to the file-sharing sites is non-booting, meaning pirates must create installation media. Instructions for generating a DVD- or USB flash drive-based installer were posted on some of the file-sharing websites, and available elsewhere on the Internet.
    Microsoft’s N editions omit Windows Media Player, and are distributed throughout most of Europe as part of the mandate by European Union antitrust regulators after a 2004 decision that concluded Microsoft’s bundling of the player program was anti-competitive.

    Prerelease with Precedent

    Leaks of upcoming Windows releases are not uncommon. In the run-up to Windows 7’s launch three years ago, pirated copies appeared regularly, from the October 2008 leak of an “alpha” version Microsoft meant only for developers to Windows 7 Release Candidate, which went public about two weeks before Microsoft officially launched the preview.
    The company has avoided much of that with Windows 8, although a Chinese edition of the operating system made it to the Internet three days before Microsoft shipped the Release Candidate, the final public preview, in late May.
    Previously, Microsoft has warned users not to install leaked builds, claiming that they can be infected with malware.
    Some customers can obtain a non-pirated copy of Windows 8 as soon as August 15, when the RTM, or “release to manufacturing” milestone — the same code as will be installed on new PCs — reaches the MSDN (Microsoft Developers Network) and TechNet services.
    Enterprises with Software Assurance licensing plans — Software Assurance is essentially an annuity that gives companies the right to run any version of a product — will be able to grab Windows 8 starting August 16, as will members of the Microsoft Partner Network.
    Windows 8 will launch October 26, with two editions in retail — Windows 8 and Windows 8 Pro — and another, the Enterprise edition that leaked yesterday, targeting corporations with volume licensing agreements.
    Credit:
    For more enterprise computing news, visit Computerworld. Story copyright © 2011 Computerworld Inc. All rights reserved.  

  • How to install Windows 7 on your Mac: The Complete Walkthrough

    How to install Windows 7 on your Mac: The Complete Walkthrough

    How to install Windows 7 on your Mac: The Complete Walkthrough
    Using Boot Camp to install Windows 7 on your Mac: The Complete Walkthrough

    Somewhat similar to the Using Boot Camp to install Vista on your Mac walkthrough, this tutorial will take you every step of the way through installing Microsoft Windows 7 on your Intel Mac (running 10.5 or later), using Boot Camp. 
    Note: if you’d rather not dual boot OS X and Windows 7, you can always install Windows 7 in a virtual environment using Parallels Desktop 6.0 for Mac.

    To install Windows 7 on your Mac using Boot Camp you will need the following:

        All firmware updates installed on your Mac (use Apple Button -> Software Update… to check)
        A Windows 7 installation DVD
        Your OS X Leopard or Snow Leopard installation DVD
        Around 30GB of empty hard drive space on your Mac. You can probably get away allocating less than 30GB to Windows 7, but it will leave very little room to install anything in Windows.
        An hour if all goes well, up to 5 hours if not
        Though not absolutely required, it’s a VERY good idea to have a complete and up to date Time Machine backup of OS X – it really came in handy for me. Because part of the process involves partitioning your drive, there’s always the distinct chance something will go wrong and everything will be wiped out.
        Patience, possibly a great deal of it. Having a book handy will also help kill time during the partitioning, installing etc).

    Installing Windows 7 via Boot Camp

        Here goes. First thing – close absolutely every open program you can. That includes those things running in the Apple Menu that you always forget about. Don’t worry about killing the Dock or Dashboard – having those running is fine.
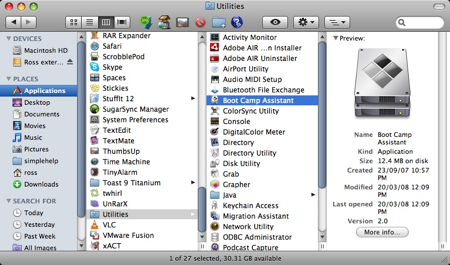
        Now open a Finder and navigate to Applications -> Utilities and double-click Boot Camp Assistant. 

    Click Continue on the initial Introduction screen. Ignore the fact that it doesn’t mention Windows 7 as a possible OS to install.
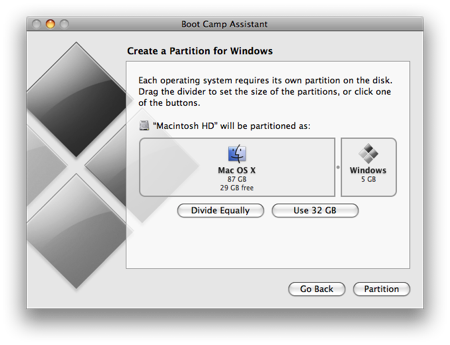
    Now you have to decide how much space you want to allocate to Windows 7. You might be able to get away with going as low as 10GB, but I would highly advise against it. You’ll have almost no space left over to install software, and your page file in Windows might cause frequent crashes. I opted for 20GB, which left me with just a bit over 16GB to use after installing Windows 7.

    To change the amount of space to dedicate to Windows 7, click the small divider between Mac OS X and Windows, and drag it to the left. 

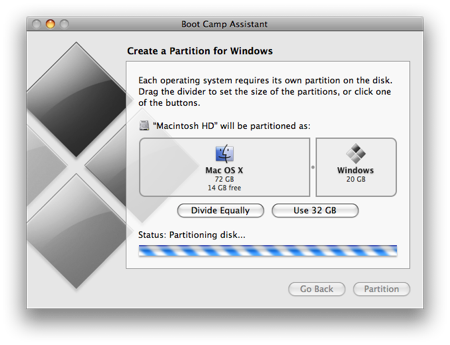
    Once you’ve determined how much space you want to allocate to Windows 7, click the Partition button. 
    The partitioning itself doesn’t take particularly long. If you receive an error, proceed to step 10 of the “How to install Vista with Boot Camp” tutorial. It provides all the troubleshooting info you need to resolve partitioning issues. Once you’ve cleared up any problems, or if everything just goes smoothly, proceed with the next step in this tutorial. 

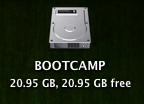
    Once completed you’ll notice a new BOOTCAMP drive on your desktop. 

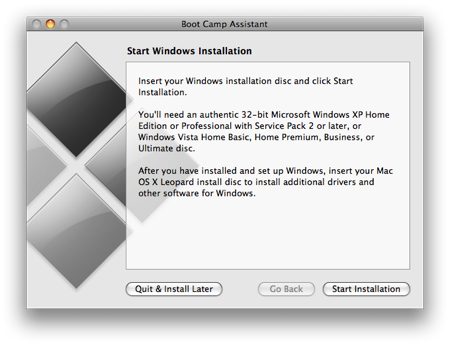
    Now insert your Windows 7 DVD and click the Start Installation button.

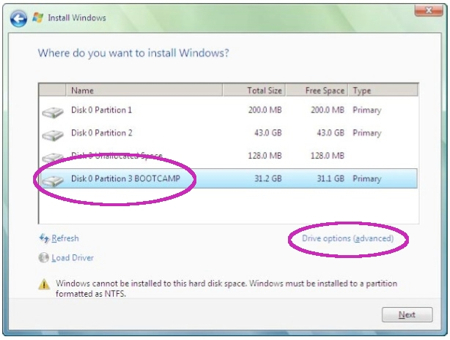
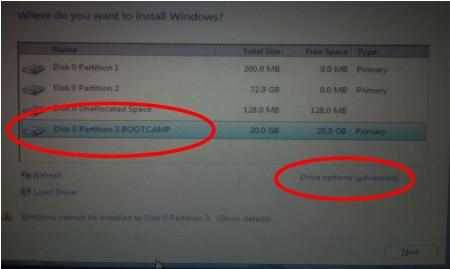
    Your Mac will restart, and Windows 7 will boot. You’ll be prompted with a window asking you which partition you want to install Windows on. Select the one with BOOTCAMP in the Name column. Selecting anything else may wipe out OS X or cause serious problems. Then select the Drive options(advanced) link. 

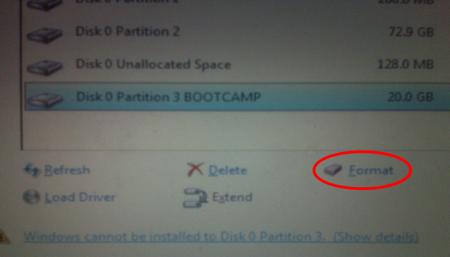
    With the BOOTCAMP volume still selected, click the Format link.

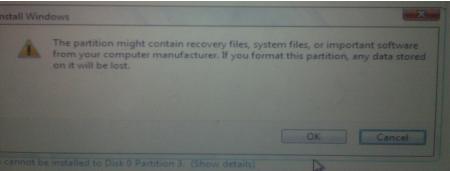
    Click OK. 

    And Windows 7 will begin to install. It’s a fairly boring process, so you may want to grab yourself a cup of coffee or your beverage of choice. But don’t go too far away, because when your system reboots, you’ll need to remove the Windows 7 DVD. 

    With the Windows 7 DVD removed, your Mac will automatically boot back into Windows 7, and the installation will complete. You’ll be prompted to select your language, keyboard layout etc. The rest of the Windows 7 installation process is very straight forward.
    Once the installation has completed and your Mac has restarted again, you’ll be able to use Windows 7. WiFi will work immediately (no drivers to install) so connect to the Internet. Windows 7 will then begin to download updates, including the proper video card driver. Let it do its thing. 

    Once completed, you’ll be prompted to reboot yet again. Do so.

    Once Windows 7 boots back up again, you’ll notice the resolution is much better, and you can enable the advanced graphics features. 

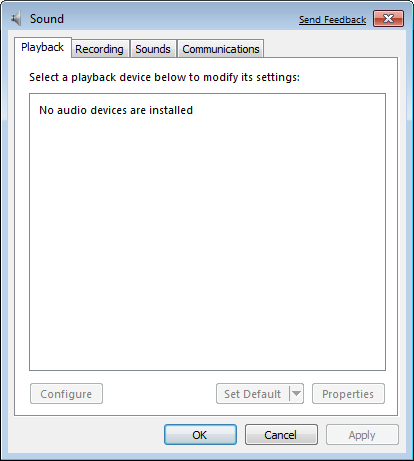
    But if you check for sound, you’ll notice there are no sound drivers installed. 

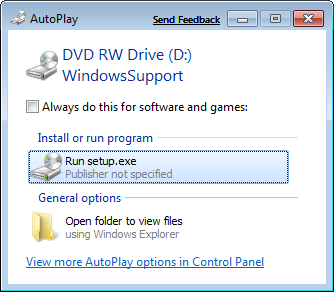
    Insert your OS X Leopard (or Snow Leopard) DVD. When prompted, select Run setup.exe. Note: If you’re using Snow Leopard and a message pops up saying “Remote Install Mac OS X”, close that window and eject the CD. Put the CD in again and this time select “Open folder to view files”, navigate to the Bootcamp folder, and run setup.exe. 

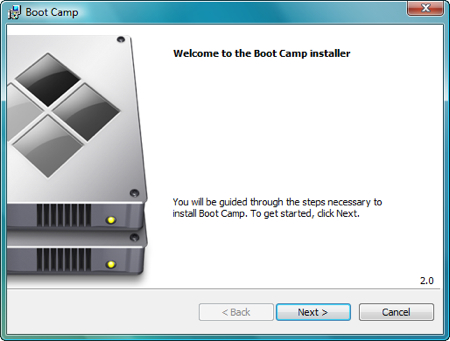
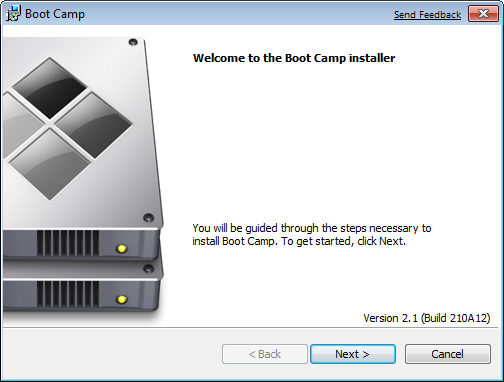
    The Boot Camp installer will launch. Click Next to begin. 

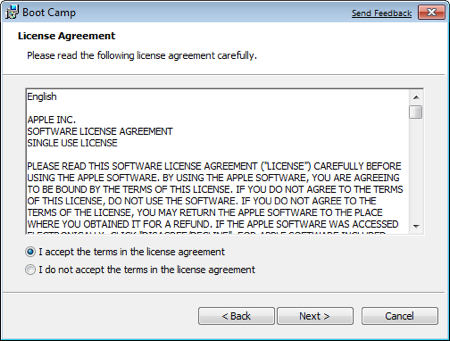
    Select I accept the terms in the license agreement and then click Next again. 

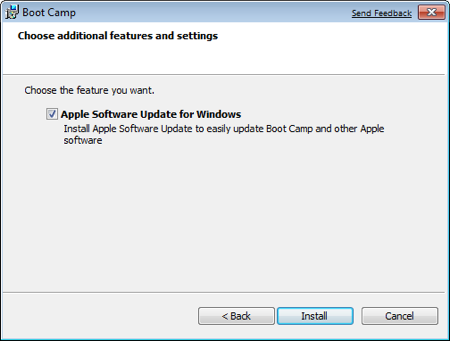
    Make sure that Apple Software Update for Windows is checked, and click Install. 

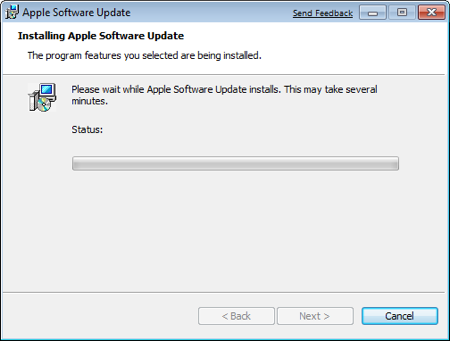
    The Boot Camp installer will do its thing, and install all the required drivers. 

    Notifications will pop up with each driver that gets installed.

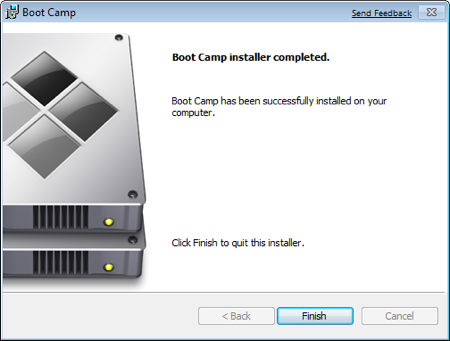
    Once completed, click Finish. 

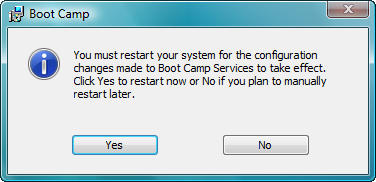
    And yet again you’ll be prompted to reboot. Remove your OS X Leopard DVD from the drive, and click Yes to restart. 

    At this point most of the hardware on your Mac should be working in Windows. However, some iMacs and MacBook Pro’s will have to update to the 3.1 version of Boot Camp for Windows. To do so, just follow the few steps in this tutorial.
    Note: If you still have problems with sound not working, you’ll need to install the Realtek drivers.
    That’s it, you’re done! When your Mac boots, hold down the Option key to select which Operating System you want to boot into. 

  • How to install Vista on your Mac: The Complete Walkthrough

    How to install Vista on your Mac: The Complete Walkthrough

    How to install Vista on your Mac: The Complete Walkthrough
    Using Boot Camp to install Vista on your Mac: The Complete Walkthrough

    This walkthrough will take you through every step of installing Microsoft Windows Vista on your Intel Mac (running 10.5 or later), using Boot Camp. It will cover a number of possible errors that you may encounter, and how to get around them. Each time I bring up an error I will explain in detail what you’ll need to do to resolve the issue and continue installing Vista. It’s up to you to decide if it’s worth the time and effort (for example, you may need to completely wipe your hard drive clean and restore from a Time Machine backup). It’s also possible that everything will go perfectly smoothly and you’ll wonder why you even needed a guide.
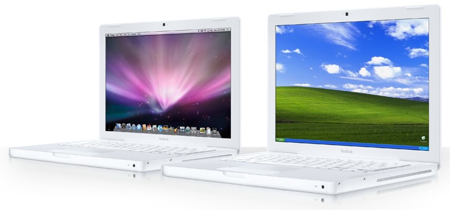

    To install Vista on your Mac you will need the following:

        All firmware updates installed on your Mac (use Apple Button -> Software Update… to check)
        A Vista installation DVD (Home Basic, Home Premium, Business or Ultimate)
        Your OS X Leopard installation DVD
        At least 10GB of empty hard drive space on your Mac (you can probably get away with less but you’ll have almost no room to install anything other than the OS)
        An hour and a half if all goes well, up to 5 hours if not
        Though not absolutely required, it’s a VERY good idea to have a complete and up to date Time Machine backup of OS X – it really came in handy for me
        Patience, possibly a great deal of it. Having a book handy will also help kill time during the partitioning, installing etc).

    Installing Vista via Boot Camp

        Here goes. First thing – close absolutely every open program you can. That includes those things running in the Apple Menu that you always forget about. Don’t worry about killing the Dock or Dashboard – having those running is fine.
        Now open a Finder and navigate to Applications -> Utilities and double-click Boot Camp Assistant. 
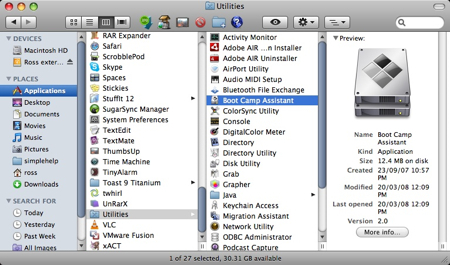
    It’s not a bad idea to have the Setup Guide handy, just in case you need it. Click the Print Installation & Setup Guide button. 
    Click OK
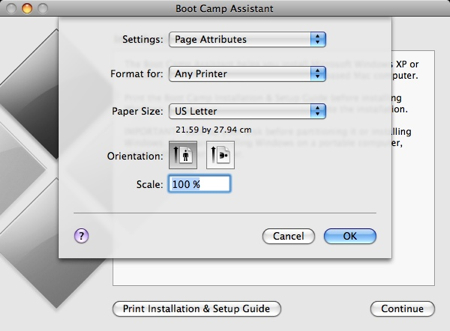
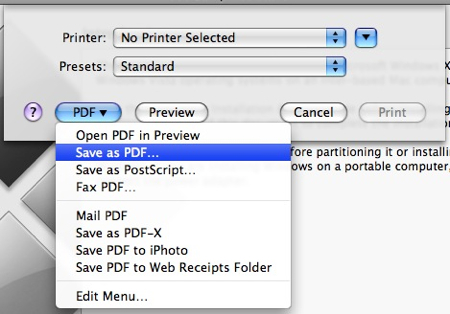
    If you have another computer around, and would like to save half a tree (printing the guide will use 20-something pages) – select the PDF button and choose Save as PDF
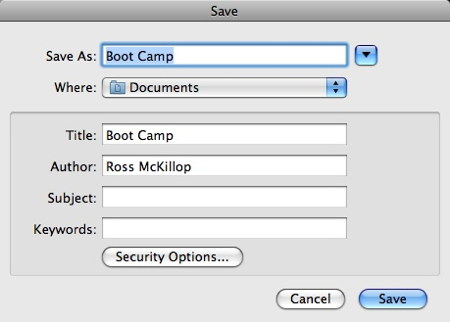
    If you don’t want to download my copy, enter the appropriate info (most importantly, the download location so you can find it) and click Save. Transfer the PDF to your other PC/Mac so you can access it while actually installing Vista. 
    Back at the Introduction page of the Boot Camp Assistant, click Continue. Now you have to decide how much space you want to allocate to Windows Vista. You might be able to get away with going as low as 6GB, but I would highly advise against it. You’ll have almost no space left over to install software, and your page file in Windows might cause frequent crashes. I opted for 20GB, which left me with just a bit over 15GB to use after installing Windows Vista Ultimate and upgrading to SP1.

    To change the amount of space to dedicate to Vista, click the small divider between Mac OS X and Windows, and drag it to the left. 
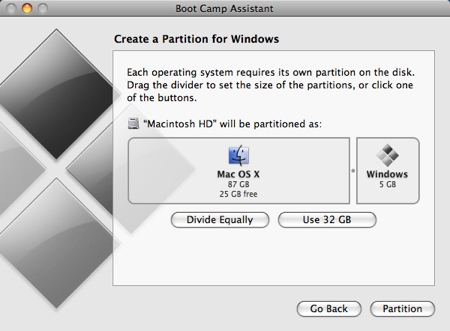
    When you’re happy with the amount of space that Vista will have, click Partition.
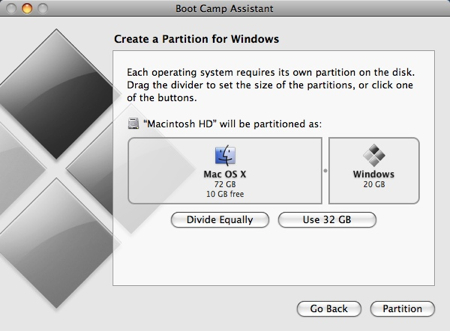
    Watch the little status indicator.. 
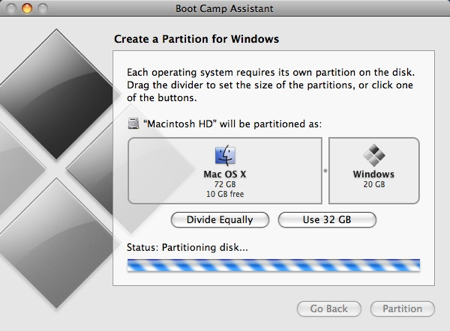
    and hold your breath that no errors occur. If you’re presented with a Start Windows Installation screen, proceed with step #11 below (and consider yourself very lucky). If you get an error, keep reading.

    The most common error is that OS X couldn’t move a file and the partition could not be created. There are a couple of things that could be wrong, and I’ll outline how to fix them from the fastest method to the longest method. Cross your fingers that the fastest one will resolve your problem.

    Close out of the Boot Camp Assistant and launch the Disk Utility by selecting Applications -> Utilities -> Disk Utility.

    Select your Mac drive, or the partition you were trying to install Boot Camp on (if you have more than one). Click the Verify Disk Permissions button, then the Repair Disk Permissions button. Once that’s done, click the Verify Disk button, then the Repair Disk button if it’s available.
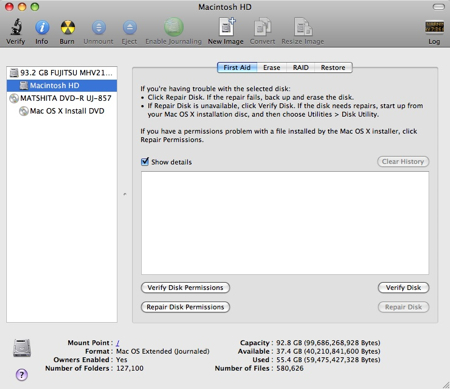
    Now go back to step #1 and try it all over again (except you don’t need to print out the PDF twice). If you were able to create the partition, excellent, continue with step #11. If you got the same “can’t move file” error, download and install OnyX Once installed, launch it (you’ll probably be prompted for your password) and select the Maintenance tab. Click the Execute button and wait.
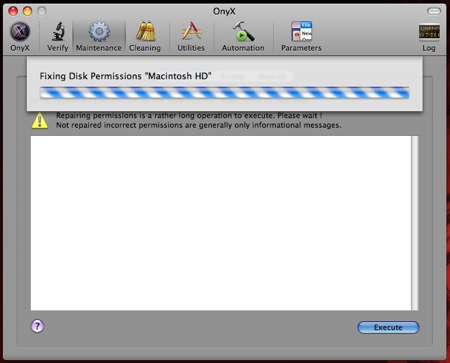
    Once again, go back to step #1 and start all over again. If it worked this time, excellent, proceed to step #11. If it didn’t, you have another couple of choices. Neither is much fun. First, you can purchase defragging software (I’m not aware of any that are free/open source) such as iDefrag and hope that it resolves your problem (it might not). Second – and this is what I opted to do – re-install OS X by formatting the entire drive (all data will be lost), run software update to get all the firmware updates, install Vista via Boot Camp, and then restore OS X from a Time Machine backup. Like I said, not great choices. If you do decide to go the format and re-install route, I’ll outline it with a few more details –

        Know that you might lose all of your data. Time Machine could fail, your roommate might decide now would be a good time to smash your backup drive – any number of problems could occur. This is my way of saying that I will NOT be held responsible if this method causes you all kinds of nightmares. With all of that said, it worked perfectly fine for me.
        Make sure you have a 100% up to date Time Machine backup. Open Time Machine and select Back Up Now. If you opted not to back up certain folders, make sure you have the contents of those folders backed up – or remove them from the “don’t back these folders up” section of Time Machine.
        Put your OS X Leopard DVD in your DVD drive, and restart your Mac.
        Hold down the c key as your Mac restarts – this will force your Mac to boot from the DVD rather than the hard drive.
        Follow the walk-through to install OS X. Make sure you select the “format this drive then install OS X” option
        Once you’ve re-installed OS X, start your Mac and run the Software Update to make sure everything is up to date. Once completed, you’ll be prompted to reboot. Do so.
        Once again, run the Boot Camp Assistant. This time you should have no problems at all
        Carry on with step #11 below, and once you’ve completely finished installing Vista, perform a Time Machine restore. To do so, boot from the OS X DVD (hold down c as your Mac starts up) and from the Utilities menu, select Restore from Time Machine (or something like that, I forget right now). Let Time Machine do its thing (boring, takes forever) and once it’s done, reboot yet again. You’ll finally have a dual boot Mac w/ Vista and OS X.

    Alright, time to install Vista. Put your Vista DVD in your DVD drive and click Start Installation.
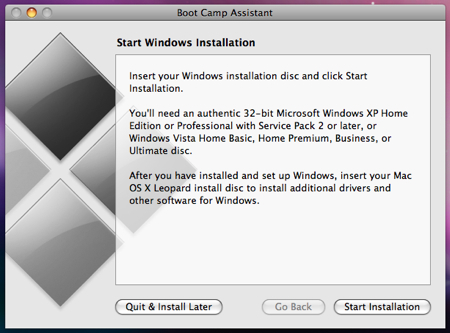
    A bunch of things will happen on their own. Don’t interfere with them. You’ll eventually land at a screen asking where you want to install Windows. Make sure, and I mean make sure you select the BOOTCAMP partition. Selecting anything else is going to force you to re-install OS X, and unless you have a recent Time Machine backup, you’ll lose all of your data.

    Now click the Drive options (advanced) link/button. Click Format and once it’s done, click OK. Now you can click Next

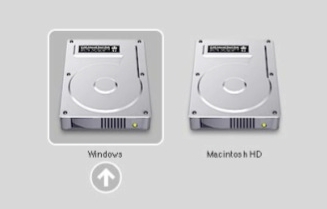
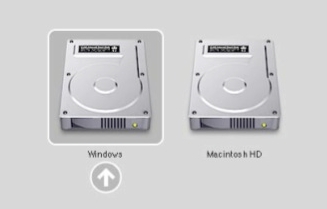
    Now Vista will install. It takes a while and it’s not particularly entertaining. Vista will restart itself at least once during the installation. If by some chance – and this shouldn’t happen – when Vista restarts itself, and you end up back in OS X instead of Vista, restart again and this time hold down the Option key as your Mac starts. You’ll be presented with a number of drive icons to choose from. Double-click the Windows icon.

    And now Vista has finished installing, you’ve setup your “account” in Vista, and you think you’re done. You’re not. Eject you Vista DVD from your DVD drive (if you have problems ejecting it go to the Computer view in Vista, click once on your DVD drive, and then select the Eject link that will show up in the menu. Now pop in your OS X Leopard DVD. You’ll be prompted “Install or run program” – click the Run setup.exe button. 
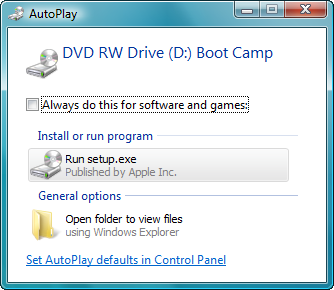
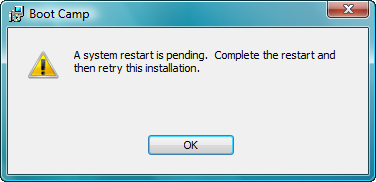
    You might be told that a system restart is pending and you can’t install anything yet. I never said this was a short process. Restart your Mac and make sure to boot into Vista. 
    This time when you Run setup.exe you’ll get the “Welcome to the Boot Camp installer” screen. Click Next

    Place a check in the “I agree” part, and click Next.
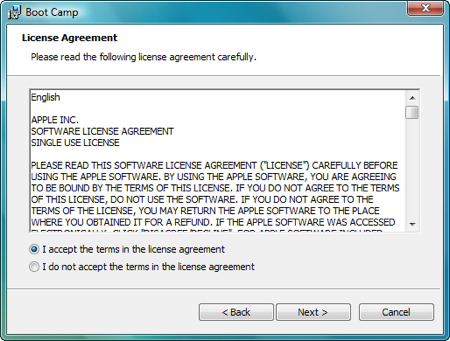
    Make sure Apple Software Update for Windows is selected, and click Install.
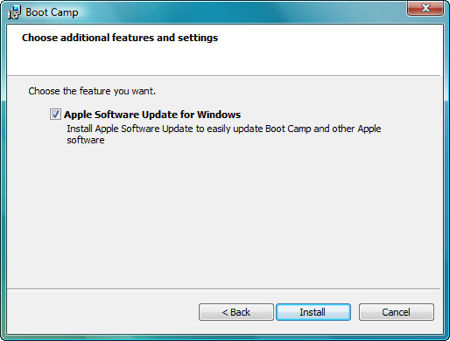
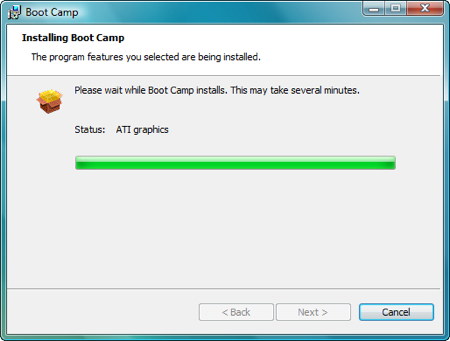
    Sit back and watch. Don’t interfere. Your screen may flicker, ignore it. 
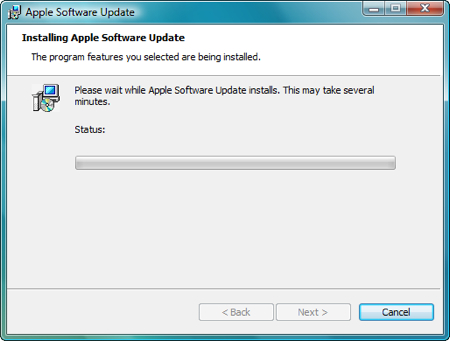
    Also ignore any pop-ups that might appear in your System tray.

    Almost done.. 
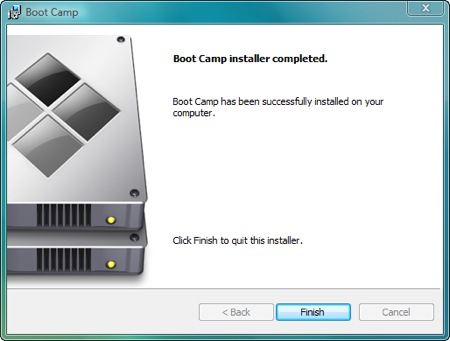
    And now you’re done. Click Finish.
    Restart yet again. 
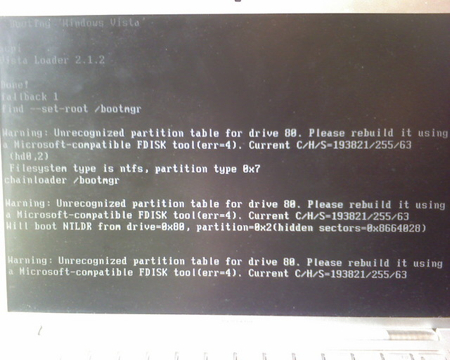
    Note: when Vista boots, you might encounter a couple screens full of error messages (Unrecognized partition table for for drive 80, can’t boot from NTLDR from drive=0×80 etc). Ignore them, and let Vista continue to boot. I have a (bad) camera phone picture of some of the errors below. 
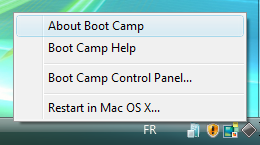
    This time when Vista starts, you’ll notice a new icon in the System tray – it’s the Boot Camp software. Click it once and a pop-up menu will appear.Select Boot Camp Control Panel…. 
    On the first tab, Startup Disk you can select which Operating System you want to boot into by default. Just high-light the one you want – but remember – you can also choose to boot to the other OS by holding down the Option key while your Mac starts. Note: you can also define which OS you want to boot into by default in your Mac. Just select the Startup Disk option in your System Preferences. 
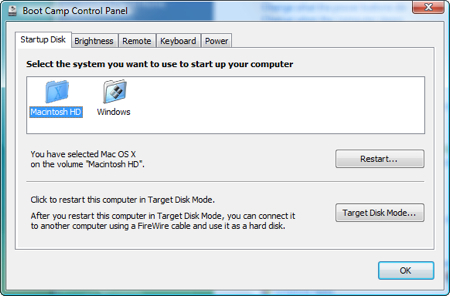
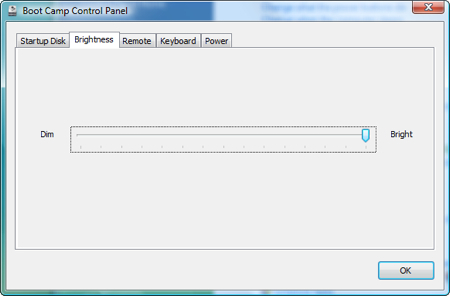
    Click the Brightness tab to adjust – you got it – the screen brightness. 
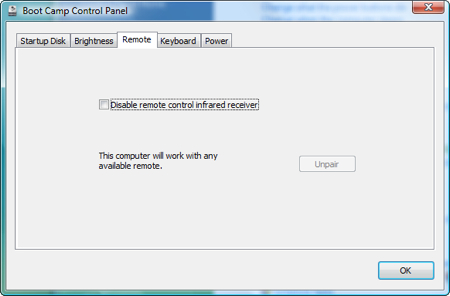
    Click the Remote tab. From here you can disable or enable the use of a remote infrared receiver. Your choice. 
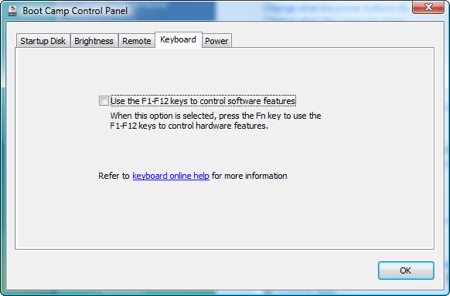
    Select the Keyboard tab to make some keyboard changes. Boring. 
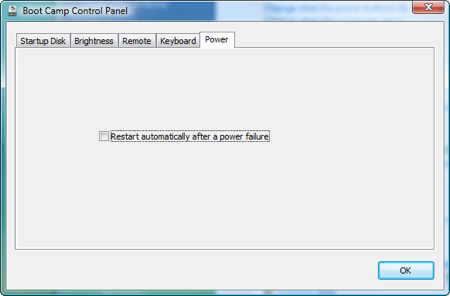
    And finally, select the Power tab. Do you want to automatically restart after a power failure? Here’s where you decide. When you’re done reviewing all of the Boot Camp Control Panel options, click OK

    And one last thing. Remember – no matter which Operating System, Vista or OS X, you decide to have as the one you automatically boot into when your Mac is turned on, you can select the other one by holding down the Option key as your Mac starts. 
  • 25 Best Free Themes for Windows 7

    25 Best Free Themes for Windows 7

    Windows 7 one of the most successful operating system from Microsoft so far. Using windows 7 on your personal computer or laptop gives a new experience to its users. There are many themes, widgets, layout option in this operating system which makes it different from other windows like 98, XP. Themes are the best way to enhance your screen layout and here we are going to share best and free themes for windows 7 which you must have to try on your PC or Laptop.

    Antarctic


    Download

    Love Birds


    Download

    Surfing Theme


    Download

    Rio Movie


    Download

    Rango


    Download

    Ireland


    Download

    Waterdrops


    Download

    Small World


    Download

    Sailing


    Download

    Kang Fu Panda 2


    Download

    Harry Potter


    Download

    Mega Mind


    Download

    Halo Reach


    Download

    Bake House


    Download

    Girls Rock


    Download

    Snow Angel


    Download

    Surreal Territory


    Download

    Best of Bing 3


    Download

    Alan Wake


    Download

    Windows Live


    Download

    Snow Sport


    Download

    Fireworks


    Download

    Bunnies


    Download

    Lightning


    Download

    Nature Photograph


    Download

  • 10 Must Have Apps For Windows 7

    10 Must Have Apps For Windows 7

    apps for Windows 7

    Windows 7 is latest operating system from Microsoft and also without any doubt, a very  successful operating system yet. It has many amazing features and have a big improvement with built  application like Media player , Games , Internet Explorer  and some other menu items. But here I would like to share with you some of the best must have applications for Windows 7 without which it is just like incomplete for the purpose for which it is designed.

    1.Mozilla Firefox

    Mozilla Firefox is one of the most famous and used web browser application at the time and thousands of the people’s  are using it as  their default browser. Firefox have a lot of extensions which makes your internet accessing easy and better. The latest version of Firefox now available Mozilla Firefox 4.0 with a new look as compare to its old versions. In latest Firefox have features include tabbed browsing, spell checking, incremental find, live bookmarking, a download manager,private browsing, and more.
    Download

    2. AVG Anti-Virus 2011 Free Edition

    AVG anti-virus is a most popular antivirus in market and also have a good response by users. It protects your computer from many kinds of viruses. It is a total security which can make the scans are faster, it does install more quickly, and some tweaks to the interface have made it easier to use.  The big improvement in this edition is Link Scanner, E-Mail scanner , an Update Manager Anti-Rootkit and PC Analyzer  to provide more protection and better performance of your pc.
    Download

    3. VLC Media Player

    VLC is a free and open source cross-platform multimedia player and framework that plays most multimedia files and completes all your needs. You can play DVDs, VCD’s,  Audio CD’s, web streams, TV cards and much more. It is a Simple, Powerful and Fast media player which Plays most codecs with no codec packs needed and all there for totally free.
    Download

    4. CCleaner

    CCleaner is the most easy tool for cleaning your Windows PC. It protects your privacy online and makes your computer faster and more secure. It is very Easy to use and a small, fast download. CCleaner removes Temporary files, history, cookies, Auto complete from history, index.DAT, Recycle Bin, Recent Documents, Temporary files and Log files from your PC and an advanced features to remove unused and old registry entries. In other words we can say it works as a sweeper for Internet Explorer , Mozilla Firefox, Google Chrome, Opera, Safari and Windows.
    Download

    5. Internet Download Manager

    Internet Download Manager is used to download any thing from any site. It shows on-screen download links, which makes your internet surfing easy and fast. You can make your downloading file Pause and Resume. You can also add a new URL to download manually.
    Download

    6. Winamp

    Winamp is also another media player used widely after Windows Media Player. It is a free  media player that plays mp3 and other audio files, syncs your iPod, subscribes to Podcasts and more. It have amazing in-built loaded equalizer setting which makes a good quality of sound for listeners. You can also download more skins and visualization effects and able to customize them.
    Download

    7.Microsoft Security Essentials

    Microsoft Security Essentials provides real-time protection for your home or small business PC that guards against viruses, spyware, and other malicious software. Microsoft Secure Essentials is a free and download from Microsoft that is simple to install, easy to use, and is automatically updated to protect your PC with the latest technology. It runs quietly and efficiently in the background so that you are free to use your Windows-based PC the way you want without any interruptions or long computer wait times.
    Download

    8.CDBurnerXP

    is a free application to burn CDs and DVDs, including Blu-Ray and HD-DVDs. Though it includes XP in name but works like a charm in Windows 7. It includes the feature to  create and burn all kinds of discs,audio-CDs with or without gaps between tracks,ISO files,bootable discs. It also provide the option for data verification after burning process. Not even this, it has multi-language interface and also available different operating systems such as Windows 2000/XP/2003 Server/Vista/2008/Win7 (x86 / x64).
    Download

    9.Digsby

    Digsby is multi messenger which lets you to make instant messaging easy with various social network sites. It is an e-mail notification and  social networking tool that lets you chat with all your friends on AIM, Facebook, MSN, Yahoo, ICQ, Google Talk, and Jabber. You can manage you buddy list in simple way.You can Customize digsby with application skins to give it a personal look and feel and also manage your Hotmail, Gmail, Yahoo Mail, AOL/AIM Mail, IMAP, and POP accounts right from it.
    Download

    10. Photo Scape

    If you have low system configuration and can’t run Photoshop then here is an alternative for it. Photo Scape is a great free photo editing software application which supports RAW, as well as all other major image formats from JPEG and PNG to animated GIF’s. It comes with rebuilt templates for users to create photo collages, fumetti, and Web comics, and has a standard set of red-eye removal, light/shadow, and contrast-editing features. You can also batch edit images, combine them, and print them out one at a time or several at once. All this for free and with a small use of memory .
    Download

  • Run XP Software in Windows 7

    Run XP Software in Windows 7

    SIUC asked the Windows forum about running software intended for Windows XP in Windows 7.
    For the most part, it should just work. I’ve rarely run into programs that run fine in XP but have trouble in Windows 7.
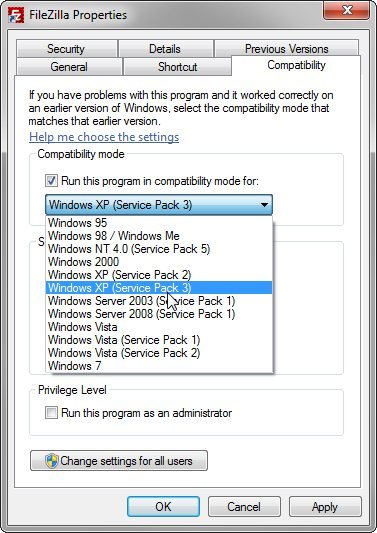
    But if you’ve run into one of those rare programs, try running it in XP Compatibility Mode:

    1. Right click the .exe file or the shortcut and select Properties.
    2. Click the Compatibility tab.
    3. Check Run this program in compatibility mode for and select an appropriate option.


    If this doesn’t work, there’s another work-around: XP Mode. (And yes, I know it’s silly that the two solutions are called XP Compatibility Mode and XP Mode.) Unfortunately, this option is only available for Windows 7 Professional and Ultimate editions.
    You’ll need to download and install Windows XP Mode and Windows Virtual PC (be patient; it’s a big download).
    Once you’re finished, you’ll be able to actually run XP inside a virtual machine in Windows 7. It’s not as smooth as simply running the programs in Windows 7–you’re in an entirely different environment. Even the hard drive that XP boots from and runs off of is a virtual one.
    But you won’t be entirely cut-off from Windows 7. You will be able to access the real hard drive from within XP, and both versions of Windows will share the same clipboard.

  • How to Install Windows 7 Without the Disc

    How to Install Windows 7 Without the Disc

    How to Install Windows 7 Without the Disc

    Here’s how to legally download Windows 7 and make your own install disc.

    Many computers ship without Windows 7 installation discs. Instead they come with “recovery” discs and/or partitions that claim to restore your PC to its “factory fresh” state, but include a ton of bloatware (free trials, media players, useless utilities, and the like) along with Windows. Removing each piece of bloat is time-consuming, and just not the same as truly starting fresh.

    In this article, you’ll learn how to make your own Windows 7 installation disc (or USB flash drive) and use the valid product key you already have to perform a fresh reinstallation. The following method is effective and legal, and doesn’t require a lot of technical expertise
    However, we don’t recommend that you delete your recovery partition or throw away your existing recovery discs. Although many people have had success with the following procedure, others have not. Some users have not been able to activate their copy of Windows even after entering a valid product key, while others own PCs that require software not included in a Windows 7 ISO. You have no way to know whether this procedure will work for you until you try, and you need a backup plan in case it doesn’t.
    Also, save your files and drivers to external media before you start. Reinstalling Windows wipes out all personal data and causes a loss of functionality in devices for which Windows lacks an adequate built-in driver. Plan on loading the latest device drivers from media you create before reinstalling Windows.

    Reinstalling Windows 7, Step by Step

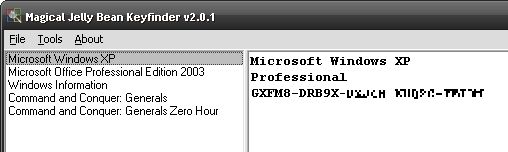
    1. Find your Windows 7 product key: Typically this 25-character alphanumeric string is printed on a sticker affixed to your PC or on documentation included with your PC. Alternatively, you can use a keyfinder program such as Magical Jelly Bean Keyfinder to pull your product key from the Registry. You need your product key to reinstall Windows.
    Magical Jelly Bean Keyfinder helps you round up your serial numbers.Magical Jelly Bean Keyfinder helps you round up your serial numbers.
    2. Download the ISO file for the version of Windows 7 you own:

    The above links point to Digital River, a licensed distributor of Microsoft software. These downloads are each over 3GB, and your product key will work only with your edition of Windows, so make sure to select the right one.
    3. Download the Windows 7 USB/DVD download tool. This utility lets you copy your Windows 7 ISO file to a DVD or USB flash drive. Whether you choose DVD or USB makes no difference; just confirm that your PC can boot to the media type you select.
    4. Boot your computer using the Windows 7 DVD or USB flash drive. Follow the prompts to prepare the destination hard drive and install Windows.

  • Huawei E303 Firmware Software Update.21.157.31.00.850 – Download

    Huawei E303 Firmware Software Update.21.157.31.00.850 – Download

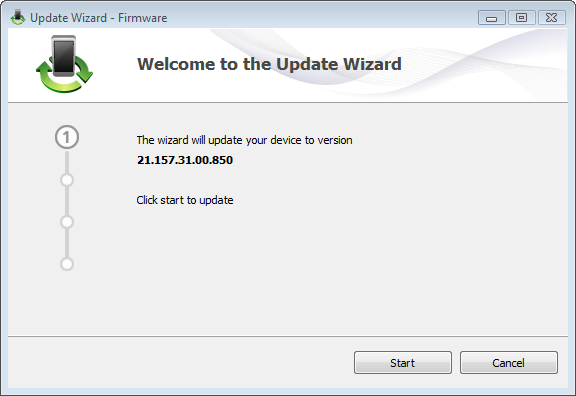
    Huawei E303 Firmware software can be used to update the firmware of your Huawei E303 USB Modem, including Glo Bolt and MTN E303 Modems. Together with the Universal Master Code Calculator tool, Huawei E303 Firmware may be required to unlock stubborn E303 Glo Bolt modems.

    Huawei E303 Firmware installation wizard
    Huawei E303 Firmware installation wizard

    File Info

    • File Name: E303 Firmware S Update.21.157.31.00.850
    • File Type: WinRAR ZIP archive (.zip)
    • File Size: 10.1 MB (10,694,218 bytes)

    Download E303 Firmware S Update Now

  • How to Reset Your Windows Password

    How to Reset Your Windows Password

    Here’s our guide to resetting your Windows password if you don’t have access to a previously created password-reset disk.

    The easiest way to reset a forgotten Windows password is to use a previously created password-reset disk. You can create such a disk (on USB removable media or a floppy) within the Windows User Accounts menu by opening the Windows Control Panel, selecting User Accounts, and clicking Create a password reset disk in the left pane. You should take this step with a new PC; once you have the disk, you can insert it when starting the PC to cause Windows to display the ‘Reset password’ option at the login screen, allowing you to regain access to your system.

    However, if you don’t have a password-reset disk and you need to reset your Windows password, I suggest using the following Sticky Keys trick.

    Reset Your Windows Password Using the Command Prompt

    1. Boot your computer using your Windows installation disc.
    2. Wait for the setup files to load, and select your language. Click Next.
    3. Click the Repair your computer link on the Install Windows screen.
    4. Select the operating system to repair, and note the drive letter on which the OS is installed (it is probably C: or D:). Click Next.
    5. Click Command Prompt at the bottom of the list of recovery tools.
    Now you need to overwrite the Sticky Keys executable with the Command Prompt executable. Sticky Keys is an accessibility feature that allows a user to tap the Shift, Ctrl, Alt, or Windows key once to achieve the same effect as holding the key down. Ordinarily, tapping Shift five times activates Sticky Keys–but with this trick, you are going to make tapping Shift five times activate the Windows Command Prompt instead.
    The instructions below use drive letter C: as an example. If your operating system is installed on another drive, replace C: with the appropriate drive letter.
    1. In the Command Prompt window, type copy c:windowssystem32sethc.exe c: and press Enter.
    2. Type copy /y c:windowssystem32cmd.exe c:windowssystem32sethc.exe and press Enter.
    3. Exit the Command Prompt and reboot the computer. At the login screen, tap Shift five times. The Command Prompt will pop up.
    4. Type net user username password, replacing username with your username and password with a new password.
    5. Exit the Command Prompt, and log in using your new password.
    To prevent another user from exploiting the same trick to reset your password, you can restore Sticky Keys as follows:
    1. Step through the instructions above to boot the PC using your Windows installation disc, open the recovery tools, and launch the Command Prompt.
    2. Type copy /y c:sethc.exe c:windowssystem32sethc.exe and press Enter.
    3. Exit the Command Prompt and reboot the computer. Pressing Shift five times will now activate Sticky Keys instead of the Command Prompt. Store your Windows installation disc in a secure location.
    Caution: Resetting a password using the Sticky Keys trick means you will lose access to encrypted files, encrypted email messages, and stored passwords for Internet Explorer and network resources. Remember to back up your important data regularly.

  • How to Upgrade Windows 7 Starter into Windows 7 Home/ Professional/ Ultimate FREE!

    How to Upgrade Windows 7 Starter into Windows 7 Home/ Professional/ Ultimate FREE!

    I just got my new netbook 2 weeks ago, but I was greatly disappointed with the fact that it came with Microsoft Windows 7 Starter edition only not Windows 7 Home Premium, Professional or Ultimate. As we all know, Windows 7 starter is the cheapest version of Windows 7 series and you can’t even change to your favorite background wallpaper or I would suggest a handicapped version of Windows 7. Eventually my search for the upgrade begin!

    Initially I was thinking of formatting my whole hard disk and get a fresh new copy of Windows 7 Ultimate (cracked ver). But after reading some forums and comment by some of the users, I found out that we can actually upgrade our current version of Windows without going to the formatting path. Instead it could be easily upgraded to any version you prefer as easy as 1 2 3. Here go the step:

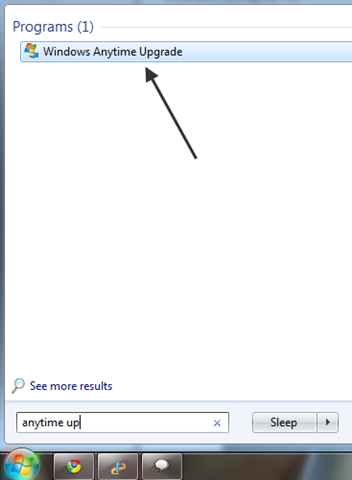
    Step 1. Enter “Anytime Upgrade” in the Start menu search,and select Windows Anytime Upgrade.

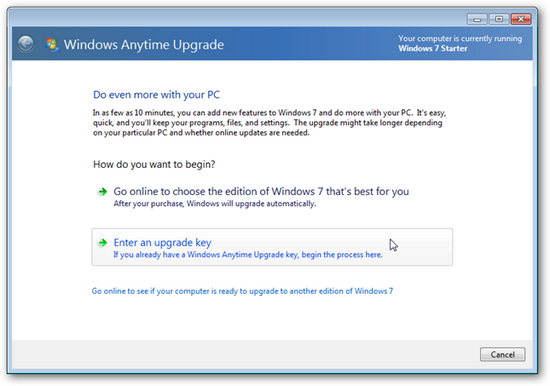
    Step 2. Select “Enter an upgrade key” from the screen.

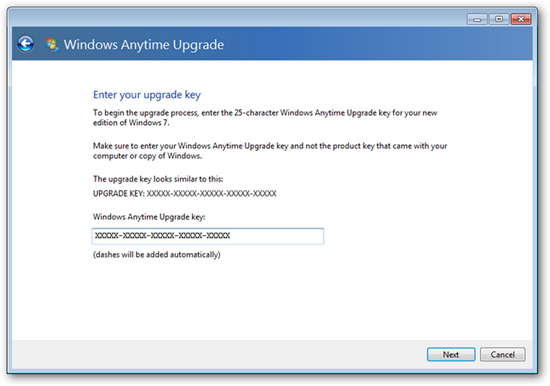
     Step 3. Download Windows 7 Anytime Upgrade keygen at Hotfile and key in the key generated into the space and click “Next”.


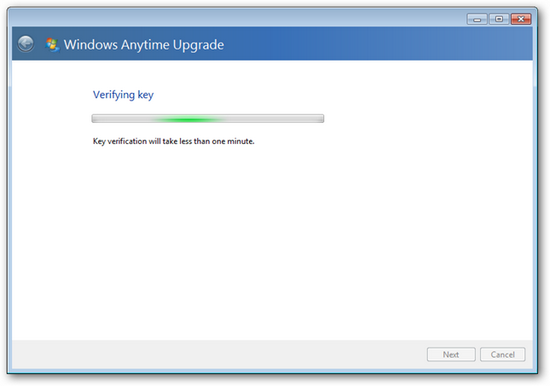
    Step 4. The key will be verified as a valid key, and Windows Anytime Upgrade will automatically choose the correct edition of Windows 7 based on your product key.  Click Next when this is finished.

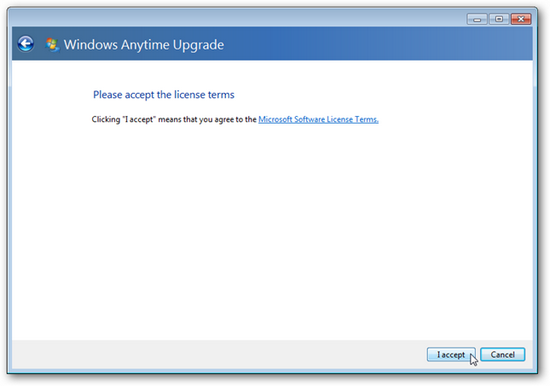
    Step 5. Click “I accept” to accept the license agreement.

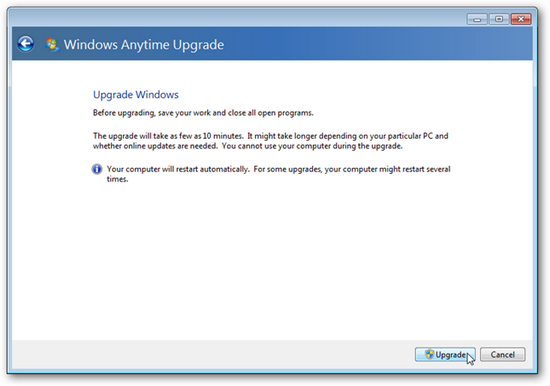
    Step 6. Click “Upgrade” to initiate the upgrade process.

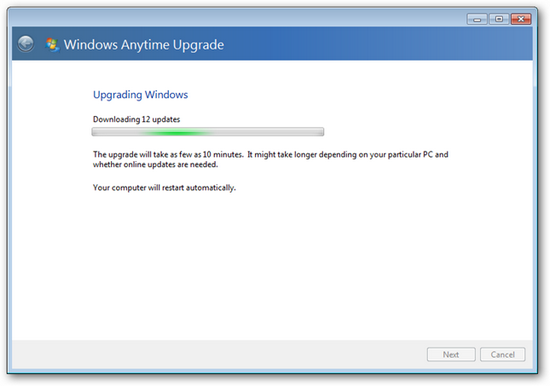
    Step 7. Wait for the Windows 7 to be installed. As stated the upgrade will take about 10 minutes but it may vary according to your connection speed.

    Step 8. Windows 7 will start installing all the feature into your computer.
    Well, you are done. You have successfully upgraded your Windows 7 Starter edition.

  • How to Mount USB Drives to a Windows Folder

    How to Mount USB Drives to a Windows Folder

    After a great success of my previous article about setting background images to the USB drives, here comes another USB related tutorial which I am sure many would love to try.
    So many times we encounter a situation when data once deleted from a USB drives cannot be recovered back simply because the deleted data does not move into the Recycle Bin instead it is deleted permanently.

    But don’t worry I got a solution to this problem. If we can mount our USBs to a windows folder then not only all deleted data can be recovered easily but also it will be lot easy to organize multiple USB drives.
    Just follow the simple steps described below:-

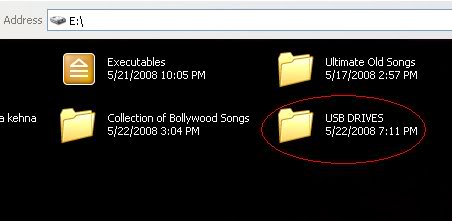
    1. Create a folder named “USB DRIVES” in any of windows partition (Desktop is the best option).


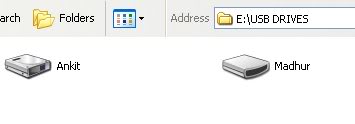
    1.) Next create any number of subfolders inside the main folder “USB DRIVES” and give them proper names. Suppose you want to mount two of your USB drives, so it advisable to create two subfolders with the exact name of your USB drives.
    3.) Press Win+R to open the Run window or alternatively go to Start->Run.
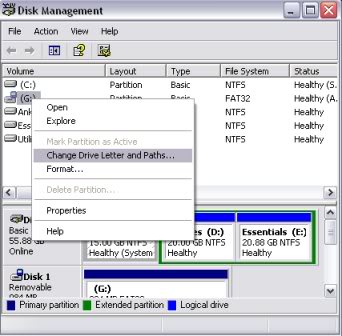
    4.) Type in the location field diskmgmt.msc and hit enter to open Disk Management.

    5.) Select your USB drive, right click on it and select Change Drive Letter and Paths… from the menu.
    6.) Click on the Add button, select Mount into the following empty NTFS folder and click on browse. Now navigate to the subfolder that you want to assign the USB drive to and confirm the process.
    That’s it you are done.

    From now on, the USB drive will be accessible from the folder “USB DRIVES” as well when it is connected to the computer.
    Hope you liked the tutorial. Any feedback is whole heartedly appreciated.
    P.S. – When moving data around the mounted USB in folders setup will completely move the data, not copy it to your USB device. Make sure to copy and paste if you want source data to remain on your PC.

    PLEASE LEAVE YOUR COMMENTS…………