Google Chrome is one of the world’s most widely used and trusted web browsers. Of course, it was developed by one of the world’s most reputable technology companies known for its strong focus on security. However, there’s still a need to be cautious when installing software from unofficial or untrusted sources, as they may not be as secure. The same also applies to Ubuntu. We’ll find out how to install Chrome on Ubuntu.
Introduced in 2004 by the Computer software company, Canonical, Ubuntu is a free open-source, user-friendly Linux-based OS for computers or virtual private servers. It is well suited for cloud computing, servers, desktops, and IoT devices. Ubuntu’s popularity has roots in quite a number of innovative features. One of which is its clean GNOME interface designed for improved system navigation. Ubuntu has high security with checks, AppArmor, and security practices. The OS also runs smoothly on low-end devices, requiring minimal RAM. Unlike closed-source alternatives such as macOS and Windows, Ubuntu is completely free and customizable.
How to Install Chrome on Ubuntu
Ubuntu’s default web browser is Firefox. With each new version of Ubuntu, you’ll find the most up-to-date version of Firefox pre-installed. But, if you prefer using Google Chrome on Ubuntu software OS or any other Ubuntu device, there are two installation options. You can opt for a manual download using the default Firefox browser. Alternatively, you can use the Ubuntu Terminal for a not-so-seamless installation process.
Installing Chrome on Ubuntu via Web Browser
How to Install Chrome on Ubuntu in 2023
Launch the default Firefox web browser in Ubuntu
Go to the official Chrome download page
Locate the Download Chrome button and click on it to download the installation file
Select the version of Chrome for Ubuntu which is the first option (64 bit .deb for Debian/Ubuntu)
Click on Accept and Install
Once downloaded, open the file and double-click to initiate the installation process. Or right-click the file and select Open With Software Center
Click on the green Install button to install Google Chrome for Ubuntu
Enter a password for authentication.
Start Chrome and click on settings in the top-right corner of the screen
In Settings, scroll down and click on Default Applications
Select Google Chrome as the default web browser
Install Chrome on Ubuntu via the Terminal
Open the Ubuntu Terminal with a keyboard shortcut Ctrl+Alt+T
Run the Sudo apt update command to update the package lists to the latest version
Benchmarking is the standard by which a PC’s performance is determined.
To thoroughly determine a PC’s performance, you need to use multiple tools and utilities specifically designed to tax each major component. We show you which tools to use, describe how to get results that are reliable and repeatable, and explain what all those numbers mean.
Running benchmarks on a PC enables users to evaluate performance, to identify potential bottlenecks, and to choose effective system upgrades. Unfortunately, many users imagine that system performance is simply a matter of CPU frequency or memory capacity, which leads them to think that dropping in a faster CPU or more memory will automatically and immediately yield noticeable performance improvements. In reality, however, that is not always the case. Though CPU and memory upgrades help in some situations, it often makes more sense to upgrade the storage subsystem or the graphics board if you’re looking for perceptible improvement in system responsiveness or gaming performance, for example. If you ran a series of benchmarks and identified which components were holding your system back, you’d be able to choose the most effective upgrade for your current system–or determine which components make the most sense in a new system suited to your particular needs. Several different types of benchmarks are available for evaluating a system’s performance. Some use synthetic tests that don’t necessarily reflect real-world usage, while others employ scripted tests that rely on actual applications and simulated real-world workloads. Some benchmarks assess the performance of a single component, while others measure total system performance. To best gauge the overall performance of a PC, consider running some combination of all of these different types of benchmarks, based on your usage patterns.
Benchmarking Do’s and Don’ts
Before running any benchmarks, you need to consider a number of hardware and software factors, in order to avoid potential damage to your system and to ensure consistent, accurate results. We’ll look at hardware factors first. Many benchmarks place significant stress on specific components, so you need to ensure that all such components are in good working order, properly cooled (if necessary), and receiving adequate power. If you have a component that seems unstable or unreliable during normal, day-to-day use, subjecting it to a taxing benchmark could kill it. Also, an inadequately cooled or underpowered device that works most of the time may become unstable under stress. That said, we’ve run benchmarks for many years, and have had only a handful of components fail due to the demands of a benchmark test–and those components were likely defective to begin with. On the software front, parameters for the operating system, applications, and drivers must be satisfied to ensure accurate, repeatable benchmark results. Windows (and other) operating systems proactively prefetch data and store numerous temporary files that could interfere with a benchmark, so it’s best to clear out any temporary files and prefetch data before running a test. In Windows 7, you can find prefetch data in C:WindowsPrefetch, and temporary files in C:WindowsTemp and C:Users[username]AppDataLocalTemp. If you have applications running, it may not be safe (or possible) to delete all temporary files, so restart your system and shut down any applications that may be running in the background before wiping out any temporary files. You don’t want applications or utilities that may be running in the background to interfere with the benchmark, so shut them down. This is especially important in connection with antimalware utilities, remote desktop tools, and downloaders that intermittently consume CPU, memory, and storage resources and steal application focus. Unless you’re testing a system as it shipped from an OEM to evaluate the effects of background applications on performance, shut them down before running the tests. In the same vein, most operating systems load multiple services and perform maintenance during the initial boot process. Consequently, after boot-up, it’s best to let the system “settle” and reach an idle state, with no drive or CPU activity, before you run a test. Using the correct (typically the latest) drivers for a component is another important step to take to ensure that it is operating and performing optimally. This is especially true of graphics boards and motherboards/chipsets, where the wrong driver can significantly worsen the system’s frame rates or transfer speeds and latency. Finally, confirm that the operating system is fully updated and patched to ensure optimal compatibility and to reflect the current, real-world OS configuration–not the OS as it may have shipped years ago.
Benchmarking Individual Components
Many components in a system contribute to its overall performance, but the CPU/processor, memory, graphics board, and storage configuration generally play the largest roles for most users. Which of these components is the most important in a particular case depends on the individual person’s usage patterns, however. A gamer seeking the best possible frame rates, for example, will probably be better served by a faster GPU than by more memory. A casual user seeking a more responsive system may benefit most by upgrading a slow hard drive to a fast solid-state drive. You must decide which aspects of system performance are most important to you, tailor the suite of benchmarks to your specific needs, and then weigh the individual test results accordingly.
CPU/Processor
The most useful CPU benchmarks place a heavy workload on the CPU while minimizes the influence of other system components. SiSoft’s SANDRA 2012 incorporates a few CPU-centric synthetic benchmarks that test a chip’s performance with various mathematical workloads. The tests are multithreaded and generally scale with higher-clocked speeds and more CPU cores. SANDRA also provides results from other CPUs for easy comparison. Utilities like SiSoft’s SANDRA 2012 incorporate various easy-to-use, synthetic benchmarks for testing the performance of different system components. Another popular CPU benchmark is Cinebench. Cinebench renders a 3D scene using the animation engine from Maxon’s Cinema 4D. Cinebench is free, works with multiple operating systems, and can run in single-threaded mode (to test the performance of a single CPU core) or in multithreaded mode (to tax all of the cores in a CPU). If all is working properly, an Intel Core i7-2700K will score about 1.55 in Cinebench’s (R11.5) single-threaded test and about 7.05 in its multithreaded test. Maxon’s Cinebench, based on the company’s Cinema 4D animation software, tests single-threaded and multithreaded CPU performance.
GPU/Graphics Board
Myriad graphics-related benchmarks are available for testing a GPU’s performance. Many games have built-in tools to test performance; and you can test games that don’t with a utility called Fraps that shows real-time frame rates and tracks performance over time. Many synthetic and “canned” graphics benchmarks don’t use actual game engines to test performance, but produce comparable results nonetheless. Fraps tests how well a game is performing on your system, even if the game doesn’t offer a built-in benchmark. For testing a GPU’s performance, we recommend using a mixture of synthetic and real-world tests to see how the GPU handles a range of different workloads. Futuremark’s 3DMark 7 is a popular tool that provides an overall 3DMark score, as well as numerical results for each of the individual tests that contribute to the final score. Another handy synthetic benchmarking is Unigine Heaven. Heaven can test a GPU’s performance using DirectX 9, 10, or 11 or OpenGL paths, with varying levels of image quality and tessellation. Heaven’s results identify both an overall score and a frame rate. The Unigine Heaven benchmarking tests GPU performance in multiple DirectX or OpenGL modes. In a system powered by an Intel Core i7-3960X, when tested at a resolution of 1920 by 1200 with 4X MSAA, 16X anisotropic filtering, and high tessellation, an Nvidia GeForce GTX 560 Ti will score about 665 points in Unigine Heaven, at about 26.4 frames per second. At the same settings, a Radeon HD 7850 will score about 706 points, at 28 fps. If you have a faster GPU than those cited here, your system should be able to beat these scores, but a slower GPU won’t be able to catch them.
Memory
The most common method of evaluating memory performance is via synthetic tests designed to ascertain peak bandwidth and latency. Performance variables include the operating frequency and capacity of the memory, and the number of channels that a given system uses. AIDA64 Extreme Edition has an excellent built-in memory benchmark that tests read, write, and copy bandwidth, as well as latency; but it is available only as a limited trial unless you pay for the full edition of the tool. The free edition of SiSoft SANDRA 2012 offers memory bandwidth and latency tests, too. It reports bandwidth scores in gigabytes per second (GBps) and latency in nanoseconds. The tests are easy to run and take moments to complete. An Intel Core i7-2700K-based system with 8GB of DDR3-1333MHz system memory running in a dual-channel configuration (two memory sticks) should offer about 16 GBps of bandwidth at an access latency in the 29ns range. Higher clocked memory should deliver more bandwidth and lower latency. SiSoft SANDRA 2012’s Memory Bandwidth benchmarking tests peak bandwidth using both integer and floating point tests.
Drives/Storage
CrystalDIskMark is an excellent tool for testing a drive’s read and write performance at several different transfer sizes. To test the performance of a hard drive or solid-state drive adequately, your best bet is to use a benchmarking that evaluates read and write transfer speeds (with both sequential and random workloads), as well as access latency. Trace-based tests, like those used in PCMark, that track performance over time with simulated application workloads are also beneficial. One of the better free tools for testing a drive’s performance is CrystalDiskMark. This benchmark is particularly useful because it tests both sequential and random read and write speeds with both large and small block sizes, and with queue depths of up to 32. A SATA II Corsair solid-state drive earned the scores shown in the screenshot at right. Hard-disk drive scores will be much lower, but most newer SATA III SSDs will score higher. CrystalDiskMark doesn’t report access latency, however, so it’s a good idea to use a tool such as HD Tune, IOMeter, or the Physical Disk Benchmark in SiSoft SANDRA 2012 for this purpose.
Total System Benchmarking
Among total system benchmarking, the rather basic Windows Experience Index (WEI) built into Windows 7 and Vista isn’t a good choice, owing to the rudimentary nature of the tests and the lack of granularity in the results. Instead consider using a suite such as BAPCO’s Sysmark or Futuremark’s PCMark 7; both are widely accepted and generate extensive results. Sysmark is expensive and tends to be difficult to run, however, whereas PCMark 7 is available in a free basic edition and can be run with a single click. PCMark 7 runs a wide range of tests that tax CPU, GPU, memory, and disk performance; and it generates scores for each test–with higher scores reflecting better performance. PCMark 7 tends to emphasize disk/storage performance, but we’re fine with that. Upgrading from a hard drive to a solid state drive tends to be one of the best upgrades a user can make to improve system responsiveness, and PCMark 7’s results reflect that. Futuremark’s PCMark 7 evaluates system performance by testing CPU, GPU, memory, and storage subsystem performance. To give you a baseline for comparison, an Intel Core i7-2700K-based system with 8GB of RAM, a discrete Nvidia GeForce GTX 280 graphics card, and a 7200-rpm hard drive will earn a PCMark score of roughly 3800. Upgrade that same system with an SSD, and its score will jump to about 5100.
Digesting the Results
Most benchmarking scores are easy to understand. But keep in mind that higher scores don’t always point to better performance. On most benchmarks, higher frame rates or scores do mean that one system or component outperformed another; but some benchmarks are timed–and may output results in minutes or seconds. In such results, lower scores usually indicate better performance.
Important Notice: Tweet this article with the bookmark social media share below to stand a chance to win an ipad or start making money with your twitter account (it works only with your twitter account and the more articles you tweet the more you stand a chance to win an Ipad)
Tech Gadgets generally are tools, that makes our everyday tasks seamless. They reduce the stress in carrying out everyday tasks activities. Thanks to technological advancements, there are different gadgets for different fields. In this article, we explore a comprehensive list of must use home and office tech gadgets. Gadgets featured in this list, are gadgets are essentials you will need as a tech enthusiast.
1. Satechi Aluminum Type C USB Clamp
The Satechi Aluminium USB adapter clamps to your computer, providing you with lot more ports in I/O. It makes connecting peripherals to your computer a whole lot easier. You do not have to lean to connect peripherals. The ports on this adapter face the user, making it easy to fix and remove peripherals. The 2017 iMac and iMac Pro models feature additional Thunderbolt slots.
2. Logitech MX Vertical Ergonomic Mouse
The importance of a very ergonomic mouse cannot be overemphasized, it is needed for smooth workflow on your PC, it makes navigation a whole lot Logitech MX vertical ergonomic mouse, takes comfort to a whole new level. This mouse reduces the pain associated with continuous use of a mouse, to the barest minimum. The Logitech MX vertical ergonomic mouse keeps your hand in a natural handshake position, which eliminates the strain caused by using the mouse sideways. With a 4000 DPI, this mouse is a very high precision mouse.
3. Norton Core Router
Having a good router that outputs good wifi Signals for the internet, is very imperative. In this Era of the internet of things, the internet has become very essential in powering a lot of devices that we use today. Whether it’s your home or your office, you are certainly going to need a Wifi router.
Speaking on Wifi Routers, the Norton core router is a highly recommended router. It is one of those WIFI routers, that is very resistant to malware like VPN filter, a malware that has plagued more than half a million routers in more than 50 countries. Apart from being a very powerful router, the Norton core router features a very beautiful and intuitive design, that can easily blend into your surroundings, be it your office or your home.
4. Shinola Power Supply ( 5 Ports)
Be it your office or your home, good power extensions are very important, they let us power ower devices. If you are someone that has a lot of devices with different prongs or connectors, you are certainly going to need an extension with universal ports.
The Shinola power supply is a very good example of the kind of power extension you would want to purchase. It features 5 port + Dual USB ports, which lets you plug your smartphones and other USB using devices, directly to the power supply, which will, in turn, facilitate faster charge.
5. Brookstone Wi-fi Scanner
The Brookstone Wi-Fi scanner is very portable scanner, that lets you scan documents, directly to your PC, via WIFI. Unlike other scanners, the Brookstone Wi-Fi scanner is a very portable scanner, that can be easily transported, it fits into your pocket perfectly. Its portability and size save you a lot of space.
6. Anker Nebula Portable Projector
Over the years, we have witnessed the widespread use of projectors instead of TV. These days people find it super convenient to use projectors instead of conventional television. This Anker projector makes the process a whole lot sweeter. The Anker Nebula projector is a portable projector that can be used anywhere in the home or in the office, provided there is a screen. This projector maxes out at 720p resolution, features 300 ANSI of brightness and DLP Intellibright technology.
7. Beoplay M5 Speaker
A Bluetooth connected speaker is a very important piece of the gadget eco-system of any home or office. At some point, you may just desire to play songs or watch an informative clip, this is where these Bluetooth speakers come in. Instead of searching for AUX cords, you can just connect your devices to these Bluetooth speakers and begin jamming.
The Beoplay M5 is one of those Bluetooth speakers you would want in your office or home, it provides rich sounds, that satisfies the auditory needs of your ears. The M5 Bluetooth speaker was manufactured by Bang & Olufsen’s.
8. Grovemade Walnut Speakers
Looking for a very powerful table speaker, with a design that blends with the furniture of your home or office? The Grovemade speaker may just be what you need. It features an aesthetics that makes you mistake it for carved wood. I was designed by Grovemade and industrial designer Joey Roth, together they worked to harness the acoustic properties of wood to create a full and bright sound. This speaker also features trimmed leather mounts on stainless steel stands.
9. Bose QuietComfort 35 Series II
Generally, headphones are gadgets that convey sounds from their sources to our ears. So if tabletop speakers aren’t your thing, you should look into getting a good Bluetooth headphone. The Bose QuietComfort 35 Series 11 headphone, fondly referred to as the Bose QC35, is one of the most sought after noise canceling headphones we have today. it is a wireless headphone, with up to 20 hours of wireless play time. If you need complete immersion, this headphone may just be what you need.
10. Henge Docks Stone Tethered Laptop Dock
Last but certainly not least, is a gadget designed for Macbook users. The scarcity of ports on Apple MacBooks isn’t news anymore. The Henge Docks stone fixes this problem. It adds a wide range of ports to your Apple Macbook. Here you will find three USB 3.1 ports, Mini DisplayPort, audio, ethernet, power supply, and an SD Card reader.
There you have it – A comprehensive list of must use home and office tech gadgets. If you have other recommendations, feel free to drop them in the comment section below.
Despite the existence of laptops with built-in modems, majority of the laptops we have today rely on wi-fi connections, to gain access to the internet. Being the primary source of internet connectivity, having good wi-fi connections on laptops is very sacrosanct. Poor Wi-fi connections facilitate slow internet surfing, which is something the body wants.
In this article, we look at a tutorial on how to boost your WIFI connections on your laptop. Boosting your wifi connection will facilitate faster internet surfing. This tutorial is applicable on laptops running Windows operating systems, and laptops running MAC OS.
Reduce Distance Between Laptop and Router
Due to variance in signal strength, is a widely known fact that bringing your laptop closer to the router, it is a sure way to boosting wifi connections on your laptop. This method works flawlessly, in cases where the router has a short signal range. The closer your laptop is to the router, the better the signal.
Another way you can combat poor signals, as a result of router distance, is by making use of a mesh wifi system. This way, a mini router will be found in all rooms of your home. A mesh wifi system consists of the main router and its nodes. These nodes or satellite module feed from the signal of the main router, they conduct signals better. This way won’t have to bother about the distance of your laptop from the router.
Update Your Router Software
Updating your router software is another method you can employ to tackling poor wifi connections on your laptop. Routers feature a firmware that allows manufacturers to push an update to them, allowing manufacturers to fix bugs that may hinder the proper functioning of these routers. If you reduced the distance of your laptop from the router, and you are still experiencing poor wifi signal, the next step would be to update your router’s firmware.
Update Your Laptop Software
Still on software. After updating the firmware of your laptop, you should also consider updating the drivers of your laptop. Update the drivers that affect the wifi connectivity of your laptop. This can be done through the manufacturers’ website.
Install and External Adapter
Using an old laptop that runs slow on wifi connections? If yes, purchasing an external wifi adapter is very important. The effect of a very powerful wifi adapter won’t be felt on a laptop running an old wireless adapter.
External wifi adapters usually feature a large antenna and make use of updated technologies, designed to improve wifi signals on your outdated laptops. Using these external wifi adapters, you will need to connect them to your laptop via a functioning USB port on your laptop.
Disable the network hogs that run in the background
Another way to boost wifi connections on your laptop is to reduce the apps using the wifi connection. Having many background apps that make use if the connection will hinder hitch free surfing. You are advised to reduce these background apps to boost wifi connection on your laptop.
Check Your Transmission Power Settings
Some network adapters allow users to edit transmission settings, if the setting is available on your network adapter, you are advised to tweak the transmission settings on your network adapter. You can access this setting through the adapter’s driver interface program.
For better wifi signals, your transmission settings should be set to a maximum of 100 percent. Also, your power settings should be removed from the power saving mode.
There you have it – a comprehensive tutorial on how to boost connections on your laptop. In troubling shooting, the cause of a poor wifi signal, the tips mentioned above will be of immense help. You try each tip until the wifi signal on your laptop improves.
Installed software not designed for your laptop? Did you install a wrong driver on your laptop? Or did you mistakenly delete one of the important programs your laptop came with? Any of these will certainly affect the proper functioning of your laptop. Things like this happen to us sometimes. Events like this usually call for one thing, and that is resetting your laptop computer.
In this article, we explore a tutorial on how to reset a laptop, restoring it to factory settings. This tutorial covers procedures on how to reset laptops running windows and MAC OS back to their factory settings.
How To Reset/Restore A Laptop Running Windows Operating System Back To Factory Settings
Before you go ahead to formatting your windows laptop, please be aware that resetting your windows laptop will wipe out all your installed programs and files on your windows laptop. Using an external hard drive is a very secure way to back up your files. Once you have backup your files, you can proceed to reset your windows laptop using the steps listed below.
There is no autonomy when it comes to resetting windows laptops; there are several methods that can be employed in resetting a windows laptop. These methods are listed below.
How To Reset A windows Laptop, Using Built-In Reset Option On Windows 10
On your windows laptop, Navigate through settings > Update & Security > Recovery.
Under “Reset this PC” click on get started
You will be presented with the option to keep files, or remove everything. Select your preferred option. Keeping your files will reset your windows laptop to default, keeping your files and uninstalling your installed apps. The ” Remove Everything option,” remove resets your windows laptop, completely wiping your computer, remove all files and installed apps.
Please Note that click the ”Erase Everything” option, will provide you with another set of options to choose from. You will be asked to select between Removing everything or remove files and clean drives. Selecting the latter will securely erase your hard drive, making it impossible to do any form of recovery.
4. Once you have selected the option of your choice, you can proceed to click the reset button.
How To Reset A windows Laptop, ” Fresh Start” Option in Windows 10
As earlier mentioned, there are different ways to re-setting your windows laptop. Using the Fresh Start option is another method. Steps to be followed when using this method are listed below:
On your windows laptop, Navigate through Settings > Update & security > Recovery page
Click the link ”Learn how to start fresh with a clean installation of windows” you will find it at the bottom of the page. You will be directed to windows defender security center. Click on Get started to proceed.
Note: Using the fresh start option, your files will be retained. There no option to remove all files. Also note that using the fresh start option, the latest version of windows will be automatically be downloaded on your windows laptop. Fresh start option reinstall all bloatware and keeps some of your settings intact.
Reinstall Using A Windows Installation Media
Using Windows 7 or later, this method is for you. The methods mentioned above is available on Windows 8 and above. If you use windows 7 or lower, you can reset your windows laptop using windows installation media.
What is windows installation media? Windows installation media is an ISO file burnt into a pen drive or DVD. Windows installation media allows you re-install windows from scratch, provided you have a product key.
How To Reset/Restore A Laptop Running MAC OS Back To Factory Settings
Unlike Windows operating system, re-setting laptops running MAC OS is a lot easier. There is autonomy here, as there is only one method of getting it done. The steps are listed below:
Note: Please be aware that re-setting your MAC Book will completely wipe your hard drive, no file will be left, and all settings will be restored to default. Backup your files if need be.
Hold Down Command and R keys on your keyboard, and turn on your MAC Book. Let
both keys go, when te Apple Logo pops up
Select Langauge and click the arrow facing right to continue
Select Disk utility and continue
Select your startup disk. Startup disk is named Macintosh HD by default
Click the erase button
From the drop-down menu, Select MAC OS Extended and click erase.
click done and the exit window
Connect to wifi
Select Reinstall MacOS
Click on continue and click agree
Select boot disk and click on Install
wait for the installation to complete
Note: Your MAC Book is will restart several times during the installation. You shouldn’t be bothered, as it is normal for it to reboot.
There you have it – a comprehensive tutorial on how to reset a laptop. As you might have already observed, re-setting a laptop isn’t as difficult as most people claim, all you have to do is follow the steps listed above. If you have any question, feel free to drop them in the comment section below.
When you are planning to install Windows 10, Windows 8.1 or Windows 7 on a PC, one of the requirements involves creating media to boot your computer into the setup wizard. This is especially true if you are performing a fresh installation of Windows. In which case, your boot options are DVDs and USB drives.
Since most PC these days hardly come with an in-built DVD drive, your options are further limited to either using an external DVD drive or a USB flash drive.
A lot of people, including me, will favor using a USB flash drive to install Windows 10. However, if you have newer hardware, it’s likely that you’re using Unified Extensible Firmware Interface (UEFI), instead of the legacy Basic Input/Output System (BIOS). If this is the case, you also have to ensure that the bootable media supports the firmware type before you can proceed with the installation.
How is UEFI different from BIOS?
The BIOS will soon be dead: Intel has announced plans to completely replace it with UEFI on all their chipsets by 2020. But what is UEFI, and how is it different from the BIOS we’re all familiar with?
Both UEFI and BIOS are low-level software that starts when you boot your PC before booting your operating system, but UEFI is a more modern solution, supporting larger hard drives, faster boot times, more security features, and—conveniently—graphics and mouse cursors.
Fortunately, if your device features a UEFI firmware, you have multiple ways to create a USB bootable media to install Windows 10, Windows 8.1 or Windows 7. You can use the Media Creation Tool, which is an easy-to-use utility made by Microsoft that downloads and copies the installation files onto a removable drive with support UEFI and BIOS. Or you can use WinToFlash, which is a freely available third-party tool that allows you to quickly create a media with support for UEFI firmware.
In this guide, we’ll try to walk you through the steps to create a bootable USB flash drive with support for both BIOS and UEFI. First we will try without a software, this should work for Windows 10, Windows 8.1 & Windows 7. However, some BIOS may not recognize your USB flash drive as a boot media, using the Media Creation Tool or WinToFlash software will resolve this.
You can always fall back to our troubleshooting guides should you encounter any problems while creating your bootable USB flash drive.
What you need
Before you begin, make sure you have an internet connection if you don’t already have a copy of the Windows OS install in a DVD, .iso or in a folder. You should also have sufficient data storage available on a computer, USB or external drive for the download. Other requirements may include:
A copy of the Windows OS install .iso, in a folder or DVD. You can use this page to download a disc image (ISO file) that can be used to update or install Windows 10, Windows 8.1 or Windows 7. The image can also be used to create installation media using a USB flash drive or DVD. Windows software download is free on the Microsoft OS download page but you might need to purchase a license for usage.
A blank USB flash drive with at least 5GB (or 4GB for Windows 8.1 and below) free space. This drive will be formatted, so make sure it doesn’t contain any important files.
Technician PC – Windows PC that you’ll use to format the USB flash drive
Destination PC – A PC that you’ll install Windows on
Boot Windows from your USB flash drive
Having met all the requirements above, any of the three methods below will get you a bootable USB flash drive. Make sure to pay close attention and ask any questions you may have on the comment section.
One of the most important thing to watch out for is the storage capacity of your USB flash drive. Windows 10 October release will require your flash drive to have at least 5GB storage capacity.
Also, if you are using a modern PC and your device features a UEFI firmware, you will need to format your USB flash drive using FAT32 file system which has a file size limit of 4GB. The Windows image file (sources/install.wim) in Windows 10 October release exceeds this limit.
Step 1 – Format the drive and set the primary partition as active
Connect the USB flash drive to your technician PC.
Open Disk Management: Right-click on Start and choose Disk Management.
Format the partition: Right-click the USB drive partition and choose Format. Select the FAT32 file system to be able to boot either BIOS-based or UEFI-based PCs.
Set the partition as active: Right-click the USB drive partition and click Mark Partition as Active.
Step 2 – Copy Windows Setup to the USB flash drive
Use File Explorer to copy and paste the entire contents of the Windows product DVD or ISO to the USB flash drive.
Step 3 – Install Windows 10 / Windows 8.1 / Windows 7 to the new PC
Connect the USB flash drive to a new PC.
Turn on the PC and press the key that opens the boot-device selection menu for the computer, such as the Esc/F10/F12 keys. Select the option that boots the PC from the USB flash drive.
Windows Setup starts. Follow the instructions to install Windows.
Remove the USB flash drive.
How to create a Windows 10, 8 & 7 UEFI boot media using WinToFlash Software
WinToFlash creates a bootable USB with any modern Windows Desktop [PHOTO CREDIT: EBENEZER OBASI]
If for some reasons, copying Windows through file explorer didn’t work, you can use the WinToFlash tool to create an installation media with UEFI support. Of course, the Windows Media Creation Tool will equally work if your target is to install Windows 10 on a PC. However, it’s faster to use this tool if your already have a copy of the Windows OS install in a DVD, .iso or in a folder.
To create a Windows install media with support for UEFI, connect a USB flash drive with at least 5GB (or 4GB for Windows 8.1 and below) of space, and then use these steps:
Step 1 – Download & Install WinToFlash Software.
Download the free lite edition of WinToFlash from the official website. Under “Download,” click Lite edition Setup Download.
After download is complete, open your download path and double-click the Novicorp WinToFlash Lite [The Bootable USB Creator] x.x.x Setup.exe file to launch the installation wizard.
Follow the installation wizard to install WinToFlash on your PC.
Step 2 – Set Windows source and destination media
After installation, click on the Novicorp WinToFlash icon from your desktop to launch the WinToFlash tool and install Windows 10 OS and below from your USB Flash Drive.
From the application start screen, click Windows Setup Bootable USB Wizard. Select the installation source of the Windows, if you have downloaded an ISO file or loading from a folder.
Startup screen of WinToFlash tool. Select Windows Setup Bootable USB Wizard to load a single OS to your boot media.
Specify Windows source path or file. If your OS is in a CD or extracted from image to a folder, go with the first option. Select the second option if the Windows software is an ISO image or archive.
Click next to setup your Windows source and destination path.
The ‘Windows files path‘ specifies the path to the Windows installation files on your PC. This can be an ISO – archive or folder – CD path, depending on your selection on the previous screen.
Use the ‘USB drive’ drop-down to select the media you want to make bootable.
Step 3 – Wrapping things up
Click next and review all parameters. Make sure that you have chosen the right USB drive.
Ensure that you have chosen the right media to avoid wiping important files from your flash drive.
Complete settings by confirming to wipe USB flash drive and accepting WinToFlash terms (click on the images below to expand).
After completing the steps, the WinToFlash tool will create a bootable media, which you can then use to install Windows 10 on devices using UEFI.
How to create a Windows 10 UEFI boot media using Media Creation Tool
If you’re planning to upgrade or install a fresh copy of Windows 10 on a system using BIOS or UEFI, you can use the Media Creation Tool to create a compatible bootable media. Just insert a USB flash drive with at least 5GB of storage to your computer, and then use these steps:
Under “Create Windows 10 installation media,” click the Download tool now button.
Click the Save button.
Click the Open folder button.
Double-click the MediaCreationToolxxxx.exe file to launch the utility.
Click the Accept button to agree to the Microsoft terms.
Select the Create installation media (USB flash drive, DVD, or ISO file) for another PC option.
Click the Next button.
Select the correct language, architecture, and edition of Windows 10 if the default selection doesn’t reflect the desired options.
Quick Tip: Under “Architecture,” you can select the Both option to create a bootable media that will work for devices using 64-bit and 32-bit processors. Also, if you’re unable to change these settings, make sure to clear the Use the recommended options for this PC option.
Click the Next button.
Select the USB flash drive option. (If you don’t see the drive, click the Refresh drive list option.)
Click the Next button.
Select the removable drive from the list.
Click the Next button. Once you’ve completed these steps, the wizard will download the Windows 10 installation files, and it’ll create the bootable media with support for UEFI as well as legacy BIOS.
Troubleshooting Windows 10, 8 & 7 Boot Media
UEFI systems cannot boot from NTFS and instead the device needs to be formatted with FAT32 which has a 4GB maximum size. If copy fails, it’s likely that the install.wim file on the media is larger than this file size limit. The solution is to split the WIM into multiple files using DISM.
Split the Windows image
Split a Windows image (.wim) file into a set of smaller (.swm) files. Use this procedure when you’re installing Windows from media that can’t handle the Windows image file size, for example:
DVDs (A standard single-sided DVD stores 4.7GB).
USB keys formatted as FAT32. FAT32 is required to boot many modern (UEFI-based) PCs, but has a maximum file size of 4GB.
Split the file
Mount your Windows distribution ISO.
Launch Windows Command Prompt. The quickest and easiest way to do that is to type “CMD” into your Windows search box.
Right click on the resulting “Command Prompt” and “Run as Administrator”.
Copy everything except the Windows image file (sourcesinstall.wim) to the USB drive. Either drag from the mounted ISO and drop on the flash drive, or use the command below:
robocopy D: E: /s /max:3800000000
Where D: is the mounted ISO and E: is the USB flash drive.
Split the Windows image file into smaller files, and put the smaller files onto the USB drive:
C:sourcesinstall.wim is the name and the location of the image file that you want to split.
C:sourcesinstall.swm is the destination name and the location for the split .swm files. The first split .swm file is named install.swm file. The file names for the next files include numbers, for example, install2.swm file, install3.swm file, and so on.
3700 is the maximum size in MB for each of the split .swm files to be created. Kepp the size of the files below 4000 (4GB) to avoid getting the error 87 (invalid parameters) error.
Note, Windows Setup automatically installs from this file, so long as you name it install.swm.
Windows 10 comes with a lot of amazing features but not all of them are readily available. Let’s dig a little deeper and unveil new tweaks, tricks and features that will change the way you use your PC.
With it being free, and Microsoft pushing the update to users, most of you probably already have migrated to Windows 10. Its constantly evolving nature means fresh features arrive twice per year, and with all the new goodies come a legion of new tweaks and tricks—some of which unlock powerful functionality hidden to everyday users. Others simply let you mold the Windows 10 experience into the shape you see fit. Here are some of the most useful tweaks, tricks, and tips that we are able to put together.
However, you need to brace yourself as some of these may break as the operating system evolves given Microsoft’s new “Windows as a service” mentality. The idea is to keep this page updated overtime to reflect the OS’s current status.
Activate Windows 10 Night Light
If you use an iPhone, iPad or macOS system you may use the built-in blue light feature ‘Night Shift’.
The Night Light feature you’ll find in Windows 10 is pretty much Night Shift for Windows.
Night Light makes the screen warmer in the evenings as it reduces the amount of blue light emitted.
Various scientific studies show that exposure to blue light in the evening makes it harder to fall asleep because (like all artificial light) it affects the circadian rhythms that manage our body clock.
Once preserve of late-night caffeine fuelled coders and over-worked, under-fed writers, screen temperature features have since become mainstream. Google’s Android and ChromeOS operating systems have one, as do iOS and macOS from Apple, and Microsoft’s Windows 10.
Like those features, Windows 10 Night Light automatically warms the temperature of your display after sunset. This makes your laptop screen or PC monitor easier on your eyes and reduces disruption to your circadian rhythm, helping it to tick along nicely.
In the morning, your display returns to its regular settings.
Night Light is a system feature; you do not need to install a separate application like Flux to use it. This makes it very easy to automatically adjust the screen temperature in Windows 10.
Night Light for Ubuntu will automatically adjust the amount of blue light your monitor or laptop display emits based on your location and the time of day.
These features are said to help reduce eye strain by adjusting your screen’s color temperature during after-dark computing sessions. That makes it easier to fall asleep when you’re done.
To activate Night Light, head to Settings > System > Display. Once you’ve done so, open the feature’s settings to fine-tune its behavior.
Scroll any window even when they’re inactive
It used to be that Windows only allowed you to scroll active windows. Now in Windows 10, you can set an option to scroll both active and inactive windows by just hovering with the mouse cursor over a window.
This feature is not a ground-breaking Windows 10 hack or tweak but it comes quite handy when time is in essence and your need to peek through your to-do list.
Windows 10 inactive scroll feature is enabled by default, but if it’s not, go to Settings > Devices > Mouse & touchpad, and make sure to enable the Scroll inactive windows when I hover over them option.
Find the hidden images
The lock screen and logon screen have some really cool images, which as it turns out, by default both rotate AND change.
It may seems Microsoft has a CDN that updates these images based on what you click that you like or not. Want to save one or more of those images for future use? Here’s where they are hiding!
Open Explorer and browse to:
%localappdata%PackagesMicrosoft.ContentDeliveryManager_[custom string of characters]LocalStateAssets
Copy all of the files to a new directory.
Open a command prompt in that directory.
Run this command ren . *.png and [enter]
Browse through them and find the ones you like!
Make Cortana’s ears perk up
Cortana’s finally made the leap to the PC in Windows 10, assuming many of the operating system’s search functions and dishing out just as much sass as the Windows Phone version. But by default, she doesn’t listen for your commands. But by default, she doesn’t listen for your commands.
If you’d like to be able to just shout commands at your PC, launch Cortana by clicking the search field in the taskbar and select the three-lined options menu in the upper-left corner. Select Settings for the list, then simply enable the “Let Cortana respond when you say ‘Hey Cortana’” option. You’ll need an active microphone for this to work, of course.
While you’re poking around Cortana’s options, you can dive into the Notebook menu to fine-tune exactly what personal data Microsoft’s digital assistant can access. Remember, however, that like Google Now, Cortana’s effectiveness is directly related to how much she knows about you.
Enabling Cortana on the Windows lock screen lets you use voice commands to view and edit your schedule at a glance. It’s pretty handy! To turn on the feature, open Cortana and head to “Cog” icon > Settings > Use Cortana even when my device is locked.
Secret, powerful new command line tools
Windows 10 packs a slew of nifty new command line features, including—hallelujah!—the ability to copy and paste inside the command prompt with Crtl + C and Crtl + V.
To activate the goodies, open the command prompt. Right-click its title bar, then select Properties. You can find and enable the new features under the Edit Options section of the Options tab.
Bash comes to Windows
If you got all hot and bothered over the ability to use keyboard shortcuts to paste text in the Command Prompt, wait until you get a load of this.
The Windows 10 Anniversary Update added the full, legendary Bash shell to Microsoft’s operating system, thanks to a partnership with Canonical, the company that guided Ubuntu Linux’s development. And it’s running natively, without virtual machines or containers. With the right tricks, you can even use Bash to run graphic Linux applications or even the Unity desktop itself right inside Windows—though those unintended features are definitely limited. Look for Ubuntu, Fedora, and SUSE Linux entries in the Windows Store to start using Bash in Windows.
Windows 10 Audio Source Switching
Windows 10’s in-taskbar volume controls pack a niche, yet nifty touch: selectable sources. Clicking the audio device name in the volume controls summons a list of all connected audio outputs, meaning you can switch from your headphones to your speakers and back again without having to dive into the Control Panel. Yay!
The April 2018 Update added more granular audio options to the Settings app too, breaking them away from the Control Panel even further.
Activate Windows 10 Spatial Sound
That’s not the only audio trick lurking within Windows 10. Windows Sonic for Headphones offers a virtual surround sound format that can make the audio coming from your headset feel more lush and atmospheric. The effectiveness of the feature varies depending on your gear and how sensitive you are towards audio cues.
To activate Windows Sonic, right-click the speaker/audio icon in the system tray on the right side of your task bar, then select Spatial sound (none). In the window that opens, click the drop-down menu and select Windows Sonic for Headphones. Click , then OK, and you’re done!
Windows Timeline
Timeline helps you pick up where you left off. Clicking the Task View button in the taskbar or pressing Windows Key + Tab summons the feature, which displays a—you guessed it—time line of your activity in supported apps, stretching back over the past. Even more handily, Microsoft lets you group related apps together into “Activities” in Timeline, so that when you open that week-old budget document, for example, the presentations and websites you referenced at the time can be easily summoned as well. This even syncs across devices, so it could be especially useful if you use multiple PCs.
The fly in the ointment: Only a limited number of apps work with Timeline currently, though Microsoft offers tools for developers to bake in support. That includes Office, Adobe’s Creative Cloud, and native Windows 10 apps like News and Maps, but Microsoft Edge is the only compatible browser. Bummer. You can deactivate Timeline by heading to Settings > Privacy > Activity History.
Cloud clipboard
Windows 10’s copy and paste functionality has been hit and miss for years, but now you can deploy that bugginess across multiple PCs with cloud clipboard—a genuinely useful feature introduced in the October 2018 Update. Head to Start > Settings > System > Clipboard and enable “Sync across devices” to start copying data on one PC and pasting it on another PC.
While you’re in this menu, enabling “Clipboard history” lets you save multiple items to the clipboard so you can use them again later. Nifty stuff.
Your Phone
Want to tie your phone and PC closer together? Download Microsoft’s Your Phone companion app for Android, and link it to your PC using the new Your Phone app from the Microsoft Store.
Your Phone lets you open, view, copy, and share photos that you took on your phone, as well as send and reply to texts right on your PC. There’s an iOS version as well, but it’s much, much more limited.
Snip & Sketch
The firmly entrenched Snipping Tool within Windows is finally getting replaced and upgraded. The October 2018 Update added Snip & Sketch, a new tool that lets you select a portion of the screen to copy when you press Windows + Shift + S. After doing so, the selected screenshot will be copied to your clipboard, so you can paste it into any image editing software—including the standalone Snip & Sketch app, which lets you annotate and share your marked-up images.
Near Share
Near Share makes it easy to share files and URLs with local PCs over the air, negating the need for flash drives or chat apps to pass something along. If you open the Share interface in Microsoft Edge or File Explorer, you’ll see PCs with Nearby Sharing enabled appear as an option if you have the April 2018 Update installed. Recipients receive a pop-up notification when something is sent. Think of it as an alternative to Apple’s Airdrop, albeit one without any mobile support.
To use Near Share, your computer needs both Bluetooth and Wi-Fi working, and you’ll have to enable the Nearby Sharing option in Settings before you can start using it. Transfer speeds were pretty slow and Bluetooth-like in our tests, so you may still want to resort to alternative means to pass especially large files around. Microsoft says the feature automatically chooses to use Wi-Fi or Bluetooth depending on what’s available, and what’s faster.
Ransomware protection
Ransomware is a growing problem. It infects PCs, encrypts your files, and holds everything hostage until you pay a ransom—hence the name. The best defense against ransomware is frequent backups and strong security software, but Windows 10 now includes basic protection right in your operating system.
Controlled Folder Access “protects your files and folders from unauthorized changes by unfriendly applications.” Your Documents, Pictures, Movies, and Desktop folders are protected by default, though you can block other folders manually or whitelist trusted software to access your locked-down info. You can tweak Controlled Folder Access by opening the Windows Security app (formerly Windows Defender), heading to the Virus & threat protection tab, and clicking the “Manage ransomware protection” link at the bottom.
Dark theme
If you love dark themes, you love dark themes. Light themes sear your eyeballs. Fortunately, Windows 10 now supports a dark theme.
Head to Start > Settings > Personalization > Color and select the “dark” option under “Choose your default app mode.” The Windows 10 October 2018 Update extended the dark theme to include File Explorer, too. Enjoy!
Enable Windows 10 Dynamic Lock
Say goodbye to Windows + L. Dynamic Lock is a handy feature that pairs your PC with your phone over Bluetooth, then automatically locks your computer when you wander away from it.
To start using it, marry the two devices in Control Panel > Hardware and Sound > Devices and Printers, then activate Dynamic Lock at Settings > Account > Sign-in options.
Game Bar
If you’re into playing around on your PC, Windows 10’s Game Bar—summoned by pressing Windows + G in-game—holds all sorts of nifty extras. It’s always been able to take screenshots or videos of gameplay clips, but as of the Windows 10 Creators Update, the Game Bar also offers easy-peasy Beam game streaming and the intriguing Game Mode, which can improve performance on resource-limited systems. The October 2018 Update overhauled the interface yet again, adding inline volume controls.
The Game Bar’s handy even if you don’t actually play, as it can be used to record video of any app—not just games. Windows 10 also has a dedicated Gaming section in its Start menu Settings to let you tinker with options, including Xbox networking and parental controls.
Per-app GPU management
The Windows 10 April 2018 Update added the ability to tell Windows which graphics hardware—discrete or integrated—to use when you open specific apps. It sounds niche, but the feature could prove pretty helpful if you’ve got a gaming laptop and want it to last longer.
By default, booting up a game switches over to discrete graphics, which use a lot more energy than the graphics cores integrated in Intel chips and AMD Ryzen APUs. But a lot of indie and retro games play just fine on integrated graphics. With Windows 10’s per-app GPU management, you can manually tell the system to stick to the more power-efficient option for games that don’t need the extra oomph.
Go to Settings > Display, then click the Graphics settings link at the very bottom of the page to start tinkering.
OneDrive Files on Demand
It’s back, huzzah! OneDrive Files on Demand resurrects Windows 8.1’s “placeholder” feature for the cloud storage service baked into Windows 10. OneDrive Files on Demand shows all of the files you have stored in OneDrive in a folder on your PC, but they’re just pointers synced with the cloud—not actually files installed on your PC. Unless you want them to be. You can select which files and folders to make available locally.
Storage Sense
Over time, your PC can quietly fill with needless junk without your even realizing it, as the Recycle Bin and temporary files suck up your storage. Storage Sense helps combat the creep. Head to Settings > System > Storage and enable the Storage Sense option to have Windows start automatically clearing out unneeded temporary files, and deleting any files in your Recycle Bin over 30 days old. You can tweak those options using the Change how we free up space link underneath the option.
The October 2018 Update added the ability to have Storage Sense send long-untouched files from anywhere on your computer to your OneDrive cloud storage, freeing up space on your hard drive. It could be a useful addition if you’re close to filling up your local storage, but keep an eye on your available OneDrive space—cloud storage isn’t free. Fortunately, the feature includes granular controls.
Mixed Reality
The Fall Creators Update added “Mixed Reality” to Windows 10. The most obvious use for it is in the legion of new Windows Mixed Reality headsets, but you can check out the benefits even if you don’t have one of those. The Mixed Reality Viewer app lets you drag digital 3D objects you’ve created in the Paint 3D app into the real world, using the combined might of your device’s camera and display. It’s not really augmented reality since you can’t interact with the objects, but it’s closer to “Mixed Reality” than the headsets are.
Somewhat related, the nifty Story Remix tool in the Photos app lets you add fantastic 3D animations to videos you’ve captured, among many other talents. It’s pretty sweet!
Start menu folders
What’s old is new again: You can create basic Start menu folders in Windows 10, organizing Live Tiles into clusters. Simply drag your Start menu apps on top of each other to create folders that expand when clicked on. As of the October 2018 Update, you can now name the folders you create, but you have to expand it open to see the option.
Troubleshooting, troubleshot
The Windows 10 Creators Update added a helpful touch for distressed PC users. The operating system’s consolidated all of its troubleshooting tools in a single location: Home > Update & Security > Troubleshoot. If you run into trouble, run there first.
Turn off File Explorer’s Quick Access view
When you open File Explorer in Windows 10, it defaults to a new Quick Access view that shows your most frequently accessed folders and recently viewed files. I love it, personally, but if you’d rather File Explorer defaulted to the “This PC” view found in Windows 8, here’s how.
Open File Explorer, then select View > Options from the Ribbon. A Folder Options window will open. Click the “Open File Explorer” drop-down menu at top, then select the “This PC” option. Click OK and you’re done!
Manage notifications
Windows 10’s Action Center houses and manages the notifications spawned by your system’s various apps. You might not want every Windows Store app you install barking at you all the time, however, or maybe you don’t want to see any notifications while you’re in presentation mode. You might just want to silent the annoying ads that the Get Office app spawns. Fortunately, those are easy to tweak.
To tinker with you your notification settings, head to Start menu > Settings > Systems > Notifications and actions. Individual Windows Store apps, like the Mail app, tend to have more granular notification options in the Settings menus inside the apps themselves.
Schedule your restarts
This is wonderful. If you’ve got pending updates that require you to reboot your PC, Windows 10 will allow you to schedule a specific time for it to do so. Finally!
Open the Settings option in the Start menu, then head to Updates and Recovery > Windows Update > Restart options to see the scheduling screen above.
Get Windows updates from other sources
But the Windows Update upgrades don’t end there. Windows 10 introduces a new option that lets you download updates using peer-to-peer technology, rather than Microsoft directly. It could help you get that hot security patch faster when everybody’s hammering Microsoft’s dedicated servers, or save you bandwidth in a computer-crowded house—just download the new patch once from Microsoft, then share it among the PCs under your care.
To tinker with the setting, head to Start > Settings > Update & Recovery > Delivery Optimization. By default, “Get updates from more than one place” is enabled and configured to grab updates from PCs on both your local network and the Internet at large. If you don’t like the idea of your PC using your bandwidth to share Windows Updates with strangers, be sure to disable it. If you leave it active, the “Advanced options” link lets you fine-tune how Windows uses your network to download and share updates, as you can see above.
Seize control of Windows Updates
While the ability to schedule installation times for updates is very welcome indeed, not everyone is happy about the way Windows 10 handles patches—specifically, that you can’t refuse them. Windows 10 Pro users—but not Windows 10 Home users—can delay downloading updates for some time, but eventually, Microsoft will force them on you.
There are some actions you can take to exert control over your Windows Update experience, however. Most notably, if you’re using Wi-Fi for connectivity, you can set Windows 10’s Wi-Fi connections as metered to download updates when you’d like to, rather than when Microsoft wants you to. The Active Hours feature lets you tell Windows specific times not to install updates. And if you ever encounter a borked update that refuses to play nice with your PC, Microsoft’s released a tool that allows you to choose individual updates so they won’t be downloaded again.
Those workarounds aren’t a replacement for being able to manually choose the Windows Update you’d like to install, but they should help ease the sting a little, at least.
Fresh keyboard shortcuts!
Windows 10 packs a handful of fresh keyboard shortcuts, all tied to newfound abilities inside the revamped operating system. There are many more than we can list here, so head over to our guide to Windows 10’s keyboard shortcuts to learn all about them. If you really want to get fancy, augment those hotkeys with Windows 10’s new touchpad gestures for true shortcut mastery.
Declutter your taskbar
Two of Windows 10’s standout features are its Cortana search integration and newly added virtual desktop support—but they claim a sizeable chunk of your taskbar. If you don’t care about either (or don’t mind using Windows key + Tab to leap through virtual desktops) you can reclaim that onscreen real estate.
Everything starts by right-clicking an empty section of your taskbar. Select Cortana, and choose to Show Cortana icon only. You can also remove the Cortana and Task View buttons from the same Taskbar menu.
Thank You!
We feel the need to thank you following through with this long episode of top 30 Windows 10 trick, tips and tweaks. The article doesn’t stop here; share your ideas with us on the comment section.
If you really want to get fancy, augment those hotkeys and use Windows 10 like a ninja, try new Windows 10 touchpad gestures for laptop.
Microsoft changed Windows for the better when it introduced trackpad gestures in Windows 8. The new gestures made controlling your PC a far more fluid experience, helping you get things done more efficiently without the need for mouse-like buttons at the top of the touch area.
In Windows 10, Microsoft improved on Windows 8’s foundation. Beyond integrating existing gestures, the company added new touch controls and dumped items that wouldn’t make any sense in Windows 10, like swiping in from the right edge for the Charms bar (since Windows 10 doesn’t have a Charms bar).
The only requirement for using these gestures is that you have a precision touchpad, so some older laptops won’t be able to use them.
If you’re not sure if your touchpad supports gestures, open the Settings app and go to Devices > Mouse & touchpad. Under the “Touchpad” heading it will say “Your PC has a precision touchpad” if you can swipe and tap instead of clicking.
Select an item: Tap on the touchpad
Scroll: Place two fingers on the touchpad and slide horizontally or vertically
Zoom in and out: Place two fingers on the touchpad and pinch in or stretch out.
Right-click: Tap the touchpad with two fingers, or press on the bottom right corner
Open Task View: Place three fingers on the touchpad and swipe up (away from you).
Show desktop: Place three fingers on the touchpad and swipe down (towards you). Reverse the movement to get all your windows to return.
Switch between open windows: Place three fingers on the touchpad and swipe right or left (this is the same as pressing Alt + Tab).
Drag an open window: Double-tap and then drag from the title bar
Open Cortana: Tap the touchpad with three fingers. If you’d rather this gesture opened Action Center instead, you can change this default in Settings > Devices > Mouse & touchpad.
If you’re starting to dip your toes into creating HD videos then you may find that sometimes the videos that you save in HD don’t actually look that great. For beginners it can be difficult to navigate through some of the technical areas of video settings – but it is necessary to do so if you want to ensure that the videos you save in HD actually turn out well.
Understanding Resolution
Essentially ‘HD’ or ‘High Definition’ is a type of resolution. In turn, resolution is a description of the amount of pixels contained in the video. For example a ‘Full HD’ resolution of 1080p is essentially 1920×1080 would be 1920 pixels wide and 1080 pixels tall.
While the resolution does affect how your videos appear, it is by no means the only factor at work, however. Assuming you’re saving an HD video in HD resolutions and it doesn’t look good then that likely means that there is some other factor that is the culprit.
Looking at the Bitrate and Frame Rate
Aside from resolution, the two big factors that can affect the quality of your videos are its bitrate and frame rate. The frame rate is essentially the number of frames per second that will be displayed on your screen – so the higher it is, the ‘smoother’ your video will appear. Ideally the number to shoot for in terms of frame rate is 60 for the smoothest possible playback supported by most monitors and TVs.
On the other hand, bitrate is a bit harder to understand but is basically the amount of space that can be used for every second of video. As such a higher bitrate will provide a better quality but come at the cost of a much larger file size. If the video isn’t allowed to have enough space to properly display at that resolution then you can expect the quality to be poor.
That is part of why using Movavi Screen Capture Studio for HD video capture is ideal. Not only is it capable of recording HD videos at a high frame rate, but it can also help you to save it easily with presets to automatically optimize your video based on the device or platform that you’re using.
It even includes a complete suite of video editing features so you can cut and combine video segments, enhance the video quality, apply special effects, add audio tracks, and insert customizable text. In short, you should be able to use Movavi Screen Capture Studio to improve your video further.
If you want to create and save HD videos while making sure they look good there is no easier way than by using Movavi Screen Capture Studio. Just give it a try for yourself and see what it can do.
How organized is your Windows 10 start menu? Do you have everything you frequently use on the start menu? What about your favorites site? Windows 10 offers tons of choices for desktop programs, and apps from the Windows Store can be useful too. But there are still probably a few key webpages you turn to every day instead of a desktop program or modern UI app.
Wouldn’t it be nice to have those lovely websites available to you on the Windows 10 Start menu? Here’s how to do that.
The Edge way
Microsoft Edge in Windows 10 has pin-to-Start functionality built-in.
Open Microsoft Edge and then navigate to the page you want to add. In the upper right-hand corner, click the three horizontal dots, and then from the drop down menu select Pin this page to Start. A pop-up window will appear asking you to confirm. Click Yes and you’ll find the site at the bottom of the live tile section in your Start menu.
The downside? This method is that links will only open in Edge. Fortunately, there’s a way around that. If you want links to open in your default browser instead of Edge, you have to use a little bit of trickery, but nothing too complicated.
The non-Edge way
Open Internet Explorer and navigate to the webpage you want to add to Start. For our purposes, let’s say it’s Facebook.
Once you’re on Facebook, right-click in an open space on the site and select Create shortcut from the context menu. IE will then show a pop-up window asking if you want to create a desktop shortcut. Click Yes.
To do the same thing in Chrome and Firefox, go to the address bar and click-and-drag the icon to the left of “http,” and drop it on the desktop. The icon will either be a green lock, a rectangular piece of paper, or a globe.
Pro Tip: In my experience, you’ll generally get better looking icons using Internet Explorer for this step.
Next, right-click the desktop icon you just created and select Copy.
Add to Start
Now type “run” into the Cortana/search box. The top choice should be the Run desktop app.
Once Run opens, type inshell:programs, click OK, and an Explorer window will open.
Now just right-click in the main part of that window (be careful not to accidentally open a folder) and selectPaste.
Your website is now in Start but it’s buried in the “All apps” list. To remedy this, just clickStart > All apps and scroll down to the listing in the alphabetical list. Since we’re doing Facebook we’ll look under “F”.
Once you find it, just click-and-drag it onto the live tiles (right) side of the Start menu and you’re done.
After you’ve added your webpages to Start, feel free to delete your shortcuts from the desktop.
If you’d like to take this a step further and add an entire section of websites to Start, check out our earlier tutorial on customizing the Windows 10 Start menu. This will teach you how to group tiles together.
The catch with websites using the non-Edge method is you can’t remove them from Start through the right-click context menu. Instead, you have to type shell:programs into Run and then delete the shortcuts in the Explorer window that opens.
This is something that is almost synonymous with Apple devices. However, this time, Microsoft is taking over the spotlight with their new ‘Find My Device’ feature introduced in November Windows 10 update. The new Microsoft invention is not just for tablets or phones. Any Windows 10 device can take advantage of the new feature, including desktops and laptops.
Although the current version of ‘find my device’ may not take your breath away or have your tablet make a sound, lock itself, erase data, or anything like that when stolen – it’s still a great feature to keep tabs of your device’s location and capture its thief – if needed.
Find My Device is buried under Settings > Update & Security.
To active this feature go to Start > Update & Security > Find My Device.
On this screen you’ll see a big Change button under the heading “Find My Device is off.”
Turn this slider to On and you’re done.
Once you click Change you’ll see a pop-up panel that says “Save my device’s location periodically.” Turn the slider to On and you’re done.
Find My Device is now on.
You should now see that the Find My Device screen has changed to “Find My Device is on” as seen above.
To make sure everything is working, login to account.microsoft.com/devices with your Microsoft account and you should see the name of your PC listed under “Your devices.”
If you don’t know the name of your device, right-click on the Start button and selectSystem. In the Control Panel window that opens you’ll see it under “Computer name.”
Heads up! In what feels like a throwback to the late 90s/early 2000’s, Microsoft has discovered one helluva bug in Microsoft Office. Executed properly, the bug could be exploited to take over your entire system running just about any version of Windows.
You can find Microsoft’s full disclosure on the bug here, but here’s the bulk of what you should know:
This bug is being exploited in the wild, though Microsoft only knows of “limited, targeted attacks” so far
It affects Windows Vista, Windows Server 2008, Windows 7, Windows 8, Windows Server 2012, and Windows RT. XP isn’t mentioned as Microsoft no longer supports it — but yeah, it’s probably affected too.
If executed properly, the exploit gives the attacker the same permissions on your system as whatever type of user you’re currently logged in as. If you’re an admin, that means full admin rights — code execution, app installs, etc.
If you have Window’s User Account Control feature enabled, it’ll throw up a prompt asking if the file is okay to execute. If you aren’t 100% sure that the file is legit, avoid doing so.
The bug is part of PowerPoint’s OLE system, which lets you embed things like spreadsheets into a presentation. It’s supposed to be fairly well sandboxed; alas, it looks like someone found a gap.
Microsoft says that hacked presentations e-mailed to users and hacked presentations sitting on the web are potentially dangerous. The short version: avoid all but the most-trusted PowerPoint presentations right now.
So just how gnarly is this bug? Says Microsoft (emphasis ours):
An attacker who successfully exploited this vulnerability could gain the same user rights as the current user. If the current user is logged on with administrative user rights, an attacker who successfully exploited this vulnerability could take complete control of an affected system. An attacker could then install programs; view, change, or delete data; or create new accounts with full user rights.
But should you panic?
Nah. Do a few things things, and you should be safe:
1) Play it smart about what presentations you open
2) If you’re on a build of Windows that has User Account Control as an option, enable it (it should be on by default, in most cases.) This won’t fix the bug outright, but it’ll throw up a big permissions prompt that’ll remind you not to open mystery files.
3) Check out this advisory page from Microsoft, which offers up a temporary patch until Microsoft finalizes a security update.
Xbox One owners can attach their Kinect motion sensors to Windows PCs and tablets thanks to a new adapter introduced by Microsoft.
The new $49.99 adapter is specific to Kinect sensors built for Xbox One, and it plugs into the USB 3.0 port of Windows 8 PCs. Microsoft already sold a separate $199.99 Kinect for Windows v2 motion sensor, which plugs directly into PCs without the need for an adapter.
There will be no difference in the performance of the Kinect sensors, Microsoft said.
Kinect sensors can recognize movement and gestures, which then allows users to participate in games. It can do much more for PCs than a simple webcam-style monitor. Kinect sensors, for example, can work with Windows applications like Microsoft’s 3D Builder, which allows the scanning of 3D objects.
Software developers are working on various PC applications that take advantage of Kinect sensors, which are also used in engineering, design, and healthcare applications.
To further fuel developer interest, Microsoft on Wednesday also released the Kinect SDK 2.0, which is available for download. It is an update from the June preview and has more than 200 updates and improvements.
With SDK 2.0, “developers can commercially deploy Kinect apps in the Windows Store for the first time,” Microsoft said.
Windows 10 adds all sorts of nifty new features designed to appeal to PC power users, but it also includes some nifty newcomers that you can’t actually see—fresh keyboard shortcuts!
The details come courtesy of Brandon LeBlanc of Microsoft’s Blogging Windows blog. If you install Windows 10 be sure to check these out.
Snapping window: Windows key + Left or Right — LeBlanc says: “(Can be used with UP or DOWN to get into quadrants.)” Quadrants is the new Snap view mode that pins apps to the four quarters of the screen.
Switch to recent window: Alt + Tab – LeBlanc says: “Hold shows new Task View window view, let go and switches to app.”
Task view: Windows + Tab – LeBlanc says: “New Task view opens up and stays open.”
Create new virtual desktop: Windows key + Ctrl + D
Close current virtual desktop: Windows key + Ctrl + F4
Switch virtual desktop : Windows key + Ctrl + Left or Right
The Command Prompt and its Experimental Properties tab in Windows 10.
If you want to start using Windows 10’s greatly enhanced Command Prompt hotkeys (copy-pasting via the keyboard, yesssss) then be sure to check out Scott Hanselman’s extensive post on the topic.
Windows 10’s newfound support for keyboard shortcuts in the Command Prompt isn’t enabled by default, however. To enable it, right-click the Command Prompt’s title bar and select Properties. Open the new-to-Windows-10 “Experimental” tab and check the box next to “Enable experimental console features.” Finally, check the boxes next to “Enable new Ctrl key shortcuts” and “Extended edit keys,” then click OK.
A quality product called CWShredder from Trend Micro released to remove traces of coolwebsearch virus from the pc, this was one of the major virus released by hackers it creates auto bookmarks to your browser mostly to the porn and other related websites and it also changes the default home page and when you attempt to change it back it reverts the changes also it impacts system performance too which causes windows to crash and reboot very often this symptom has been noticed on vast number of pc’s. Download CWShredder today from EwtNet and safeguard your pc.
Effective hijack removal tool
Quick fix for browser related hacks
A quality product from major antivirus company
Focused on browser protection
Improves browser & system speed
Efficient in removing coolwebsearch virus
Fast and low on using system resources
Small size file and quick install
Easy navigation
Provides for all major browser
Click on the download button to begin the download
HijackThis is a security tool which generates logs with files that are required and point to malware files & un important files, if you are picky and need control of manually deleting files instead of letting the security software take control of deleting files, hijack this is a good option. But it is extrememly important to use tool with extra caution as you might end up deleting some important files too. Download free Hijackthis tool at EwtNet
Lite tool with control over deleting files
Fast and effecient
Does a good job in finding virus effected files
Need good technical understanding to use this tool while deleting files
User friendly design
Click on the download button to begin the download
Dense concentrations of Wi-Fi access points and routers in large cities could be attacked by malware able to spread silently from node to node, researchers at the University of Liverpool have shown for the first time.
In the experiment conducted by Jonny Milliken, Valerio Selis and Professor Alan Marshall, a specially-crafted virus called ‘Chameleon’ was pitted against a range of common access points with poorly-secured management interfaces (i.e. using default passwords). Once access had been achieved, Chameleon then attempted to take control of the device by re-flashing its firmware with a replacement, open source OpenWrt. Attackers gaining control in this way would be able to monitor traffic for credentials or other data but the team’s real discovery was that Chameleon would also be able to spread and infect other routers in its neighbourhood in a manner similar to an “airborne virus.”
Having proved the concept in the lab, the team modelled the attack against the sort of Wi-Fi density found in two cities, Belfast and London, finding that even using an infection rate of five to ten percent, Chameleon would be able to infect several thousand access points within a few months.
Outbreak…and resistance
Although this sounds like a small number and a long timescale, in a large city each one of these access points could be serving anything from a handful to many thousands of people, so attackers would have gained access to potentially large amounts of valuable data.
Most striking of all, because many access points are left untouched and unmanaged, the attack would be hard to detect. Access points using encryption would offer a small challenge to the extent that re-flashing them would destroy the embedded key. This would need to be captured first.
The team doesn’t reveal which brands or classes of access point or router were vulnerable to Chameleon but were in no doubt that the re-flashing attack would work in the real world.
“In some cases it will work, in some cases it will fail; some are resilient against it, some are not,” Professor Alan Marshall told Techworld.
“It was assumed that it wasn’t possible to develop a virus that could attack WiFi networks but we demonstrated that this is possible and that it can spread quickly. We are now able to use the data generated from this study to develop a new technique to identify when an attack is likely,” said Marshall.
Attack the weakest (access) points
“Whilst many APs are sufficiently encrypted and password protected, the virus simply moved on to find those which weren’t strongly protected including open access WiFi points common in locations such as coffee shops and airports.”
According to Marshall, the solution is to embed intrusion prevention technology into access points, something he was pursuing through Queen’s University Belfast spin-out, Traffic Observation and Management.
The research highlights the unprotected state of router/access point technology, which rely on correctly-configured encryption and management to keep out attackers. But there is growing evidence that even without direct wireless attacks, these devices are riddled with vulnerabilities.
Out of over 500 million Twitter users, only 30% can boast of knowing their way around Twitter main website without clicking. Though the new Twitter interface is pretty much like the old one, using keyboard shortcuts could prove useful when you want to perform a quick task.
If you use the main Twitter website, we can help you out with some seriously useful keyboard shortcuts. Whether it’s navigational tricks or keyboard actions, these handy shortcuts will save you tons of time.
To view the complete list of keyboard shortcuts from your Twitter account at any time. Click on the Gear Icon on the menu bar and select Keyboard shortcuts.
AMD has released the latest beta driver of its Catalyst software, making its Mantle API a reality for those with supported graphics cards.
AMD’s Catalyst 14.1 beta driver was expected last week, although a few glitches delayed the release. Over the weekend, AMD published the beta driver to its Web site. Note that you’ll need to uninstall the current driver before installing the beta.
AMD is positioning Mantle as a low-level API optimized for its own hardware, offering significantly better performance than the generic DirectX API that powers both AMD and Nvidia graphics cards and integrated CPU/GPU chips, known as APUs. (For more, see our earlier deep dive into Mantle technology.)
So far, just one game, EA’s Battlefield 4, has been optimized for Mantle, although a tech demo of an upcoming game, Star Swarm, has also been released. According to AMD, gamers who load the new beta Catalyst driver should see up to 45% improvement in frame rate running Battlefield 4, and 200% when using the driver and playing the Star Swarm demo. A few other games, including the Thief reboot and Wing Commandercreator Chris Roberts’ Star Citizen, will also support Mantle, the developers have said.
PCWorld hasn’t had a chance to test Mantle yet, but real-world tests conducted by Anandtech showed gains of up to 30 percent when running Battlefield 4 on an Intel i7 4960x CPU. Naturally, because the Catalyst driver is a beta, future improvements are expected.
The new driver also includes support for AMD’s “frame pacing” technology, which smooths the handoffs between multiple GPUs working together in a Crossfire alignment to an “even and regular pace,” according to AMD.
AMD says that the following graphics cards will support the new Catalyst driver, and by extension, Mantle: the AMD Radeon R9 and R7 cards, plus the Radeon HD 8000 and 7000 series, and as well as the A10-7000 and A8-7000 APUs. Don’t expect to see the same dramatic gains in frame rate using the older cards, however, AMD warns—you’ll have to wait for future updates to see those improvements.
Is longer a secret, it’s been over a decade since Windows XP came into being. It’s true, time has changed; newer technologies has been introduced, even the guys up there are already getting tired of it. Yet, I want to stick with Window XP.
What you are asking for is quite a difficult one. Microsoft has already decided to end it’s support for the OS come April, 2014 and to continue using it, will open your PC to various security vulnerability. Psst! Listen to my brief advice and implement it with caution. I really understand why you might not be able to give up your Windows XP. Your business may depend on a specialized application that won’t run on Windows 7 or 8. Or you may not be able to afford a new PC and your old one isn’t powerful enough for an upgrade. Perhaps you’re just stubborn.
Reluctantly, I’m going to advise you on protecting a Windows XP computer after Microsoft’s updates stop. But I give this advice with a warning: This is not perfect protection. You’ll be better off giving up on XP.If you absolutely can’t or won’t give up XP, consider disconnecting that particular PC from the Internet. Use it the old-fashioned way: as a truly personal computer with no connection to the outside world. Then buy another PC or a tablet for email and browsing.
If that isn’t practical, follow these suggestions to make your XP computer more secure:
Get a full security suite: A simple antivirus program won’t be enough. Buy a heavy-duty suite with a two-way firewall and exploit protection in addition to antivirus. I like Kaspersky Internet Security, but there are several solid security suites, as we found in our recent roundup.
Get a second opinion: Now that you have a powerful security suite, don’t trust it. Augment your regular antivirus program with Malwarebytes Anti-Malware Free. Run it once a week to scan for malware that your suite may have missed.
Use Firefox or Chrome: An out-of-date browser is an open door for malware, and any version of Internet Explorer that runs on XP is very out of date indeed. But the latest versions of Firefox and Chrome can still run on your machine.
Protect your browser: Scripts are a dangerous malware delivery system, and the right browser add-ins can block them. And yes, you can tell the add-ins to make exceptions and allow scripts from sites that you trust. If you use Firefox, install NoScript Security Suite. For Chrome, go with NotScripts.
And remember that eventually, the security suites and browsers will stop supporting XP, as well. This can’t go on forever.

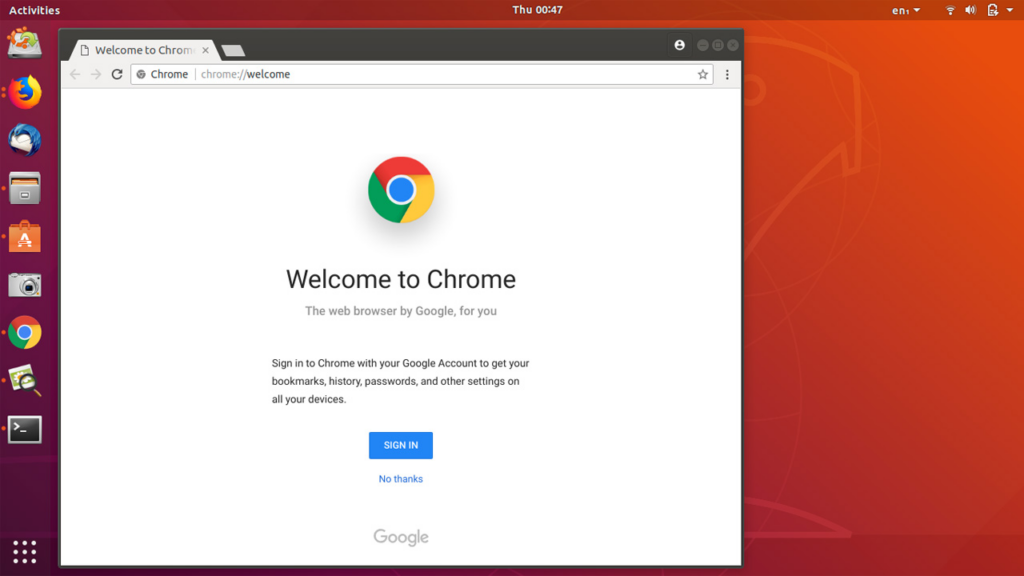
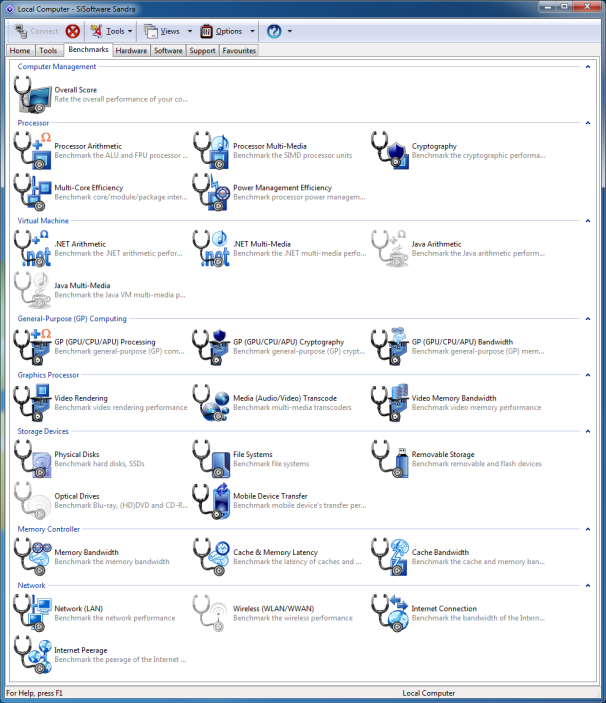
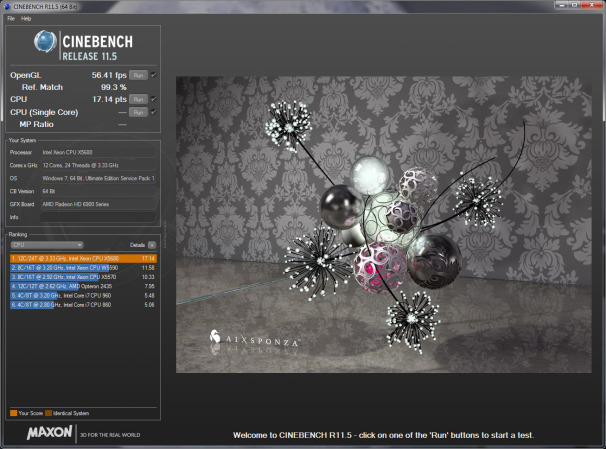 Maxon’s Cinebench, based on the company’s Cinema 4D animation software, tests single-threaded and multithreaded CPU performance.
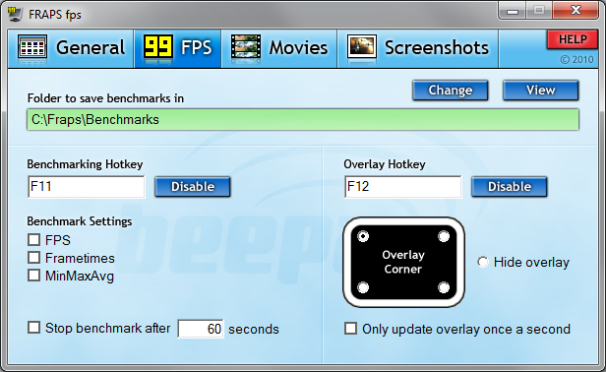 Fraps tests how well a game is performing on your system, even if the game doesn’t offer a built-in benchmark.
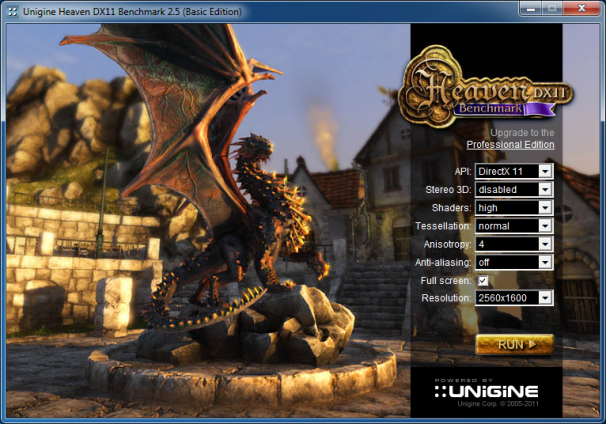 The Unigine Heaven benchmarking tests GPU performance in multiple DirectX or OpenGL modes.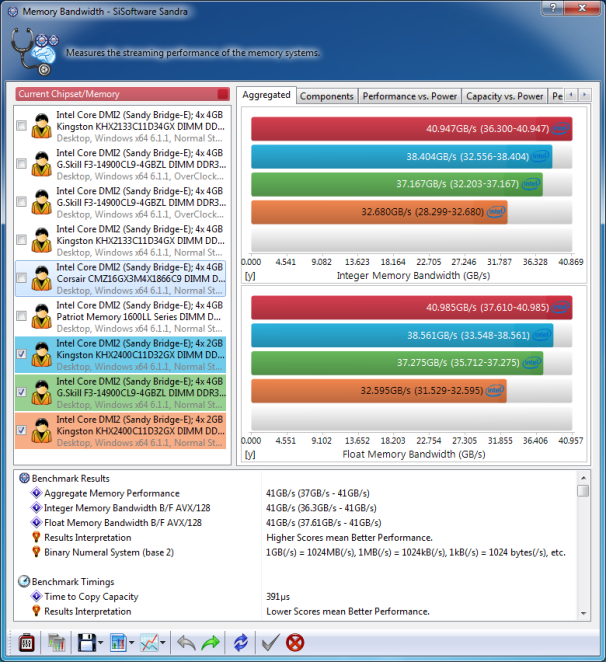
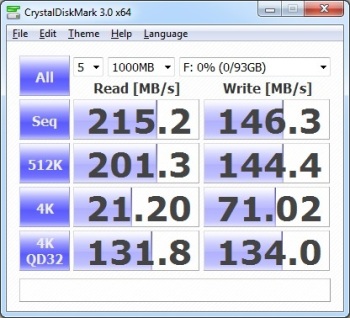 CrystalDIskMark is an excellent tool for testing a drive’s read and write performance at several different transfer sizes.
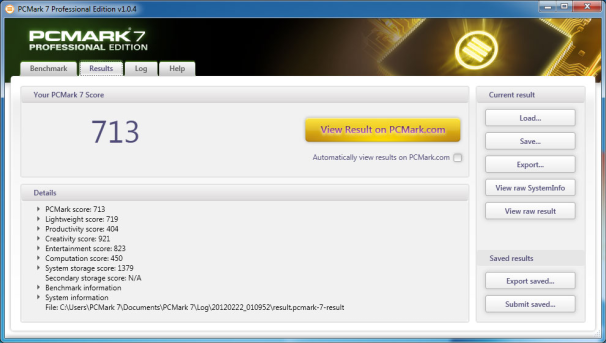 Futuremark’s PCMark 7 evaluates system performance by testing CPU, GPU, memory, and storage subsystem performance.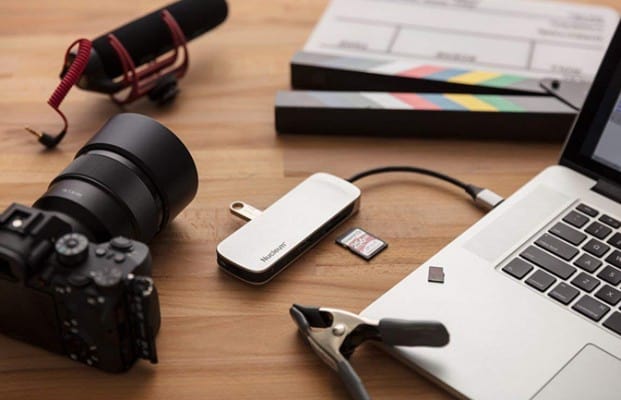
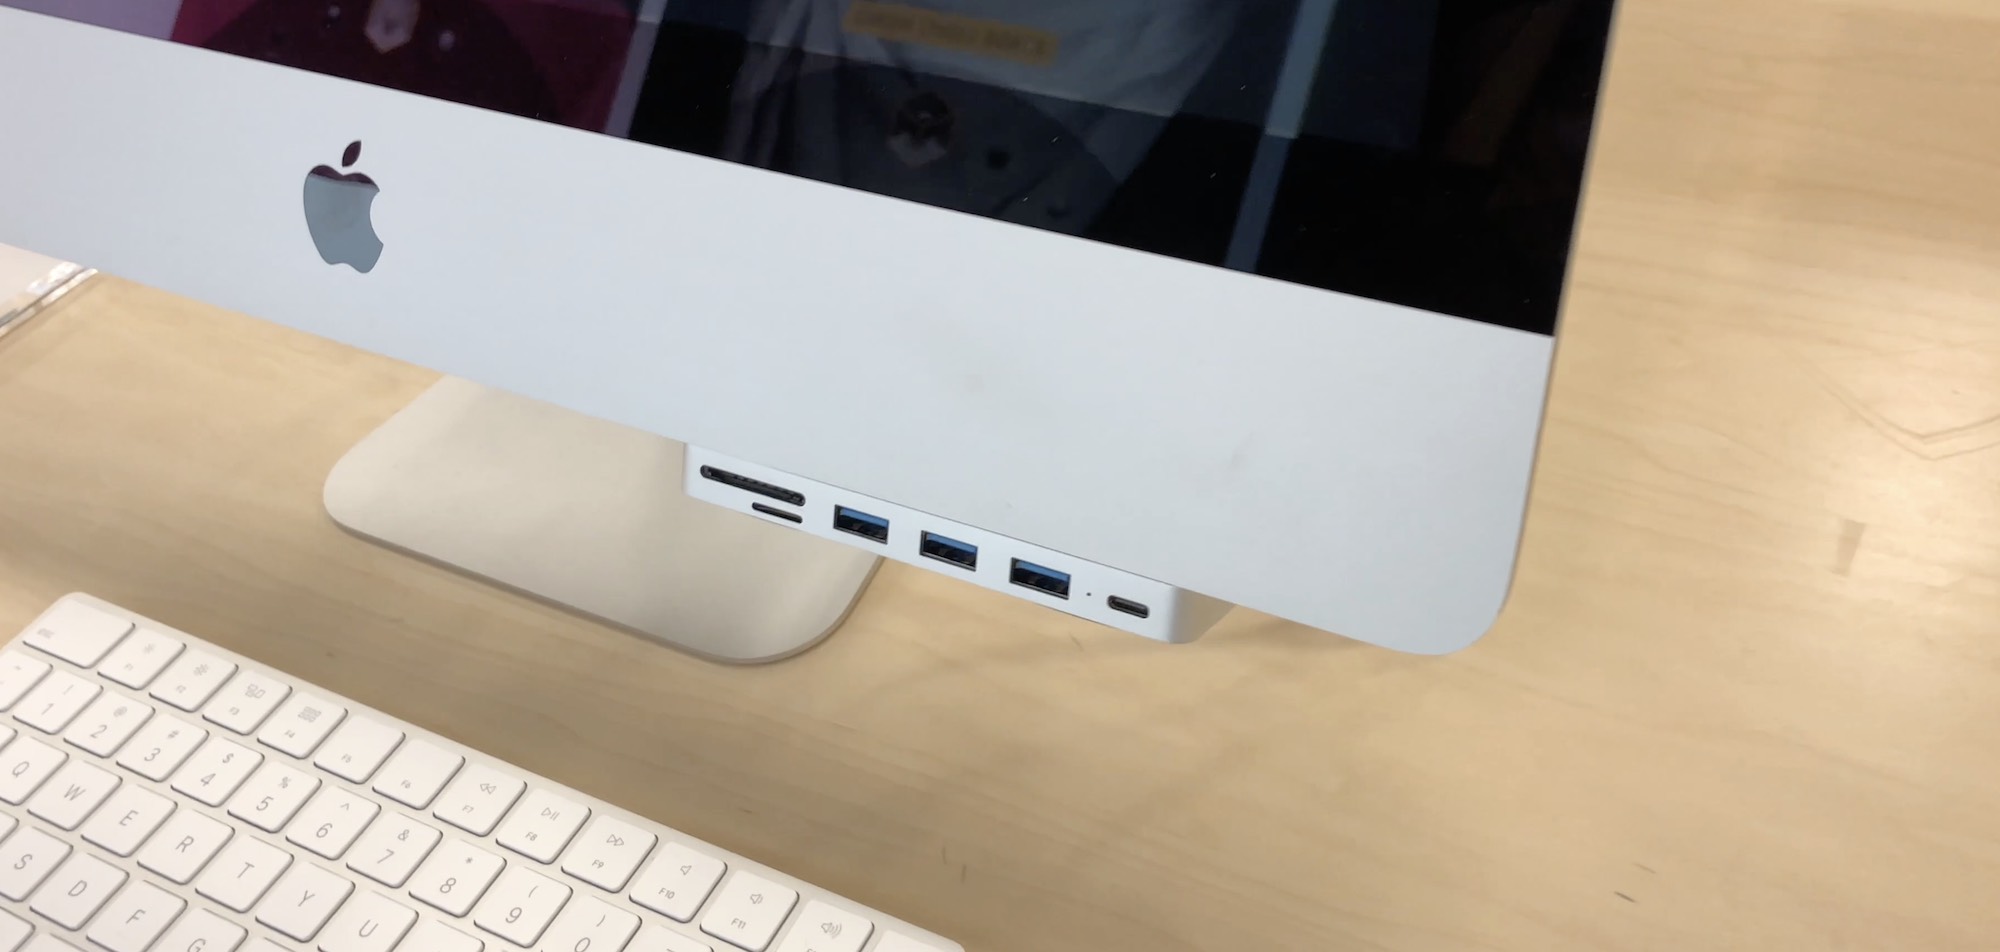

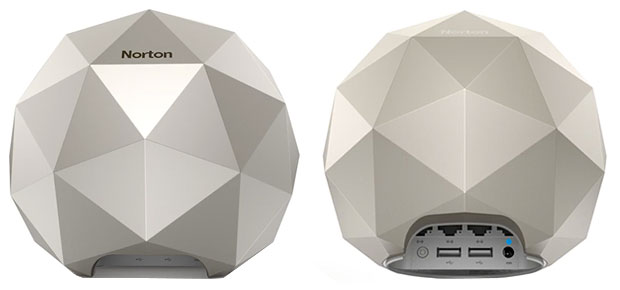

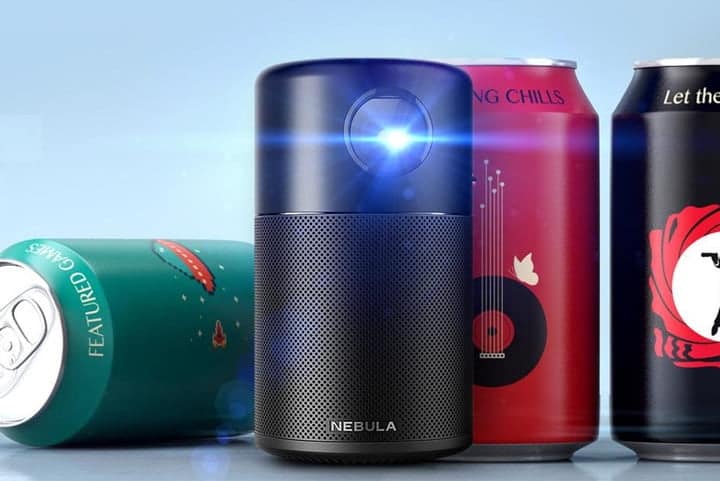
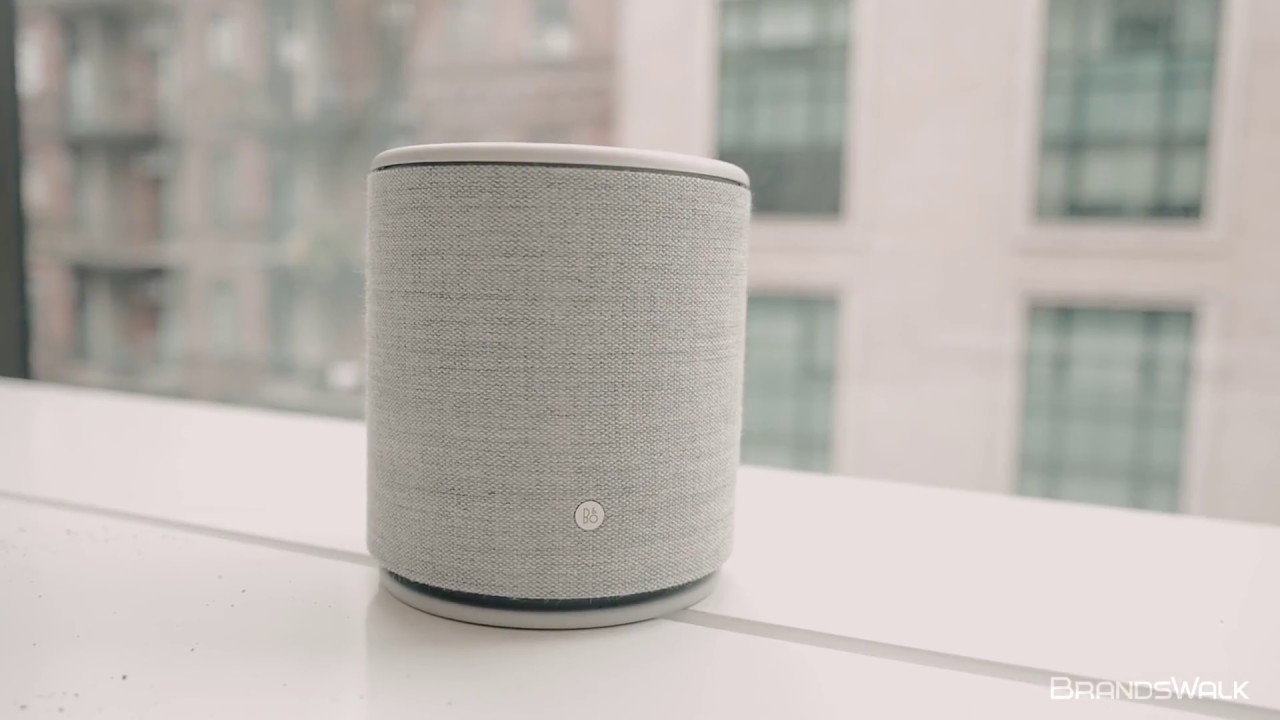


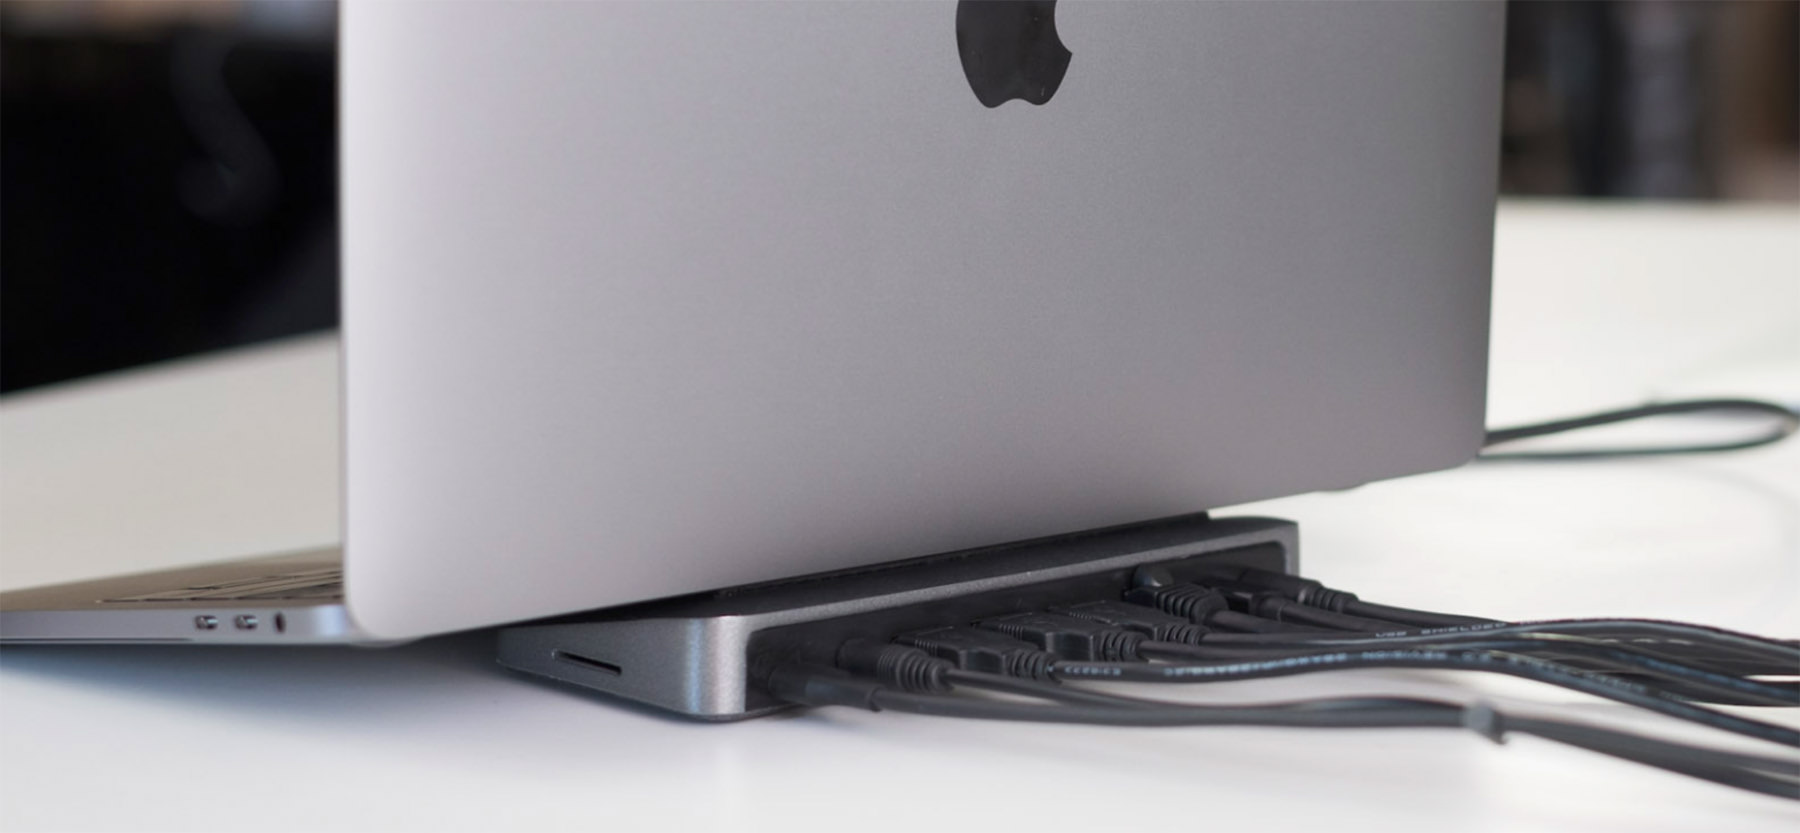
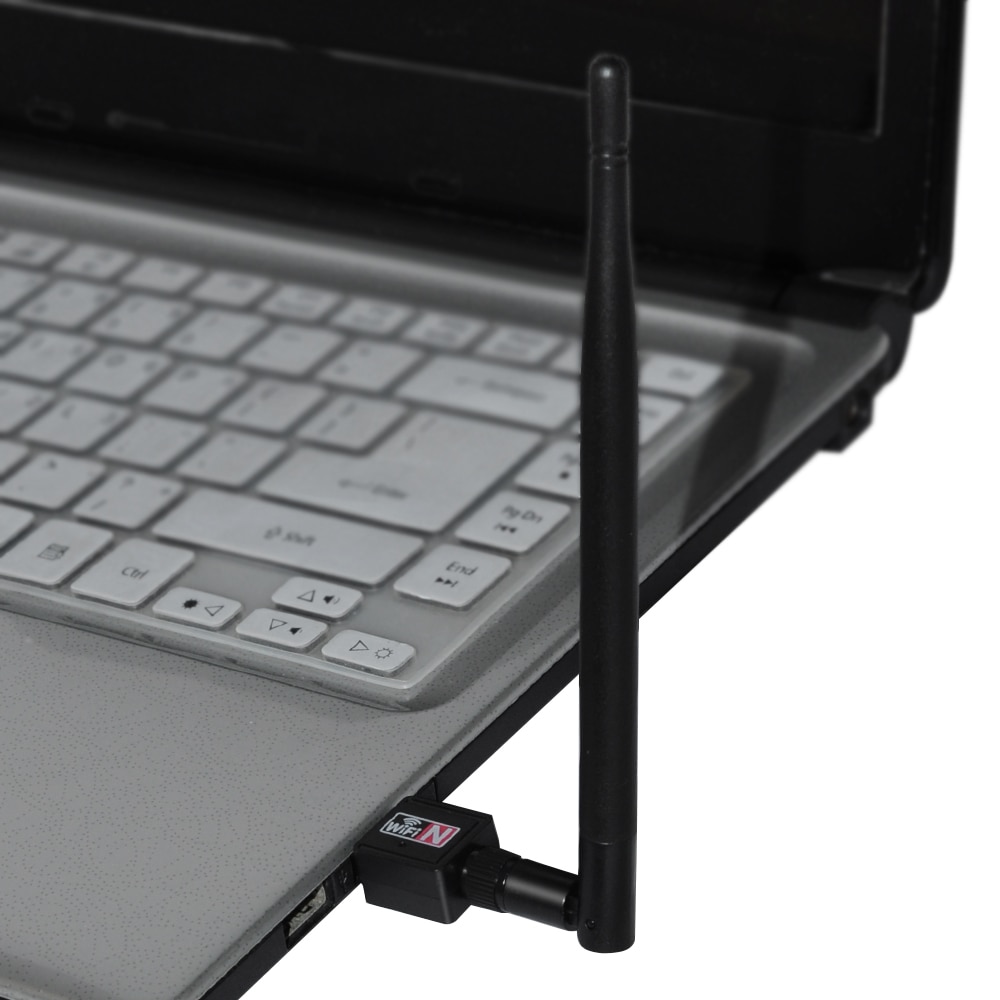
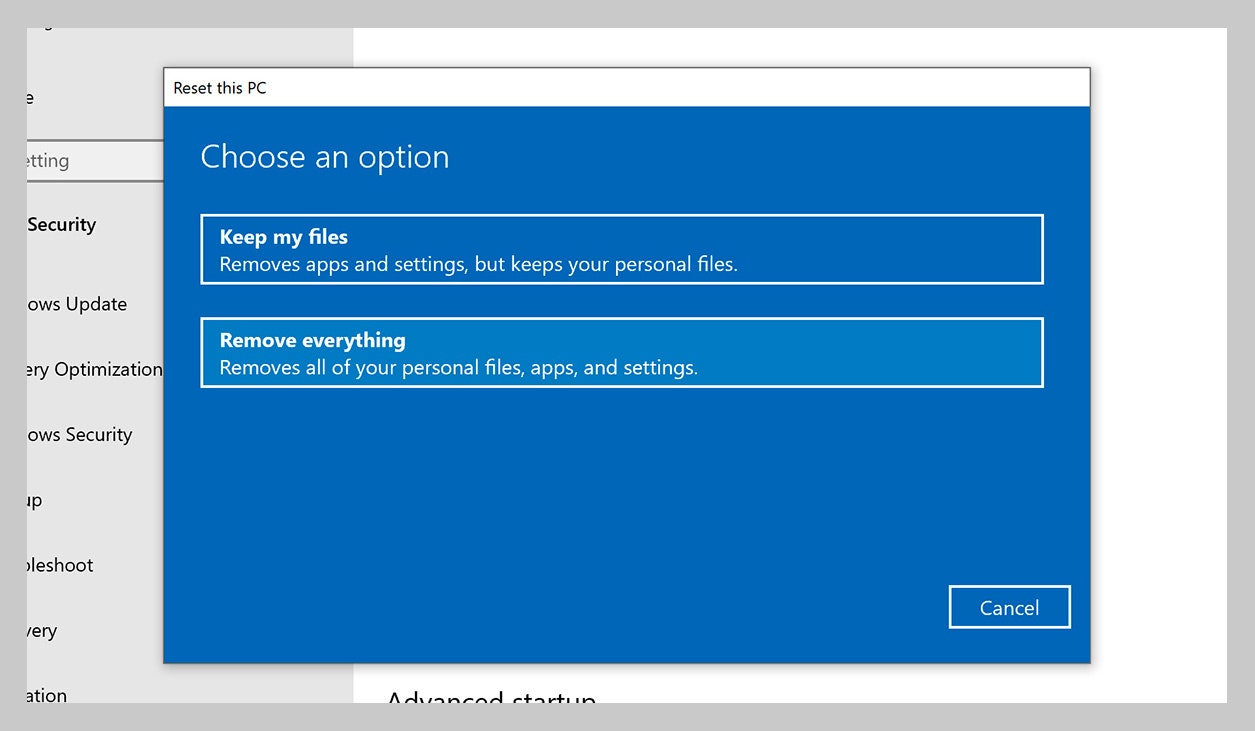
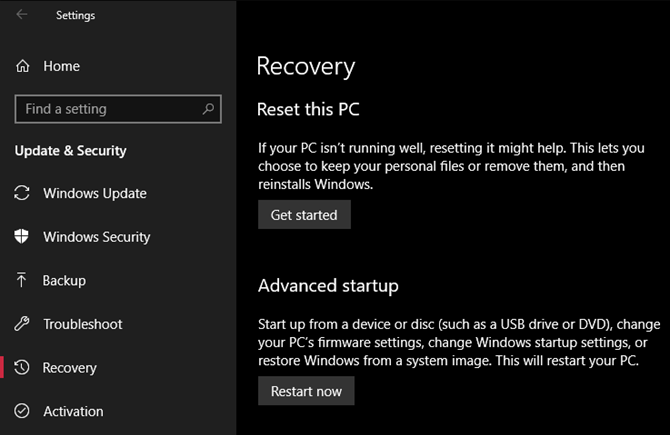
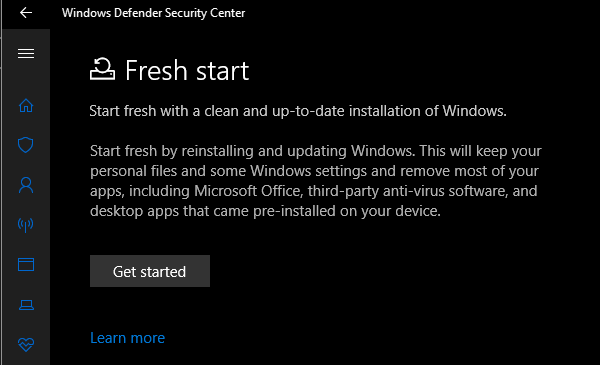

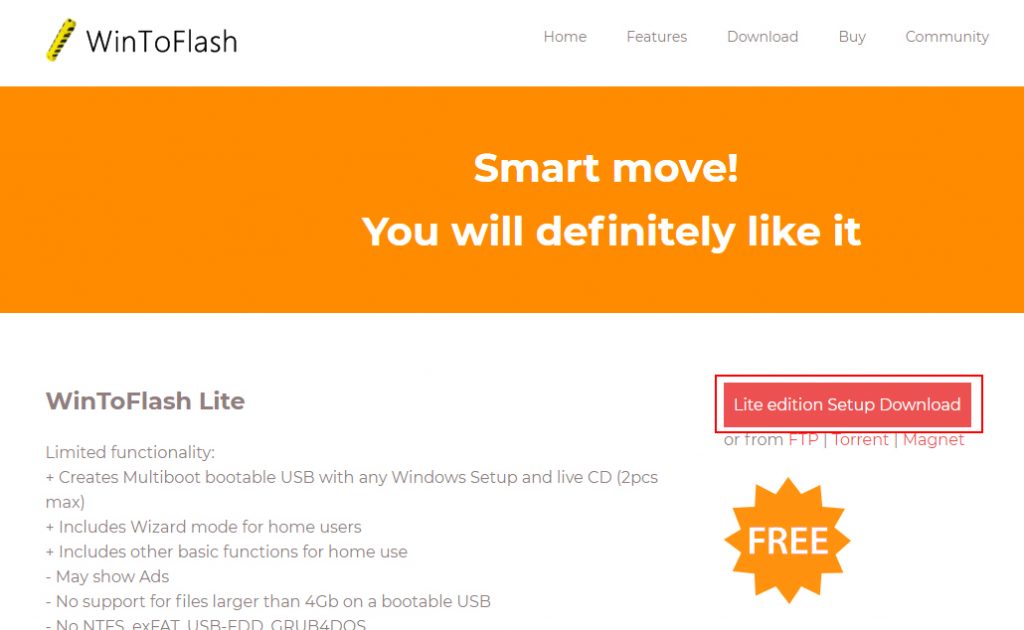
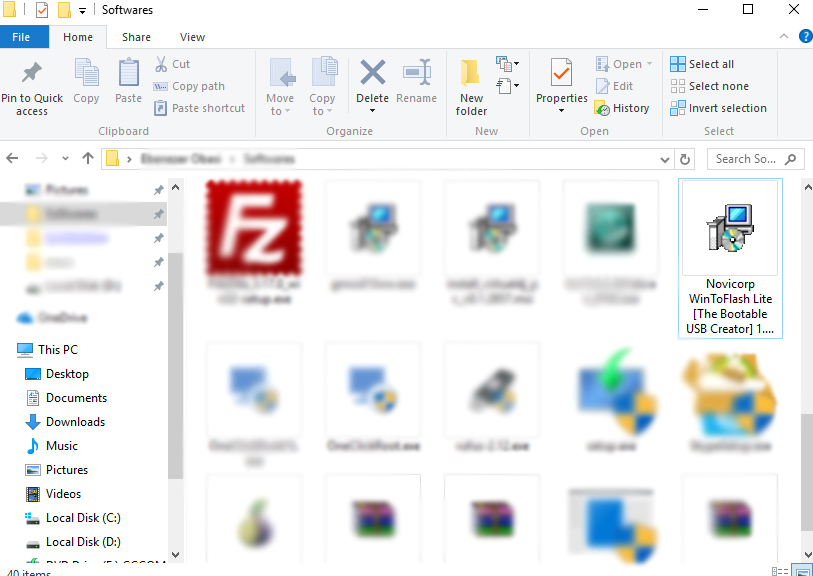
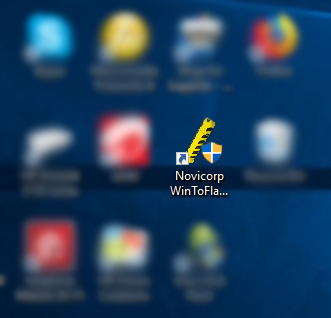
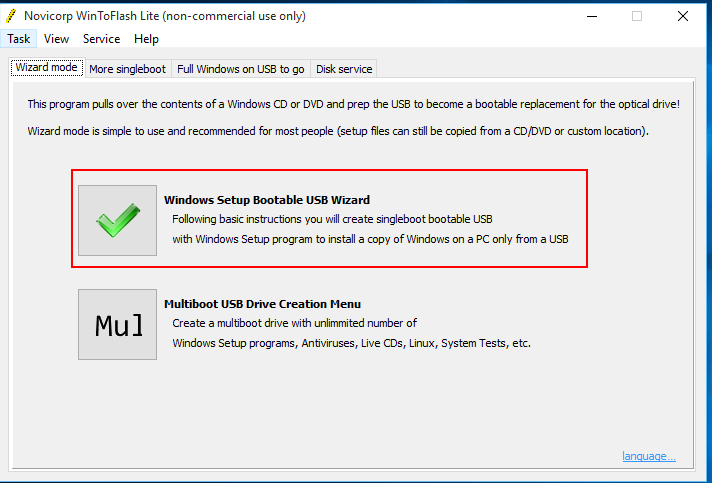
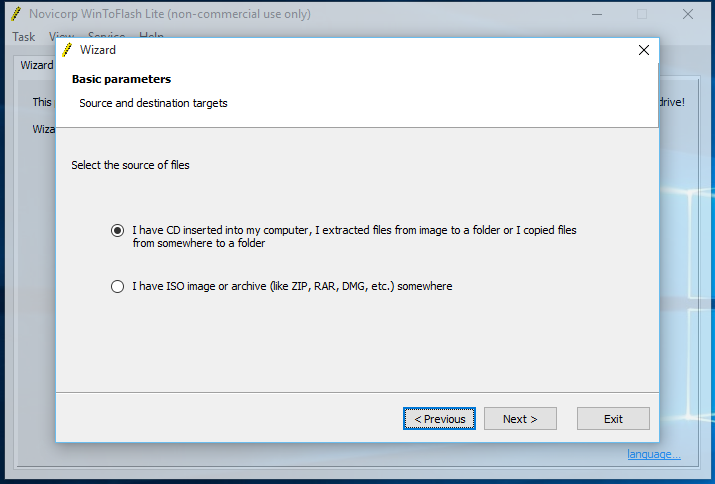
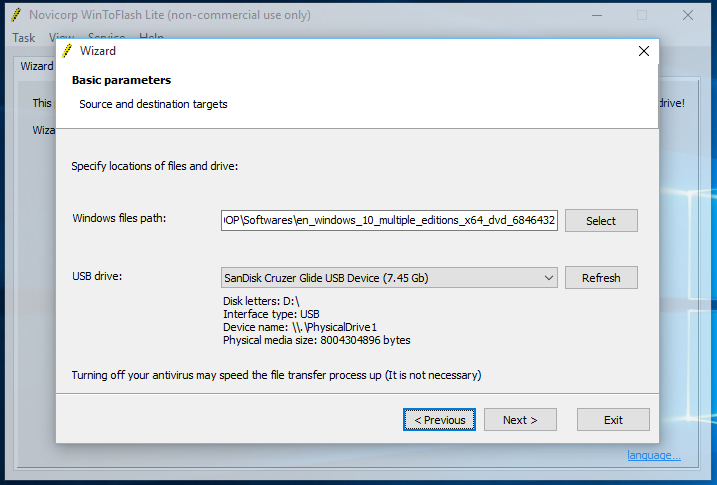
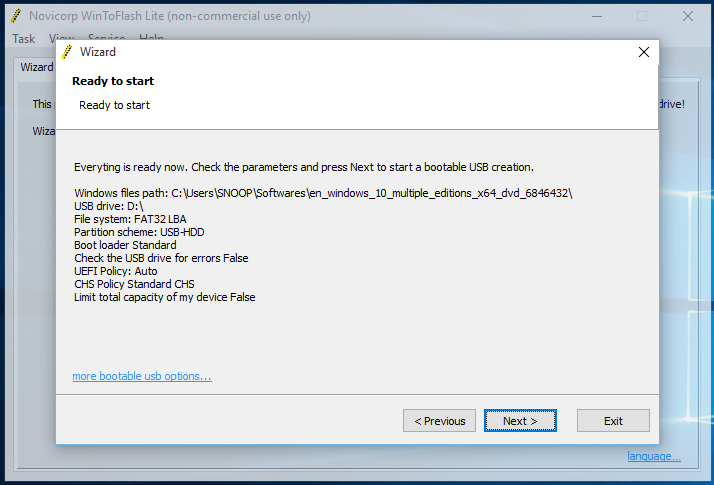
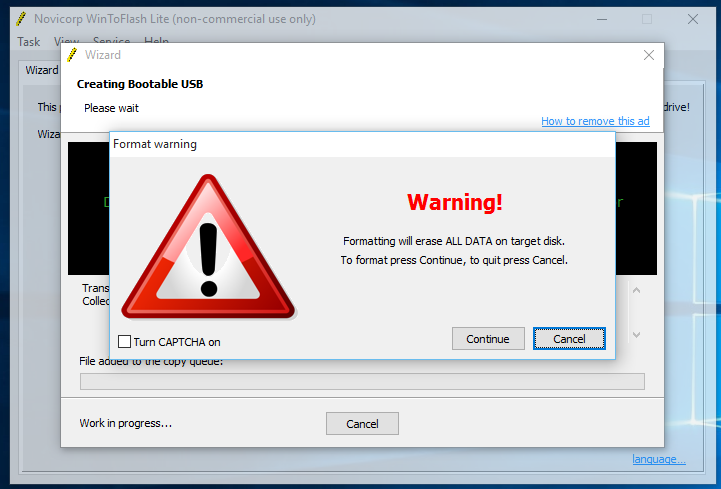
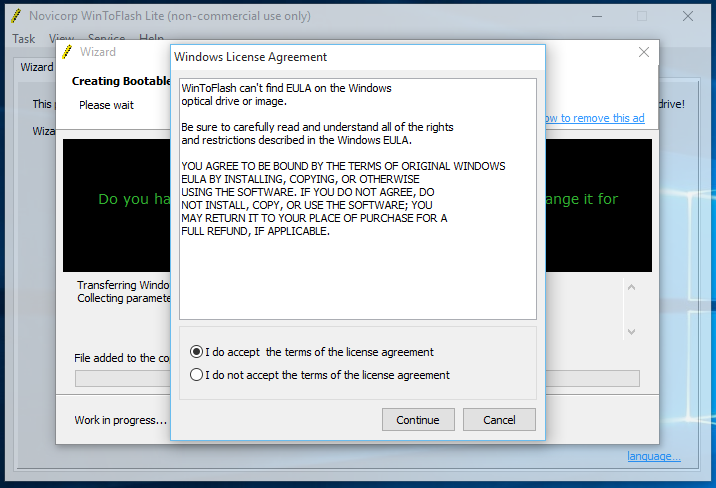
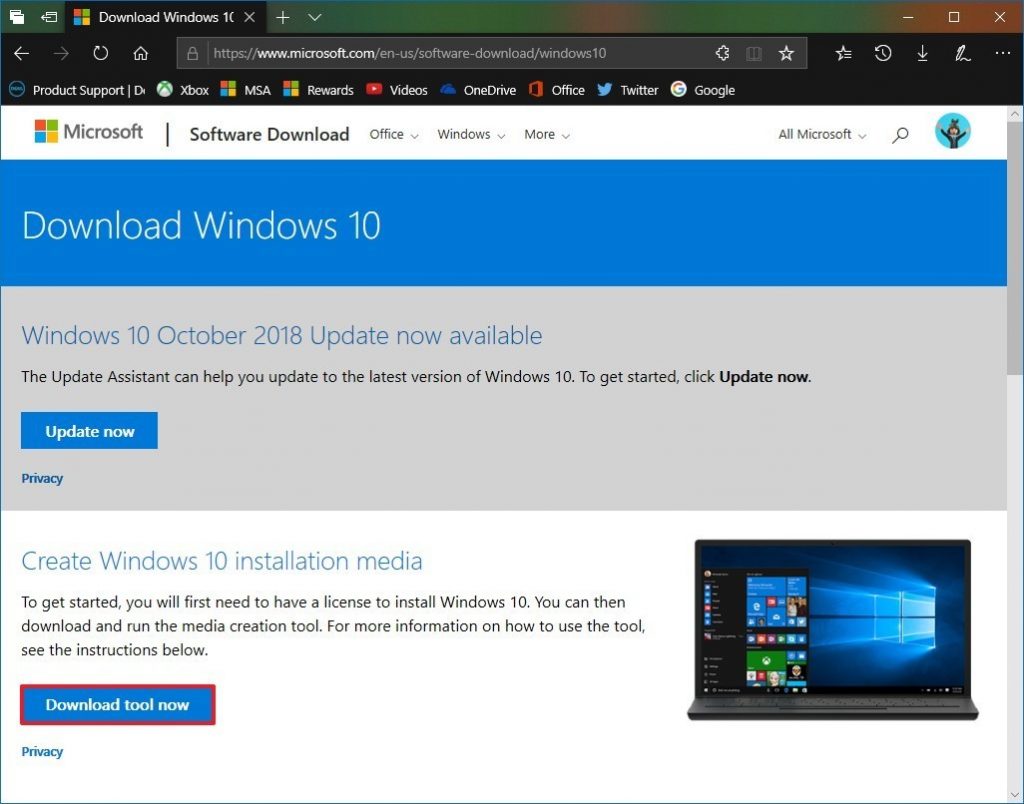
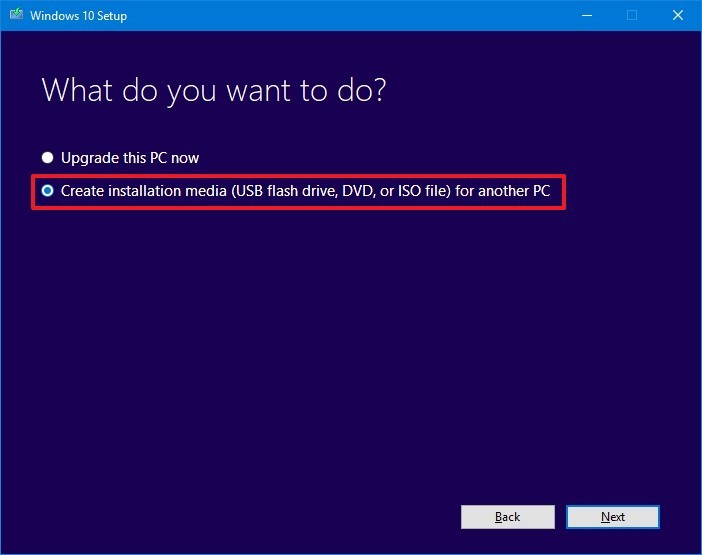
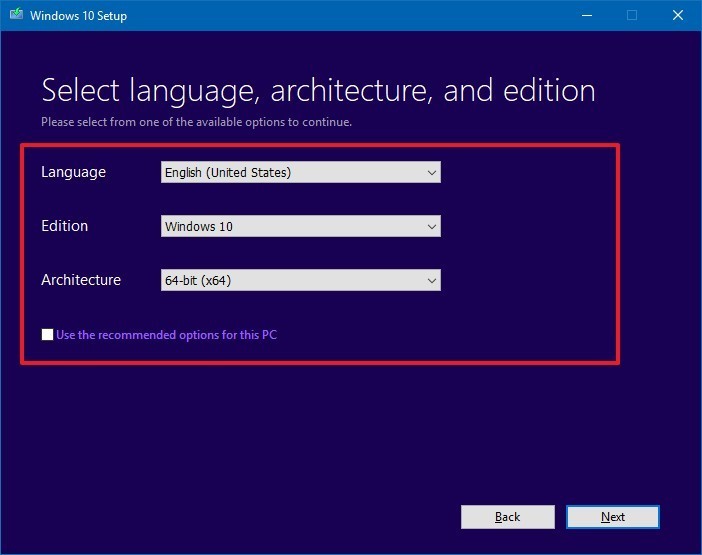
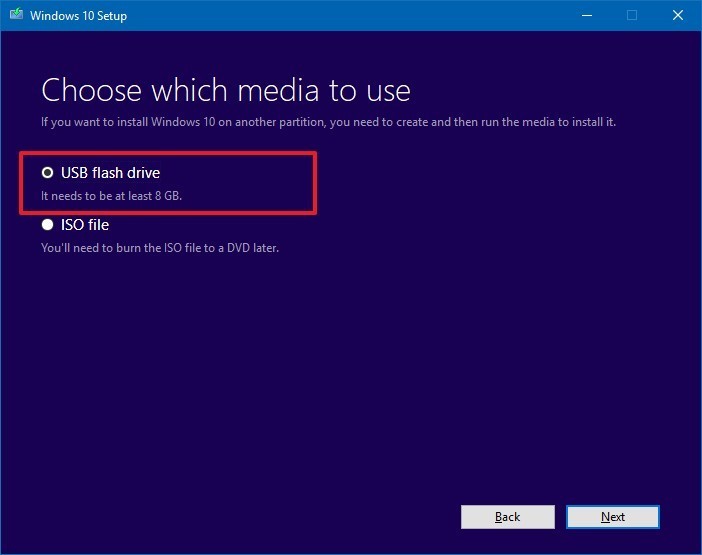
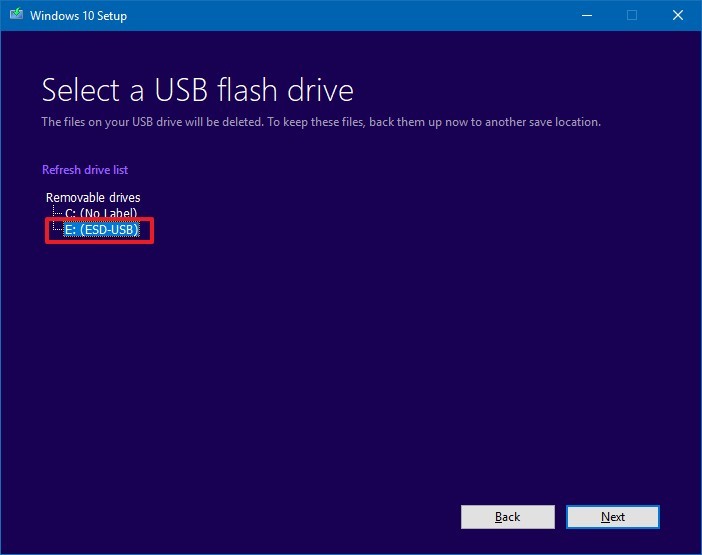


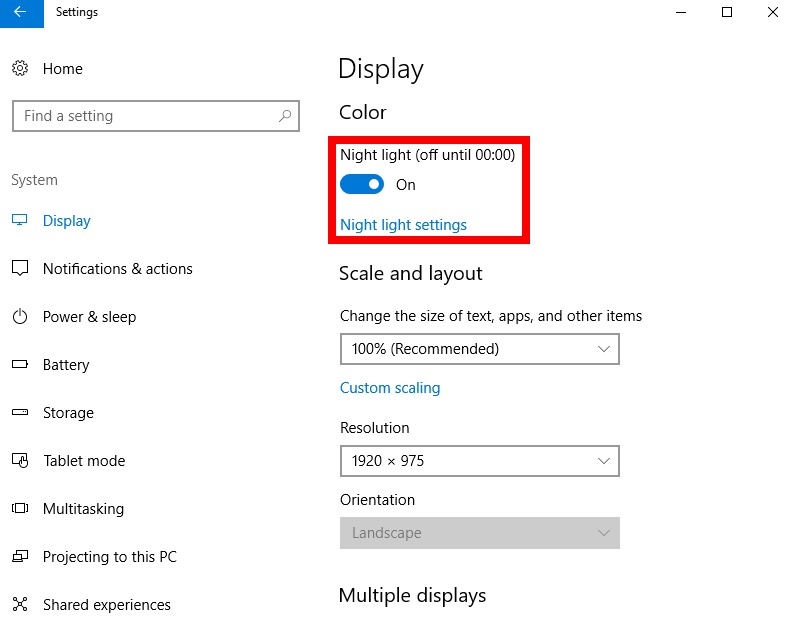
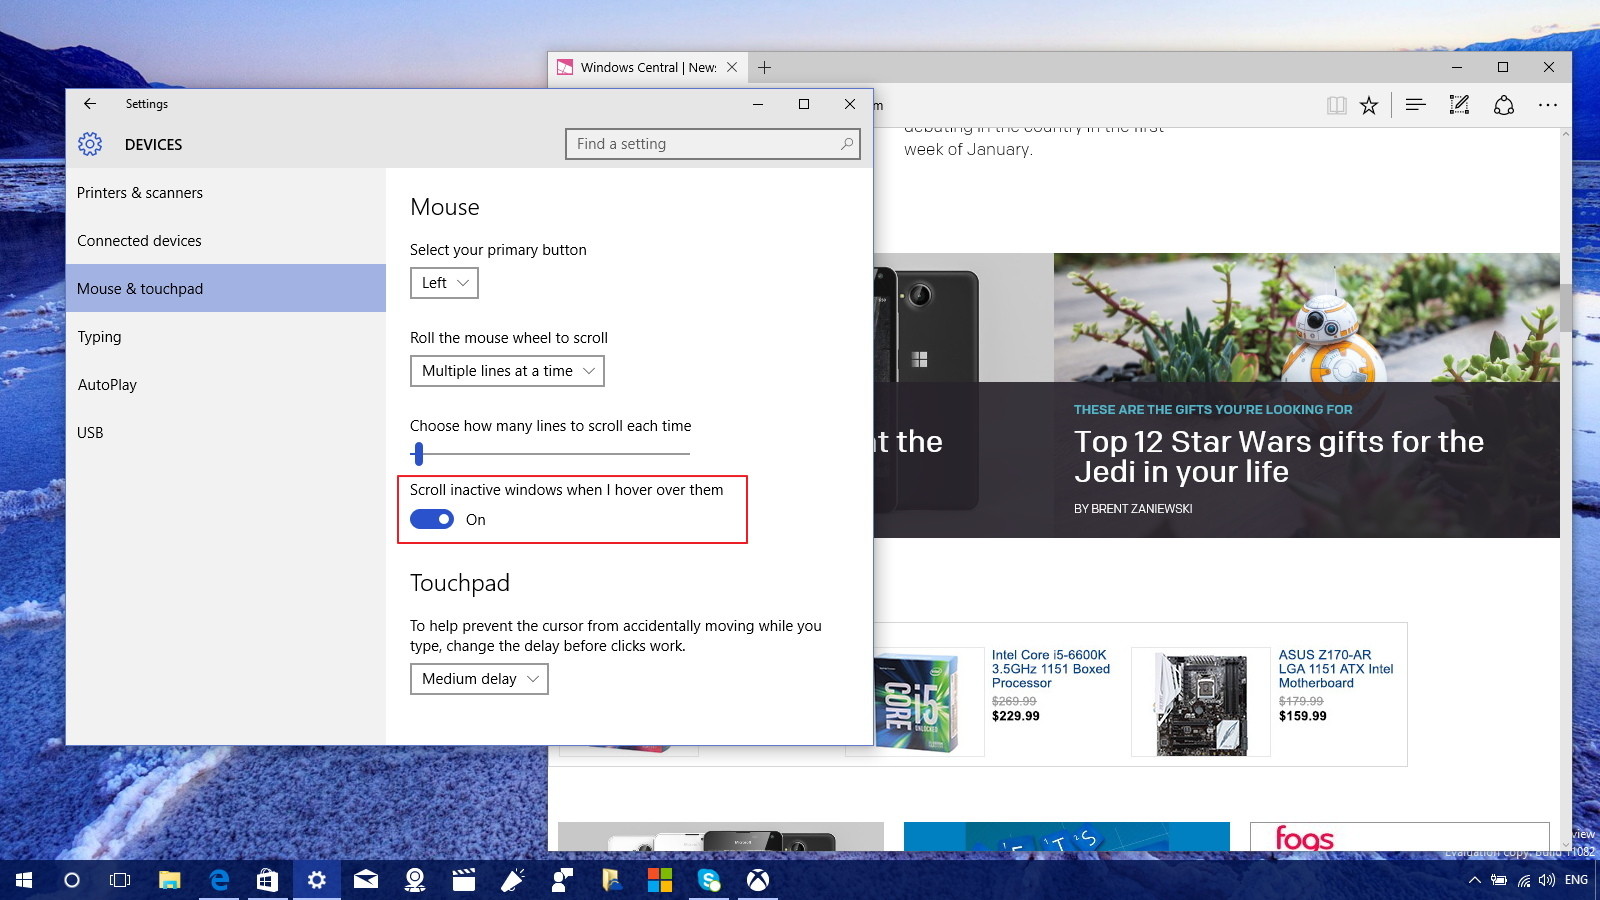
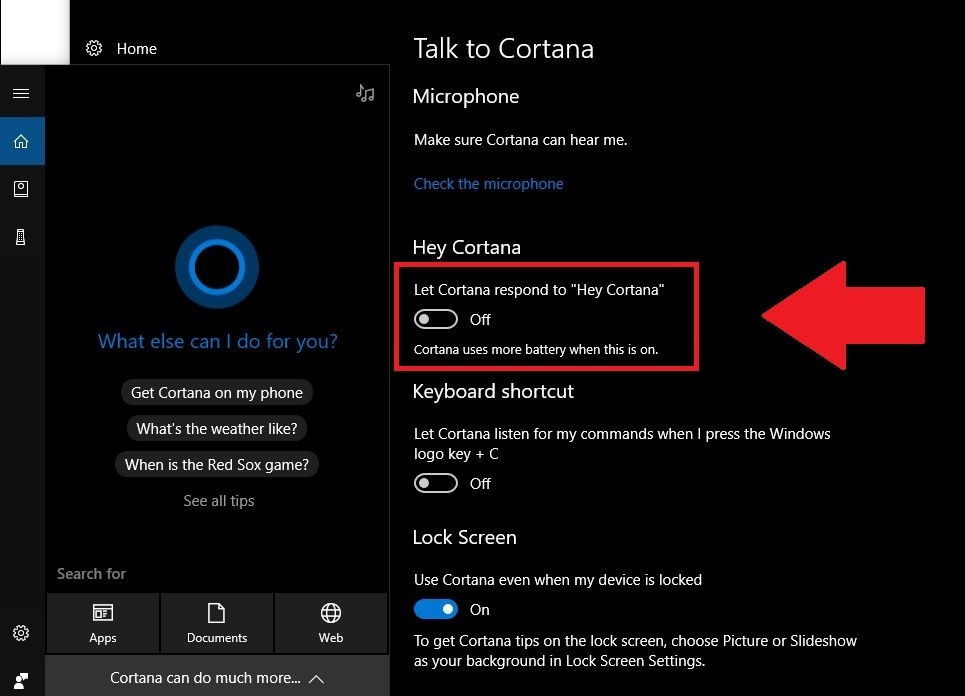
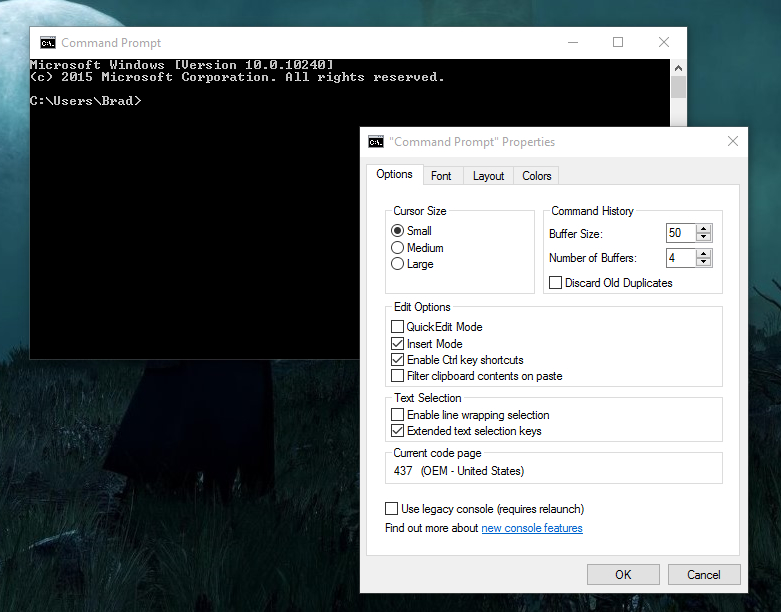
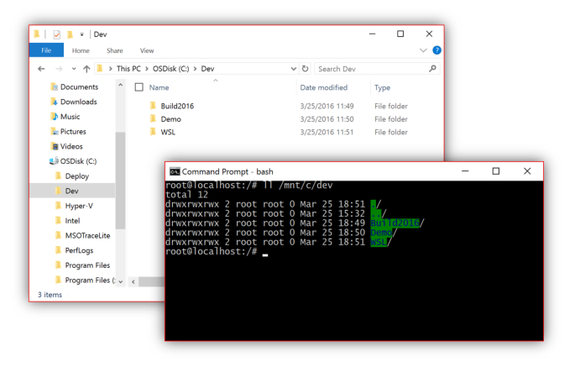
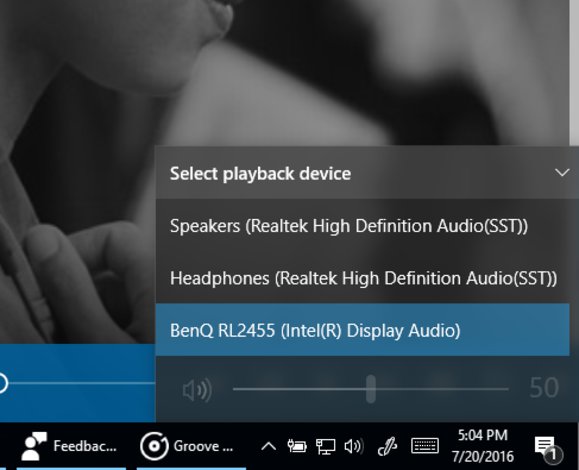
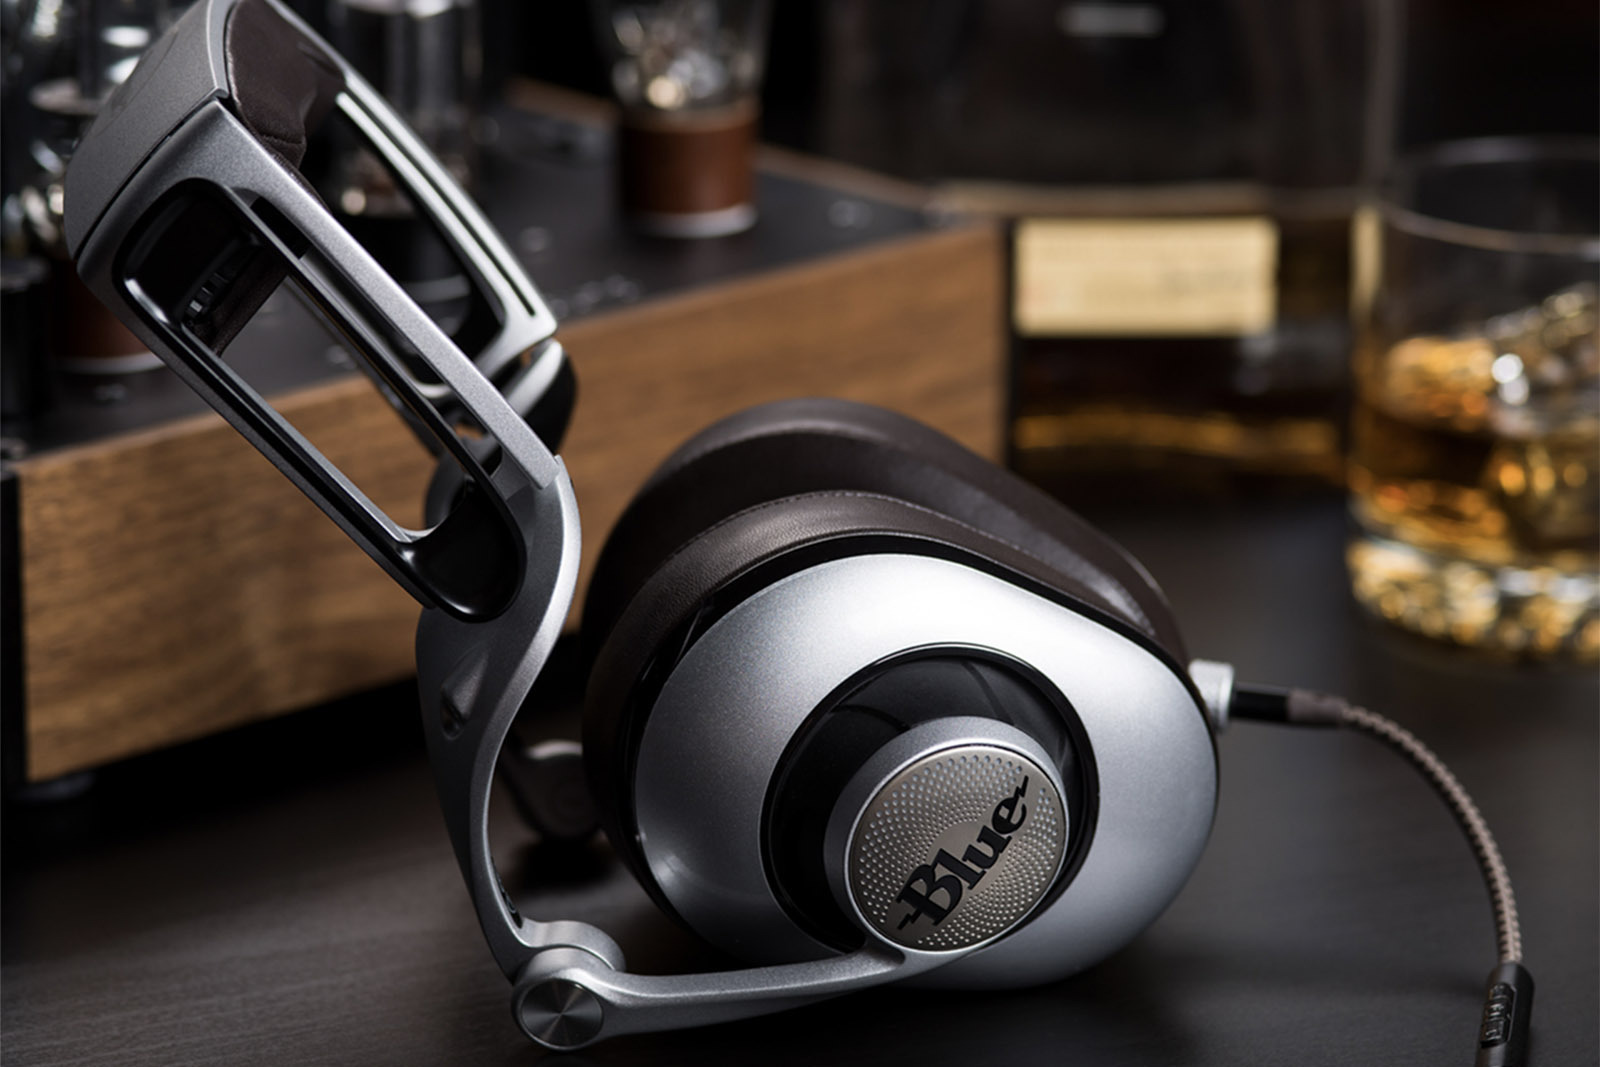
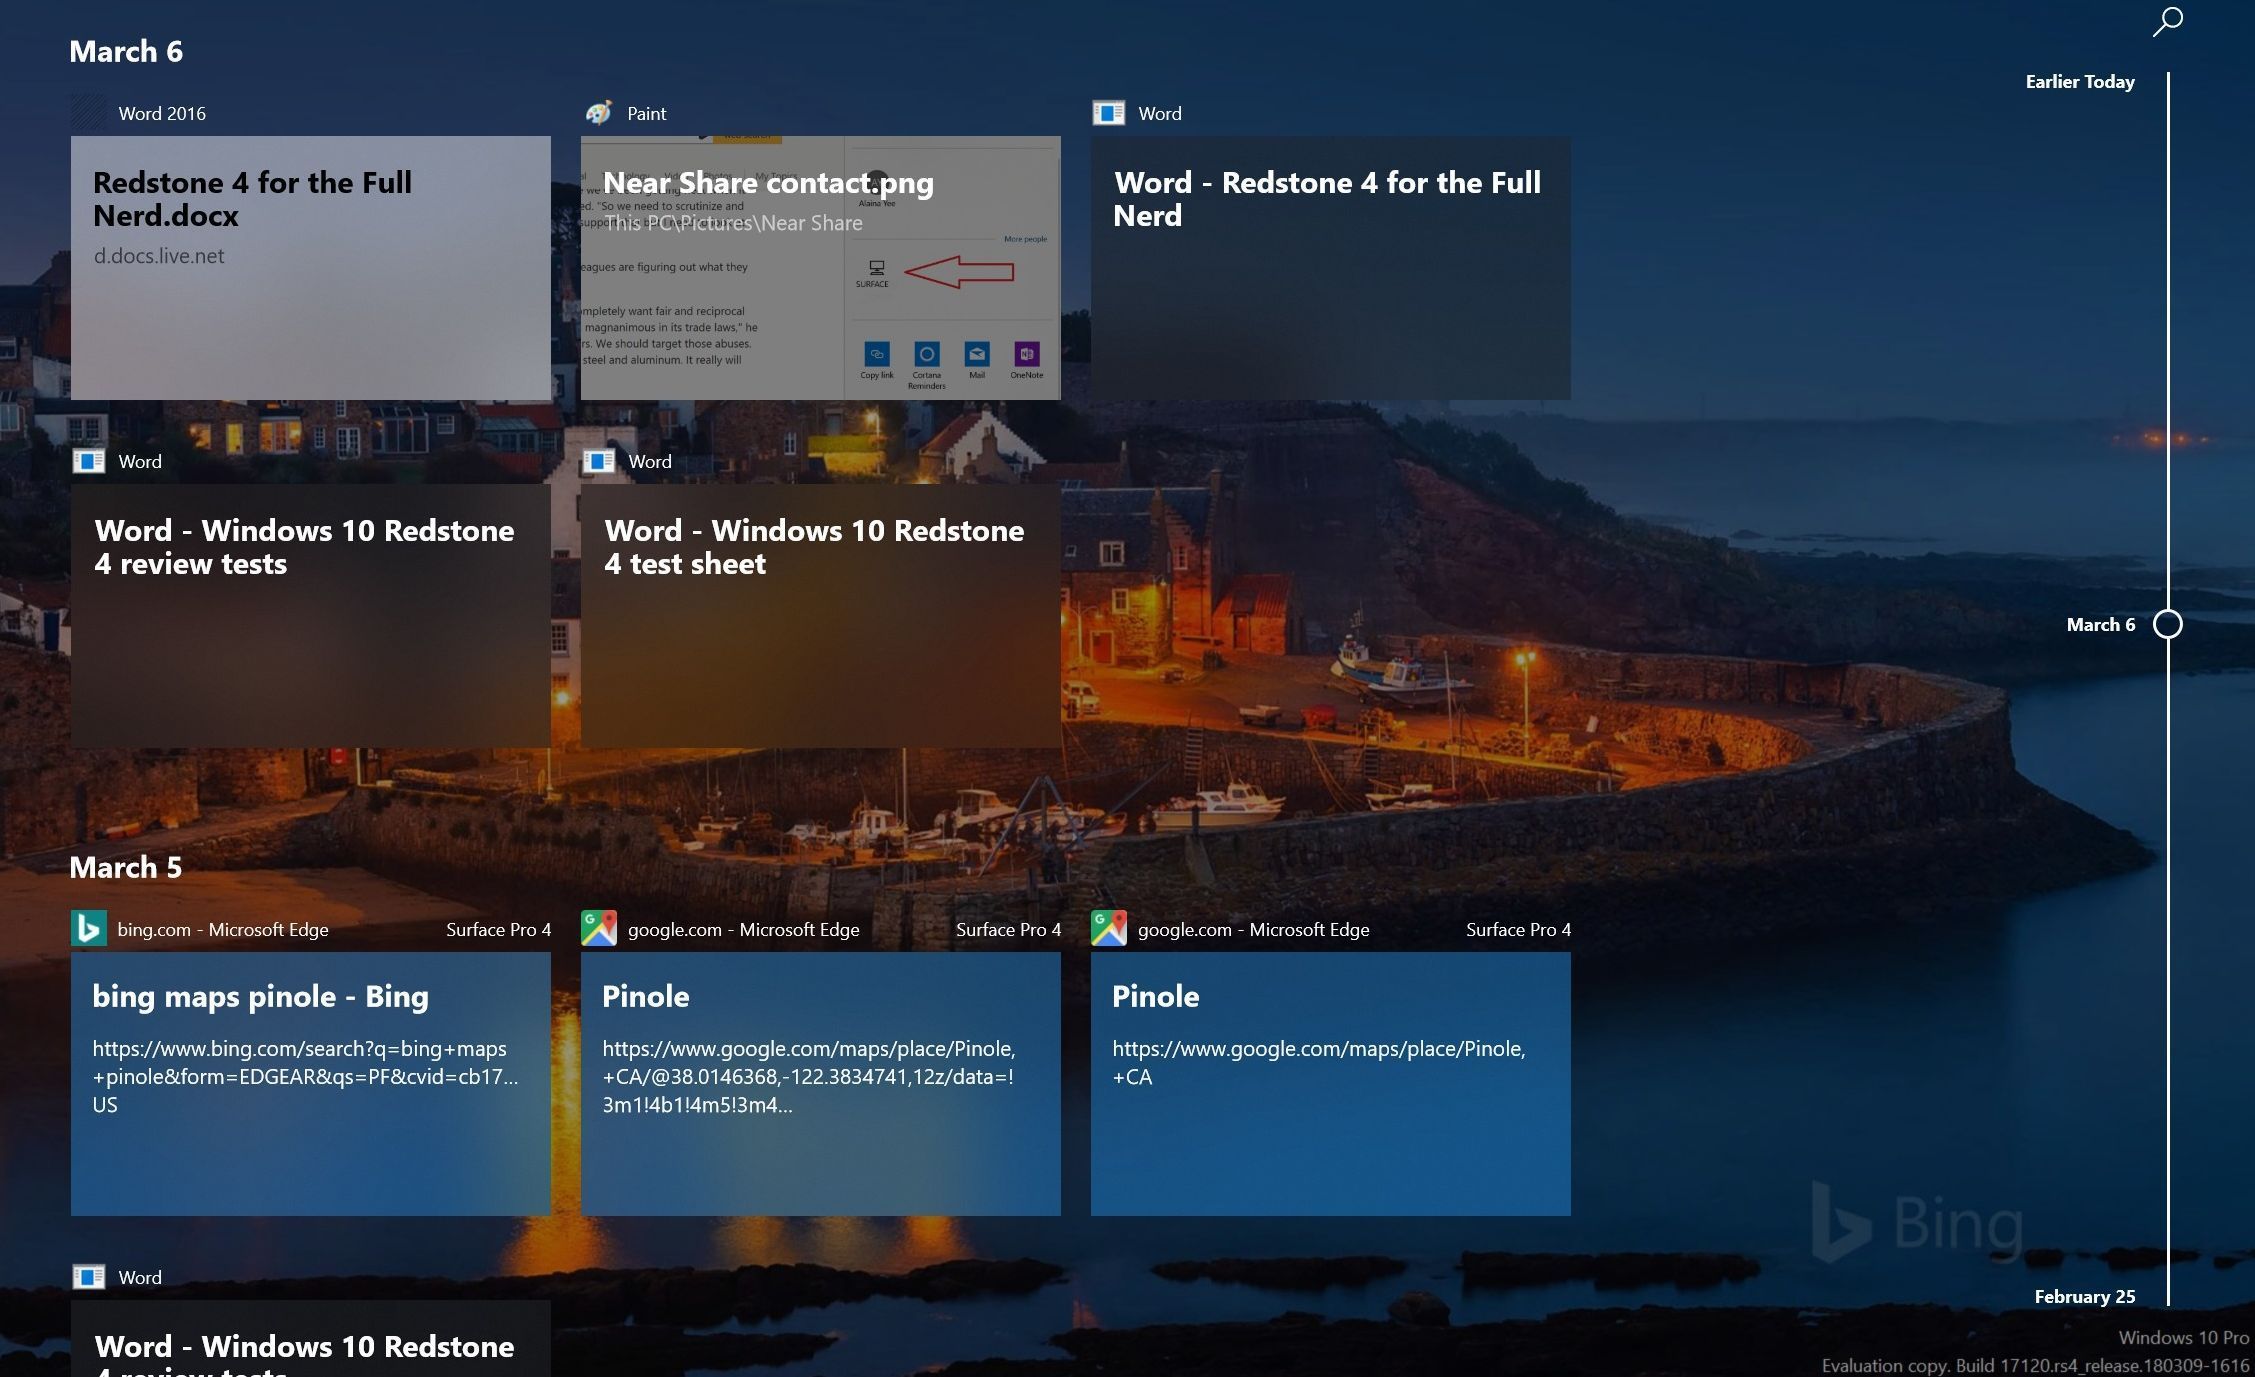
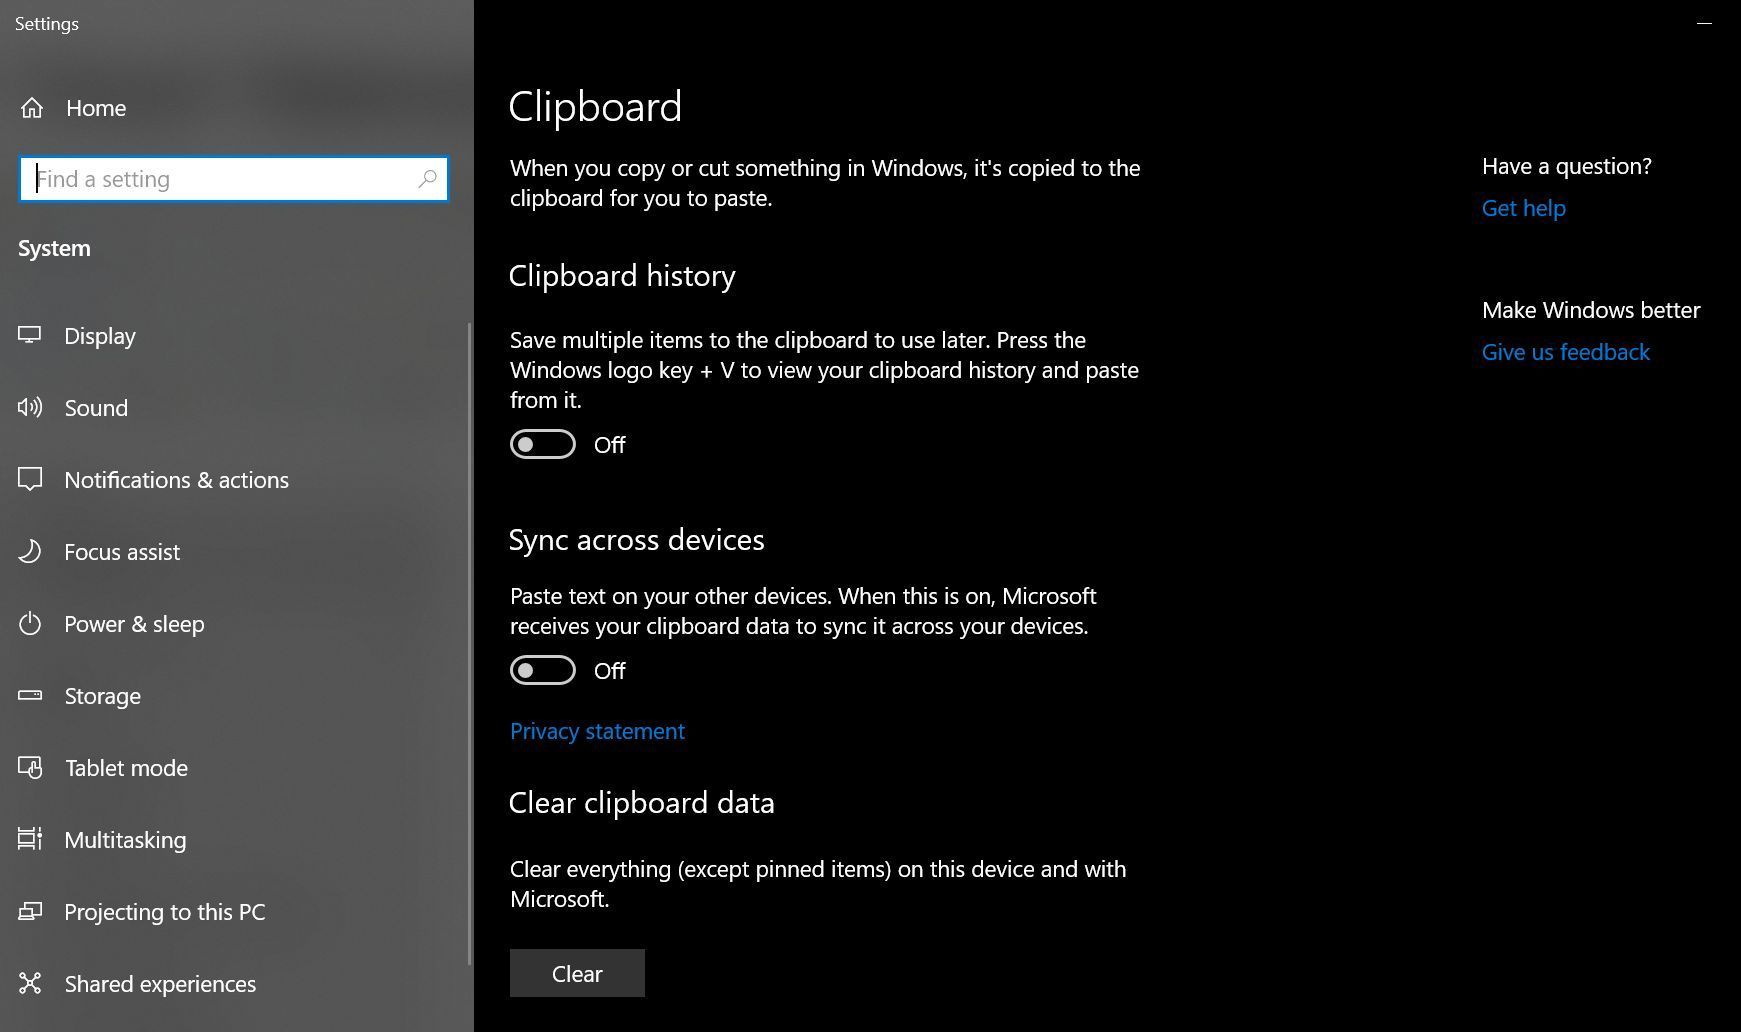
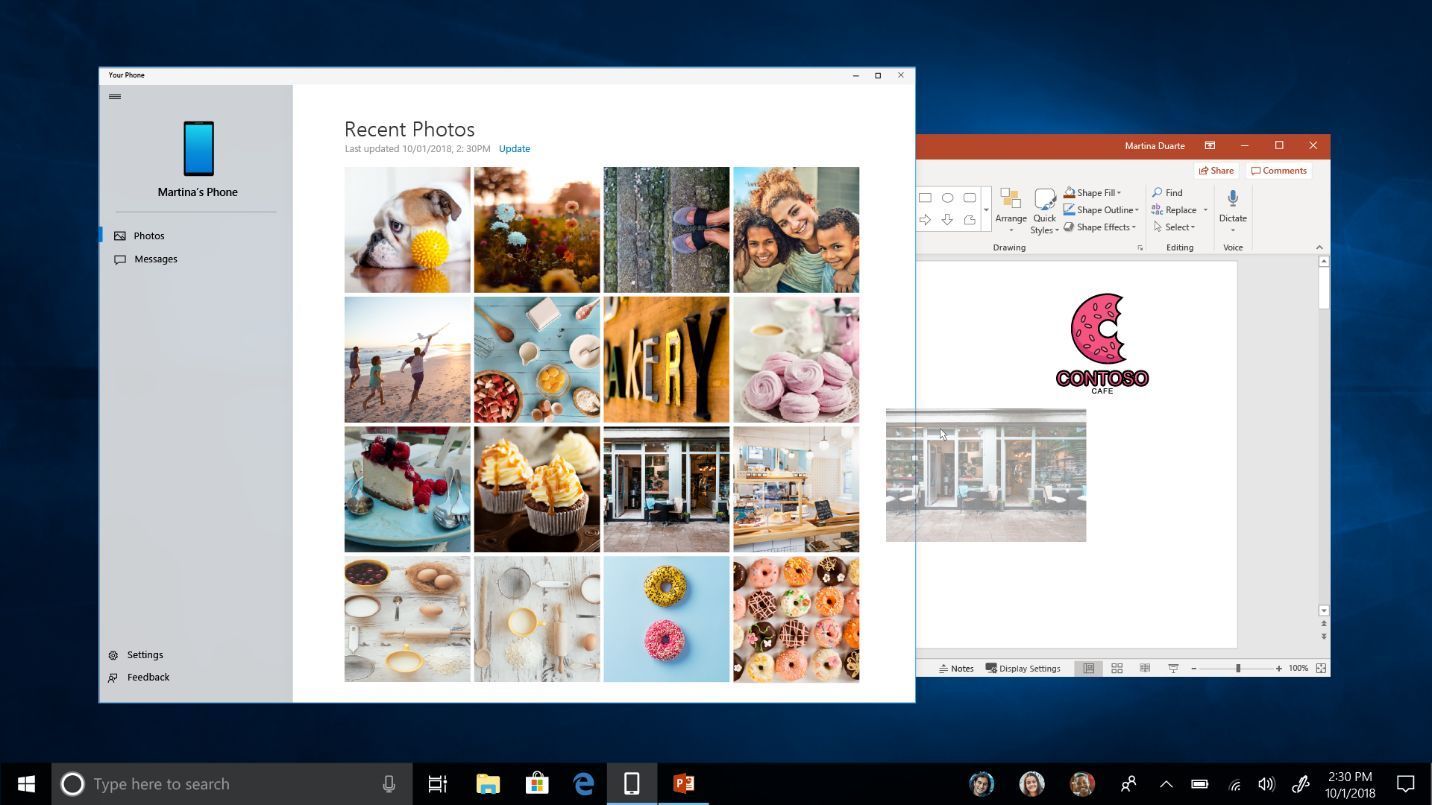
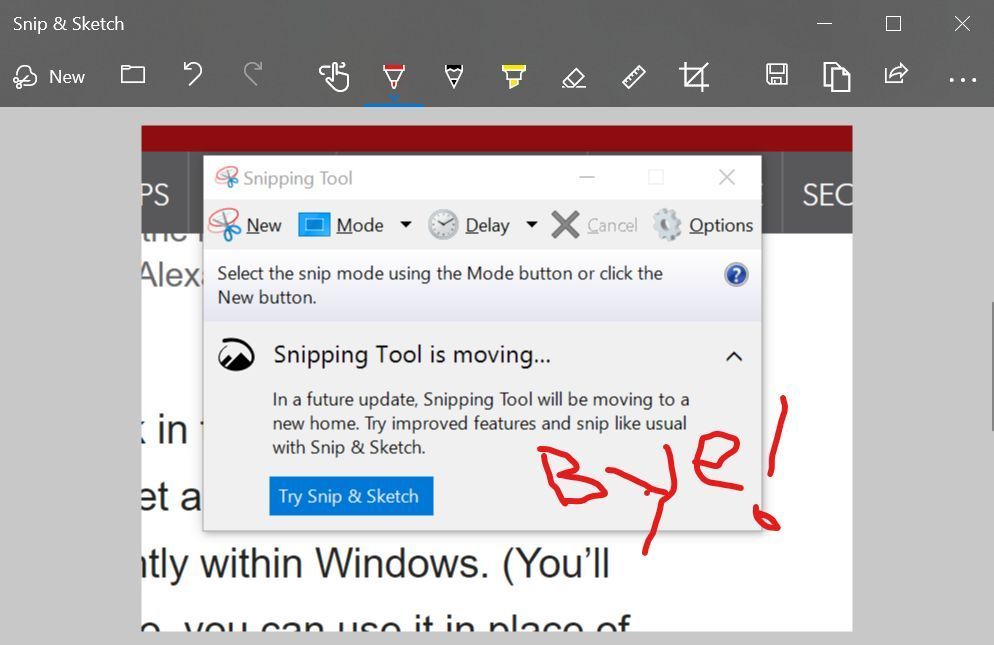
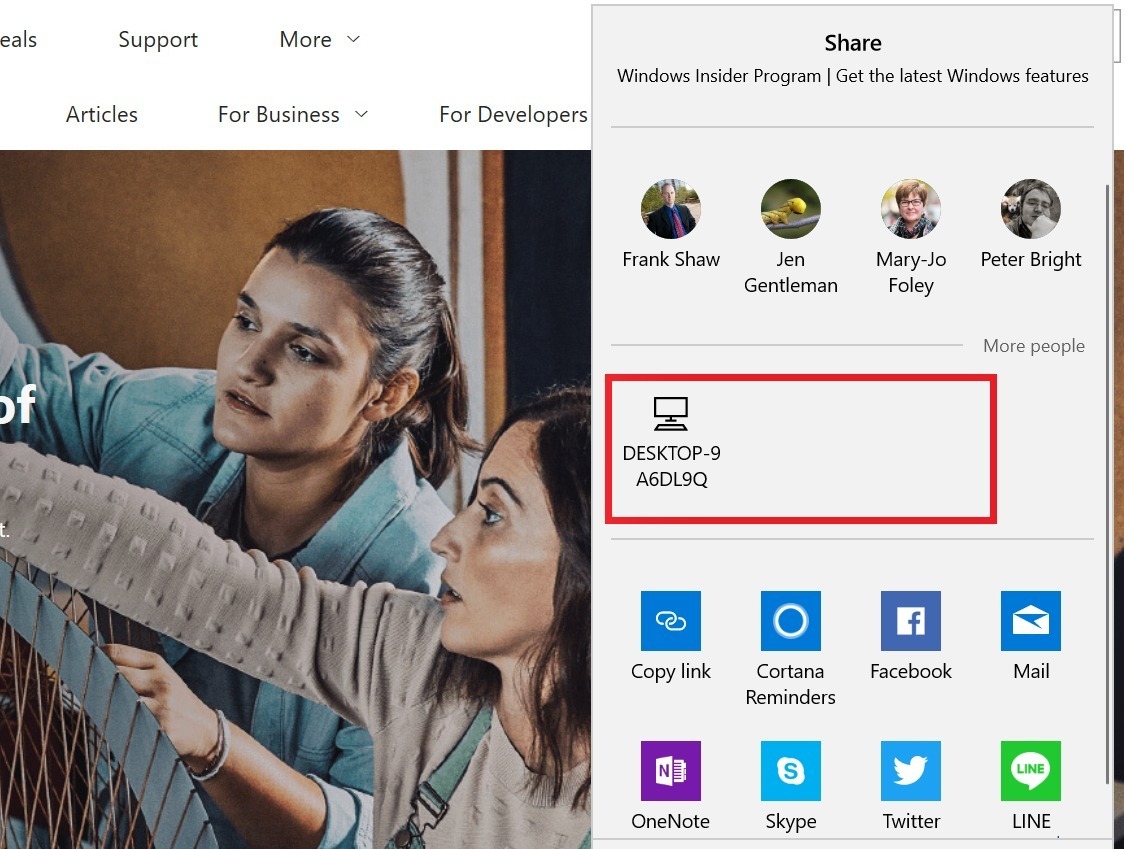
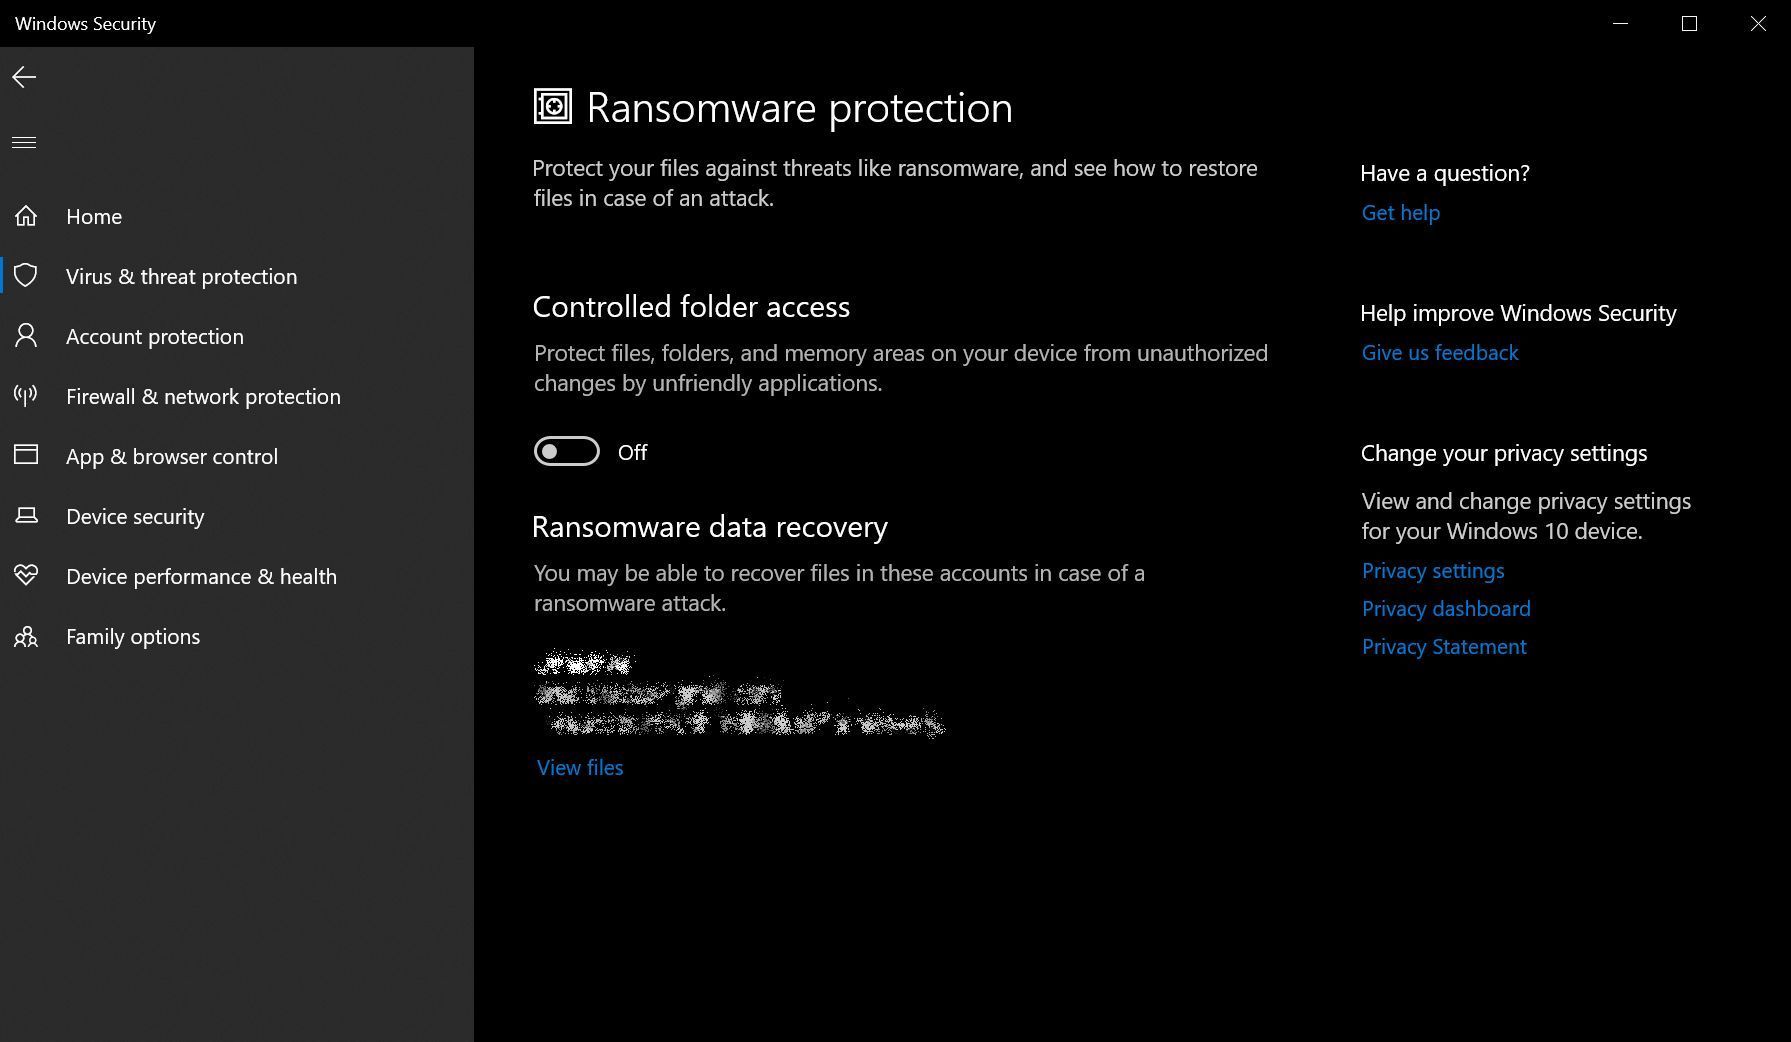
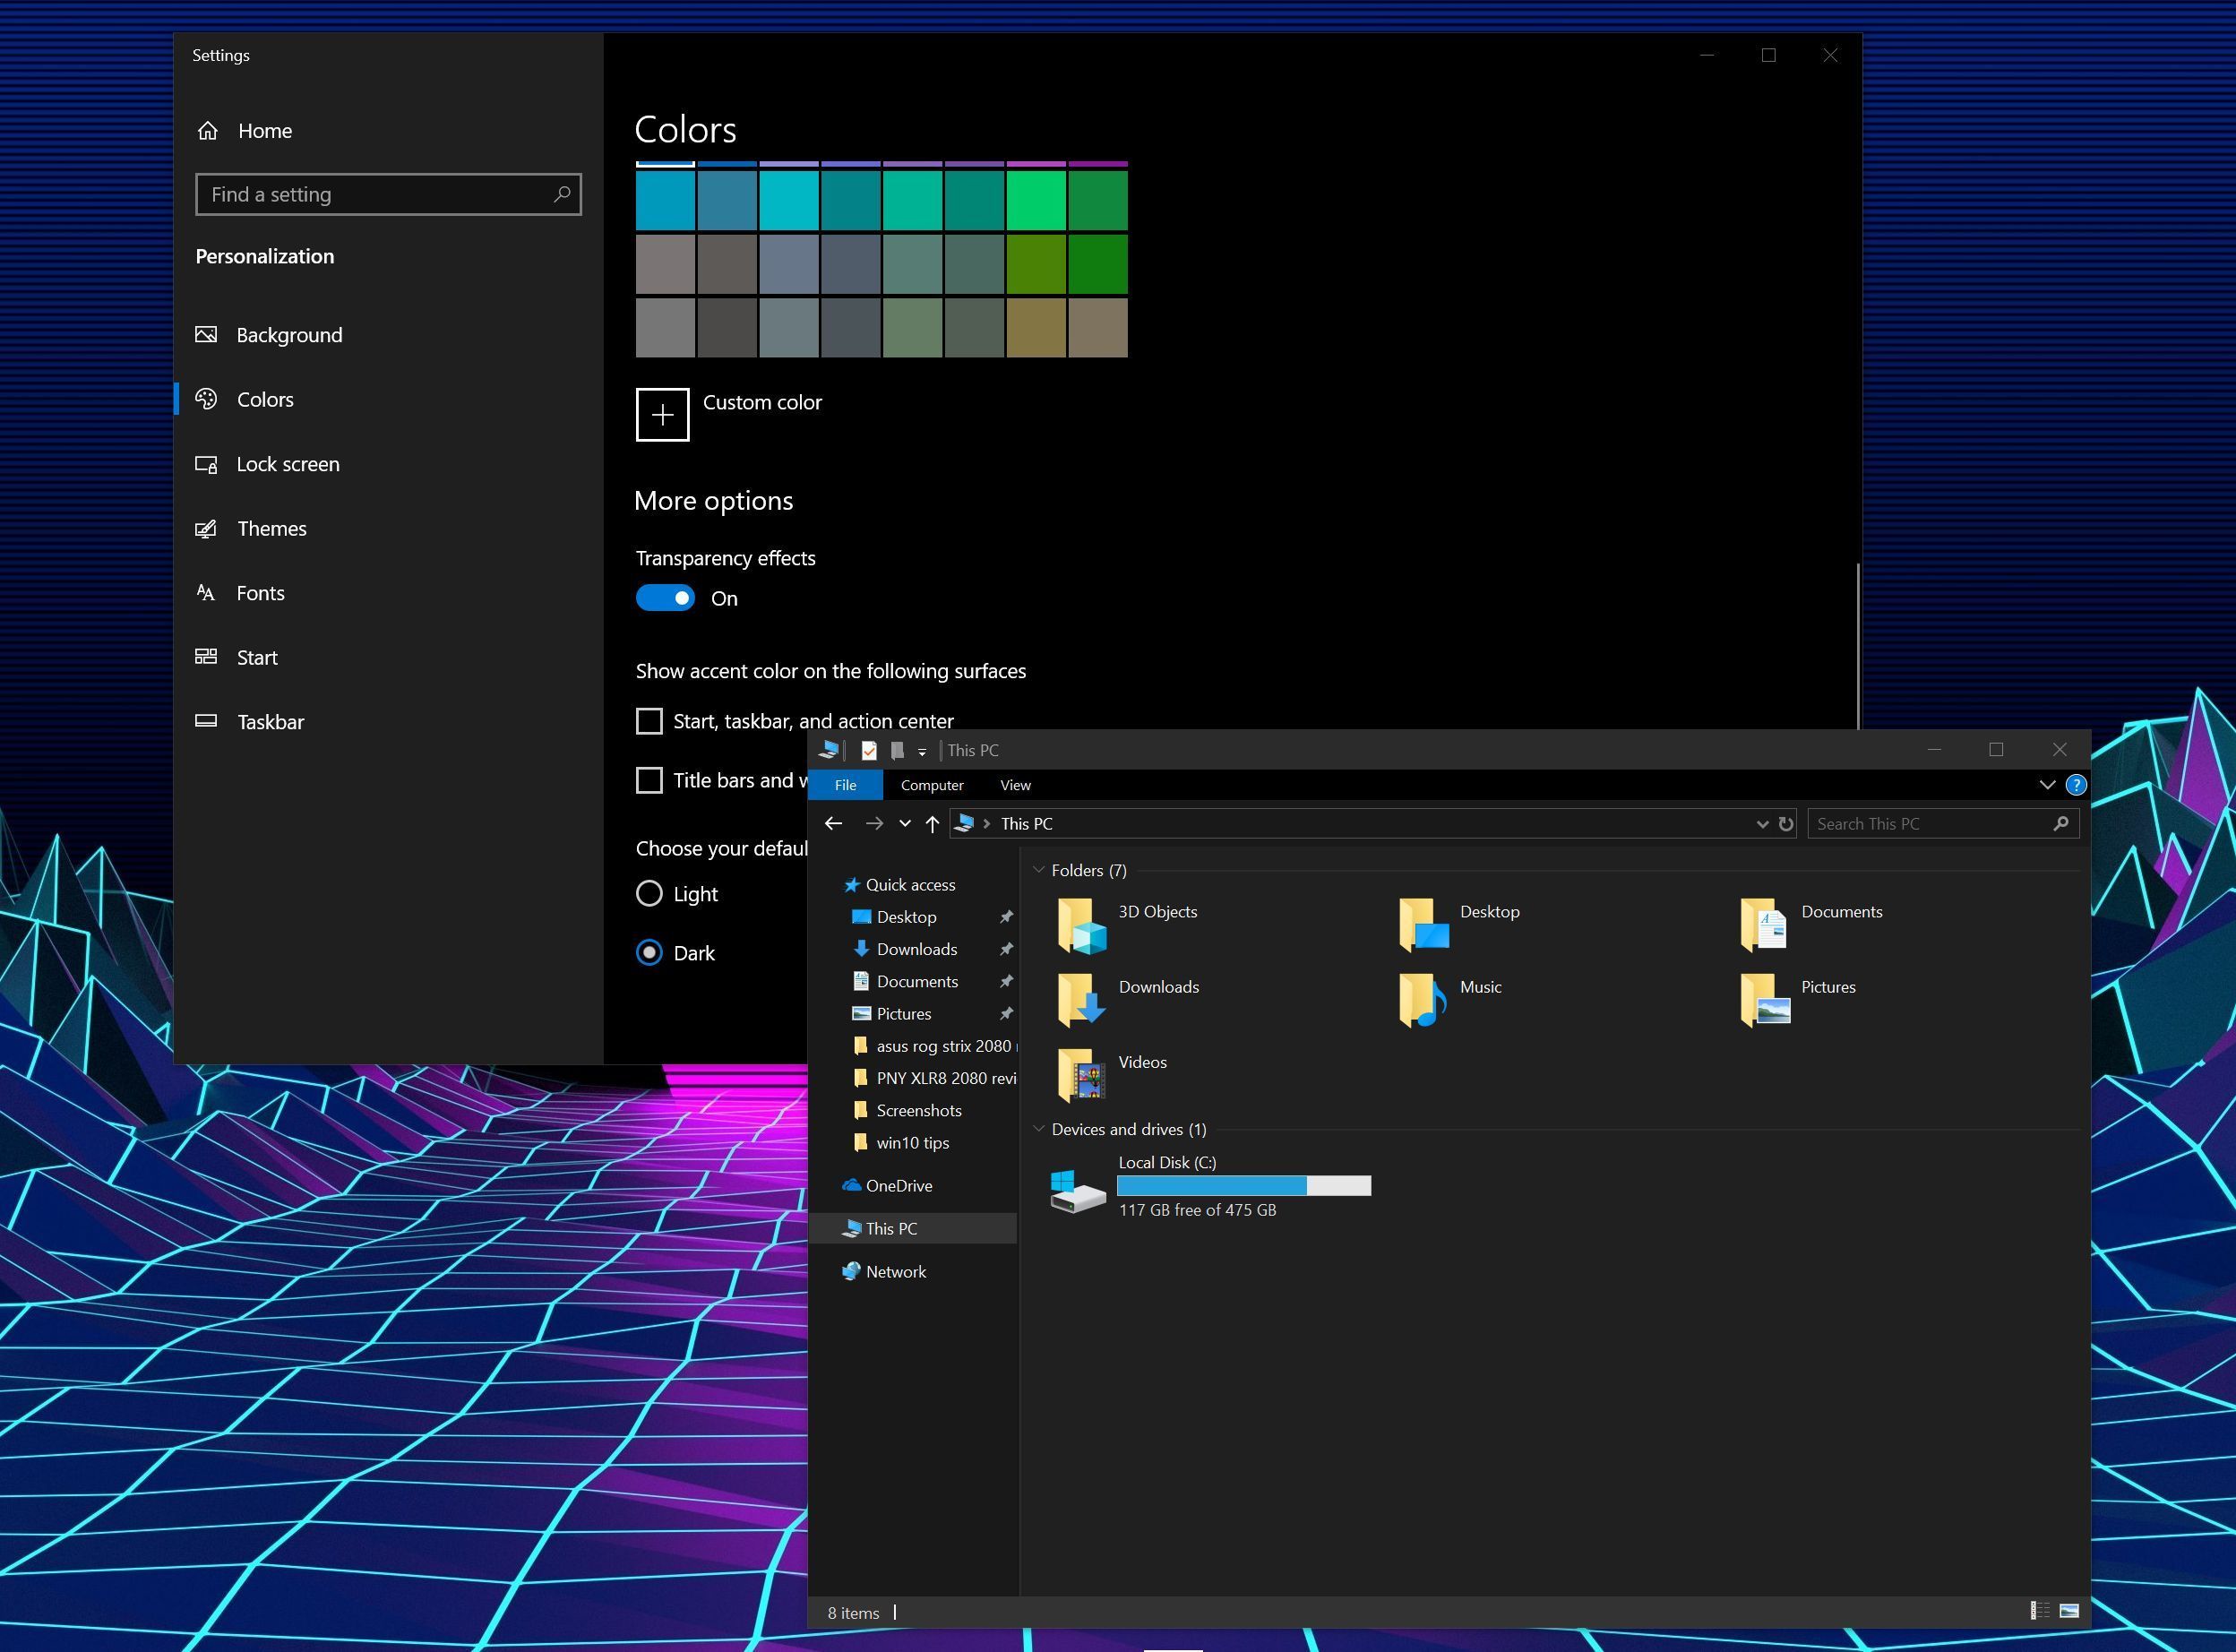
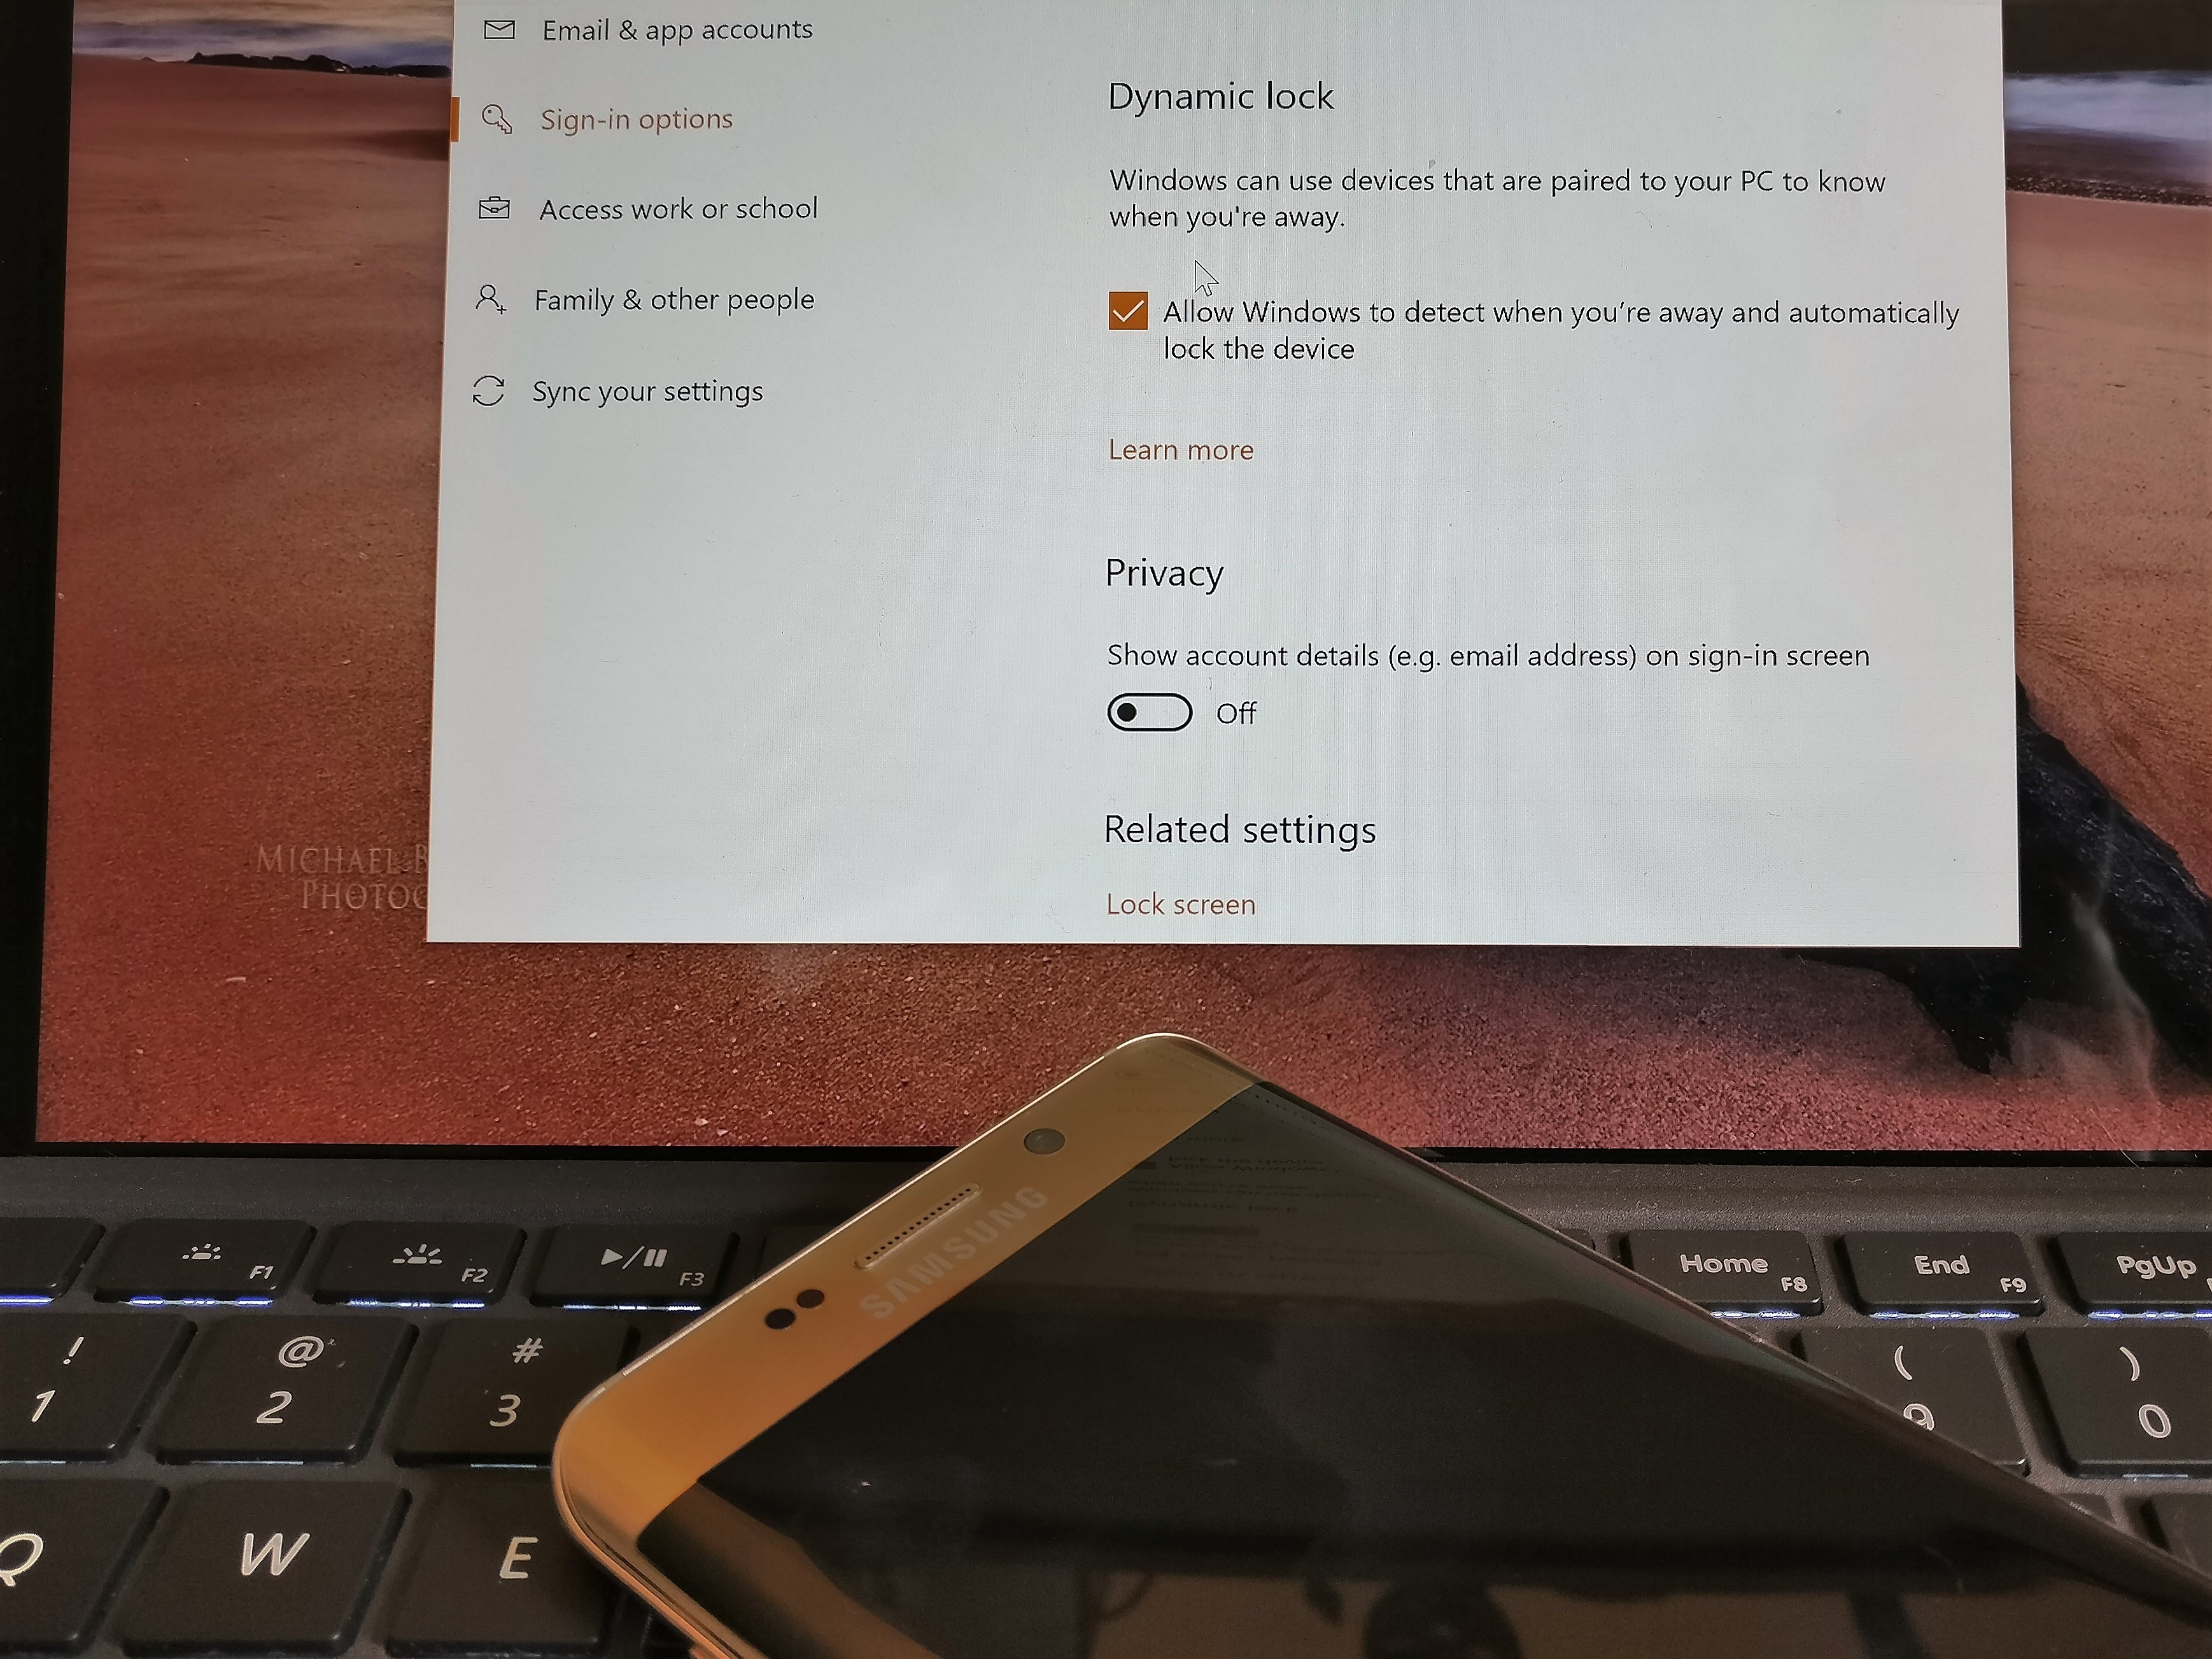
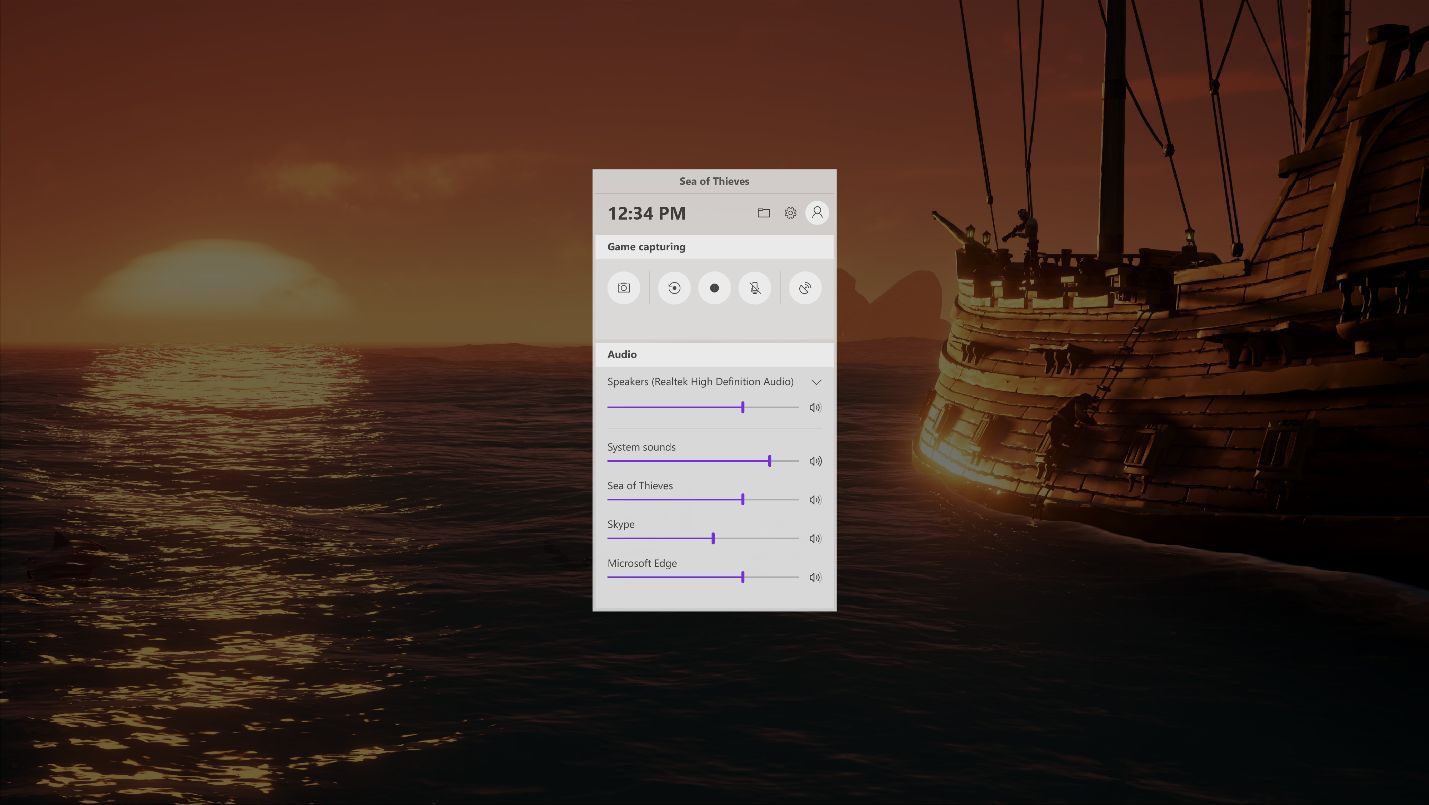
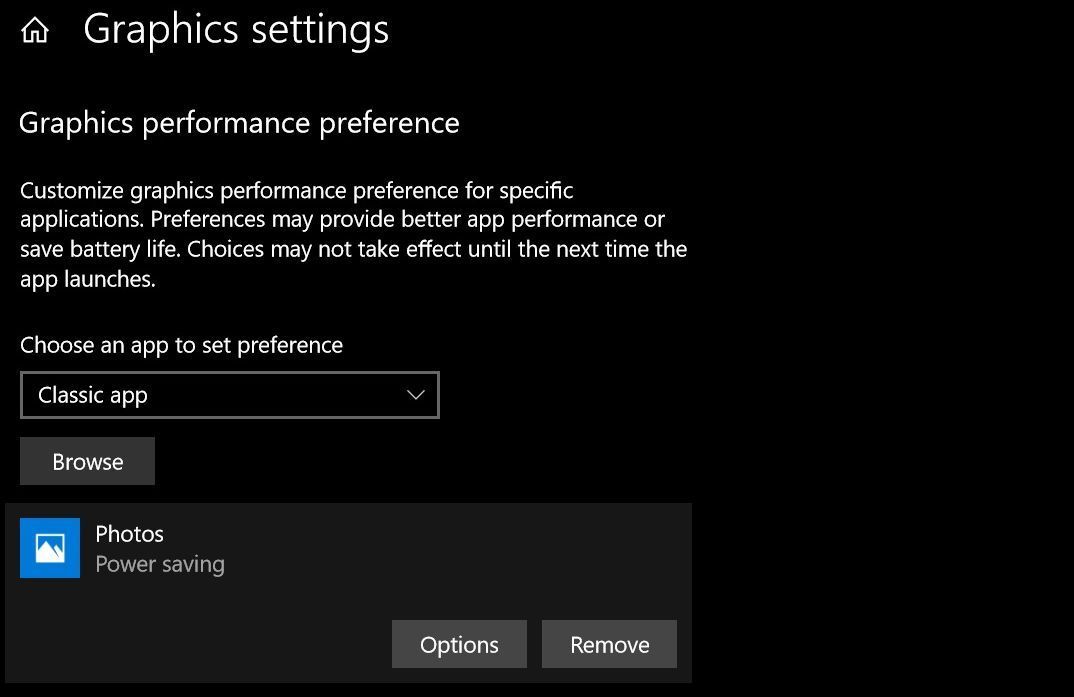
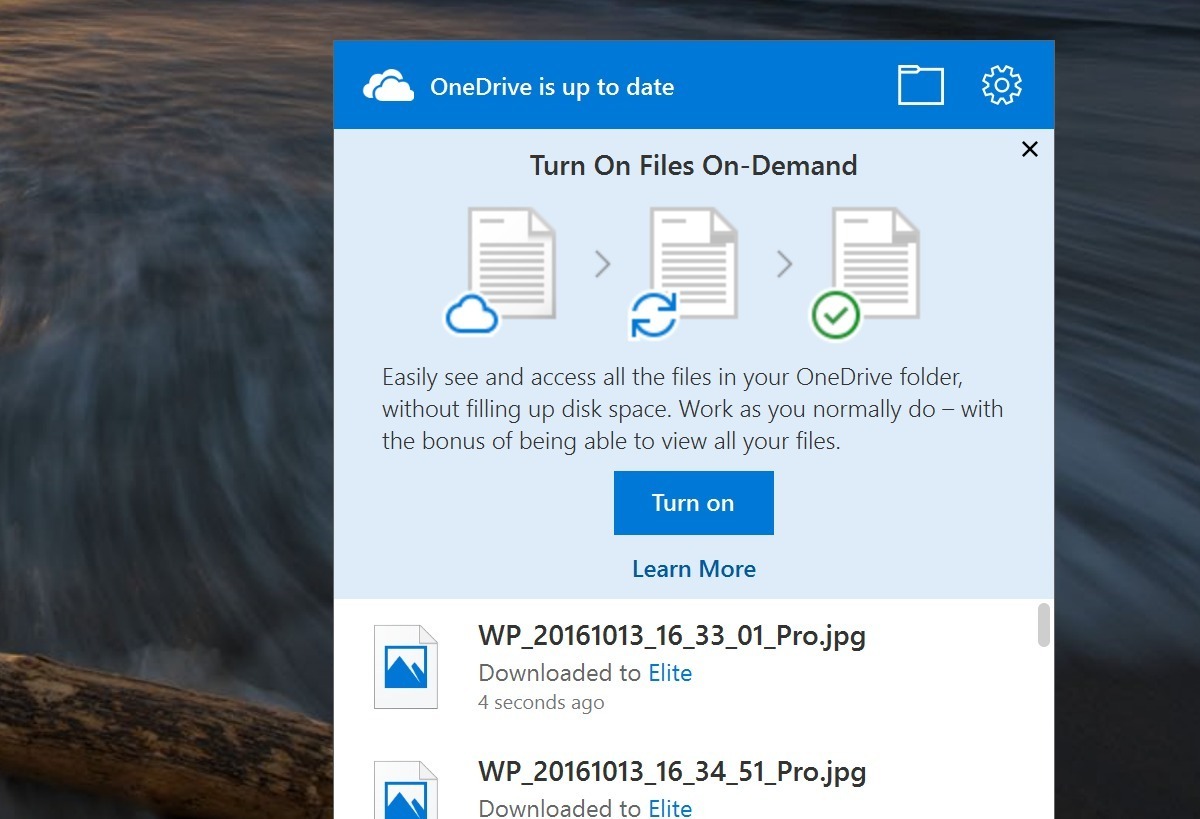
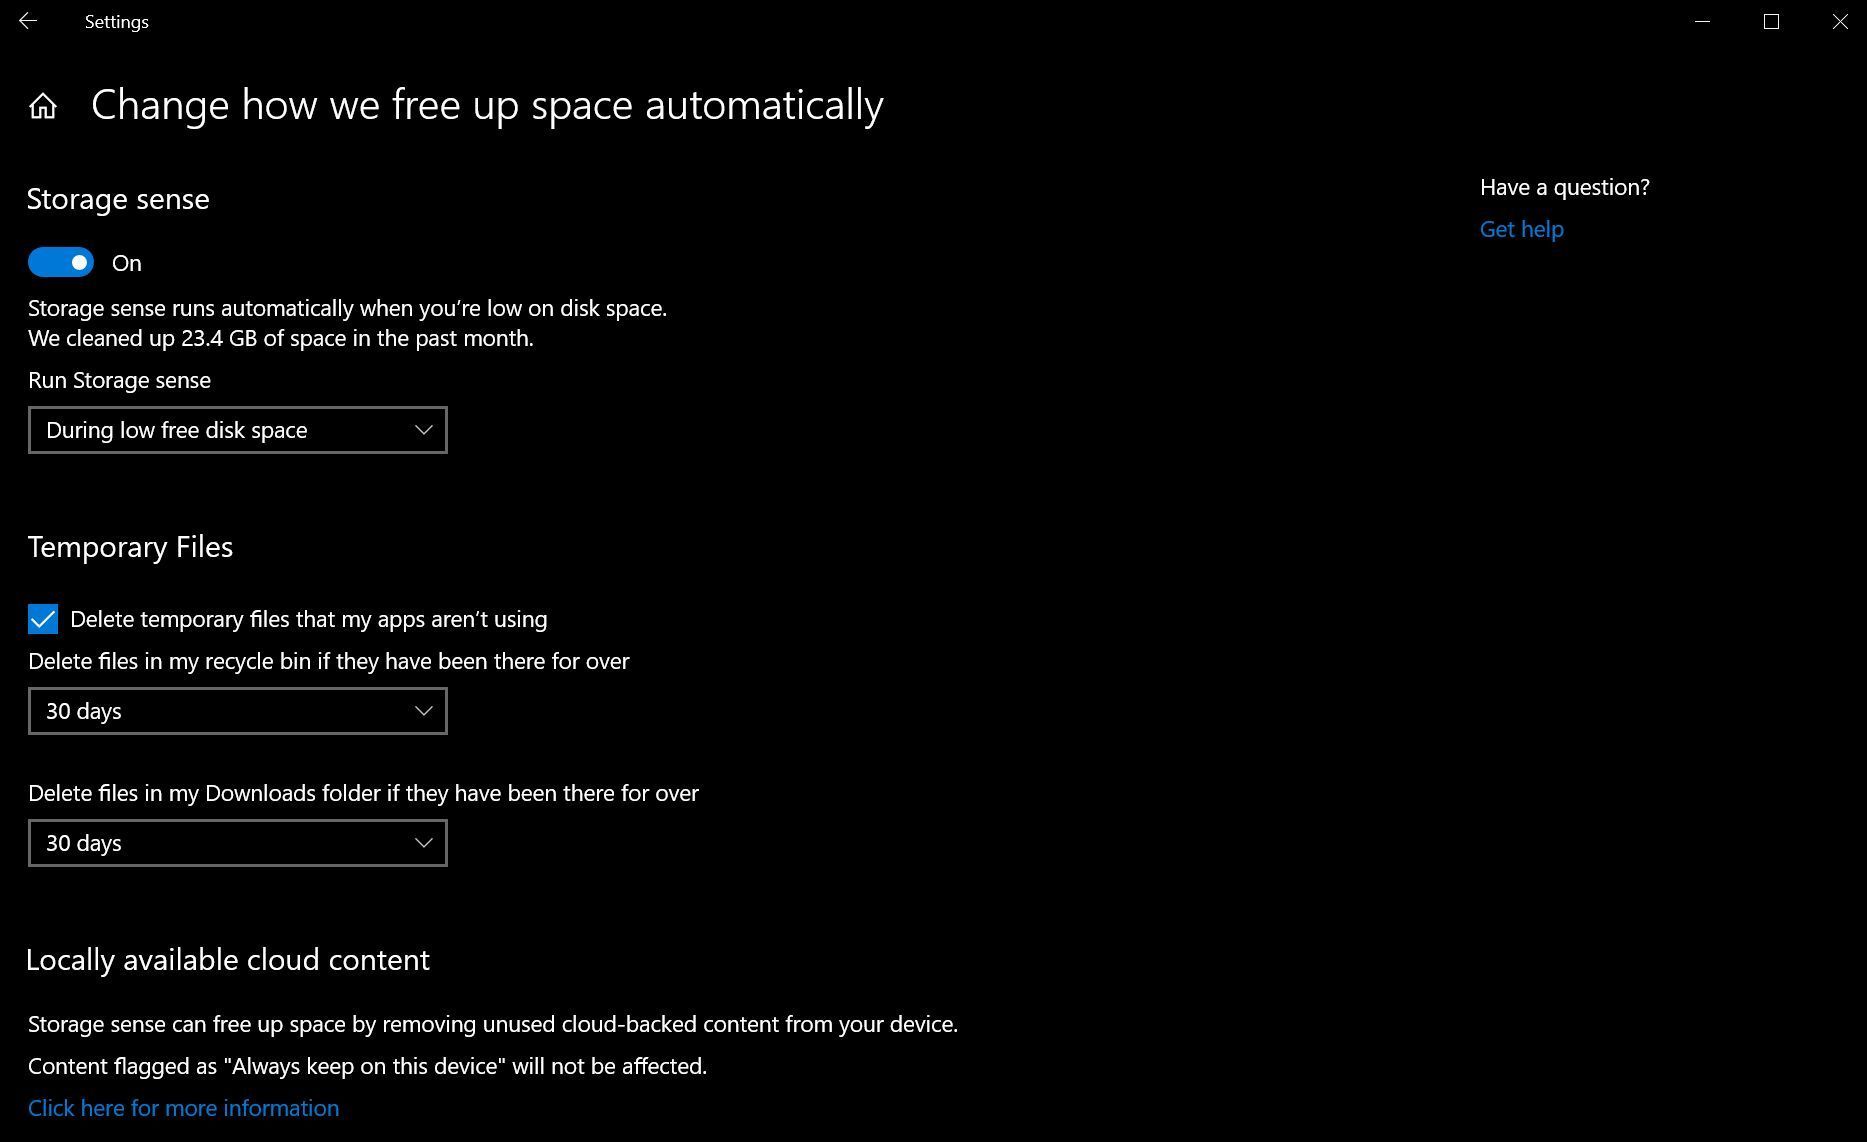
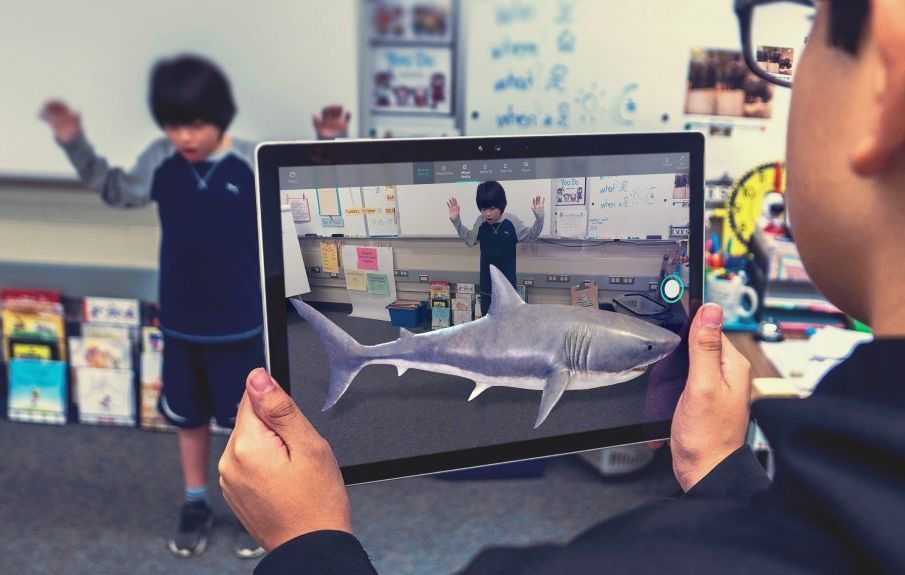
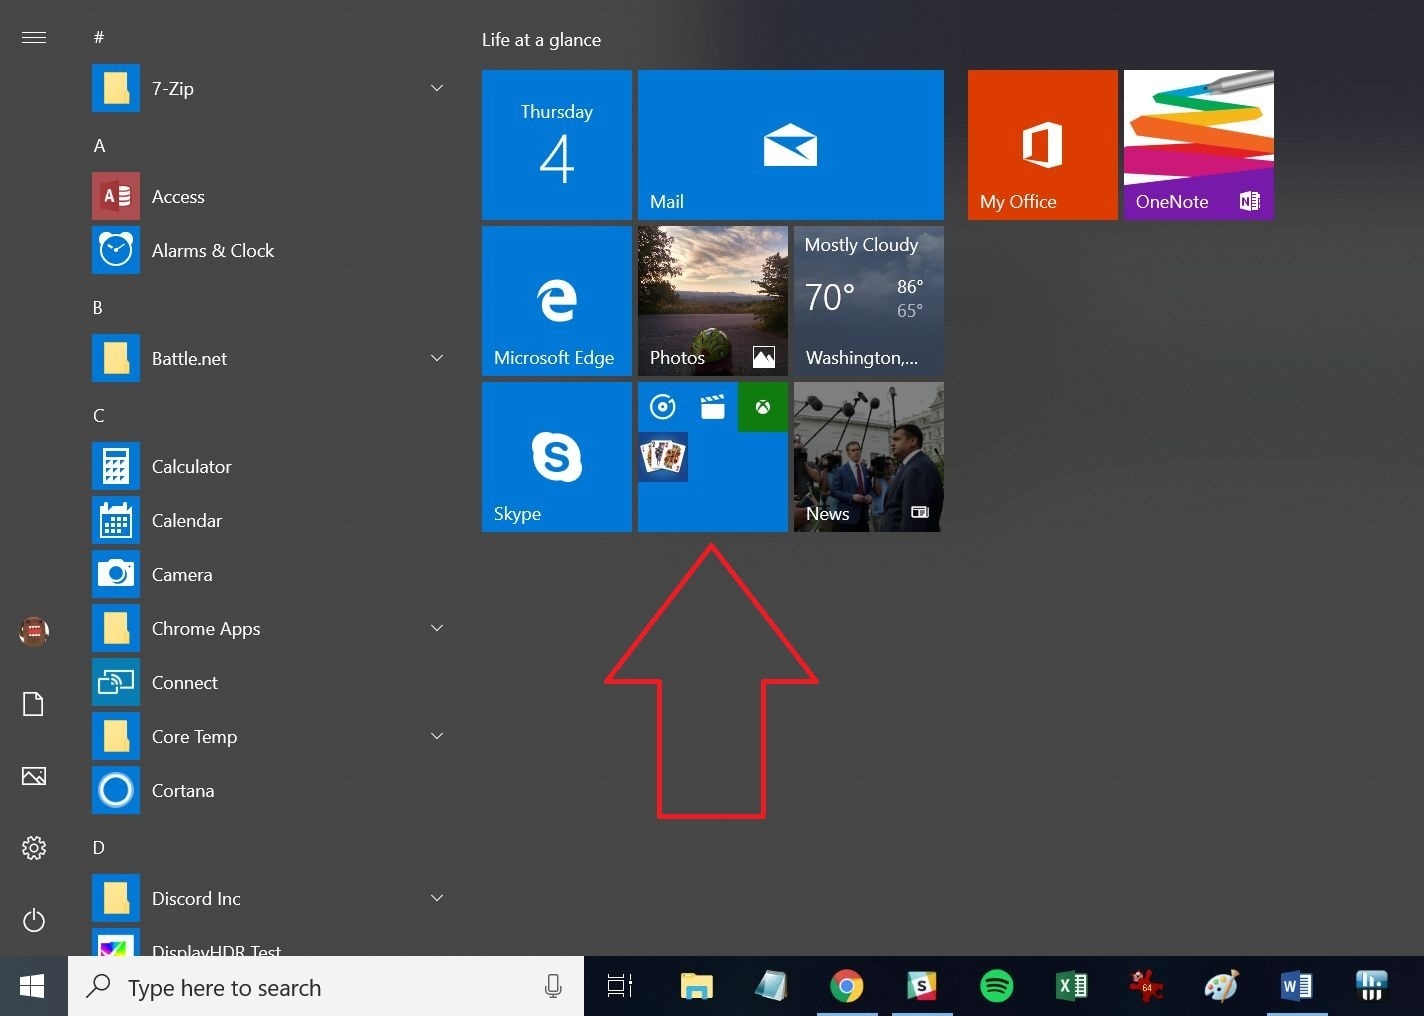
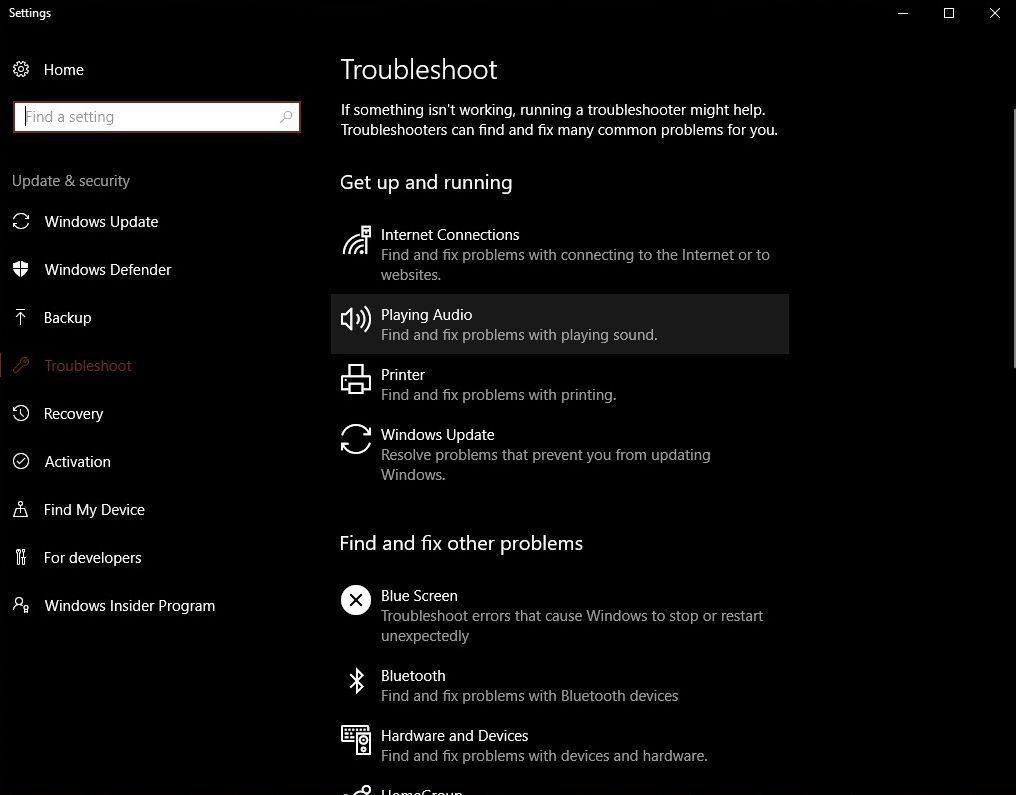
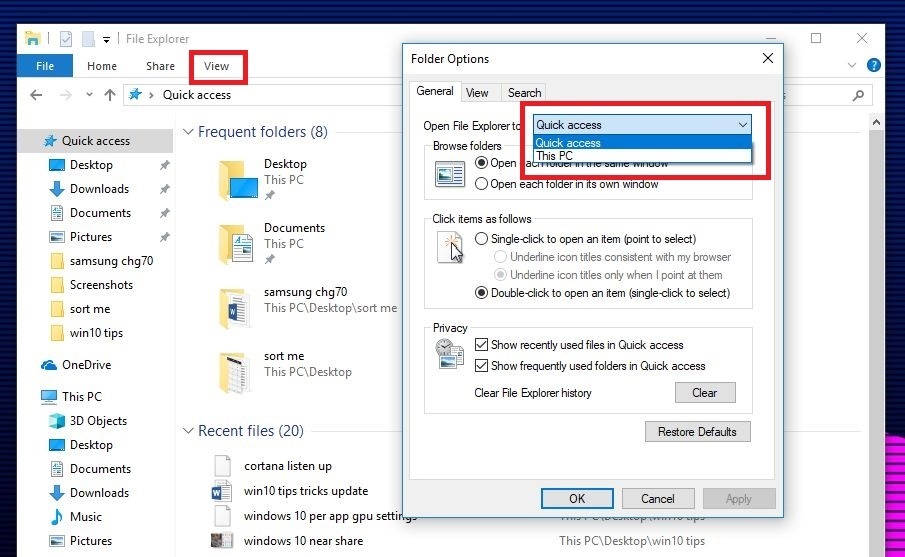
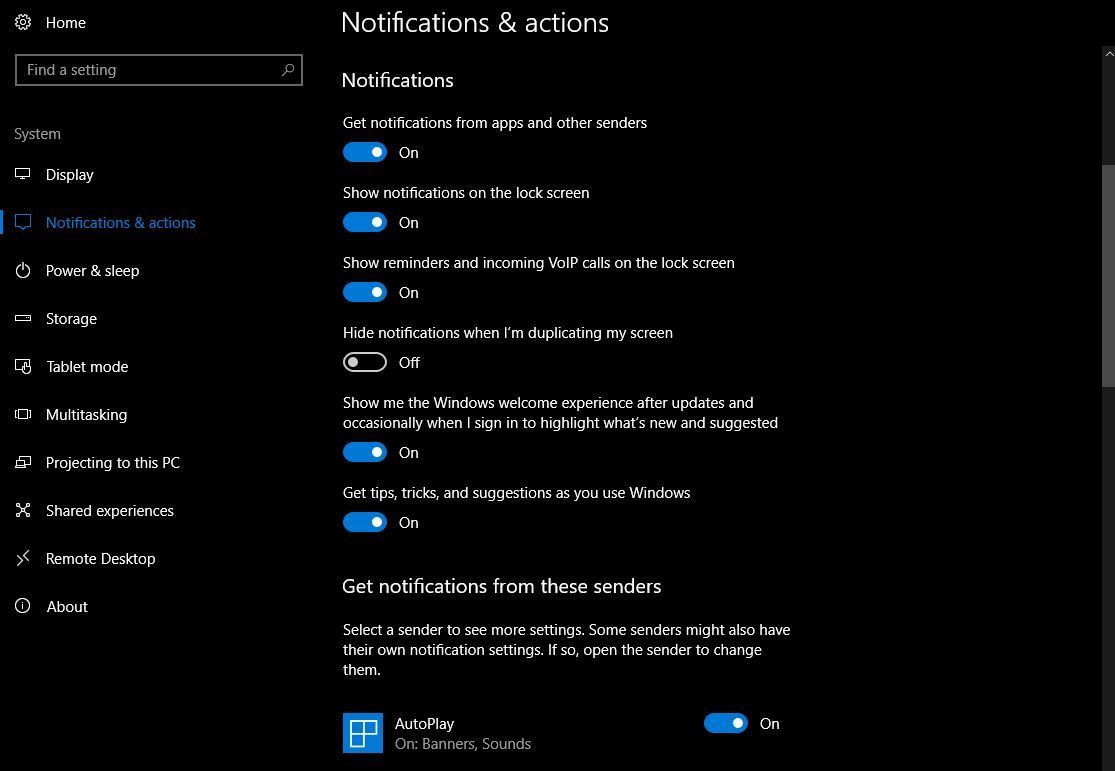
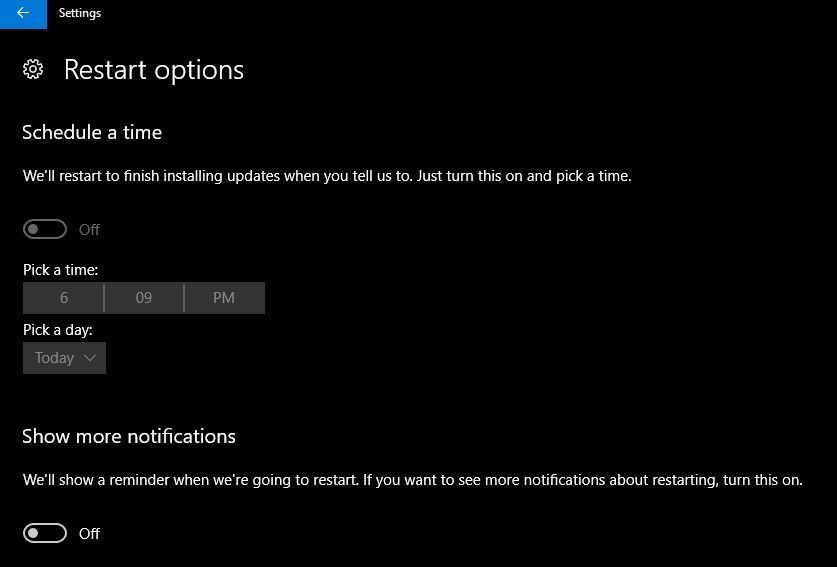
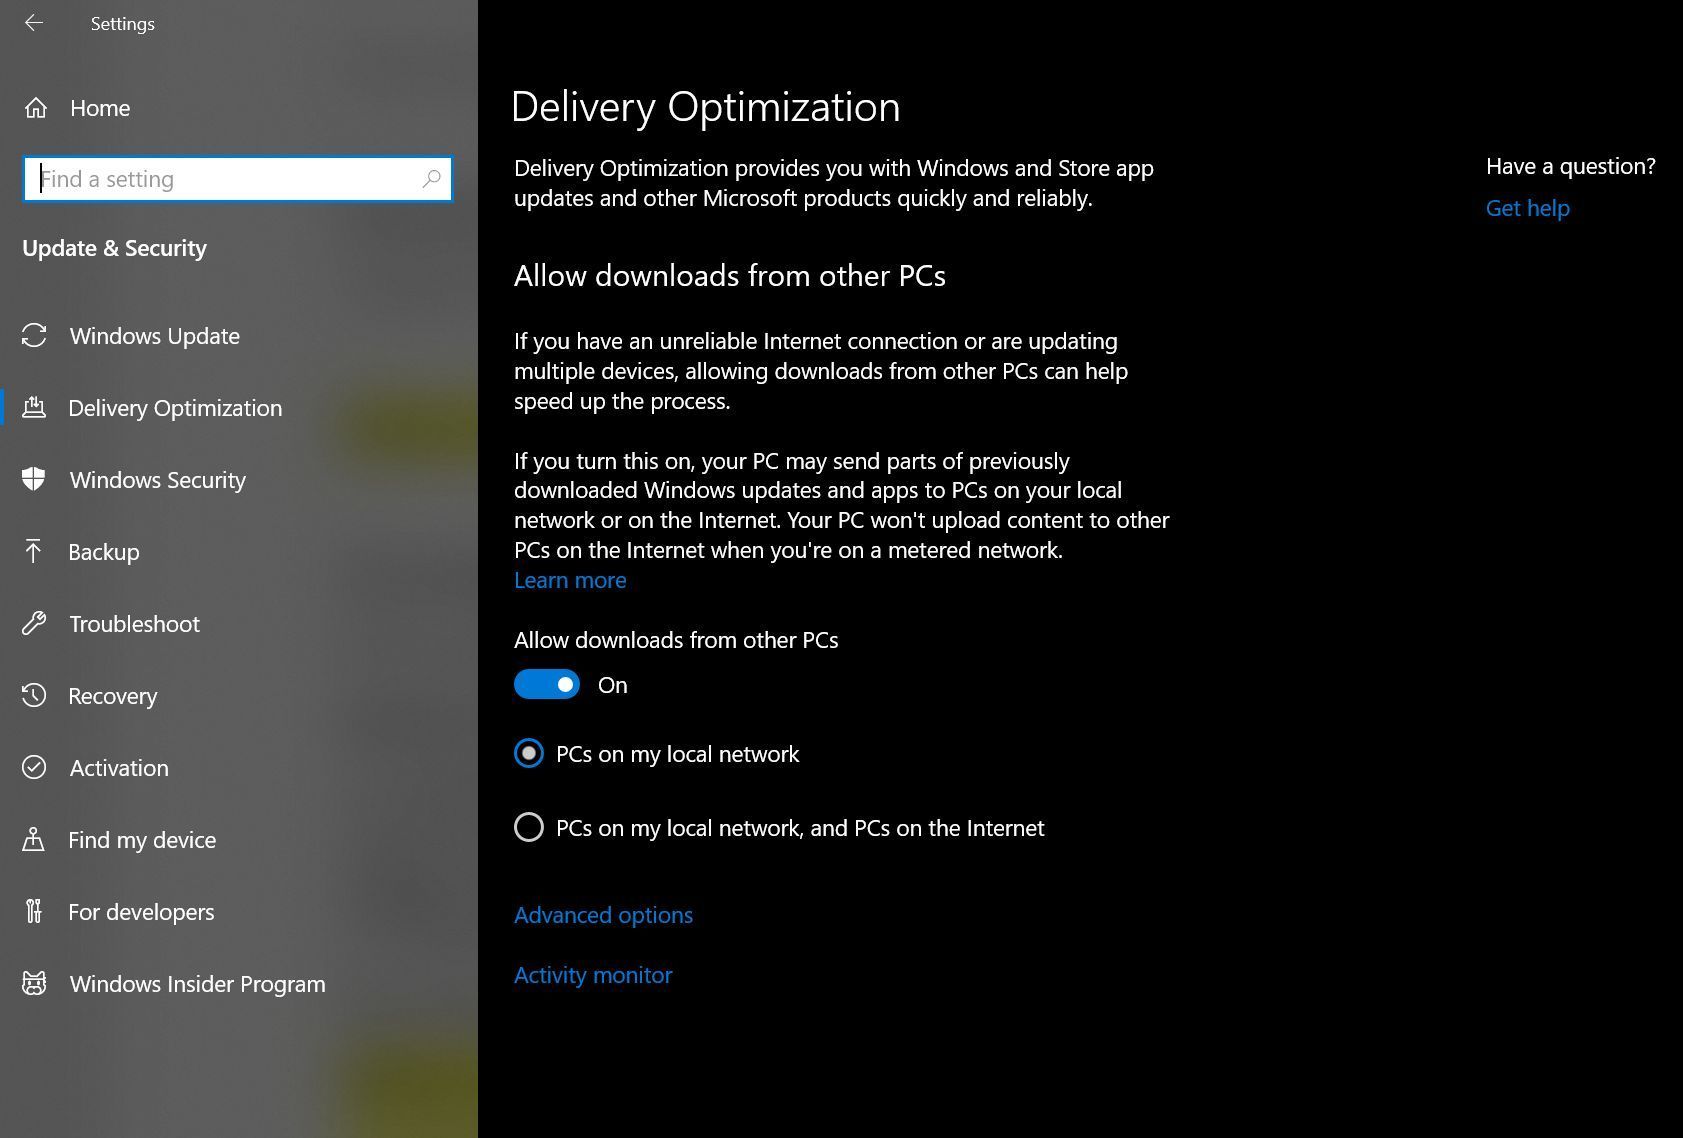

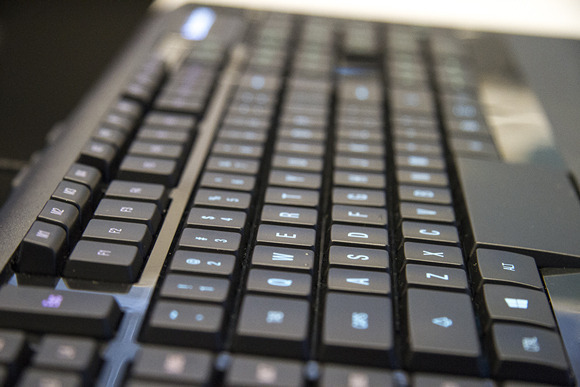
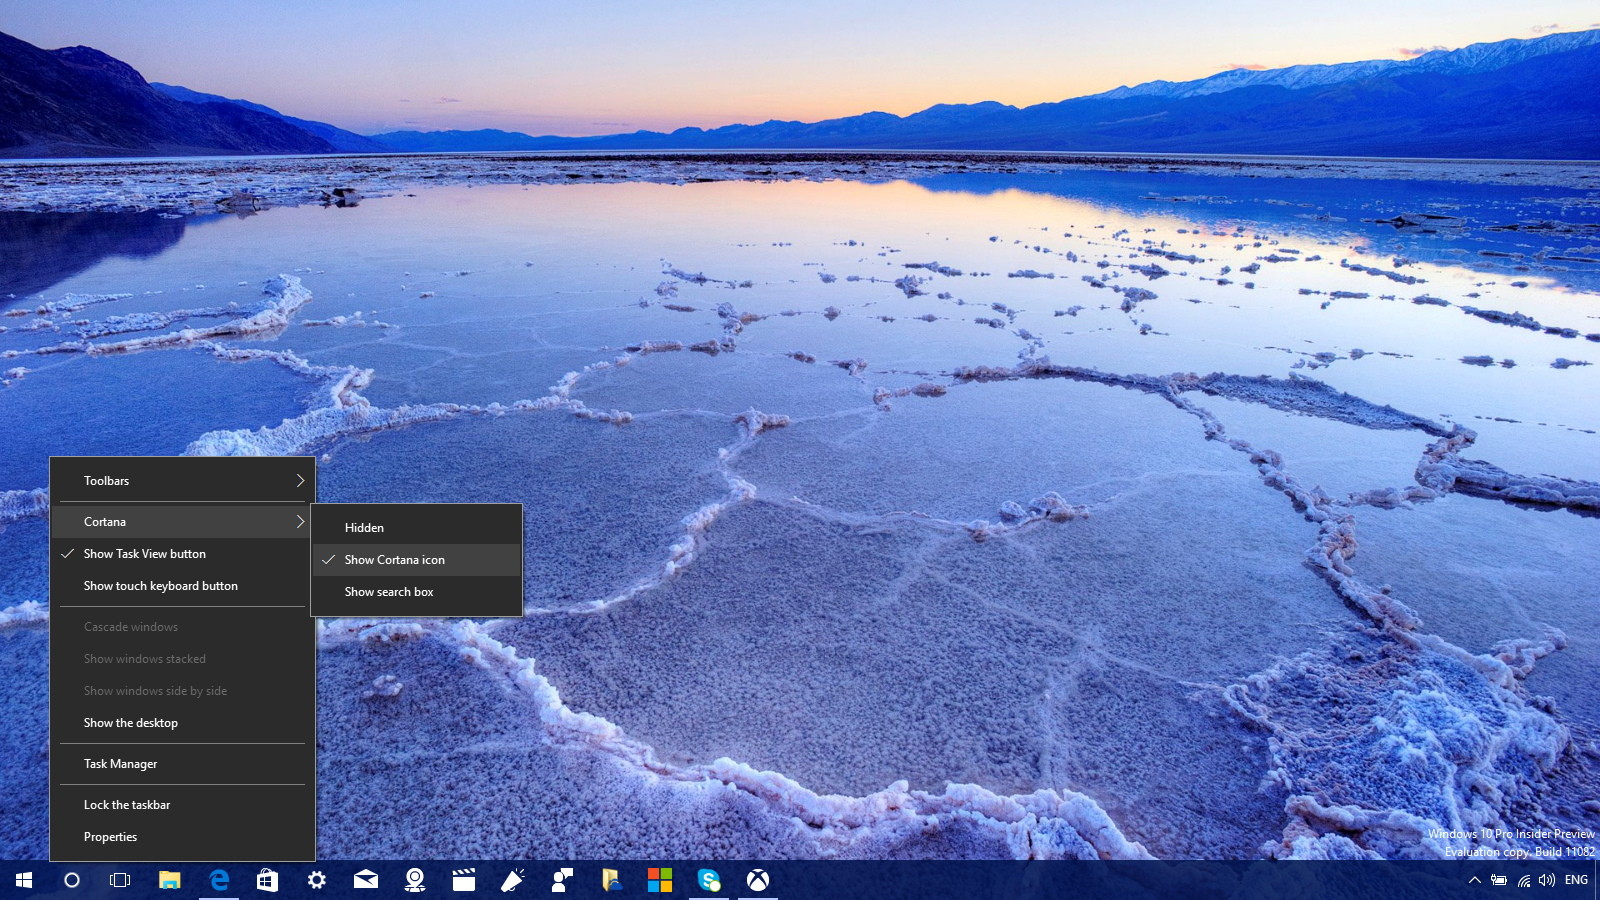
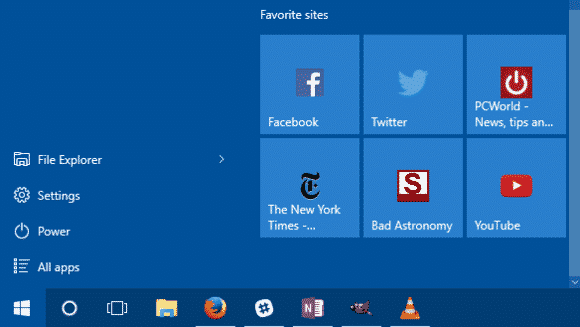
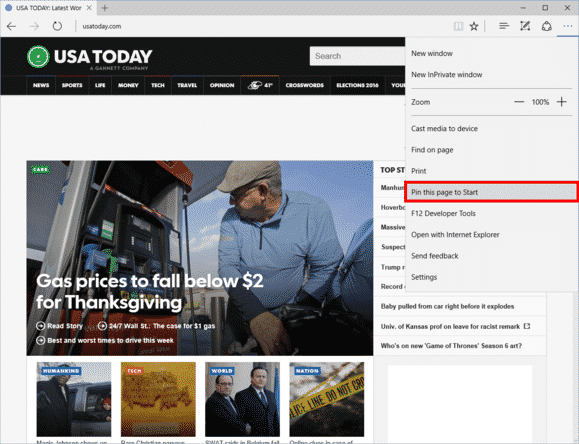
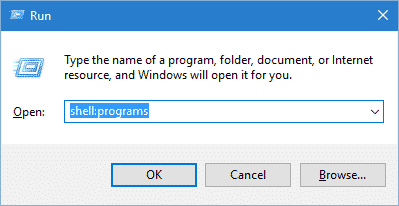
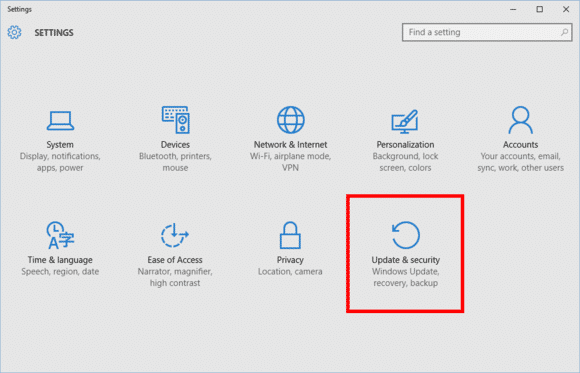
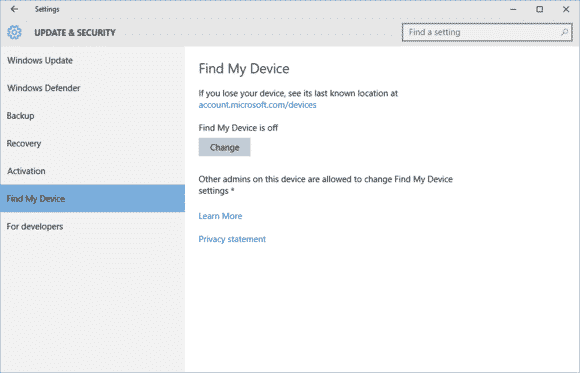
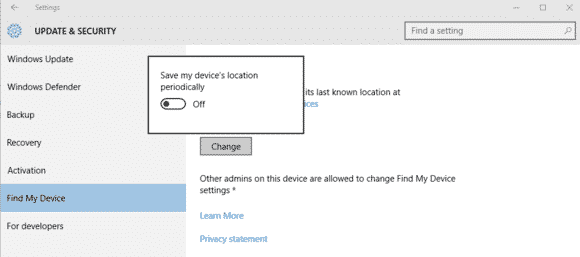
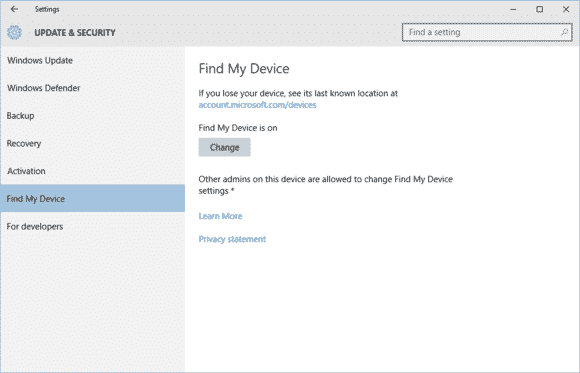

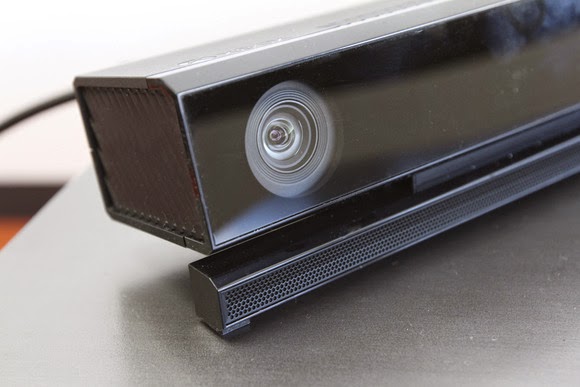
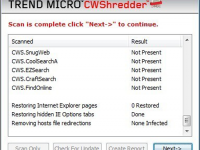
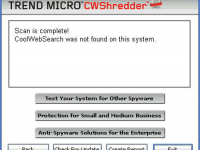
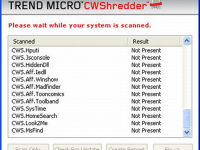

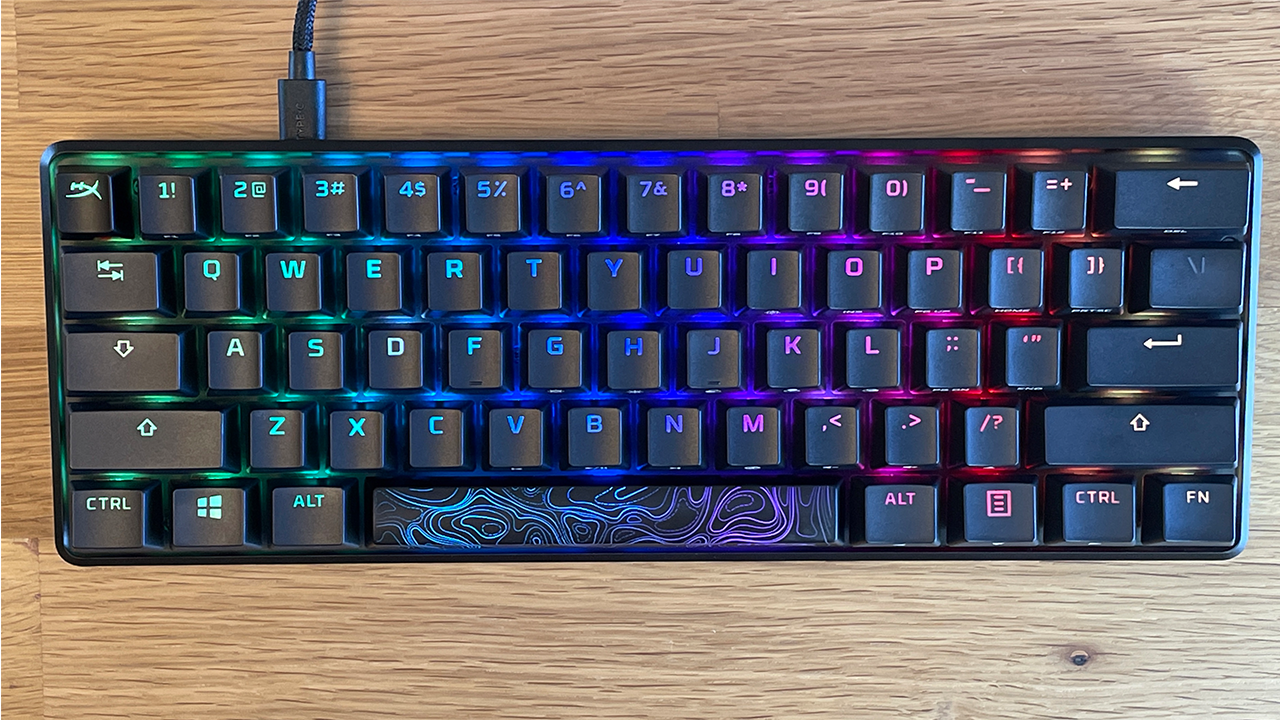
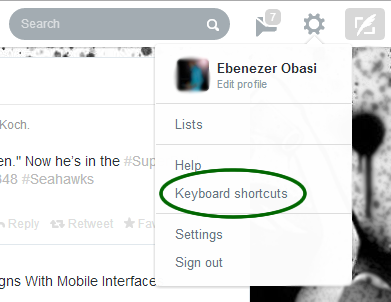
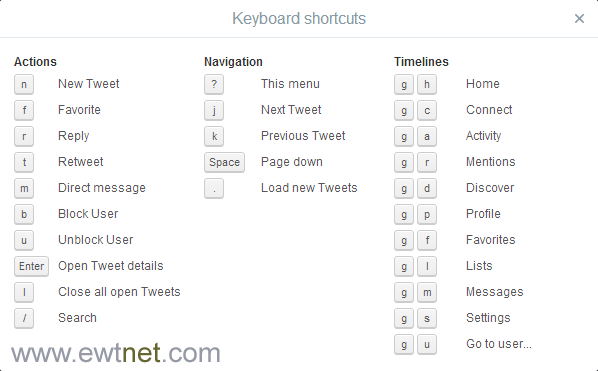




You must be logged in to post a comment.