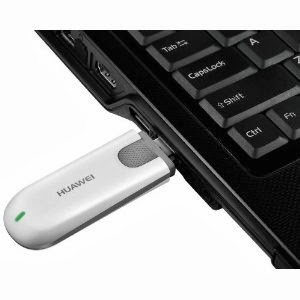
The recent series of internet modem dominant in West Africa and South Asia is the Huawei E303 Data Card. The data card has quickly being adopted by network service providers in those countries due to it’s high speed HSDPA/3G internet features.
Taking a closer look at your brand new data card will reveal that the IMEI is somewhat similar 86************ which contrasts with the 35*********** IMEI found on the older internet modems. This contrast is the major reason why you cannot calculate your unlock code using Universal MasterCode Calculator, old DC-Unlocker or any of the code unlocker you have used in the past.
In this tutorial I will walk you through the steps on how to unlock any of the recent internet modem, including MTN NG, Airtel NG, Huawei E303 Glo Bolt, Airtel E173 and Etisalat internet modem using DC-Unlocker. Huawei E303 Glo Bolt Internet Modem can be unlocked for free using this method.
Things you will Need
To begin the process of your modem unlocking, you will need the following items:
A working PC of course, with internet facility.
DC-Unlocker Client Version 1.00.1084 or later – Download now.
An account on DC-Unclocker with at least 4 credits.
After you have downloaded DC-Unlocker on your computer. You need to buy unlocking credits from their website. However, before purchasing unlocking credits, you need to confirm the number of credits required to unlock each modem.Unlocking E303 data cards should cost you 4 credits, but in the case of other models, you can check here to confirm the amount of credit needed to unlock them.
Unlocking Huawei E303 Data Cards
If everything is set, connect your USB Modem with the supported sim card. Allow the dashboard installation.
Disconnect to the internet and plug your USB Modem with a different provider SIM. And insert your modem to the USB port.
After some seconds, you should see a popup window requesting for the unlock code. Click the Cancel Button and exit the modem dashboard.
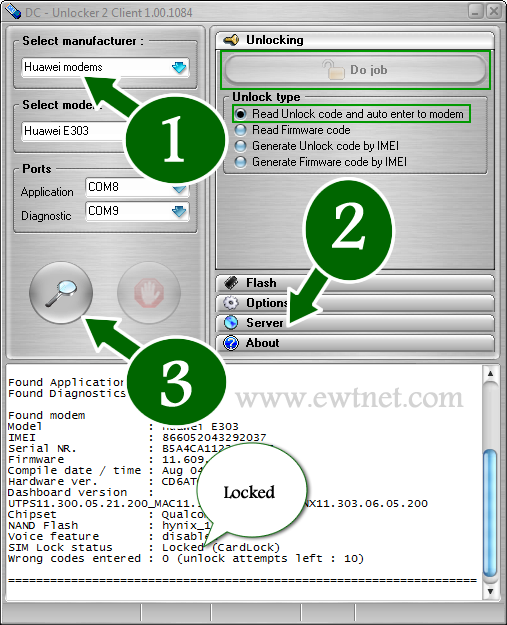
Locate and install dc-unlocker_client-1.00.1084.exe on your computer. Next, find the icon on your desktop and run as administrator.
Choose what “manufacturer” that your modem is. i.e. Huawei Modems
Click the magnifying glass, and it will search for plugged USB modems.
Once the modem is detected, Click on Server and enter your account details.
Go to Unlocking menu, and click on Do Job.
Wait till the unlocker program says that, unlock is successfully done.
Of course, you can use this method to unlock ZTE modems, all Etisalat, Glo, Airtel and MTN modems, just follow similar steps to the ones above.
Payment Worries for Nigerians
The payment processors available in DC-Unlocker’s are currently not supported in Nigeria and most countries. However, the company has dealers in over 50 different countries worldwide. The official dealer in Nigeria is Gurutech and charges N2,500 for DC-Unlocker credits.
If you have no intention of going through the so many long process involved in modem unlocking, or you cannot afford the N2,500 price tag from the Nigerian dealer. You can sit back and lets do the job for you. Click here for more details.
Before now, the Huawei E303 Glo Bolt Internet Modem has been an ugly nightmare for Nigerian geeks. I happened to be a victim of this nightmare, but somehow, I found an escape route. You might have wondered why Glo Bolt Modem cannot be unlocked using code unlockers or the Huawei E303 unclocking I tips posted earlier. The reason is because Glo Bolt modems has been blocked by either its manufactures or Glo themselves. When a user enters a wrong unlock code in a particular modem over ten times, the modem is blocked and can no longer accept SIM cards outside the one it was branded for, this is the exact state of Glo Bolt modems.
At some point, the possibility of unblocking or re-branding the Glo Bolt modem looks hopeless, but thanks to our team’s curiosity, we now have a solution to Unblock Huawei E303 Glo Bolt Internet Modem using firmware updater. It is free and easy to follow steps.
Requirements to Unlock Huawei E303 Glo Bolt Modem
A PC with internet access (preferably not from a modem).
Uninterrupted power supply (Your devices cannot be interrupted throughout the process). If you are using a laptop, it is recommend you charge your battery to the brim.
Unblocking your Huawei E303 Glo Bolt Modem
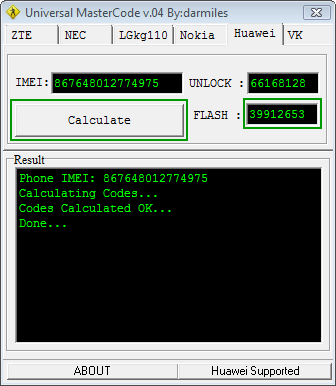
Run the Universal Master Code Calculator you have downloaded earlier. Put your IMlEI and hit the Calculate button. Copy the Flash code into somewhere save. We will use it as a password at some point in this tutorial.
Universal MasterCode Tool
Next, extract the contents of the HUAWEI E303 Firmware Update into a folder. Make sure the modem is connected and it has been installed with the SIM card inside it. Now exit the dashboard tray if it’s open and run E303SUpdate_21.157.31.00.850.B757.exe, put the Flash code you got earlier from the Universal Master Code Calculator when it prompt for password.
In less than 3 mins, you will have a brand new modem at your disposal 🙂 Just insert any SIM and enjoy permanent freedom. You can also download a new modem dashboard here.
Earlier today I published an infographics on things you can do with your smartphone but I didn’t mention the possibility of checking the status of your television/electronics remote control battery with your smartphone.
Of course, in the modern technology it is no longer a question of ‘what you can do’ with your smartphone, it is now a question of ‘what you can’t do ‘ with your smartphone.
The latest discovery has revealed that you can check the power status of your TV set or home theater remote control with your smartphone. This is possible because most standard remote controls send signals to your home theater gear using a beam of infrared light, which a sensor on your hardware picks up. The beam of course is invisible to the human eyes, however, never neglect the power of your smartphone’s Camera! If your remote control start behaving in a funny way, you can easily use your phone to check if your remote batteries need refreshments.
Checking your Battery Power Status
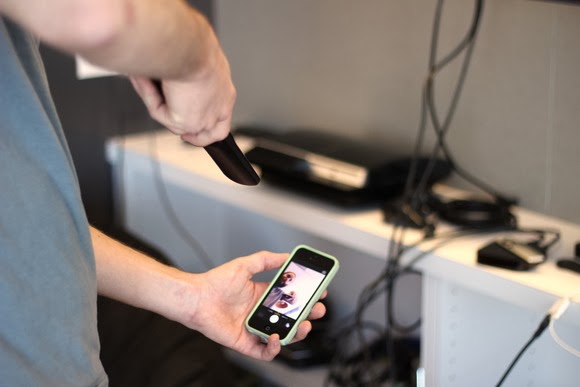
To check your battery status, simply wake your smartphone and launch the Camera application. Next, switch to the front-facing camera, point the remote at the camera, and press any button on the remote.
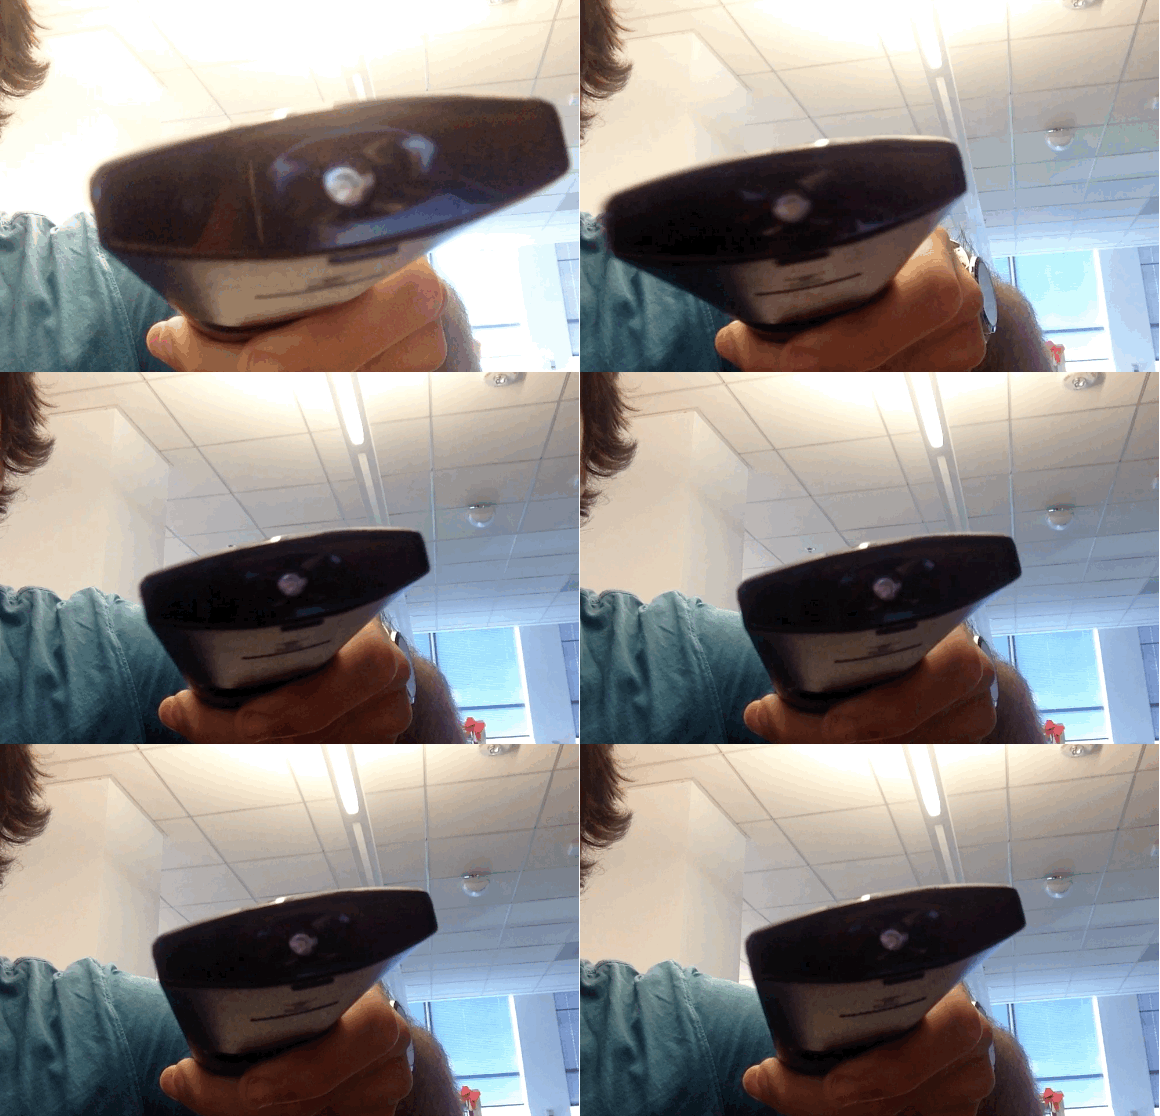
If the remote is working properly, you should see a flicker of light come from the IR blaster as viewed through your phone’s screen that looks something that this:
If you don’t see the flicker from the IR blaster, or perhaps just a very, very dim flicker, you probably need to change the remote’s batteries. (And if new batteries don’t help, you probably need to replace your remote. Sorry.)
Of course, this trick isn’t limited to your smartphone’s camera; many digital cameras can see infrared light, despite having filters to tune it out. So if all you have at your disposal is your laptop’s built-in webcam, you may have everything you need.
The recent versions of Google Chrome will let you synchronize your Google account with Chrome so that you don’t have to login again to each Google products (e.g. Google Drive, Gmail, Blogger, Google Play, etc) website you visit. This will also mean that anybody who has access to your Google Chrome browser can easily explore your email and other Google products without your consent.
How do you ensure that no intruder can have access to your Google account without you logging off? If you share a PC at home, other family members can start searching the web as you by simply opening Chrome.
Luckily, Chrome’s multiple profile support can help, providing an easy-peasy way for multiple people to use the same browser without worrying about intruders or having to constantly sign in and out of Google profiles.
How to Add a New User
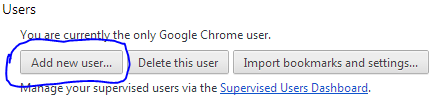
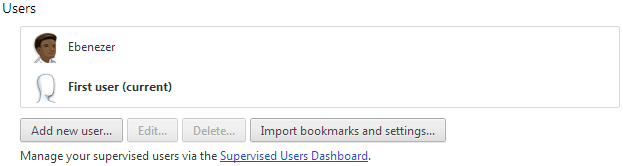
First off, open Google Chrome’s menu—the icon with three horizontal lines in the upper right-hand corner—and open the Settings option. Towards the bottom you’ll see a “Users” section >> Simply click on Add new user.
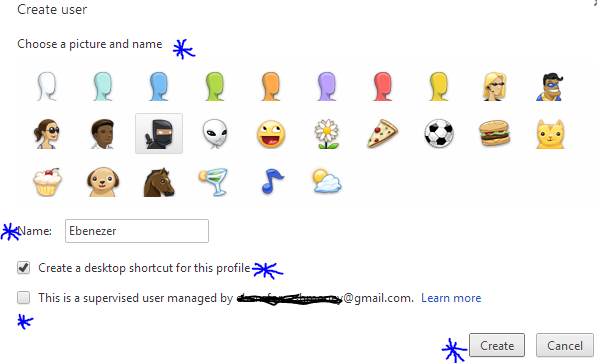
A pop up window will appear with a bunch of user icons and new user account configuration. Choose an icon and name for your profile, you will have to decide whether you want to create a desktop shortcut icon for the profile, and then tap the “Create” button. Viz.. In a few seconds, a new window will open with the new user profile.
Notice that the first time you create a new user profile, Chrome will actually create two profiles: One called “Default Profile” for the person who is currently signed in to Chrome, and one for the new profile that you just created.
So the first time you add a new user, you are actually creating two profiles. To change the name of the default profile to something more user friendly, go back to the Chrome settings tab. Highlight the default profile in the “Users” section and the click the “Edit…” button to change the name.
That’s pretty much it. Just follow the same process as many times as you need to create a user profile for each member of your household.
Create User Profiles for Kids
If your kid is less than 16 years old. You need to be weary of what he/she does on the internet. The most reliable, easy and cheap way to achieve that is with Google Chrome. The browser allows you to supervise a particular profile. You can block the profile from visiting certain websites, view website histories by that user profile, delete and add bookmark.
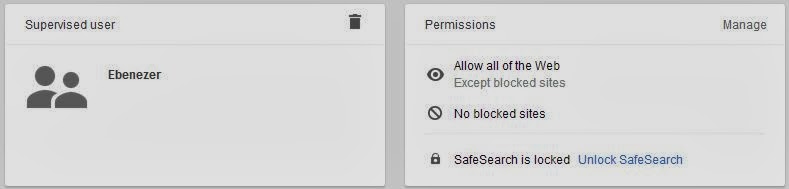
To be able to monitor your kid internet activities, you will need to create a special kind of profile called a supervised user, a beta-grade profile type Google added to Chrome earlier in January.
To make a supervised user, simply click the checkbox next to “This is a supervised user managed by [email address].” Parents of supervised users can block specific websites, check out the websites they’ve visited, and lock kids into Google’s “Safe search.” If you block a website that your child thinks they should be allowed to view, they can even send you a request to unblock it, and you can manage settings for your supervised users via the dashboard at chrome.com/manage.
You need to be weary of the fact that user profiles are not password protected, however, so Chrome’s supervised users feature is far from fool proof. You will still have to keep an eye on your child’s surfing habits to make sure they are using their profile and not switching over to yours, or—if you’re really worried—create separate user accounts as the operating system level .
How to Switch between Profiles
To switch between users, just click the user icon that appears in the upper left corner of the browser window. The other created users will appear in a drop down menu. Select the one you want to switch to and a new window will open for that user profile. If that’s too much trouble, you can also use the customized desktop shortcuts Chrome offers to make when creating a profile to open the browser as a particular user.
As +Brian Gardner rightly said “the social media makes you look better, and that’s the problem”: We all like to appear slicker than we actually are, just to get a few likes and comments on Facebook.
Whether you are using Facebook as a business entity (page) or as an individual you can backdate your new status update, schedule an update (scheduling updates is only available to page admins) or even change the date of your already posted items.
Maybe you just remembered a photo you were suppose to post three years ago or something you were suppose to say yesterday, don’t worry, you can still go back to the past – at least on Facebook.
Scheduling Posts on Facebook Pages
If you need to make a statement at a time you won’t be available on your Facebook page, scheduling your status update may come handy. The system allows you to post a status update and schedule it to be publish at a given time.
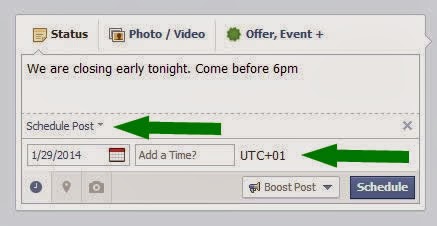
You can prepare a post and schedule it to appear later by adding a date and time in the future before you post it. You can schedule a post up to 6 months in advance in 10-minute intervals.
From your Page’s sharing tool:
Choose the type of post you want to add to your Page
Clickin the lower left of the sharing tool
Choose the date and time you want the post to appear
Click Schedule
If you choose a date in the past, the post will appear immediately at the appropriate place on your Page’s Timeline. All times correspond to the current time zone you’re in.
Note: Scheduling post is currently available to only Facebook page admins.
Backdating Timeline Post
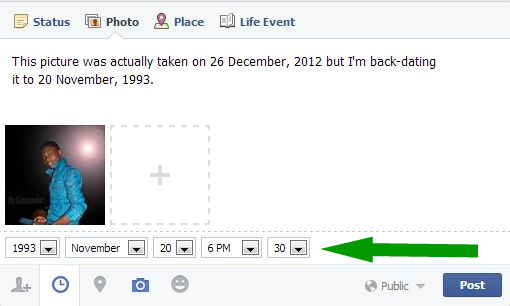
You can backdate your videos, photos, status and just about everything you own on Facebook. Simple goto to your Facebook sharing tool:
Choose the type of post you want to add to your Timeline
Clickin the lower left of the sharing tool
Choose the date and time you want the post to appear
Click Post
To backdate an existing photo:
Click on the photo you want to backdate.
From the right-hand panel, click Edit.
Choose the date and time you want the post to appear.
Some of us here have been enjoying the photo editing feature on Google+ since its introduction in November, 2013 but I believe a great number of you are yet to know about this feature and how to use it.
As one of it’s techniques to land you on Google+, Google has integrated an amazing photo editing tool into Google+. Though a number of you has sworn enmity with Google+ but in this case, hatred doesn’t matter: This tool will make you use Google+.
Google+ photo editing tool allows its users to crop, enhance or customize photos they have uploaded through their Google+ account, Blogger platform, Android OS or any of Google’s services that involves photos. Google+ creates an automatic album for all the photos you shared on various Google platforms. Any changes you apply on a photo will reflect on it regardless of where it’s being used or was uploaded.
To edit a photo
Login to your Google+ account.
Goto your photos page.
Click on the photo you want to edit
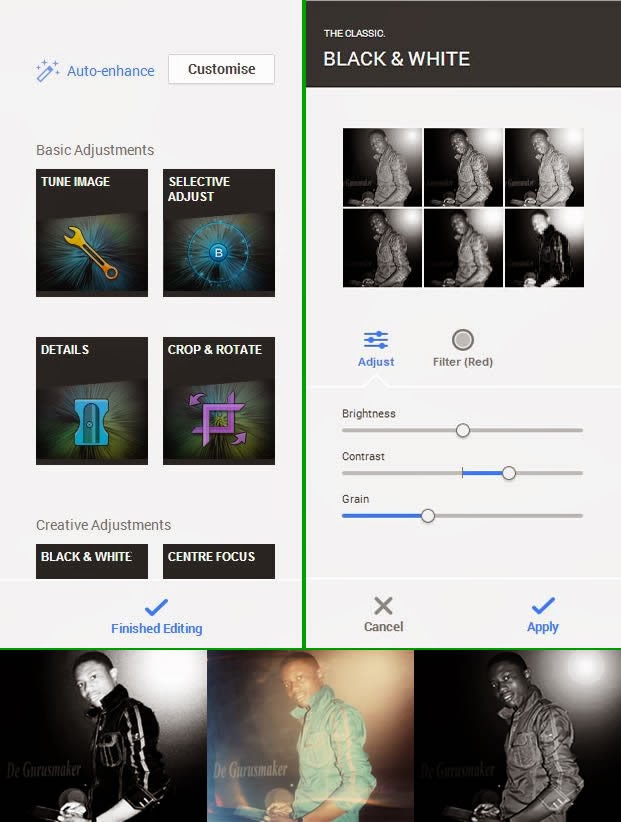
This will open a light-box, click on edit inside the light-box.
Clicking edit will bring photo editing tools to the right hand-side of the screen. For the first timers, I would advice you play around with the tool until you are able to master it’s functions.
When you are done editing, hit the finished editing link to apply your changes.
Android OS is gradually taking it’s place as the mobile king: every tom, dick and harry now own one. This insane increase in consumers has lead to the development of many third-party ‘useful’ Android application.
As a measure intended to shield your Android device from malwares synonymous with most third-party applications, the OS does not accept application unapproved by Google (unapproved applications may be installed but will not work correctly on non-rooted Android devices).
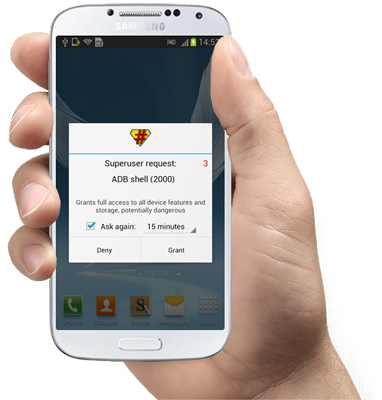
Rooting (or jailbreaking) your Android device gives you unimaginable control over your device, letting you have master control on how your device functions; update the OS, replace the firmware, overclock (or underclock) the processor, customize just about anything.
In the past rooting might be an easy “nut to crack” for Mr. tom Mr. dick, but certainly not for Mr. harry. The process was generally complicated and you might just end up in the ‘bricked’ zone with one miscalculated move. In this tutorial, I’m going to show you how to root/jailbreak any Android phone with just 1 click (or maybe 2).
Requirements:
– A healthy Windows PC (Windows XP, 7, 8 or higher).
– You must have Kingo Android Root software installed in your PC. If you don’t have the software, you can download a copy here.
– Your device must be properly charged.
Compatibility Check Up
To begin the rooting process, make sure you have downloaded and installed Kingo Android Root software on your PC: The application will root any (or at least 95%) android device with 1 click but to remain on the safer side, check if your device is compatible with the software.
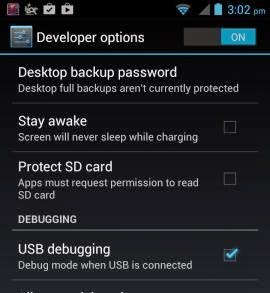
Enable USB Debugging
If your device is among the compatible devices, proceed to your device settings and enable USB debugging. If it’s running Android 4.0 or 4.1 follow this steps to enable USB debugging:
GOTO Settings.
Navigate to Developer Options
Tick the box just beside “USB debugging.” (You may need to switch “Developer options” to On before you can do so.)
Follow this steps if your device is running on Android 4.2 and later:
GOTO Settings
Navigate to About Phone
Enter Developer Options
Tick the box next to “USB debugging“.
Then Click OK to save your changes.
Run Kingo Android Root Software
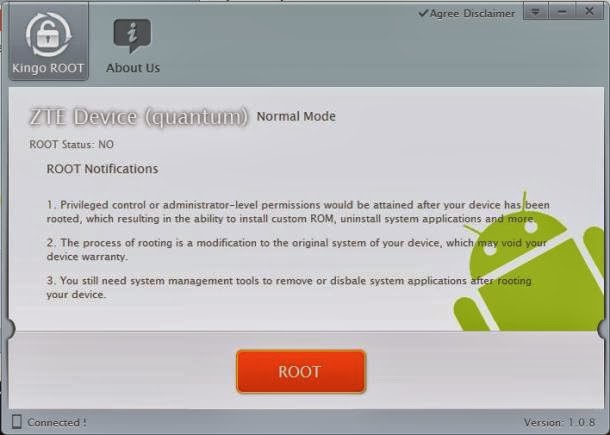
After enabling USB debugging on your device, locate Kingo Android Root icon on your start menu or desktop. Run the application by double clicking on it and connect your device via its USB sync cable. If your device is connected successfully, you should see an indication at the bottom-left corner of the software interface.
1 Click Rooting
Once your device is connected; you are just 1 click away from being the master of your Android phone/tablet. Click ROOT, grab a cup of coffee and watch Kingo Android Root do the rest for you. The whole process is automated and should take up to 2 mins; your device maybe rebooted a couple of times.
Beware: Rooting your Android device will make it open to malware attack, to remain on the safer side; only install applications from trusted sources and websites.
Un-Root your Android
If you decided rooting is just ‘what it is’ you can always sign off by running the Kingo Android Root software on your PC, reconnect your device via USB sync cable and click UNROOT when your device is set.
You can also opt for any of these popular Android UNroot methods instead. They’re best for mostly MTK-powered devices.
Although future generations of PCs are likely to be operated on Android OS with Lenovo’s latest invention, Windows PC and Mac users can still enjoy Android apps without installing Android OS.
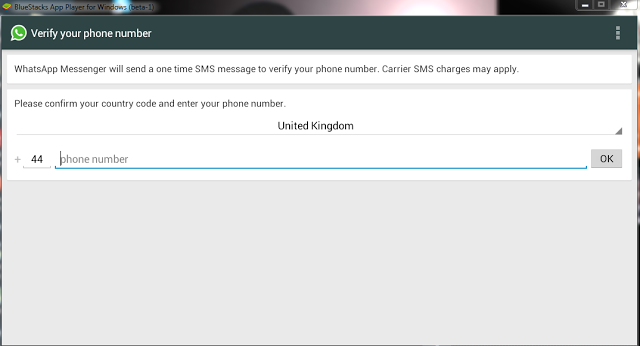
Bluestacks is a free software that allows you to use your favorite Android apps on a Windows PC or Mac. You can download apps like Angry Birds Space, 2go, Whatsapp or BBM to Go directly into Bluestacks, or sync the apps from your phone using the Bluestacks Cloud Connect Android app.
Using Bluestacks is similar to using an Android tablet: It works a bit like a widget. When clicked, the BlueStacks App Player will display the ten apps that have already been pre-installed and application suggestions which can be installed using Google Play Store. You can install more application by clicking on More below the big + sign. Bluestacks can be viewed in minimized or full screen.
Download Bluestacks
To download Bluestacks, proceed to Bluestacks download page, click on the download button that fits your OS description. The Download Now link will download a small installer file to your desktop. Remain online and double-click the installer to proceed with the actual download.
Please note that Bluestacks is currently in beta stage: Beta or prerelease software is not intended for inexperienced users, as the software may contain bugs or may potentially damage your system. I strongly recommend that users exercise caution and save all mission-critical data before installing or using this software.
I have personally tried this software on Windows XP, Windows 7 & Windows 8, the performance is great and it is worth trying!
The introduction of AdBlock Plus add-on has brought about some level of sanity to the nature at which most pages are being rendered. The popular browser add-on is set to extend it’s tentacles a little beyond the blocking of online ads (except for the whitelisted ones) to bringing sanity to popular social networks.
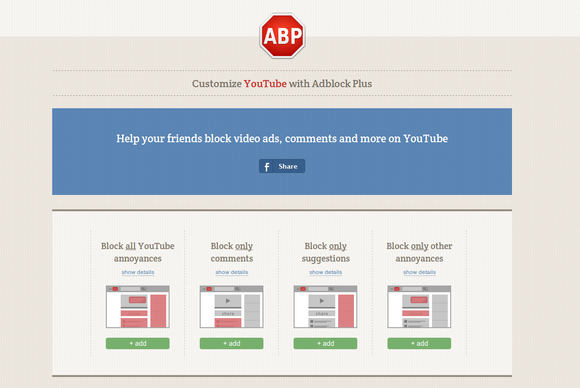
You Tube of late, has been really annoying; prompting ABP’s editorial pen to introduce YouTube Customizer site, a feature that helps you banish all the bits of the video site that annoy you, while keeping the ones you enjoy.
YouTube Customizer site allows you to control which youtube component you want your browser to render. If you’re generally annoyed with the current state of YouTube you can block everything but the video you’re watching. The list of banished items includes comments, suggested videos, featured and recommended videos in the end screen, the sharing tab in the description, in-video annotations, and channel recommendations.
Just for the record, that’s a breathtaking list of YouTube cruft and dumping it all may be a step too far for most of us. What good is YouTube, after all, if you can’t waste the afternoon following an endless stream of recommended videos.
Instead of blocking everything, ABP includes options to only block comments, or only suggestions and recommendations, or only the sharing tab and in-video annotations.
Getting Started
To get started, make sure you have AdBlock Plus installed on your browser. If you do not have the add-on installed on your browser, simply download it by clicking on your browser link below.
You could also block some mixture of the above—for example, blocking comments and annotations but leaving recommendations intact. If you have any YouTube pages open after you add AdBlock’s customizations you may have to refresh the page for your changes to take effect. And if you ever want to return YouTube to the data buffet it once was, check out ABP’s instructions on how to remove your customizations.
Note that your changes only work on the browser where you have AdBlock Plus installed and first added the YouTube filters.
When it is down to the customization of your Windows PC, it goes beyond the changing of icons and wallpaper. Windows 8, 7, XP and those before them, allows you to install custom themes of your preference, however, due to the fact that most of the themes developed by third-parties developers may contain malwares which are harmful to your PC; Microsoft has disallowed the ability to install themes from third-parties developer, hence, this tutorial.
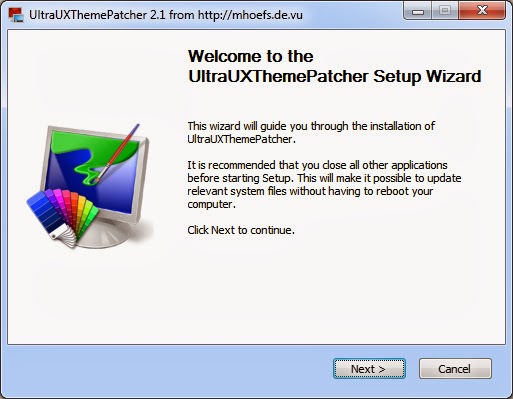
Among our numerous contenders, Ultra UXTheme Patcher stands out as the best Windows 8 Themes application program. All you have to do is install it on your system and it will automatically modify the required items.
Once you have installed the program you can then use any custom Windows 8 themes on your PC . Just download any custom windows 8 themes and copy it over to this directory in your windows PC:
C:WindowsResourcesThemes
Note: Some themes might require a few additional instructions to install . Check the description of the themes for any addition instructions .
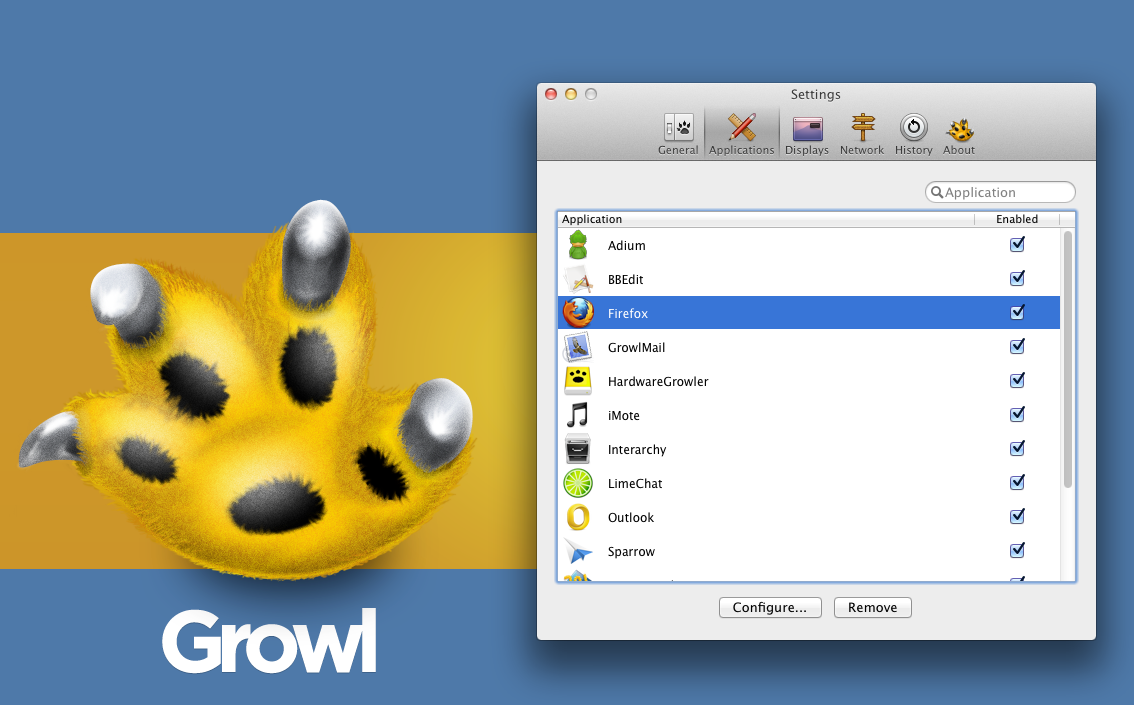
You might install Growl for design purposes or simply by accident. There are numerous applications that provide support to it. There are even some applications that are available along with Growl. It is one of the few applications that many will consider to be usable with OS X only. Growl is perhaps the coolest notification applications for OS X. The application is known to aid many in getting alerts, whether they’re new tweets, software update or new emails. Developers have also considered Growl as a staple application because its API’s are usable by developers for the integration of alerts in their individual applications. Growl is not only OS X’s primary notification system, it is a well thought out design available with different animations and themes. It comes with its own themes preset, which you can obtain after downloading the application from your nearest Mac App Store. You can simply visit the Growl website to get a hold of the desired themes.
There are many styles of themes to opt from, including AirMail Classic, Basics 1.3, Portal Growl Style and more. Growl is a cool application because you can customize the notification type you want to be displayed. If you want to customize it further, you can set styles on the screen. Growl was set to get updated by its developers. It is a 3rd party notification system that features Boxcar and Prowl in addition to an enhancement of display and action displays via visual ones.
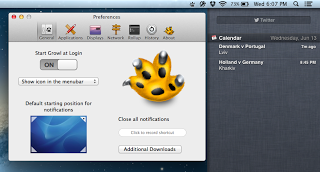
This update is a major one because of the support provided to the Notification Center in Mountain Lion. Its functionality and operation is a straightforward one- users can keep on using Growl and consolidating the present visual displays on Apple’s Notification Center. Users can also open Preferences, click on General, and set the OS X notifications to on. By doing so, you will become capable of adding Growl to your apps listed, which is under the System Preferences’ Notifications. It might also be effective to make use of Growl as a major bridge between the Notification Center and the 3rd party apps.
Growl 2.0 also comes with an additional element where you can separately handle the action and visual displays.
Like every new Windows release, Windows 8 is more secure than the operating systems that came before it. That’s due in large part to three major enhancements: An increased emphasis on UEFI Secure Boot optimizations, the extension of the SmartScreen Filter across the operating system, and the default inclusion of a more robust version of Windows Defender, which now protects against all kinds of malware—not just spyware.
Windows Defender’s increased scope doesn’t sit well with computer manufacturers, however. OEMs make beaucoup bucks by installing those trial versions of McAfee, Norton and other security suites you’ll find bundled on boxed PCs. Windows Defender’s default installation threatens that gravy train.
Microsoft tossed its partners a bone by allowing OEMs to deactivate Windows Defender in order to ship boxed PCs with alternative security solutions installed. That’s all well and good from a “variety is the spice of life” perspective, but one side-effect that isn’t so hot is what happens when you fail to register that third-party security software: Windows 8 doesn’t automatically reactivate Windows Defender by default. In other words, your pretty new prepackaged PC is wide open and vulnerable to all the nasties of the ‘Net.
Fortunately, activating Windows Defender is a snap. Here’s how to do it.
Activate Windows Defender in Windows 8
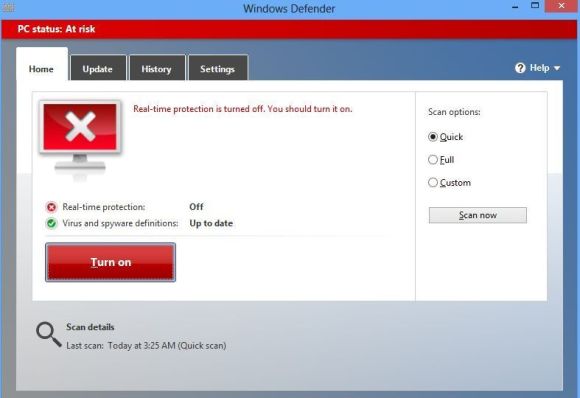
Windows Defender isn’t subtle about being deactivated.
First, head to the modern-style Start screen and type “Windows Defender” to have Windows search for the program, then click on the Windows Defender icon when it appears in the results. A Windows Defender window will appear on the classic desktop. If Microsoft’s security software is disabled, you’ll seen a lot of scary red tones alongside an “At risk” warning and an image of a computer screen with a big X on it. Subtle, eh?
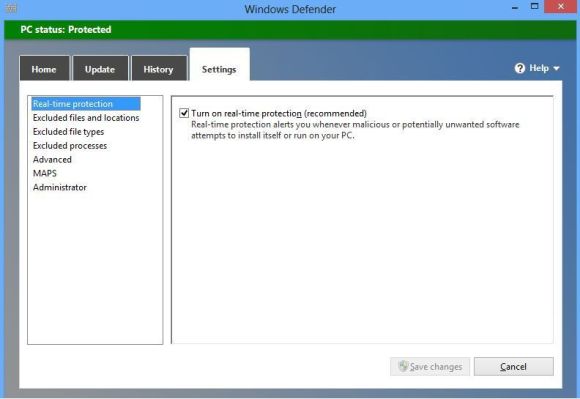
Next, click on the Settings tab at the top of the window. Make sure “Real-time protection” is selected in the left pane, then check the box next to “Turn on real-time protection (recommended).” Finally, click Save Changes at the bottom of the Window.
How you want your Settings tab to look!
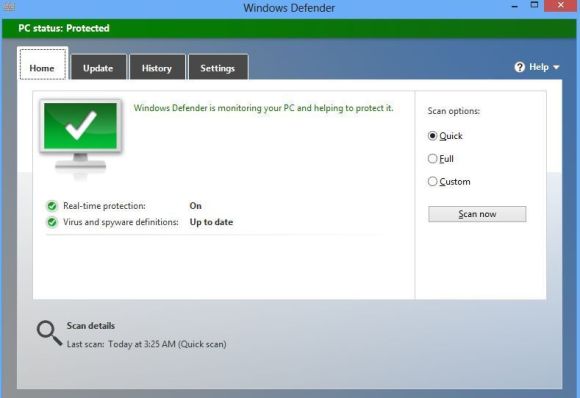
You’ll know it worked when the terrifying red “At risk” bar at the top of the Windows turns a much more soothing shade of green and switches to “PC Status: Protected.”
Check for leaks
You’re not quite done yet. Now it’s time to make sure your PC is actually malware-free! Click the Update tab, then click on the big Update button in the middle of the Window to download the latest malware definitions Microsoft has on file.
Next, open the Home tab and select the “Full” radio button in the Scan Options list. All you have to do now is click Scan Now, then sit back and wait while Windows Defender checks the nooks and crannies of your PC for any hidden baddies. Grab a cup of coffee; it may take some time. While you’re waiting, we recommend checking out your Windows 8 antivirus options.
The West African Certificate Examination Council (WAEC) is responsible for conducting the annual West African Senior School Certificate Examination (WASSCE) for students in senior secondary school (SSS) or senior high school (SHS). The examination is written in five English-speaking West African countries, Nigeria, Ghana, Sierra Leone, The Gambia, and Liberia.
Excruciating suspense follows the end of each WAEC examination. Even after the results are out, it’s not always a welcome idea to rush to the next cyber cafe to check your WAEC result. This guide is provided to help you check your WAEC result from the comfort of your bed using your mobile phone.
Before we proceed, you should consider the types of WAEC examinations below to avoid mismatching dates.
Types of WASSCE IN WAEC
The examination is written in two different batch.
The WASSCE (November/December): Also known as the G.C.E. by its old name (General Certificate Examinations), students from government and private schools can take this exam. Uniforms are not needed, but the students must obey other rules. This exam is only taken in the fall season (November/December), and the grades are available by December.
The WASSCE (May/June): Also known as the S.S.C.E. by its old name (Senior School Certificate Examinations), this exam is ideally made for students who go to government schools. Students from private schools, that are well known in the country, can only sit for this exam in any government schools. They must also wear a type of uniforms as the teachers want them to wear. This exam is only taken in the spring season, and the grades are usually available on or before August of the same year.
Depending on the type of WASSCE examination you wrote, your grades should be available by January or July for November/December and May/June batch respectively.
How to check WAEC result on phone
Time needed: 1 minute
To check your WAEC result through SMS simply, send an SMS in the format below:
Open your SMS/Messaging App
Open the SMS application on your mobile phone.
Create a new message
Create a new message, like you would send a message to a friend.
Enter your WAEC info
In the new SMS window, type WAEC*ExamNo*PIN*ExamYear
Send SMS
Send the SMS to the short-code 32327 (MTN, Airtel & Glo subscribers). For example: WAEC*4250101001*123456789012*2007
Ensure you adhere strictly to the format above . There should be no space in the message. Wait for your result to be delivered to your phone via SMS. (SMS cost N30 only)
Frequently Asked Questions (FAQ)
What is an e-PIN and where do I find it?
The e-PIN stands for Electronic Personal Identification Number. In WAECDIRECT, it is a unique 10-digit or 12-digit number that is required to access the service. The service enables direct access to a candidate’s results via multiple channels. The e-PIN is found in a valid WAEC Voucher.
Where can I buy a valid WAEC Voucher?
An Electronic PIN may be purchased at the National office of WAEC and at any of its Zonal and Branch Offices across Nigeria. From time to time it may become available at any other outlets so designated by WAEC. The reviewed price for the e-PIN is now N700.
Is there a limit to a number of times I can check my WAEC result?
No, you can check your WAEC result as many times as you like, however, you may only check your result up to a maximum of 5 (five) times with the use of 1 (one) e-PIN. In order to check further after exhausting the allowed 5 (five) times, you will need to purchase another e-PIN which will entitle you to another 5 (five) result checks.
I have a problem in checking my WAEC result Please help?
Kindly send the following details to [email protected] for verification and assistance – Error message displayed – Your examination number – Type of Exam – Year of Exam. – Visit http://www.waecdirect.org/ or the nearest WAEC office for Further enquirers
WASSCE Grades and Meaning
The grades below are given on the WASSCE certificates for the students who finished their exams. They also depend on how well the students did in their exams.
Grade
Meaning
A1
Excellent
B2
Very good
B3
Good
C4
Credit
C5
Credit
C6
Credit
D7
Pass
E8
Pass
F9
Fail
You may only use one e-PIN voucher to check one result. To check another result of interest, you will require a new e-PIN voucher. If you misuse a e-PIN voucher by attempting to check another result different from the first one checked, you will be penalised as having used the e-PIN, and will be presented with the appropriate error message.



 in the lower left of the sharing tool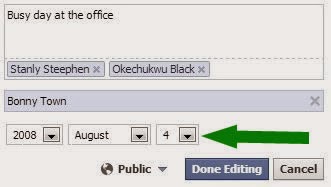





You must be logged in to post a comment.