Over the years, there has been an observable increase in the size of a smartphone and tablet display. Smartphones and tablets have grown into gadgets that we can use to entertain ourselves using media content. Despite these observable increase in the size of smartphone and tablet display, there comes a time when you desire to project stuff from your smartphone or tablet display onto a bigger display. In this article, we explore a tutorial on how to connect your mobile phone to a smart TV, allowing you to view contents on your smartphones unto a bigger screen.
In this tutorial, we explore four different methods for connecting your mobile phone to your smart TV. This Tutorial covers how to connect Android mobile phones to smart TV’s and how to connect iPhone’s to smart TV’s.
How To Connect Your Mobile Phone To Your Smart TV Using HDMI Cable
Connecting your smartphone to your smart TV using an HDMI cable, is a universal method of connecting smartphones to a smart TV. It works for both Android and IOS devices. It is a very reliable method to project content from your mobile phone to a smart TV. It lets you transfer both audio and video from the same source.
Some smart TVs feature HDMI 2.1 while others feature HDMI 2.0. The minimum requirement to stream 8K content from your mobile phone to a smart TV is an HDMI 2.0 port.
Smartphones usually do not feature HDMI ports, so you are required to purchase an HDMI to USB C, Micro USB or Lightning ports. You connect one side of the HDMI cable to your smart TV and the other part housing the adapter to your mobile phone.
Connect Your Mobile Phone to Your Smart TV Using USB Cable
Just the way you connect pen drives to your smart TV, you can also connect your mobile phone to your smart TV using USB cables. Smartphones usually come with cables, with one end featuring either a USB A, USB C or lightning and the other end being USB A.
You are required to connect the USB A port to your smart TV and the other end of the cable to your mobile phone. Your smart TV will then read your mobile phone as a storage device. You will be able to view photos, audio files, and video from your mobile phone.
Connect Your Mobile Phone to With Wireless Casting on Android
Casting eliminates cords. Casting lets you connect your mobile phone to your smart TV without using cords. Casting is a process of wireless streaming content from your mobile phone or tablet, by connecting to the same WiFi network as your television.
Some mobile phones come with inbuilt casting features, while other mobile phones require you to download third-party apps. In case your mobile phones need third-party apps, Allcast is a highly recommended app for casting.
Apart from using casting apps on mobile phones, there are streaming devices you can use to add the functionality to your smart TV. Google Chromecast is an example of such streaming devices.
Using Apple Airplay
Similar to casting on Android, Airplay is a feature designed for devices running any OS designed by Apple. It lets you connect your iPhone to your Smart TV wirelessly.
Airplay only works between Apple devices. You are not allowed to wirelessly connect your iPhone to smart TV’s not made by apple. Similar to casting on Android, both the Apple TV and iPhone must be connected to the same network.
There you have it – a comprehensive tutorial connect your phone to your smart TV. If you have questions, feel free to drop them in the comment section below.
In this article, we explore a comprehensive tutorial featuring procedures to change wireless security on a laptop. Here we explore inevitable steps to take in changing the security/password of a wi-fi router using your laptop. You would also learn how to change your Wi-fi router’s security type here. The steps taken are listed below.
1. Open Your Router’s Configuration Page
You can access your Router configuration page if your laptop is connected to the router. You can connect your laptop to your router using an Ethernet cable or The Router password. In a situation where you have forgotten the password, using an Ethernet cable is preferable because you will not be required to input any password.
After you might have connected your laptop to your router, you are to input the IP address on your browser, to gain access to its software platform. The Standard Router Addresses are 192.168.1.1, 192.168.0.1, 192.168.2.1, or 10.0.1.1(Apple) or 10.0.0.1. Enter any of these Addresses and hit enter.
If you find it difficult to access your Router’s software platform using the already mentioned IP addresses, you can source for the exact I using the command prompt. Once Command prompt is opened, type ipconfig and hit enter. Now look for active connection in the list and find your Router Default Gateway address. The Default Gateway is your Router’s IP address.
If you are still finding difficult to source for your Router’s gateway address, you advised to reset your router for about 30 seconds, to restore it back to factory settings. After which you are to look up the default address for your Router’s model and enter it into your browser URL box
2. Enter Your Router’s Username and Password
Apart from the normal connection password, you are required to input a special username and password, to gain access to the admin platform. Please note that the default Username for most routers is “admin” or “userAdmin” and the default password is “admin”, “password” or your current Wi-Fi’s password. If you changed your the username and password before now, you are required to input the one you enrolled.
3. Open The Wireless Section
Once you have successfully gained entry to your Router’s software platform using your browser, you ate presented with different tabs that perform different functions. Since you want to change your Router’s wireless security, you are required to click on the Wireless tab.
4. Change the password
By now you should be in the Wireless tab on your Router’s admin page. In the Wireless tab, Look for the box labeled “Password”, “Passphrase” or “Shared Key”. Some Routers require you re-enter the admin password, for confirmation. You are advised to create a very strong password, featuring letters, numbers, and symbols.
5. Change Your Security Type
Please note that there are three main types of wireless encryption: WEP, WPA, and WPA2. If you desire the most secured network, you are required to make use of WPA2. Using this network type, you may experience problems connecting to older devices. If you run into these problems, you are advised to switch to WPA.
6. Change Your Network Name
If you desire to have a unique Router name, you have the option to set a unique name here. This will make discovery very easy, you won’t have to guess your Router’s name, in a situation where they are many similar Routers in the same space.
7. Save your Settings
After you might have successfully carried out all the steps listed above, the next step will be to save the changes you made to the security setting. This way all changes made will take effect. The save button is usually located on the top or bottom of the page. Locate it and click on it to save changes. You can now go ahead to test the new password.
There You have it – a comprehensive list of procedures to change wireless security on a laptop. If you have any questions, feel free to drop them in the comment section below.
i Dual booting Linux with Windows 10 on your PC, means having both operating systems installed on your PC. This process involves you partitioning your hard disk and installing the operating systems on different partitions, This way you will able to use both operating systems on your PC simultaneously. In this article we explore a tutorial on How to Dual Boot Linux with Windows 10 on your PC
Requirements
1. Two USB flash drives or DVD-Rs
Since we will be installing tow operating systems on our computer, you are required to purchase DVDs of both operating systems. You are required to purchase a Windows operating system DVD and a DVD containing the Linux Ubuntu operating system.
Apart from installing the operating systems using DVD, you could also install them from a bootable flash drive, which is a way faster. If your laptop doesn’t support booting from USB, you are advised to install the operating systems using DVDs, as mentioned earlier.
2. A Windows 10 license
Installing the Windows 10 OS on a computer that didn’t come with Windows 10 OS on default, requires a Windows license key, so if your computer didn’t come with the Windows 10 operating system on default, you will be required to input a license key. If your computer came with the Windows 10 operating system, you won’t be required to input any. The Windows 10 license key, will be provided to you by the retailer.
3. Windows 10 Creation Tool
If you are installing the Windows 10 operating system from a bootable flash drive, you are required to download a windows 10 media creation tool. The Windows 10 media creation tool provides a step by step guide to creating a Windows 10 media on a USB. You can also use to create windows media on DVDs.
4. Etcher Software
Similar to the Windows Media Creation tool, The Etcher software lets you load a Ubuntu media unto a bootable flash drive or DVD. The Etcher software is supported on Linux, MacOS, and Windows.
Please Note that you are required to download the Ubuntu ISO Image, you will load in the bootable flash drive. Once it has been downloaded, you are required to launch the Etcher software, next click on Select image and then point to the already downloaded Ubuntu ISO image downloaded. Now Select your flash drive, from the list of storage locations provided. Click flash and the Etcher software will convert your bootable flash drive, into a Ubuntu installer.
After you have successfully met all the requirements above, purchased or created a bootable device for both operating systems, you proceed to install both operating systems on your computer. The steps to installing the operating system are listed below:
How to Install Windows and Ubuntu on Your PC
Just as a reminder, before we get started with the installation, you should have already created windows installation media, created a Ubuntu installation media and made a backup of your important files.
Creating a dual boot of Linus and Windows OS can be done in two ways. Its either you install the windows 10 OS first, and then using a ubuntu installer to resize the partition and installation will proceed in the empty space. Or you install Ubuntu first and then install the Windows 10 OS in the smaller partition on your hard disk.
Installing Windows
If you already installed Windows OS on your PC, you are required to skip this step and move straight to installing Ubuntu on your PC, otherwise, continue with the steps listed below:
1. Insert the Windows Installation in you have: As mentioned earlier, its either you use a DVD with the Windows 10 OS inside or you use a bootable flash containing windows 10. If you have a windows 10 DVD, insert it in your DVD player, If you have a bootable flash drive, plug it into your USB port and follow the steps below.
2. Click on the boot menu key: PC’s have different boot menu keys, you have to look out for the boot menu key assigned to your PC. The boot menu key is usually displayed on the bottom of your screen when you power your PC on. If you are unable to locate the boot menu key for your computer, you advised to search it on Google, to make things faster.
3. Change Boot order: Changing boot order means changing the device your PC boots, On default, your PC is set to boot from your hard disk. If you using a Windows 10 DVD, you are required to set your PC to boot from your disk drive. If you are booting from a bootable flash drive, you are required to set your PC to boot from the bootable flash drive. IF you don’t know how to do this, you advised to research on Google or contact your manufacturer.
4. Press any key on your keyboard and proceed with the installation: After you might have successfully booted your installation media, you will be prompted to press any key on your keyboard, to proceed with the installation.
5. Follow the on-screen prompts: You will be presented with different on-screen prompts. Prompts that will require you select your preferred language, inserting your product key and lots more. These are basic steps that do not require any expertise.
6. Select the version of Windows 10 you wish to install:
During the installation process, you will be required to select the version of Windows 10 you wish to install. Here you will be provided with the option to install windows 10 x64 and Windows 10 x86. Please note that installing windows 10 x86 is the same thing as installing windows 10 32 bit and installing windows 10 x64 is the same thing as installing windows 10 64 bit. Here you will also be required to select windows 10 home, professional and other versions. Please, note that the windows 10 pro is the most powerful version of Windows 10.
7. Review License terms and click next
8. Click on custom install: After reading the license information, you are required to select the type of installation you want. You have options to upgrade, keeping all your files or doing a custom advanced install. You are advised to do a custom install. You will able to select the drive you want to install the windows 10 OS.
9. Allocate Storage For Installation of Windows 10
Our sample hard drive has not been allocated or partitioned before. If your hard drive isn’t like this or has been partitioned before, you are required to highlight all the partitions and delete them. Your entire hard drive will be unallocated. Click continue to create a new partition.
You are advised to create a partition with up to 80GB to accommodate the windows operating system.
10. Click Next, to confirm partitioning and to begin windows installation.
Now that you have successfully installed the Windows 10 operating system on one of the partitions, the next step is to install Ubuntu on your hard drive.
Installing Ubuntu
At this point, we assume you already have the Windows 10 operating system installed on your hard drive. The next step is to install Ubuntu on the other partition you created. Installing Ubuntu will be done using the installation media you created earlier.
1. Insert Installation Media into your Computer: You are to insert the installation media in your computer. If the installation media was created on a DVD, you are to insert it into your CD ROM, if the installation media is on a bootable flash drive, you insert it via your USB port.
2. Click on the boot menu key: PC’s have different boot menu keys, you have to look out for the boot menu key assigned to your PC. The boot menu key is usually displayed on the bottom of your screen when you power your PC on. If you are unable to locate the boot menu key for your computer, you advised to search it on Google, to make things faster.
3. Give priority to Your Installation Media: After you must have successfully entered the boot menu on your computer, the next step is to give priority to your installation media. If you are booting from a DVD plate, you are to give priority to your CD ROM, select boot from CD ROM. If you are booting from a bootable flash drive, you are required to give priority to your flash drive, select boot from flash drive.
4. Install Ubuntu: After you have successfully prioritized your Boot device, your computer will be booted into the Ubuntu installation interface. Here you are provided with the option to either try ubuntu or install Ubuntu.
5. Select Your Preferred Language: After you might have clicked the install Ubuntu button, you will be required to select your preferred language. Here you are to select the language you understand.
6. Select Your keyboard layout: Despite being an output component of the computer, the layout configuration software plays a huge role, in key placement. Here you have options to choose from the different layout assigned to different languages. After you have selected your preferred keyboard layout, you are advised to click continue.
7. Select Installation Type: Installing Ubuntu, you provided with Normal Install Option, as well as Minimal installation option. If you select normal installation, Ubuntu will be installed alongside a web browser, utilities, office software, games, and wallpapers. Minimal Installation installs Ubuntu alongside a web browser and utility software.
8. Install Ubuntu Alongside Windows 10: You are provided with the option to either install Ubuntu alongside Windows 10 or erase the hard disk and install Ubuntu.
9. Follow in the On-Screen prompts provided: You will be required to confirm Ubuntu installation, select time zone and fill in your Particulars, to setup login security.
10. Reboot Your PC: After you might have successfully installed Ubuntu on your PC, You will be provided with the option to continue testing or restart. You are required to click the restart button, to begin using Ubuntu.
Note: After you might have successfully followed all the steps provided in this tutorial, you will be provided with the dual boot screen, where you will be given the option to either boot into windows or boot into Ubuntu.
There you have it – A complete and comprehensive tutorial on How to Dual Boot Linux with Windows 10 on your PC. If you have questions, feel free to drop them in the comment section below.
Windows 10 comes with a lot of amazing features but not all of them are readily available. Let’s dig a little deeper and unveil new tweaks, tricks and features that will change the way you use your PC.
With it being free, and Microsoft pushing the update to users, most of you probably already have migrated to Windows 10. Its constantly evolving nature means fresh features arrive twice per year, and with all the new goodies come a legion of new tweaks and tricks—some of which unlock powerful functionality hidden to everyday users. Others simply let you mold the Windows 10 experience into the shape you see fit. Here are some of the most useful tweaks, tricks, and tips that we are able to put together.
However, you need to brace yourself as some of these may break as the operating system evolves given Microsoft’s new “Windows as a service” mentality. The idea is to keep this page updated overtime to reflect the OS’s current status.
Activate Windows 10 Night Light
If you use an iPhone, iPad or macOS system you may use the built-in blue light feature ‘Night Shift’.
The Night Light feature you’ll find in Windows 10 is pretty much Night Shift for Windows.
Night Light makes the screen warmer in the evenings as it reduces the amount of blue light emitted.
Various scientific studies show that exposure to blue light in the evening makes it harder to fall asleep because (like all artificial light) it affects the circadian rhythms that manage our body clock.
Once preserve of late-night caffeine fuelled coders and over-worked, under-fed writers, screen temperature features have since become mainstream. Google’s Android and ChromeOS operating systems have one, as do iOS and macOS from Apple, and Microsoft’s Windows 10.
Like those features, Windows 10 Night Light automatically warms the temperature of your display after sunset. This makes your laptop screen or PC monitor easier on your eyes and reduces disruption to your circadian rhythm, helping it to tick along nicely.
In the morning, your display returns to its regular settings.
Night Light is a system feature; you do not need to install a separate application like Flux to use it. This makes it very easy to automatically adjust the screen temperature in Windows 10.
Night Light for Ubuntu will automatically adjust the amount of blue light your monitor or laptop display emits based on your location and the time of day.
These features are said to help reduce eye strain by adjusting your screen’s color temperature during after-dark computing sessions. That makes it easier to fall asleep when you’re done.
To activate Night Light, head to Settings > System > Display. Once you’ve done so, open the feature’s settings to fine-tune its behavior.
Scroll any window even when they’re inactive
It used to be that Windows only allowed you to scroll active windows. Now in Windows 10, you can set an option to scroll both active and inactive windows by just hovering with the mouse cursor over a window.
This feature is not a ground-breaking Windows 10 hack or tweak but it comes quite handy when time is in essence and your need to peek through your to-do list.
Windows 10 inactive scroll feature is enabled by default, but if it’s not, go to Settings > Devices > Mouse & touchpad, and make sure to enable the Scroll inactive windows when I hover over them option.
Find the hidden images
The lock screen and logon screen have some really cool images, which as it turns out, by default both rotate AND change.
It may seems Microsoft has a CDN that updates these images based on what you click that you like or not. Want to save one or more of those images for future use? Here’s where they are hiding!
Open Explorer and browse to:
%localappdata%PackagesMicrosoft.ContentDeliveryManager_[custom string of characters]LocalStateAssets
Copy all of the files to a new directory.
Open a command prompt in that directory.
Run this command ren . *.png and [enter]
Browse through them and find the ones you like!
Make Cortana’s ears perk up
Cortana’s finally made the leap to the PC in Windows 10, assuming many of the operating system’s search functions and dishing out just as much sass as the Windows Phone version. But by default, she doesn’t listen for your commands. But by default, she doesn’t listen for your commands.
If you’d like to be able to just shout commands at your PC, launch Cortana by clicking the search field in the taskbar and select the three-lined options menu in the upper-left corner. Select Settings for the list, then simply enable the “Let Cortana respond when you say ‘Hey Cortana’” option. You’ll need an active microphone for this to work, of course.
While you’re poking around Cortana’s options, you can dive into the Notebook menu to fine-tune exactly what personal data Microsoft’s digital assistant can access. Remember, however, that like Google Now, Cortana’s effectiveness is directly related to how much she knows about you.
Enabling Cortana on the Windows lock screen lets you use voice commands to view and edit your schedule at a glance. It’s pretty handy! To turn on the feature, open Cortana and head to “Cog” icon > Settings > Use Cortana even when my device is locked.
Secret, powerful new command line tools
Windows 10 packs a slew of nifty new command line features, including—hallelujah!—the ability to copy and paste inside the command prompt with Crtl + C and Crtl + V.
To activate the goodies, open the command prompt. Right-click its title bar, then select Properties. You can find and enable the new features under the Edit Options section of the Options tab.
Bash comes to Windows
If you got all hot and bothered over the ability to use keyboard shortcuts to paste text in the Command Prompt, wait until you get a load of this.
The Windows 10 Anniversary Update added the full, legendary Bash shell to Microsoft’s operating system, thanks to a partnership with Canonical, the company that guided Ubuntu Linux’s development. And it’s running natively, without virtual machines or containers. With the right tricks, you can even use Bash to run graphic Linux applications or even the Unity desktop itself right inside Windows—though those unintended features are definitely limited. Look for Ubuntu, Fedora, and SUSE Linux entries in the Windows Store to start using Bash in Windows.
Windows 10 Audio Source Switching
Windows 10’s in-taskbar volume controls pack a niche, yet nifty touch: selectable sources. Clicking the audio device name in the volume controls summons a list of all connected audio outputs, meaning you can switch from your headphones to your speakers and back again without having to dive into the Control Panel. Yay!
The April 2018 Update added more granular audio options to the Settings app too, breaking them away from the Control Panel even further.
Activate Windows 10 Spatial Sound
That’s not the only audio trick lurking within Windows 10. Windows Sonic for Headphones offers a virtual surround sound format that can make the audio coming from your headset feel more lush and atmospheric. The effectiveness of the feature varies depending on your gear and how sensitive you are towards audio cues.
To activate Windows Sonic, right-click the speaker/audio icon in the system tray on the right side of your task bar, then select Spatial sound (none). In the window that opens, click the drop-down menu and select Windows Sonic for Headphones. Click , then OK, and you’re done!
Windows Timeline
Timeline helps you pick up where you left off. Clicking the Task View button in the taskbar or pressing Windows Key + Tab summons the feature, which displays a—you guessed it—time line of your activity in supported apps, stretching back over the past. Even more handily, Microsoft lets you group related apps together into “Activities” in Timeline, so that when you open that week-old budget document, for example, the presentations and websites you referenced at the time can be easily summoned as well. This even syncs across devices, so it could be especially useful if you use multiple PCs.
The fly in the ointment: Only a limited number of apps work with Timeline currently, though Microsoft offers tools for developers to bake in support. That includes Office, Adobe’s Creative Cloud, and native Windows 10 apps like News and Maps, but Microsoft Edge is the only compatible browser. Bummer. You can deactivate Timeline by heading to Settings > Privacy > Activity History.
Cloud clipboard
Windows 10’s copy and paste functionality has been hit and miss for years, but now you can deploy that bugginess across multiple PCs with cloud clipboard—a genuinely useful feature introduced in the October 2018 Update. Head to Start > Settings > System > Clipboard and enable “Sync across devices” to start copying data on one PC and pasting it on another PC.
While you’re in this menu, enabling “Clipboard history” lets you save multiple items to the clipboard so you can use them again later. Nifty stuff.
Your Phone
Want to tie your phone and PC closer together? Download Microsoft’s Your Phone companion app for Android, and link it to your PC using the new Your Phone app from the Microsoft Store.
Your Phone lets you open, view, copy, and share photos that you took on your phone, as well as send and reply to texts right on your PC. There’s an iOS version as well, but it’s much, much more limited.
Snip & Sketch
The firmly entrenched Snipping Tool within Windows is finally getting replaced and upgraded. The October 2018 Update added Snip & Sketch, a new tool that lets you select a portion of the screen to copy when you press Windows + Shift + S. After doing so, the selected screenshot will be copied to your clipboard, so you can paste it into any image editing software—including the standalone Snip & Sketch app, which lets you annotate and share your marked-up images.
Near Share
Near Share makes it easy to share files and URLs with local PCs over the air, negating the need for flash drives or chat apps to pass something along. If you open the Share interface in Microsoft Edge or File Explorer, you’ll see PCs with Nearby Sharing enabled appear as an option if you have the April 2018 Update installed. Recipients receive a pop-up notification when something is sent. Think of it as an alternative to Apple’s Airdrop, albeit one without any mobile support.
To use Near Share, your computer needs both Bluetooth and Wi-Fi working, and you’ll have to enable the Nearby Sharing option in Settings before you can start using it. Transfer speeds were pretty slow and Bluetooth-like in our tests, so you may still want to resort to alternative means to pass especially large files around. Microsoft says the feature automatically chooses to use Wi-Fi or Bluetooth depending on what’s available, and what’s faster.
Ransomware protection
Ransomware is a growing problem. It infects PCs, encrypts your files, and holds everything hostage until you pay a ransom—hence the name. The best defense against ransomware is frequent backups and strong security software, but Windows 10 now includes basic protection right in your operating system.
Controlled Folder Access “protects your files and folders from unauthorized changes by unfriendly applications.” Your Documents, Pictures, Movies, and Desktop folders are protected by default, though you can block other folders manually or whitelist trusted software to access your locked-down info. You can tweak Controlled Folder Access by opening the Windows Security app (formerly Windows Defender), heading to the Virus & threat protection tab, and clicking the “Manage ransomware protection” link at the bottom.
Dark theme
If you love dark themes, you love dark themes. Light themes sear your eyeballs. Fortunately, Windows 10 now supports a dark theme.
Head to Start > Settings > Personalization > Color and select the “dark” option under “Choose your default app mode.” The Windows 10 October 2018 Update extended the dark theme to include File Explorer, too. Enjoy!
Enable Windows 10 Dynamic Lock
Say goodbye to Windows + L. Dynamic Lock is a handy feature that pairs your PC with your phone over Bluetooth, then automatically locks your computer when you wander away from it.
To start using it, marry the two devices in Control Panel > Hardware and Sound > Devices and Printers, then activate Dynamic Lock at Settings > Account > Sign-in options.
Game Bar
If you’re into playing around on your PC, Windows 10’s Game Bar—summoned by pressing Windows + G in-game—holds all sorts of nifty extras. It’s always been able to take screenshots or videos of gameplay clips, but as of the Windows 10 Creators Update, the Game Bar also offers easy-peasy Beam game streaming and the intriguing Game Mode, which can improve performance on resource-limited systems. The October 2018 Update overhauled the interface yet again, adding inline volume controls.
The Game Bar’s handy even if you don’t actually play, as it can be used to record video of any app—not just games. Windows 10 also has a dedicated Gaming section in its Start menu Settings to let you tinker with options, including Xbox networking and parental controls.
Per-app GPU management
The Windows 10 April 2018 Update added the ability to tell Windows which graphics hardware—discrete or integrated—to use when you open specific apps. It sounds niche, but the feature could prove pretty helpful if you’ve got a gaming laptop and want it to last longer.
By default, booting up a game switches over to discrete graphics, which use a lot more energy than the graphics cores integrated in Intel chips and AMD Ryzen APUs. But a lot of indie and retro games play just fine on integrated graphics. With Windows 10’s per-app GPU management, you can manually tell the system to stick to the more power-efficient option for games that don’t need the extra oomph.
Go to Settings > Display, then click the Graphics settings link at the very bottom of the page to start tinkering.
OneDrive Files on Demand
It’s back, huzzah! OneDrive Files on Demand resurrects Windows 8.1’s “placeholder” feature for the cloud storage service baked into Windows 10. OneDrive Files on Demand shows all of the files you have stored in OneDrive in a folder on your PC, but they’re just pointers synced with the cloud—not actually files installed on your PC. Unless you want them to be. You can select which files and folders to make available locally.
Storage Sense
Over time, your PC can quietly fill with needless junk without your even realizing it, as the Recycle Bin and temporary files suck up your storage. Storage Sense helps combat the creep. Head to Settings > System > Storage and enable the Storage Sense option to have Windows start automatically clearing out unneeded temporary files, and deleting any files in your Recycle Bin over 30 days old. You can tweak those options using the Change how we free up space link underneath the option.
The October 2018 Update added the ability to have Storage Sense send long-untouched files from anywhere on your computer to your OneDrive cloud storage, freeing up space on your hard drive. It could be a useful addition if you’re close to filling up your local storage, but keep an eye on your available OneDrive space—cloud storage isn’t free. Fortunately, the feature includes granular controls.
Mixed Reality
The Fall Creators Update added “Mixed Reality” to Windows 10. The most obvious use for it is in the legion of new Windows Mixed Reality headsets, but you can check out the benefits even if you don’t have one of those. The Mixed Reality Viewer app lets you drag digital 3D objects you’ve created in the Paint 3D app into the real world, using the combined might of your device’s camera and display. It’s not really augmented reality since you can’t interact with the objects, but it’s closer to “Mixed Reality” than the headsets are.
Somewhat related, the nifty Story Remix tool in the Photos app lets you add fantastic 3D animations to videos you’ve captured, among many other talents. It’s pretty sweet!
Start menu folders
What’s old is new again: You can create basic Start menu folders in Windows 10, organizing Live Tiles into clusters. Simply drag your Start menu apps on top of each other to create folders that expand when clicked on. As of the October 2018 Update, you can now name the folders you create, but you have to expand it open to see the option.
Troubleshooting, troubleshot
The Windows 10 Creators Update added a helpful touch for distressed PC users. The operating system’s consolidated all of its troubleshooting tools in a single location: Home > Update & Security > Troubleshoot. If you run into trouble, run there first.
Turn off File Explorer’s Quick Access view
When you open File Explorer in Windows 10, it defaults to a new Quick Access view that shows your most frequently accessed folders and recently viewed files. I love it, personally, but if you’d rather File Explorer defaulted to the “This PC” view found in Windows 8, here’s how.
Open File Explorer, then select View > Options from the Ribbon. A Folder Options window will open. Click the “Open File Explorer” drop-down menu at top, then select the “This PC” option. Click OK and you’re done!
Manage notifications
Windows 10’s Action Center houses and manages the notifications spawned by your system’s various apps. You might not want every Windows Store app you install barking at you all the time, however, or maybe you don’t want to see any notifications while you’re in presentation mode. You might just want to silent the annoying ads that the Get Office app spawns. Fortunately, those are easy to tweak.
To tinker with you your notification settings, head to Start menu > Settings > Systems > Notifications and actions. Individual Windows Store apps, like the Mail app, tend to have more granular notification options in the Settings menus inside the apps themselves.
Schedule your restarts
This is wonderful. If you’ve got pending updates that require you to reboot your PC, Windows 10 will allow you to schedule a specific time for it to do so. Finally!
Open the Settings option in the Start menu, then head to Updates and Recovery > Windows Update > Restart options to see the scheduling screen above.
Get Windows updates from other sources
But the Windows Update upgrades don’t end there. Windows 10 introduces a new option that lets you download updates using peer-to-peer technology, rather than Microsoft directly. It could help you get that hot security patch faster when everybody’s hammering Microsoft’s dedicated servers, or save you bandwidth in a computer-crowded house—just download the new patch once from Microsoft, then share it among the PCs under your care.
To tinker with the setting, head to Start > Settings > Update & Recovery > Delivery Optimization. By default, “Get updates from more than one place” is enabled and configured to grab updates from PCs on both your local network and the Internet at large. If you don’t like the idea of your PC using your bandwidth to share Windows Updates with strangers, be sure to disable it. If you leave it active, the “Advanced options” link lets you fine-tune how Windows uses your network to download and share updates, as you can see above.
Seize control of Windows Updates
While the ability to schedule installation times for updates is very welcome indeed, not everyone is happy about the way Windows 10 handles patches—specifically, that you can’t refuse them. Windows 10 Pro users—but not Windows 10 Home users—can delay downloading updates for some time, but eventually, Microsoft will force them on you.
There are some actions you can take to exert control over your Windows Update experience, however. Most notably, if you’re using Wi-Fi for connectivity, you can set Windows 10’s Wi-Fi connections as metered to download updates when you’d like to, rather than when Microsoft wants you to. The Active Hours feature lets you tell Windows specific times not to install updates. And if you ever encounter a borked update that refuses to play nice with your PC, Microsoft’s released a tool that allows you to choose individual updates so they won’t be downloaded again.
Those workarounds aren’t a replacement for being able to manually choose the Windows Update you’d like to install, but they should help ease the sting a little, at least.
Fresh keyboard shortcuts!
Windows 10 packs a handful of fresh keyboard shortcuts, all tied to newfound abilities inside the revamped operating system. There are many more than we can list here, so head over to our guide to Windows 10’s keyboard shortcuts to learn all about them. If you really want to get fancy, augment those hotkeys with Windows 10’s new touchpad gestures for true shortcut mastery.
Declutter your taskbar
Two of Windows 10’s standout features are its Cortana search integration and newly added virtual desktop support—but they claim a sizeable chunk of your taskbar. If you don’t care about either (or don’t mind using Windows key + Tab to leap through virtual desktops) you can reclaim that onscreen real estate.
Everything starts by right-clicking an empty section of your taskbar. Select Cortana, and choose to Show Cortana icon only. You can also remove the Cortana and Task View buttons from the same Taskbar menu.
Thank You!
We feel the need to thank you following through with this long episode of top 30 Windows 10 trick, tips and tweaks. The article doesn’t stop here; share your ideas with us on the comment section.
If you’re starting to dip your toes into creating HD videos then you may find that sometimes the videos that you save in HD don’t actually look that great. For beginners it can be difficult to navigate through some of the technical areas of video settings – but it is necessary to do so if you want to ensure that the videos you save in HD actually turn out well.
Understanding Resolution
Essentially ‘HD’ or ‘High Definition’ is a type of resolution. In turn, resolution is a description of the amount of pixels contained in the video. For example a ‘Full HD’ resolution of 1080p is essentially 1920×1080 would be 1920 pixels wide and 1080 pixels tall.
While the resolution does affect how your videos appear, it is by no means the only factor at work, however. Assuming you’re saving an HD video in HD resolutions and it doesn’t look good then that likely means that there is some other factor that is the culprit.
Looking at the Bitrate and Frame Rate
Aside from resolution, the two big factors that can affect the quality of your videos are its bitrate and frame rate. The frame rate is essentially the number of frames per second that will be displayed on your screen – so the higher it is, the ‘smoother’ your video will appear. Ideally the number to shoot for in terms of frame rate is 60 for the smoothest possible playback supported by most monitors and TVs.
On the other hand, bitrate is a bit harder to understand but is basically the amount of space that can be used for every second of video. As such a higher bitrate will provide a better quality but come at the cost of a much larger file size. If the video isn’t allowed to have enough space to properly display at that resolution then you can expect the quality to be poor.
That is part of why using Movavi Screen Capture Studio for HD video capture is ideal. Not only is it capable of recording HD videos at a high frame rate, but it can also help you to save it easily with presets to automatically optimize your video based on the device or platform that you’re using.
It even includes a complete suite of video editing features so you can cut and combine video segments, enhance the video quality, apply special effects, add audio tracks, and insert customizable text. In short, you should be able to use Movavi Screen Capture Studio to improve your video further.
If you want to create and save HD videos while making sure they look good there is no easier way than by using Movavi Screen Capture Studio. Just give it a try for yourself and see what it can do.
Like Twitter, Facebook (and now, Telegram), the use of usernames makes it easier to find and locate users on the website. However, finding or adding users by username isn’t something very common among mobile messaging apps. WhatsApp allows you to add a username or moreorless, a nickname but people can neither find nor add you with this username – something privacy lovers will appreciate.
Telegram on it’s own right is taking a different path. Since last year the company made it possible for you to add friends by username – without necessarily knowing their phone numbers – on their mobile app.
The advantage of a username is that you can share your contact details for Telegram without revealing your phone number, thus safeguarding some level of privacy. A lot of users has been asking us how to add a username to the app. So, here is a step to step guide:
Add Username on Telegram
Tap the menu button on your Android screen.
Launch Telegram application.
Tap the Apps button on your Android screen. Locate and launch the Telegram application.
Tap the menu icon on Telegram
Navigate to Settings
On the Telegram app tap the menu icon (represented with three horizontal lines) and open Settings. Among other options on settings, you will find Username which is set to ‘None‘ by default.
Username is set to ‘None’ by default.
Tap on Username.
Tapping on the Username option will open a page where you can enter or modify your username. Simply enter your desired username on the text input box.
Usernames must be a minimum of five characters — so you can’t make up for losing out on a one-letter Twitter handle here — and can contain letters, numbers and underscores.
Save your username.
Save your new username by tapping ‘Good’ sign at the top-right side of your screen.
You are also free to change your alias, so long as the new one is not already taken.
How organized is your Windows 10 start menu? Do you have everything you frequently use on the start menu? What about your favorites site? Windows 10 offers tons of choices for desktop programs, and apps from the Windows Store can be useful too. But there are still probably a few key webpages you turn to every day instead of a desktop program or modern UI app.
Wouldn’t it be nice to have those lovely websites available to you on the Windows 10 Start menu? Here’s how to do that.
The Edge way
Microsoft Edge in Windows 10 has pin-to-Start functionality built-in.
Open Microsoft Edge and then navigate to the page you want to add. In the upper right-hand corner, click the three horizontal dots, and then from the drop down menu select Pin this page to Start. A pop-up window will appear asking you to confirm. Click Yes and you’ll find the site at the bottom of the live tile section in your Start menu.
The downside? This method is that links will only open in Edge. Fortunately, there’s a way around that. If you want links to open in your default browser instead of Edge, you have to use a little bit of trickery, but nothing too complicated.
The non-Edge way
Open Internet Explorer and navigate to the webpage you want to add to Start. For our purposes, let’s say it’s Facebook.
Once you’re on Facebook, right-click in an open space on the site and select Create shortcut from the context menu. IE will then show a pop-up window asking if you want to create a desktop shortcut. Click Yes.
To do the same thing in Chrome and Firefox, go to the address bar and click-and-drag the icon to the left of “http,” and drop it on the desktop. The icon will either be a green lock, a rectangular piece of paper, or a globe.
Pro Tip: In my experience, you’ll generally get better looking icons using Internet Explorer for this step.
Next, right-click the desktop icon you just created and select Copy.
Add to Start
Now type “run” into the Cortana/search box. The top choice should be the Run desktop app.
Once Run opens, type inshell:programs, click OK, and an Explorer window will open.
Now just right-click in the main part of that window (be careful not to accidentally open a folder) and selectPaste.
Your website is now in Start but it’s buried in the “All apps” list. To remedy this, just clickStart > All apps and scroll down to the listing in the alphabetical list. Since we’re doing Facebook we’ll look under “F”.
Once you find it, just click-and-drag it onto the live tiles (right) side of the Start menu and you’re done.
After you’ve added your webpages to Start, feel free to delete your shortcuts from the desktop.
If you’d like to take this a step further and add an entire section of websites to Start, check out our earlier tutorial on customizing the Windows 10 Start menu. This will teach you how to group tiles together.
The catch with websites using the non-Edge method is you can’t remove them from Start through the right-click context menu. Instead, you have to type shell:programs into Run and then delete the shortcuts in the Explorer window that opens.
Freaking out about creating a good-looking header photo for your Twitter profile?
You’ve probably noticed that striking visual piece in the Twitter profile layout — a full-screen-width banner image, known as a “Header Photo.”
On Tuesday, April 8, 2014, Twitter blessed it’s users with a new profile layout that includes a full-width header photo.
But you may have noticed that not every header photo is a home run …
Following the release of twitter new profile layout “New You” last month, I have compiled a few image recommendations to help you create a header photo that looks professional, makes a great first impression, and markets your brand’s best assets — without violating the Twitter Image Terms.
What’s new about the “new you”?
Background image -out, cover image -in, summarize the new twitter profile look. The new web profile lets you use a larger profile photo, customize your header, show off your best Tweets and more. Other features included to the new look are:
Best Tweets: Tweets that have received more engagement will appear slightly larger, so your best content is easy to find.
Pinned Tweet: Pin one of your Tweets to the top of your page, so it’s easy for your followers to see what you’re all about.
Filtered Tweets: Now you can choose which timeline to view when checking out other profiles. Select from these options: Tweets, Tweets with photos/videos, or Tweets and replies.
Feeling Un-Cosy? 5 Steps to Setup a Branded Twitter Profile
If you are an existing twitter user, you may find your old profile header photo a little bit un-cosy after migrating to the new look. With the background image feature gone from the profile area, the massive space occupied by the header photo becomes your next billboard.
In this article I’m going to show you how to make the most of this massive space in five steps.
1. Abide by Twitter Image Policy
Twitter reserves the right to suspend/terminate your account if you don’t comply to the rules. One of this rules states that “You may not use obscene or pornographic images in either your profile photo, header photo, or user background”. Having that at the back of your mind, let’s proceed to the next step.
2. Map out the exact dimensions and shape
The Twitter header photo is not a common image size, and the rectangular composition includes a cut-out for your profile image in the lower left corner.
This means the best-looking header photos tend to be images that are designed to take advantage of the header photo’s exact size and shape.
Shape and dimension of Header area. Click to view full image
Detailed measurements:
Official recommended size for Twitter header photo is: 1500 pixels wide by 500 pixels tall.
Profile image cut-out: 211 pixels wide by 125 pixels tall, spaced 90 pixels from the left edge of the header photo.
Profile image size: 200 x 200 pixels, with a recommended image upload size of 250 x 250 pixels. (Note: Larger images can be cropped).
Important tips:
If you upload an image smaller than 1500 x 500, it will be stretched to fit. This will make your image quality appear slightly grainy or distorted. The best practice is to upload an image that’s sized to Twitter’s dimensions.
Screenshot measurements reveal that only 321 pixels are visible from a 500-pixel image upload. The top edge appears to be covered by the Twitter header bar. A test with a 321-pixel tall image became distorted when uploaded, so do upload a 500-pixel tall image even though only the bottom 321 pixels will be visible.
3. Don’t hide content behind your profile picture.
Even though you are granted a massive 1500 pixels by 500 pixels to design a Header Photo doesn’t mean that you have all of that to work with. Because of the way that Profile Image are placed on Twitter profiles, there’s a section of your Header Photo that won’t appear unless you click on it.
Note the area highlighted with dotted lines in the image below: That’s the part of the Header Photo that isn’t immediately visible to your Twitter followers.
The dotted area is not visible unless the viewer clicks on the Header Photo
Unless you are hiding a Christmas tree behind your profile image, it is generally recommended to keep the space clear.
4. Decide contents to include in your header photo
Outside abusive and pornographic contents, Twitter currently does not have any rule limiting users on what kind of contents to display on their profile header image. However, it is the best practice to include only text/image that describe or relates to you.
Use high-quality photographs that are in focus, have balanced color and good lighting, or use photo editing software to optimize your images. You can design an image collage or use one big, beautiful photograph — just keep the cover photo shape in mind when setting up your composition.
Australian Football League Twitter profile. Notice the powerful text on the Header Photo
Your company logo should appear somewhere, usually in your profile image, in which case it is not needed as an extra graphic in your cover photo. If you plan to include text, consider its placement when selecting images.
Here are a few image content ideas suitable for brands:
Candid photos of customers enjoying your products (be sure to get permission to use their likeness)
Your most popular products
Icons of awards won
Employees in action
Company founders
Store interior or exterior
Branded vector graphic
You might also consider the following type of text to grab your audience attention:
Company tagline or short phrase that explains what your business does
An impactful word that embodies your brand
Inspiring quote
Names of people in your photo
Photographer credits
Image copyrights
5. Upload your profile header header photo
Now is the easy part. Uploading your profile header photo is as simple as ever.
Log in to your Twitter account.
Go to your profile by clicking on “Me” on the twitter main menus.
Just below the header photo area, click on Edit Profile button.
Click on the Camera Icon on Header Photo space and click Upload from the drop down menu
Reposition and scale your header photo by dragging the image and scale bar below it. When done, click Apply.
Finally, save your changes and you are good to go!
Awesome! If you think you did a great job, inspire others by posting your Twitter profile links on the comment section. GoodLuck!
If you are residing within Australia, Nigeria, India, Russia or anywhere else around the world, wanting to own a U.S bank account or localized accounts in EURO, CHY, GBP and JPY. The Payoneer service is a secure and convenient service that allows you to send and receive funds globally.
This is nothing like PayPal or the likes. These are fully functional bank accounts in your name. You can withdraw your funds from an ATM or make payments online with your Payoneer debit card.
Payoneer debit card
As a resident of Nigeria (or any other country) you can own a U.S Checking Account that provides you with a US collection account that can be used to receive payments from US companies directly to your Payoneer account.
These payments can be withdrawn using your Payoneer debit card or used to make other payments online.
Payoneer Global Payment Service
Furthermore, Payoneer allows account holders to own, receive and make payments in other localised currencies using the Global Payment Service.
There are two types of receiving accounts:
Local receiving accounts – let you get paid by local bank transfer from companies in different countries as if you had a local bank account in that country. Receiving local accounts include:
USD Receiving Account (United States)
EUR Receiving Account (Europe)
GBP Receiving Account (United Kingdom)
CHY Receiving Account (People’s Republic of China)
JPY Receiving Account (Japan)
Wire (SWIFT) receiving accounts – let you get paid by wire transfer worldwide. You can use wire (SWIFT) receiving accounts to receive payments from companies located in countries where local receiving accounts aren’t supported.
Payoneer Debit Card
Payoneer allows you to receive ACH / Direct Deposit transfers from cooperate organizations such as eBay, Fiverr, Amazon, Upwork, etc. The debit card makes it easy and convenient to perform various transactions online such as purchasing or paying for services online and can be used in any ATM globally that accepts MasterCard.
You can request for a separate debit card for all your currencies. Depending on your location, your debit card is shipped between 2-5 weeks.
Setting Up your Payoneer Account
Creating a Payoneer account is easy. You can start by simply creating an account on the Payoneer website. But the easiest method to get your account approved and verified is going through a third party.
Co-operations such as Amazon, SeoClerks and Fiverr allows you to receive funds through your Payoneer account. Hence, providing you with a unique link to setup of your Payoneer account. In this tutorial, I will be walking you through on how to setup your U.S bank account and get your Payoneer card using Infolinks.
A scanned copy of a government-issued ID (any of Driving licence, Passport, National ID or Voter’s Card will be fine)
Setting Up your Infolinks Publisher’s Account
Infolinks is a media advertisement partner that allows you to share advertisement revenue by implementing the infolinks publisher code on your website or blog. If you don’t already own one, proceed to Gmail to create a free email account. Then visit Blogger.com to start a free blog powered by Google.
When all is set, proceed to Infolinks Publisher’s account setup, and enter your website/blog (e.g. website.blogspot.com) address in the specified input box. FIll the remaining info and complete the setup by implementing the Infolinks code on your website/blog (See how to add custom widget on Blogger to add your Infolinks code on the Blogger platform).
Request your Payoneer Debit Card
I believe you have already setup your email address and created an Infolinks publisher’s account. Now, proceed to your Infolinks payment setting:
Enter your contact details and click next
Select Payoneer pre-paid debit card as your payment method
Immediately beneath this area, you will find a notification box prompting you that no Payoneer account is associated with your infolinks account. Kindly, follow the Creat account link and fill the form at the Payoneer website. This process will require your email address and a government issued ID. If you do not have any of driving licence, national id or passport you can select National ID and use your voters’s card later.
Note: Ensure that your billing address is valid and correct. To be on the safer side, visit the nearest post office to get details of your mailing address.
At this point a confirmation message will be sent to your email. Sit back and wait for 2-5 business days for your Payoneer account to be reviewed and approved.
Once your account is approved you will receive a congratulation email!
Your Payoneer Debit card will arrive your mailing address within 2-5 weeks. Once you receive it, you can proceed to your Payoneer account to view your status and activate your card.
Setting Up your U.S Bank Account
A free U.S checking account will be created for you the moment your debit card request is approved. This account is used to receive payments from US companies directly to your Payoneer account.
Check your email inbox for an email from [email protected] containing the following message:
Dear FirstName,
Welcome to the Payoneer US Payment Service.
This service provides you with a US collection account that can be used to receive payments from US companies directly to your Payoneer account!
Your US Payment Service information: BANK NAME: Bank Of America ACCOUNT TYPE: CHECKING ACCOUNT #: ***-***-***-***-***-*** ABA # (Bank Routing Number): ####-##### Please Note: Your US Payment Service has not yet been verified. In order to ensure that payments you receive are funded to your account without delay, you’ll need to verify your service by completing the following steps:
Click here to complete the US Payment Service Questionnaire Click here to submit a copy of your government-issued photo ID
Kindly, follow the links provided in the email to submit your US Payment Questionnaire and a scanned copy of your government-issued photo ID respectively.
Wait for a message similar to this one:
Congratulations! Your U.S Bank Account is ready to be used. You can use this account to receive funds from various U.S co-operation including Paypal and Amazon.
Need Help?
If you want us to help you setup your U.S Checking Account or request for a Payoneer debit card. Contact us here.
Earlier today I published an infographics on things you can do with your smartphone but I didn’t mention the possibility of checking the status of your television/electronics remote control battery with your smartphone.
Of course, in the modern technology it is no longer a question of ‘what you can do’ with your smartphone, it is now a question of ‘what you can’t do ‘ with your smartphone.
The latest discovery has revealed that you can check the power status of your TV set or home theater remote control with your smartphone. This is possible because most standard remote controls send signals to your home theater gear using a beam of infrared light, which a sensor on your hardware picks up. The beam of course is invisible to the human eyes, however, never neglect the power of your smartphone’s Camera! If your remote control start behaving in a funny way, you can easily use your phone to check if your remote batteries need refreshments.
Checking your Battery Power Status
To check your battery status, simply wake your smartphone and launch the Camera application. Next, switch to the front-facing camera, point the remote at the camera, and press any button on the remote.
If the remote is working properly, you should see a flicker of light come from the IR blaster as viewed through your phone’s screen that looks something that this:
If you don’t see the flicker from the IR blaster, or perhaps just a very, very dim flicker, you probably need to change the remote’s batteries. (And if new batteries don’t help, you probably need to replace your remote. Sorry.)
Of course, this trick isn’t limited to your smartphone’s camera; many digital cameras can see infrared light, despite having filters to tune it out. So if all you have at your disposal is your laptop’s built-in webcam, you may have everything you need.
The recent versions of Google Chrome will let you synchronize your Google account with Chrome so that you don’t have to login again to each Google products (e.g. Google Drive, Gmail, Blogger, Google Play, etc) website you visit. This will also mean that anybody who has access to your Google Chrome browser can easily explore your email and other Google products without your consent.
How do you ensure that no intruder can have access to your Google account without you logging off? If you share a PC at home, other family members can start searching the web as you by simply opening Chrome.
Luckily, Chrome’s multiple profile support can help, providing an easy-peasy way for multiple people to use the same browser without worrying about intruders or having to constantly sign in and out of Google profiles.
How to Add a New User
First off, open Google Chrome’s menu—the icon with three horizontal lines in the upper right-hand corner—and open the Settings option. Towards the bottom you’ll see a “Users” section >> Simply click on Add new user.
A pop up window will appear with a bunch of user icons and new user account configuration. Choose an icon and name for your profile, you will have to decide whether you want to create a desktop shortcut icon for the profile, and then tap the “Create” button. Viz.. In a few seconds, a new window will open with the new user profile.
Notice that the first time you create a new user profile, Chrome will actually create two profiles: One called “Default Profile” for the person who is currently signed in to Chrome, and one for the new profile that you just created.
So the first time you add a new user, you are actually creating two profiles. To change the name of the default profile to something more user friendly, go back to the Chrome settings tab. Highlight the default profile in the “Users” section and the click the “Edit…” button to change the name.
That’s pretty much it. Just follow the same process as many times as you need to create a user profile for each member of your household.
Create User Profiles for Kids
If your kid is less than 16 years old. You need to be weary of what he/she does on the internet. The most reliable, easy and cheap way to achieve that is with Google Chrome. The browser allows you to supervise a particular profile. You can block the profile from visiting certain websites, view website histories by that user profile, delete and add bookmark.
To be able to monitor your kid internet activities, you will need to create a special kind of profile called a supervised user, a beta-grade profile type Google added to Chrome earlier in January.
To make a supervised user, simply click the checkbox next to “This is a supervised user managed by [email address].” Parents of supervised users can block specific websites, check out the websites they’ve visited, and lock kids into Google’s “Safe search.” If you block a website that your child thinks they should be allowed to view, they can even send you a request to unblock it, and you can manage settings for your supervised users via the dashboard at chrome.com/manage.
You need to be weary of the fact that user profiles are not password protected, however, so Chrome’s supervised users feature is far from fool proof. You will still have to keep an eye on your child’s surfing habits to make sure they are using their profile and not switching over to yours, or—if you’re really worried—create separate user accounts as the operating system level .
How to Switch between Profiles
To switch between users, just click the user icon that appears in the upper left corner of the browser window. The other created users will appear in a drop down menu. Select the one you want to switch to and a new window will open for that user profile. If that’s too much trouble, you can also use the customized desktop shortcuts Chrome offers to make when creating a profile to open the browser as a particular user.
Some of us here have been enjoying the photo editing feature on Google+ since its introduction in November, 2013 but I believe a great number of you are yet to know about this feature and how to use it.
As one of it’s techniques to land you on Google+, Google has integrated an amazing photo editing tool into Google+. Though a number of you has sworn enmity with Google+ but in this case, hatred doesn’t matter: This tool will make you use Google+.
Google+ photo editing tool allows its users to crop, enhance or customize photos they have uploaded through their Google+ account, Blogger platform, Android OS or any of Google’s services that involves photos. Google+ creates an automatic album for all the photos you shared on various Google platforms. Any changes you apply on a photo will reflect on it regardless of where it’s being used or was uploaded.
To edit a photo
Login to your Google+ account.
Goto your photos page.
Click on the photo you want to edit
This will open a light-box, click on edit inside the light-box.
Clicking edit will bring photo editing tools to the right hand-side of the screen. For the first timers, I would advice you play around with the tool until you are able to master it’s functions.
When you are done editing, hit the finished editing link to apply your changes.
Facebook has been improving over the recent years, from the introduction of Video Recording On Instagram to the amazing Recommendations Bar for Bloggers making facebook the leading social network in this present world. We do not intend to keep our loyal blog readers on the dark, so we try as much as possible to keep our loyal blog readers updated with developments of this magnitude.
Why do I need to Embed Facebook Post to my Blog Post?
First of all, I think that’s a question you need to ask yourself, considering the fact that you issued this search on google :-), but if you are reading this tip because you find it interesting, here are a few answer that was put together by me.
Embedded Posts are a way to put public posts – by a Page or a person on Facebook – into the content of your web site or web page.
The embedded post will show any media attached to it, as well as the number of likes, shares, and comments that the post has. Embedding posts will let people using your web site see the same rich information that is shown on Facebook.com, and they will enable people to follow or like content authors or Pages directly from the embed.
What Platforms are Supported?
Are you really that inquisitive? Well, it’s good news for all, because the facebook embeddable post does work on every platform (All platforms include wordpress, blogger, oxwall, joomla, even your simple html site).
Special note: You need to add the following code to any place in your <body> section
If you are using a site built with either dreamweaver, blogger or oxwall.
Embedding your Facebook Post into your Blog Post!
There are two ways of doing this, but each method depends on where your source post is located on facebook.
Embedding Code from a Facebook Post
This method is applicable, if you are embedding a post from your profile newsfeed or in the case of embedding photos and items. To embed a post, first check if the post is public by hovering over the audience selector (you’ll see a globe icon). Only public posts from Facebook Pages and profiles can be embedded. If the post is public, click on the icon that appears in the top right corner of the post on Facebook:
Choose ‘Embed Post’ from the drop down menu that appears. You will see a dialog appear with the code to embed your post in it:
Copy and paste this code into your web page in the place where you want it to appear.
Embedding Code from a Facebook Page
Assuming you have a Facebook page and you would like to share a content from your page to your blog readers, here is the way to go: Simply, goto your page and grab the URL of the Facebook post you want to embed. For photos, you can easily get the URL by clicking on them. But for other media, it is a bit complicated, at least for newbies. To get a post’s URL, simply click on its timestam
Copy the link on your address bar and go to Facebook Configurator. Paste your URL in the field provided. Once your story loads in the tool, click on Get Code. You will get two codes similiar to the image below
Simply copy the second code and paste it where you want it to appear…..
Looking for Demo? Here is a post I published some months ago, try it out and see how it goes Remember to ask your questions here and also share your testimonies with others with the aid of our comment sections.
Who knew your boss could see so much of your Facebook page–including the pics from your wild weekend? Oversharing can lead to underemployment. Take some practical steps to control what others see about you. The power of social networks like Facebook and Twitter comes from their ability to quickly share information about your life with other people. But along with that ability comes the risk of sharing sensitive information with the wrong people, and that risk increases as your network grows well beyond your core circle of friends. Using Twitter and Facebook effectively takes more than discretion; you should know how to tweak the settings for these services so that you have full control over who sees what on your Facebook page or on Twitter. In the two stories linked below, and in others to come, we’ll cover both sides of the coin: how to use the tools at your disposal to keep your profiles in check, and how to handle the etiquette side of the equation, as well. The garden-variety freshman may not have much to worry about, but it’s a different story if you–as many people are increasingly doing–are using Facebook and Twitter not for updates about your meals, pets, and drinking binges, but for professional purposes. So we’ve outlined here a handful of common disastrous scenarios in which one (or both) of these social networks was misused, as well as the best way to prevent or remedy the problem. But in the end you’ll find that the fundamental lesson is invariably the same, and that’s to remember the golden rule of all social networks: Never forget that the whole world is watching. Now go on to:
This widget adds a multi column widget section to your blogger template. You must have seen the multi-column footer in most websites and wordpress blogs.
The Multi Column Footer Widget allows you to add upto 4 (recommended column is 4 but you can add more sections) widgets in different columns at your footer region. This feature is quite new to blogger and luckily, you will be among the first people to enjoy this widget.
Below we have prepared a complete walk through that will guide you in installing a similar widget to your blogger site.
How To Add the Multi Column Footer Widget To Blogger
First we will add the CSS code to your blogger templates and then the HTML. So without wasting any time lets jump straight to the steps,
5. Now search for </body> and paste the following code just above </body> <div id='lower'> <div id='lower-wrapper'> <div id='lowerbar-wrapper'> <b:section class='lowerbar' id='lowerbar1' preferred='yes'> </b:section> </div> <div id='lowerbar-wrapper'> <b:section class='lowerbar' id='lowerbar2' preferred='yes'> </b:section> </div> <div id='lowerbar-wrapper'> <b:section class='lowerbar' id='lowerbar3' preferred='yes'> </b:section> </div> <div id='lowerbar-wrapper'> <b:section class='lowerbar' id='lowerbar4' preferred='yes'> </b:section> </div> <div style='clear: both;'/> </div> </div>
6. Save your template and you are done! Now go to Page Elements and add your widgets to the newly added Footer Widget that will look something like this, You can observe that there a total of four columns by default and you can add as many widgets as you want to each column. If you wish to increase or decrease the number of vertical columns then follow the steps below.
How to Customize the Widget?
Well I will keep it simple. I think the colors and overall size and padding and margining are just perfect. The only thing that you will need to adjust according to your template is the width of the widget and the number of vertical columns.
1. In order to reduce or increase the overall width of the widget simply change width: 960px; 2. If you wish to decrease the number of widgets to three then simply delete this part of the code, <div id=’lowerbar-wrapper’> <b:section class=’lowerbar’ id=’lowerbar4‘ preferred=’yes’> </b:section> </div>
3. Or if you wish to add an extra column then add the code below just above <div style=’clear: both;’/> <div id=’lowerbar-wrapper’> <b:section class=’lowerbar’ id=’lowerbar#‘ preferred=’yes’> </b:section> </div>
Remember that lowerbar# refers to the column number. So if you want to add a fifth column then simply replace lowerbar# with lowerbar5. After you have added the fifth column then remember to change width: 23%; with width: 17%; You will repeat step 3 for as many columns as you wish to create. But three and four and five columns are a standard. Increasing them will make things look ugly.
Analysis: “Strong” isn’t a detailed password rating; go for a quintillion possible combos and add a symbol.
Security breaches of mind-numbing size like those at LinkedIn and eHarmony.com set crypto– and security geeks to chattering about weak passwords and lazy users and the importance of non-alphanumeric characters to security. And insisting on a particular number of characters in a password is pointless security-fetish control freakishness. Nope. The number and type of characters make a big difference. How big? Adding a symbol eliminates the possibility of a straight dictionary attack (using, literally, words from a dictionary). Adding a symbol, especially an unusual one, makes it much harder to crack, even using rainbow tables (collections of alphanumeric combinations, only some of which include symbols).
How big is the difference in length and character?
Widgets, also known as gadgets, are small tools or applications that can be added to a website or blog to enhance its content or functions, or to pull content and services from third-party websites. Widgets come in multiple forms, such as countdown tickers, photos, games, or interactive social media applications that allow you to chat. Some widgets in Blogger serve the purpose of enhancing your blog, such as listing your blog followers or allowing readers to subscribe to your blog content.
Here are steps on how to add a widget to Blogger.
Log in to your Blogger account with your username and password. Once you are logged in, make sure you are at your blogger’s dashboard; otherwise, click on the “Dashboard” link, which will take you to a list of your blogs. 2Access the Layout page of your blog. After selecting your blog, click on the “Design” link, which will take you to the Layout page. Click on the “Page Elements” link, then click on “Add a Gadget.”
3Choose a widget or gadget. A Blogger pop-up window will appear that lists all the gadgets available to you through Google Blogger. You may search for the name of a specific gadget, or you can browse through several categories, including Basic gadgets, Featured gadgets, Most Popular gadgets or More Gadgets, which are contributed by third-party developers for Blogger.
4Add the widget to Blogger. Once you find the widget you want to add, click on the blue plus sign symbol to add it to your blog’s layout. On the Layout screen, you will be able to click and drag the widget to where you want it to appear on your blog. Save your changes. Once you have added the widgets you want to your layout, click on the “Save” button at the bottom of the Layout screen to save your changes to Blogger.
5Add a custom widget to Blogger using the HTML and JavaScript widget. The HTML and JavaScript widget within Blogger is a blank widget that allows you to add or paste third-party functionality or other code to your blog. The HTML and JavaScript widget can be found by clicking on “Add a Gadget” from the Blogger Layout screen.
Watch Video
Tips
When adding Blogger widgets or customized widgets to your blog’s sidebar, take note of the pixel width size to make sure it fits and is visible within your sidebar. If you are using a Blogger template, you can adjust the sidebar width using the Template Designer on the Design tab to accommodate your widget.
Each time you use the “Add a Gadget” feature in Blogger, your new widget will always appear at the top of your layout above all your other widgets. You will be required to drag and drop your new widget to its desired location.
When adding a widget using the “Add a Gadget” tool within Blogger, you have the option to enter the URL for a gadget you want to add from outside of Blogger. Click on the link that says “Add Your Own” and type in the name of the website you want to add.
Warning
Adding a large number of widgets to your blog may potentially cause your blog pages to load slower, however this may vary depending on the browser being used and personal browser configurations.Credit to Wikihow.com
I have already discussed about a small but useful utility Asterisk Key to find hidden passwords in Internet Explorer. But scope of this application is not limited to web browsers only. It can also be used to reveal passwords hidden under asterisks from any windows applications like Google Talk, Yahoo Messenger etc. How many times have you forgotten your saved passwords? It happens with everyone. But don’t worry. Things can be a lot easier after you learn how to use this software. All you have to do is to launch the application for which the password has to be found along with Asterisk Key. Then click on “Recover” button in Asterisk Key. That’s it. You can see in the image below the password gets revealed along with the application name. It’s very simple. Now a forgotten password hidden under asterisks is just a click away. Also, you can easily hack others stored passwords as well. Enjoy!!! Download:- Asterisk Key Any comments are whole heartedly appreciated. P.S. Asterisk Key size is just 453 Kb and it does not work with Firefox. It’s up to you if you use if for hacking.
Many times we need to unblock certain websites to gain access to some important stuffs. We all know many ways to do that. But how about actually learning to block one? Have you even been in a situation when you have to block certain websites from your computer for any reason? Well, I am not sure about any body else but certainly I have been many times in such situation. Parents may also want to prevent access to certain websites on their computer so that children can’t get to them from internet. So what’s the solution? Aaaah… It’s very simple.
1.) Open “Run” from the start menu (or press WinKey + r). Just copy paste the following path and hit ENTER. notepad %windir%system32driversetchosts
Alternately, go to C:WindowsSystem32DriversEtc and find the file “hosts”. Open that file in Notepad. 2.) When this hosts file is opened in Notepad, at the end of the file you will see something like “127.0.0.1 localhost”. 3.) Under “127.0.0.1 localhost” just add another website URL that you want to block. For Example:- 127.0.0.1 localhost 127.0.0.2 www.rakshitk.com 127.0.0.3 www.whoismadhur.com 4.) Make sure every time you add another website, the last digit of the address 127.0.0.x should not be the same.
5.) Save the file and exit. So, here you go. Restart your browser if it is opened and changes will take place immediately. The good thing is that no message, no pop ups nothing will be displayed when someone tries to open a blocked website. Your browser will just fail to open those websites without any error messages.
Each one of us must have tried many softwares for locking their private files and folders. Few must have bought a licensed copy of one while others are better of using a free version. However, you can achieve the same level of privacy without any software. This tutorial will make things crystal clear of what I am trying to say. Few months back, Madhur had written a similar article on locking folders without any software but this article is a step forward to what he has described at that time. The trick which I am going to tell here will make a virtual folder by the name “Locker” where you can put as many files and folders you want and after locking, this “Locker” folder will disappear.
Here is step-by-step guide to achieve that. 1. Download or Copy the following text file which contains the program code:- Text File -> LockCode.txt 2. Paste the above code in notepad or create a new text document by right clicking on your desktop and selecting New->Text Document. 3. Replace “type your password here” with your password in the code you just pasted on the notepad. DON’T FORGET THIS.
4. Save the above file as BATCH file (by extension .bat). Choose any filename but make sure that it ends with .bat (Open My Computer. Goto Tools -> Folder Options -> View. Scroll down and UNCHECK Hide extensions for known file types. Now rename your file with .bat extension) 5. Now you can see a MS-DOS BATCH file you just created. See the picture below:-
6. Double click on it to create a new folder named “Locker“. 7. Now put all files and folders you want to protect in to this new folder “Locker“. 8. Double click that BATCH file again to lock the folder “Locker”. It will disappear as soon as it gets locked. 9. If you want to unlock that folder, double click the BATCH file again. You will be prompted for the password, enter the correct password and that folder “Locker” will then be appear which is easily accessible by you. That’s it. You are done. You have just learnt how to protect your important files and folders without any software. Isn’t it amazing? What’s your take on this? Do you know any other technique? Update:- As pointed out my Mayank in the comment section, the safety of that BATCH file is also very important. So it’s better that you store it in some other directory or completely remove it. Then later on when you want to unblock your files and folder, just copy that batch file to same directory as your “Locker” folder and follow the above mentioned process.
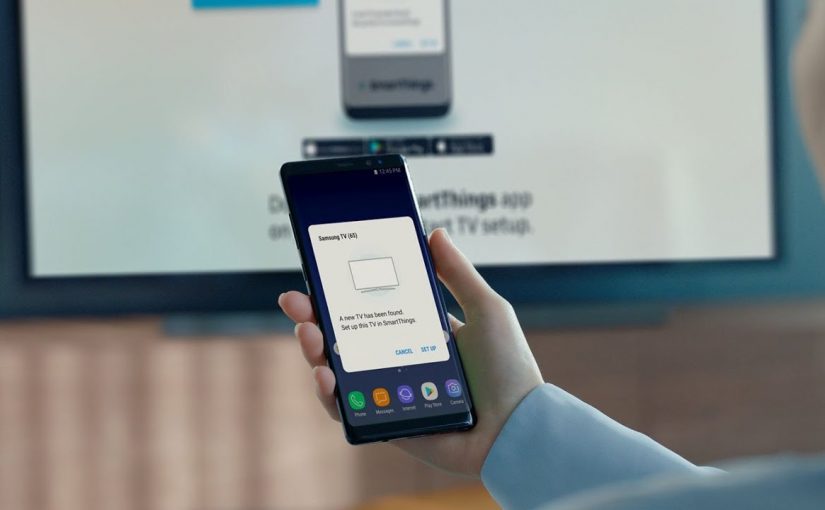

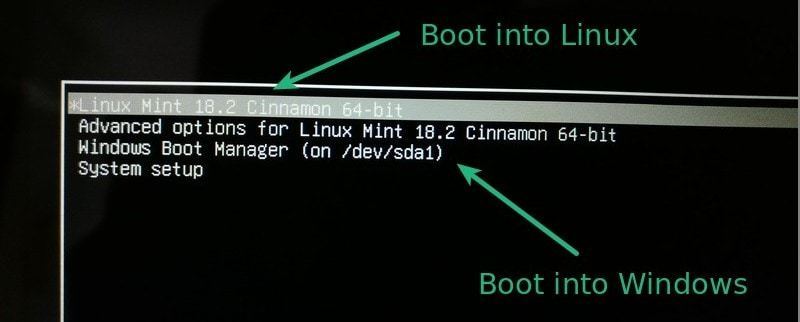
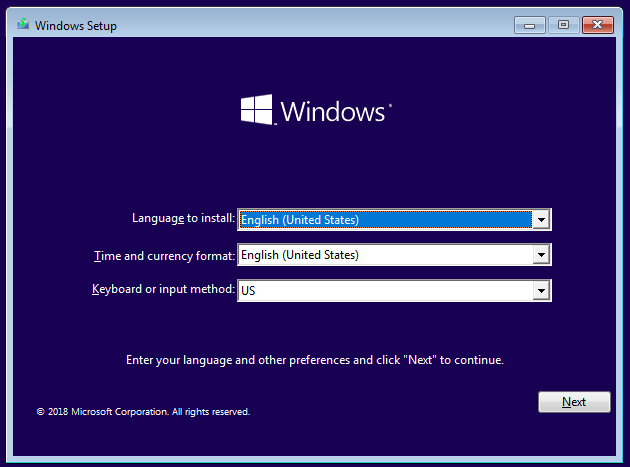
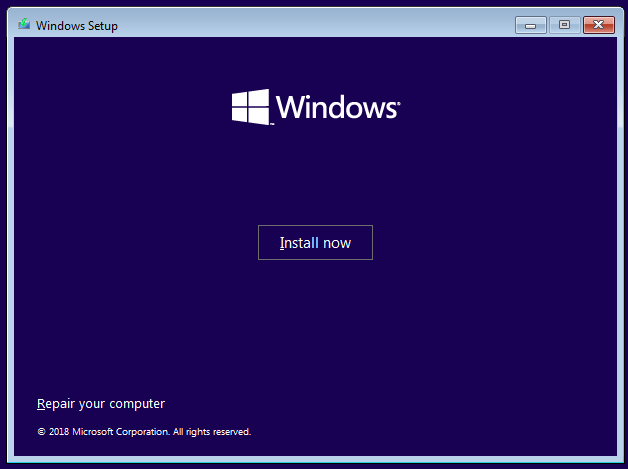
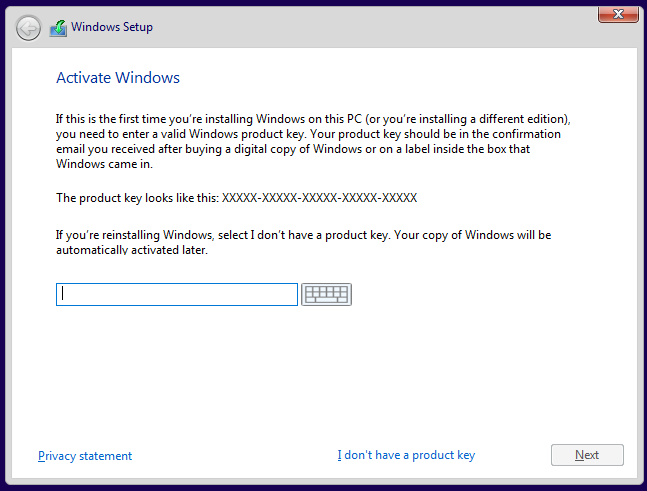

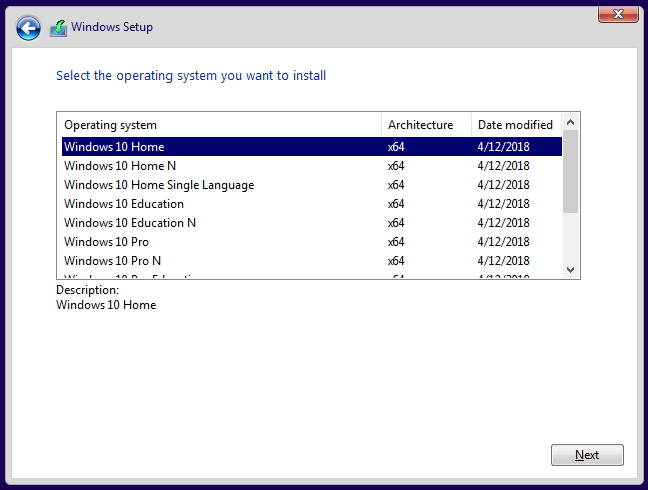
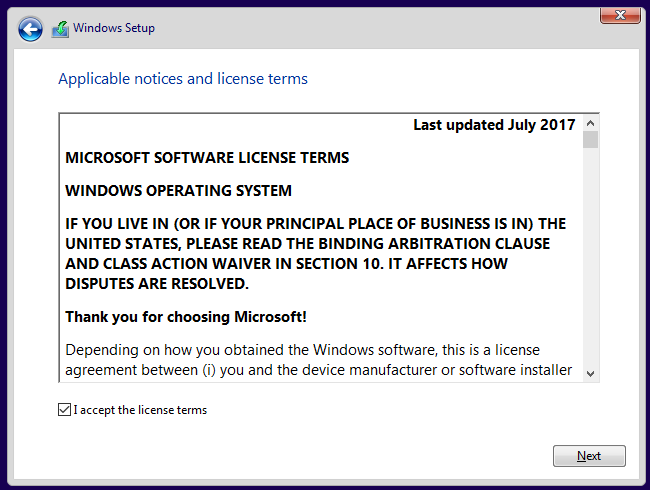
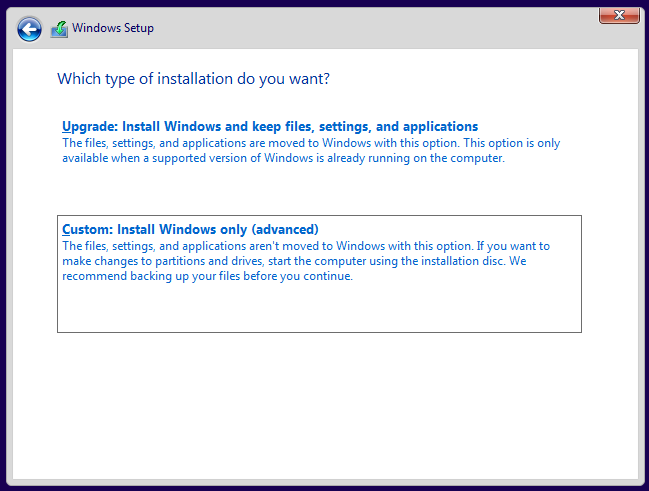
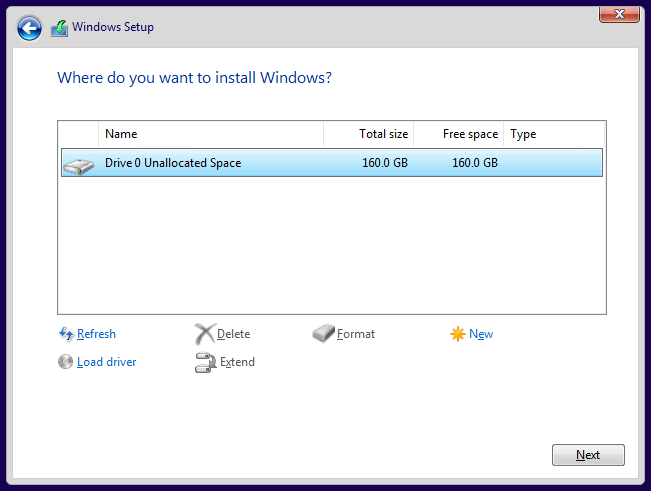
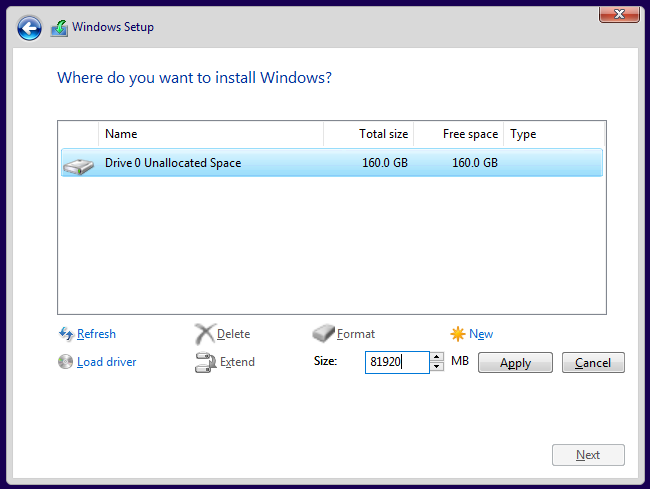

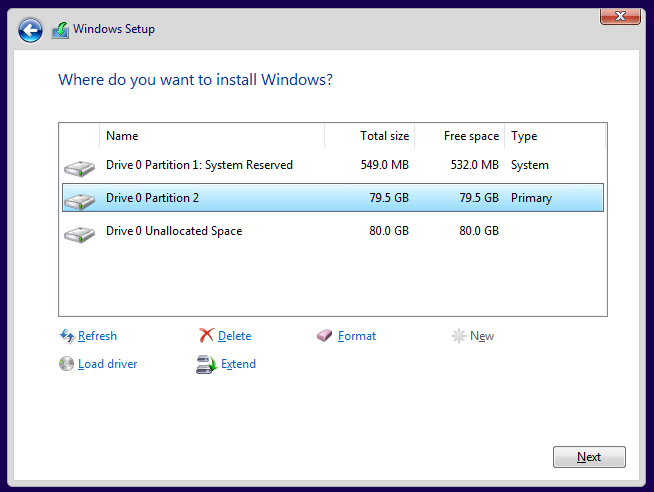
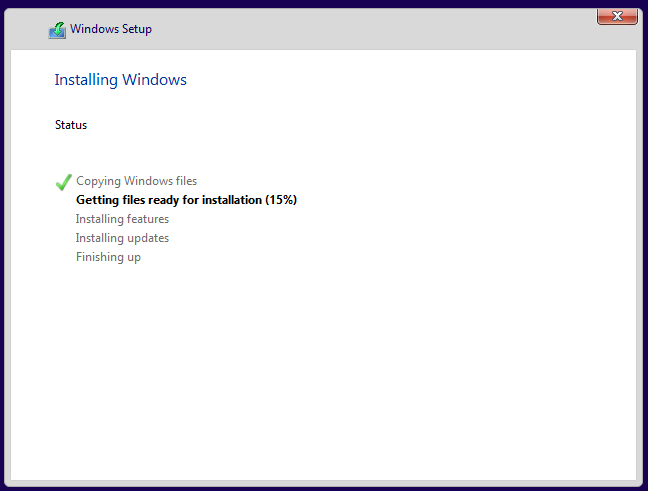
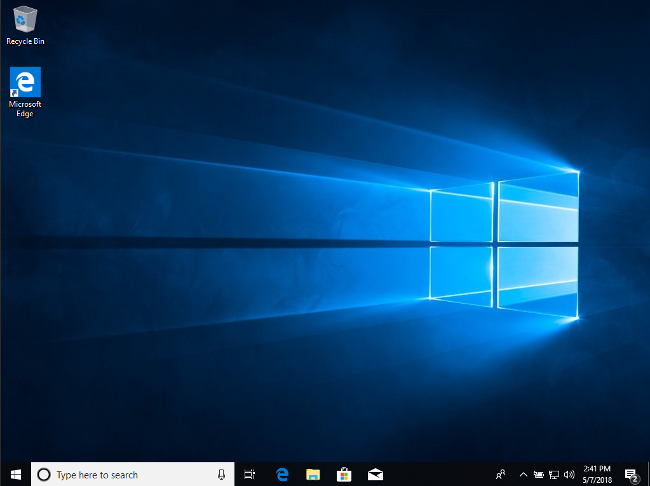

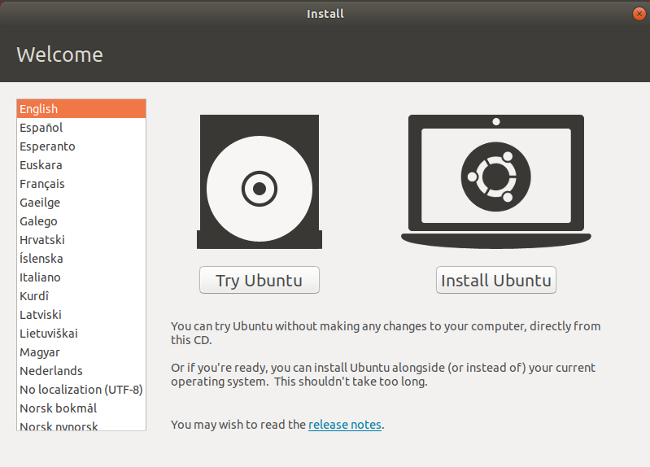
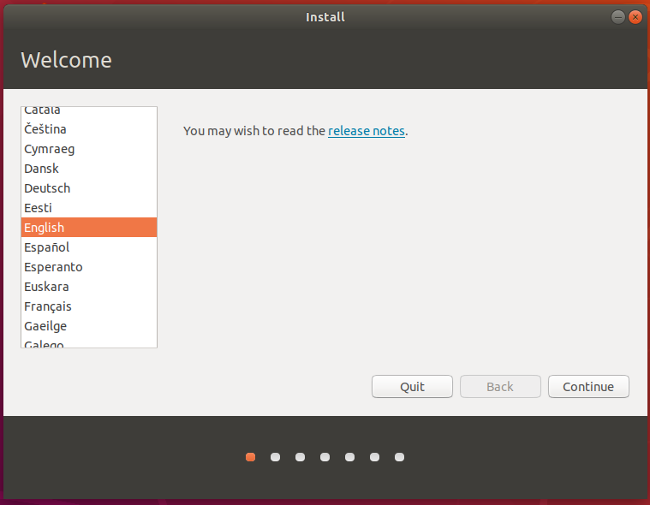
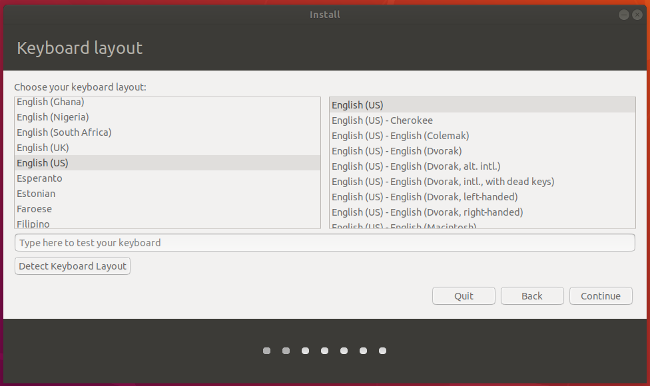
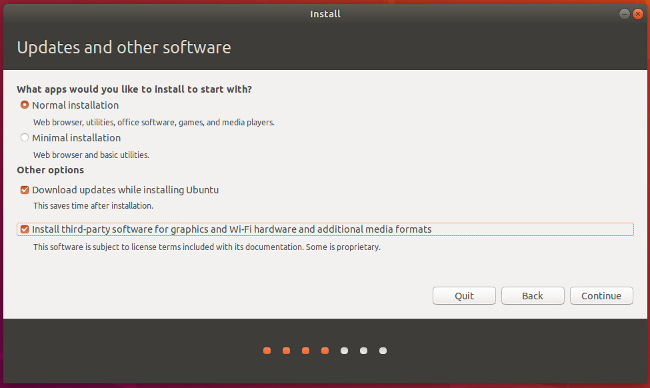

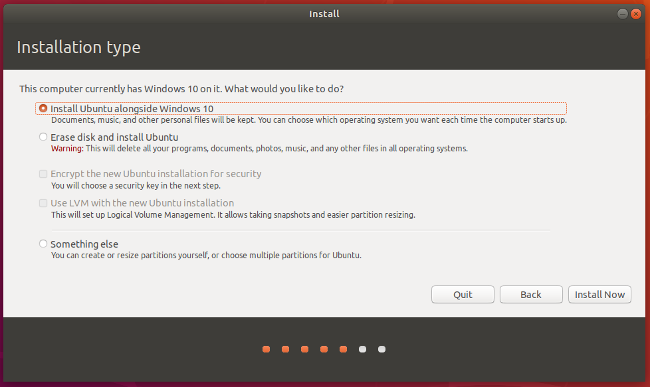

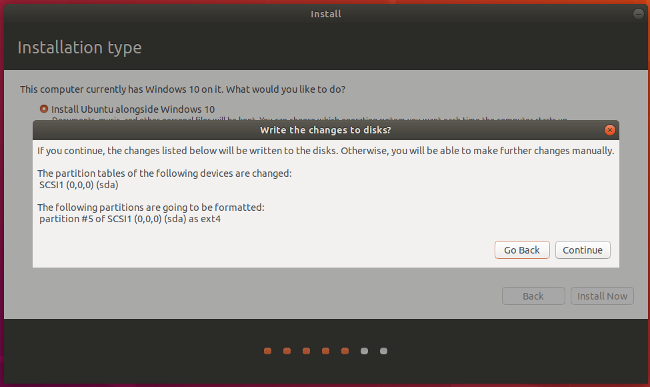
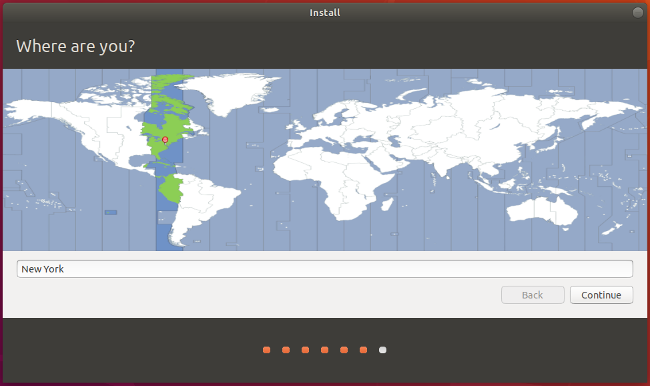
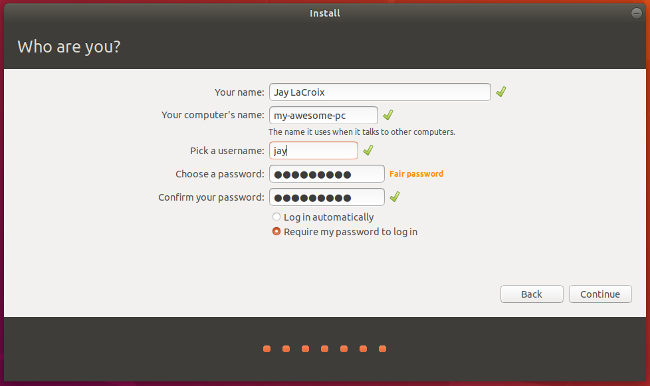

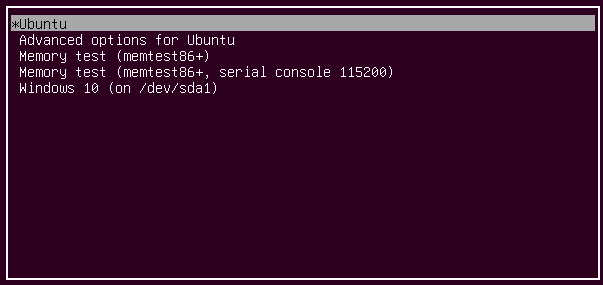


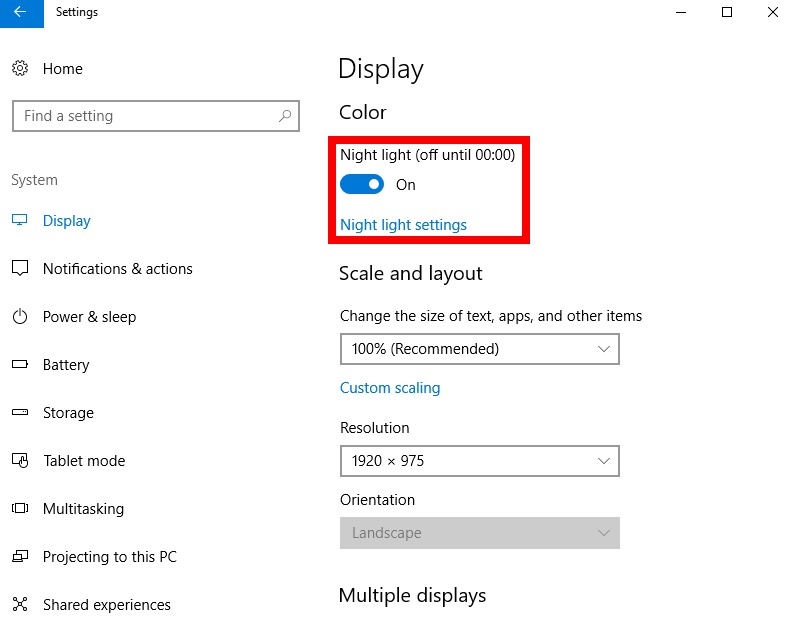
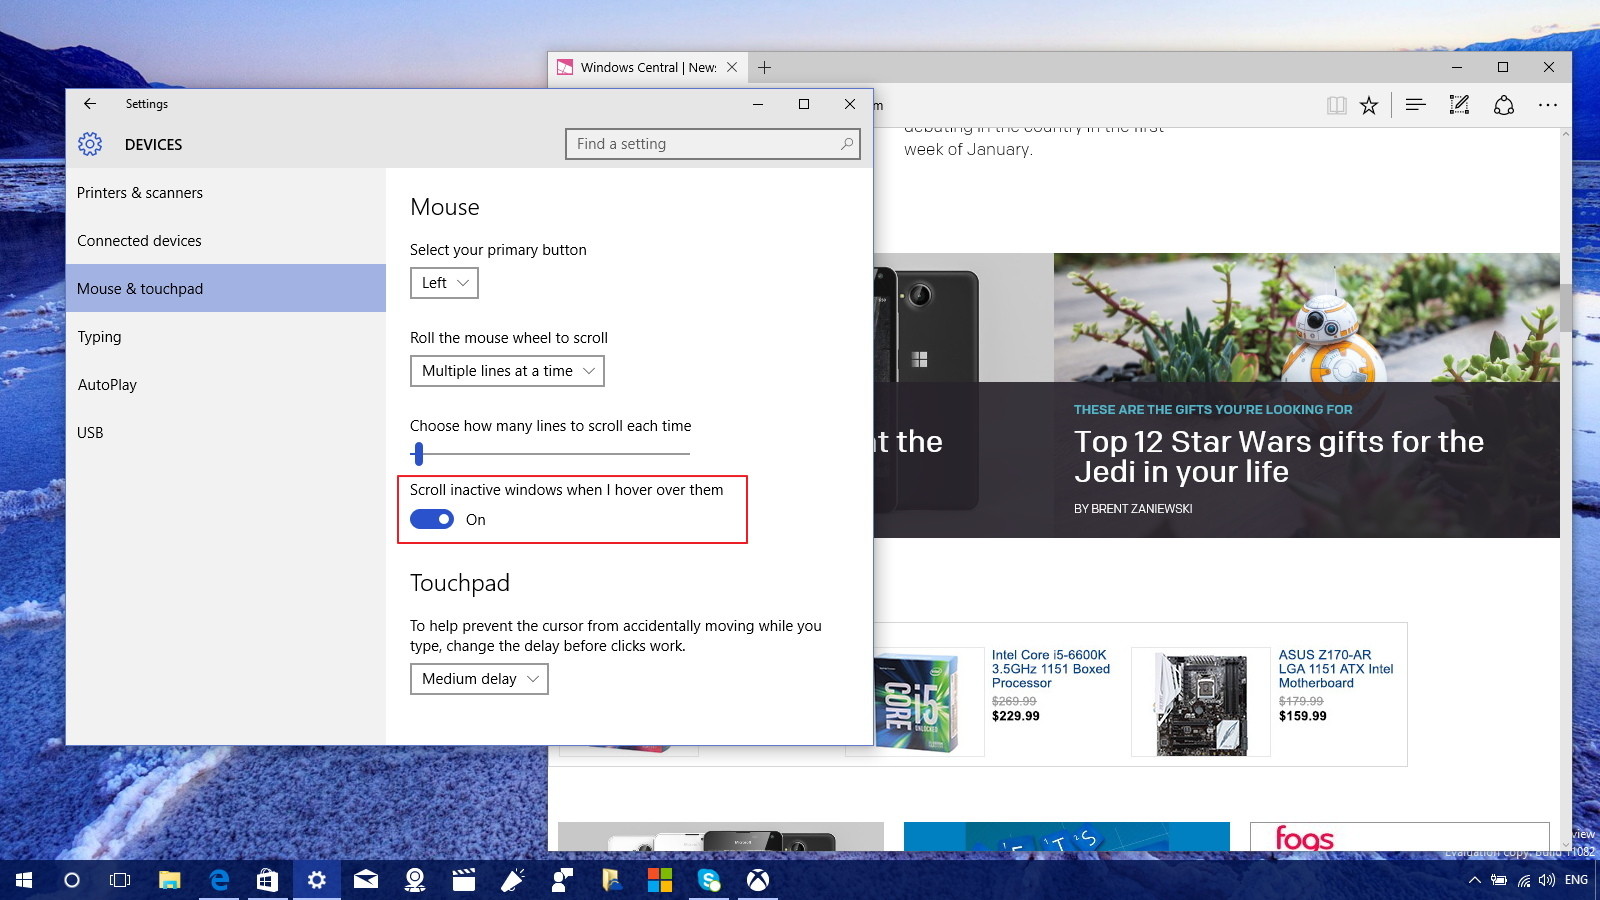
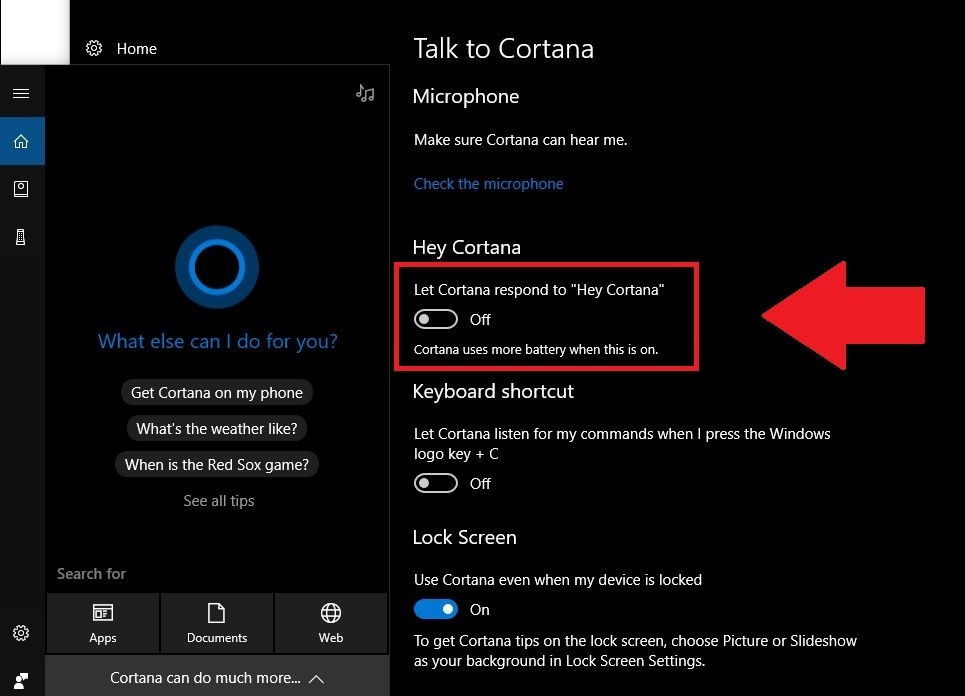
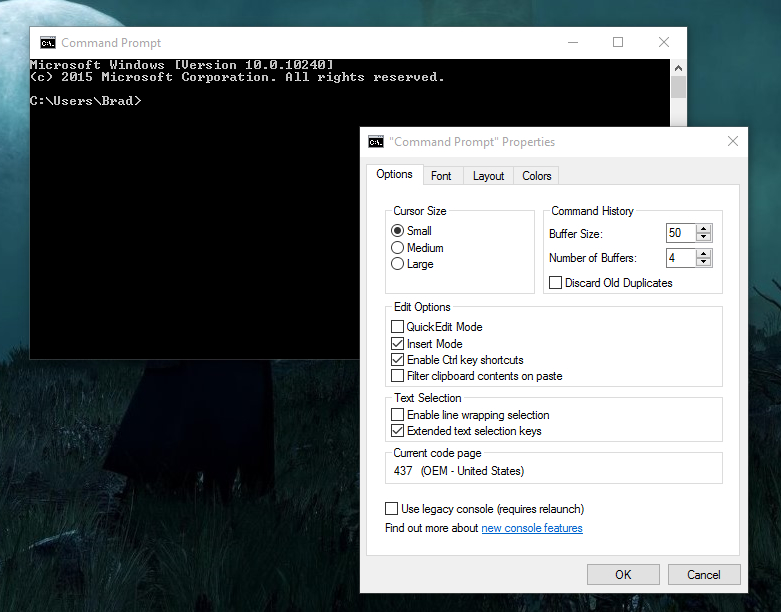
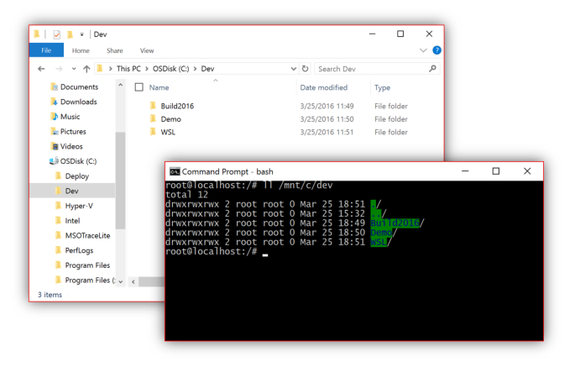
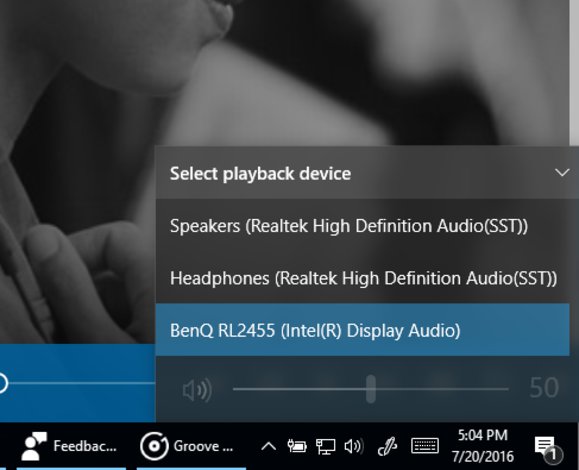

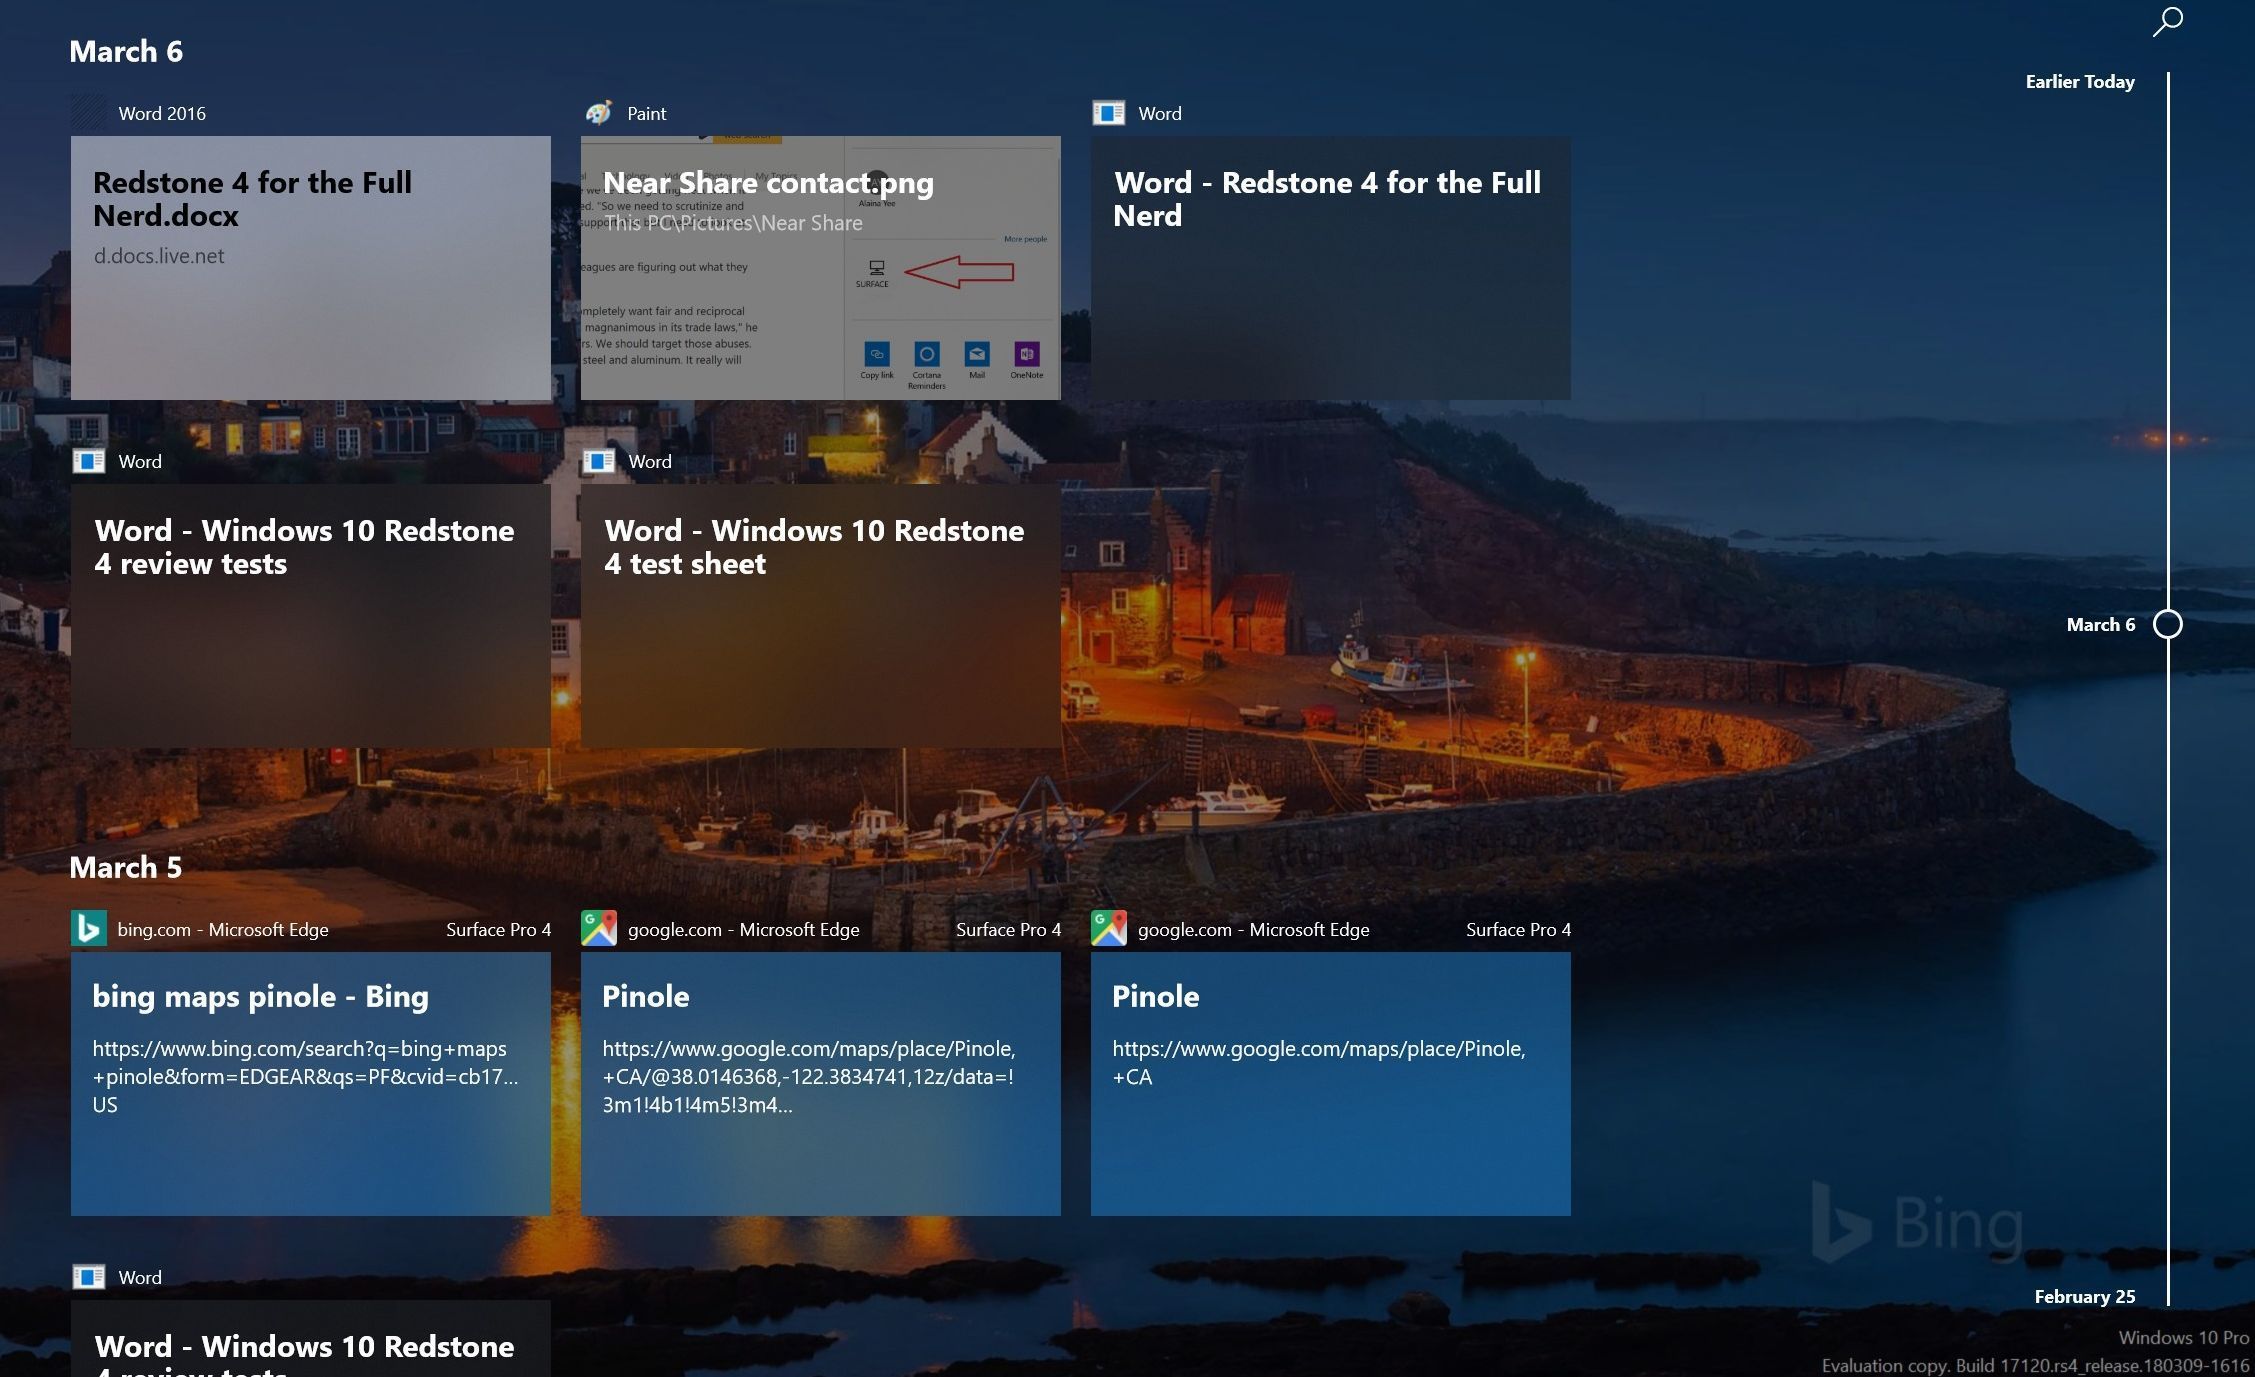
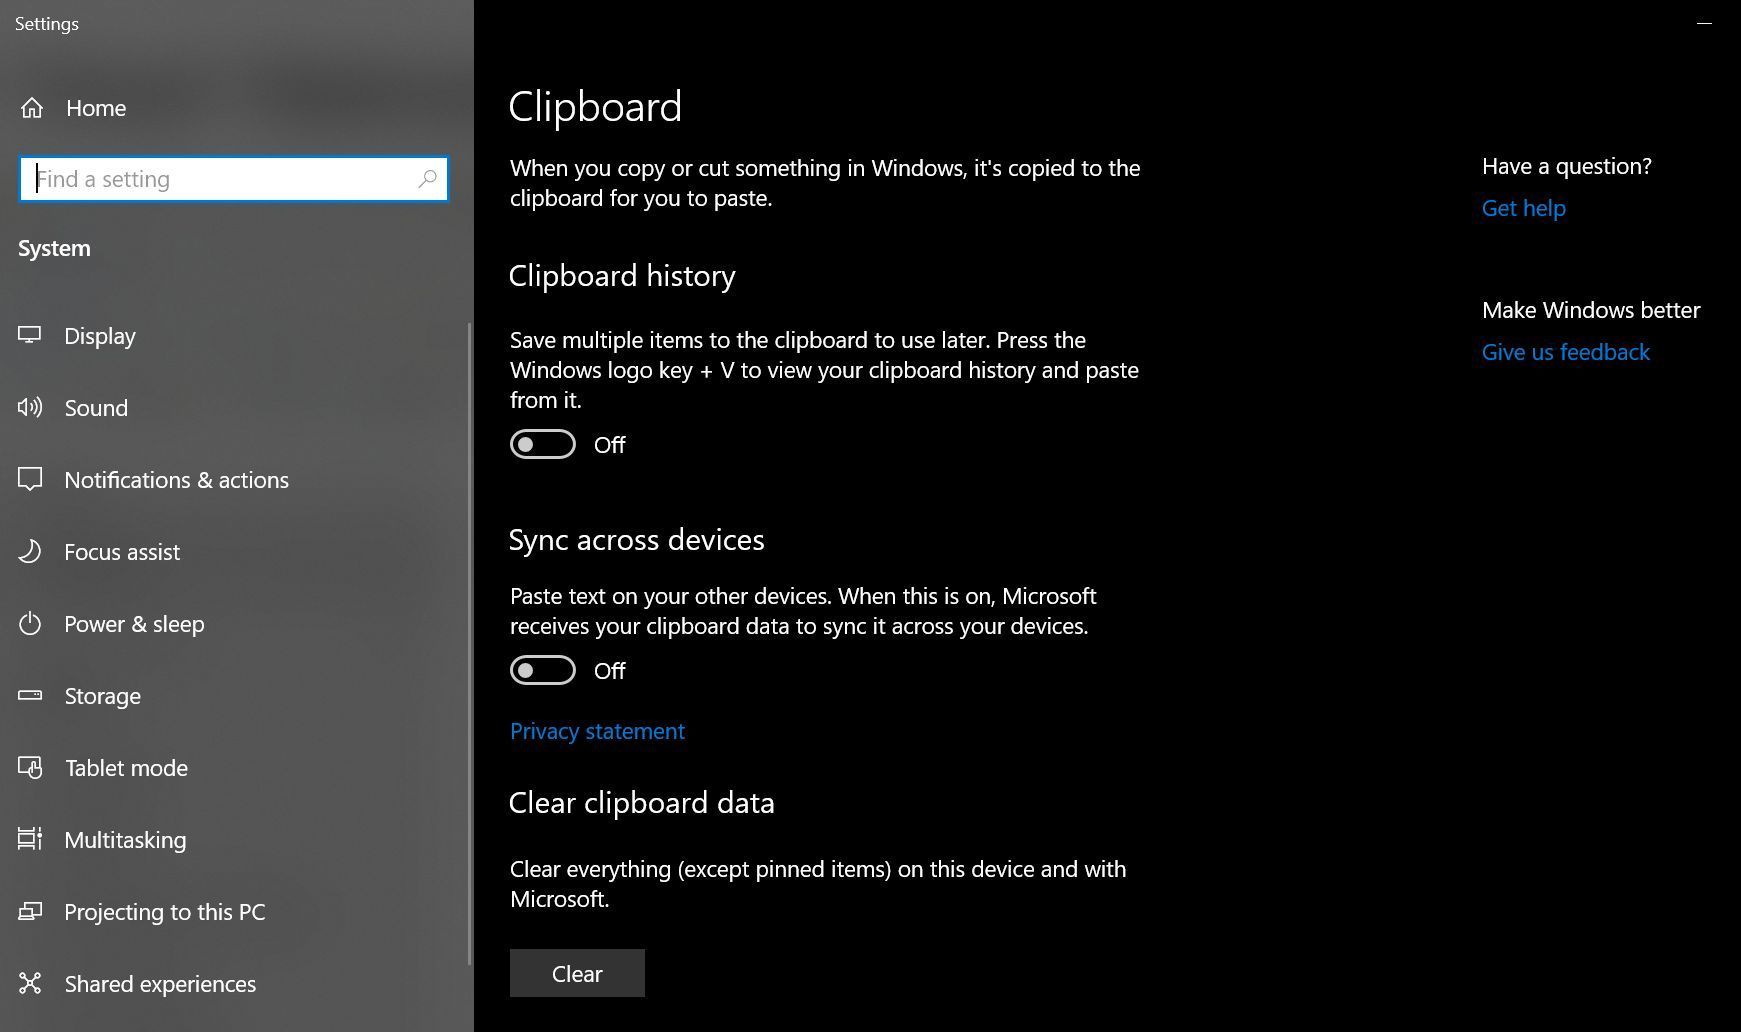
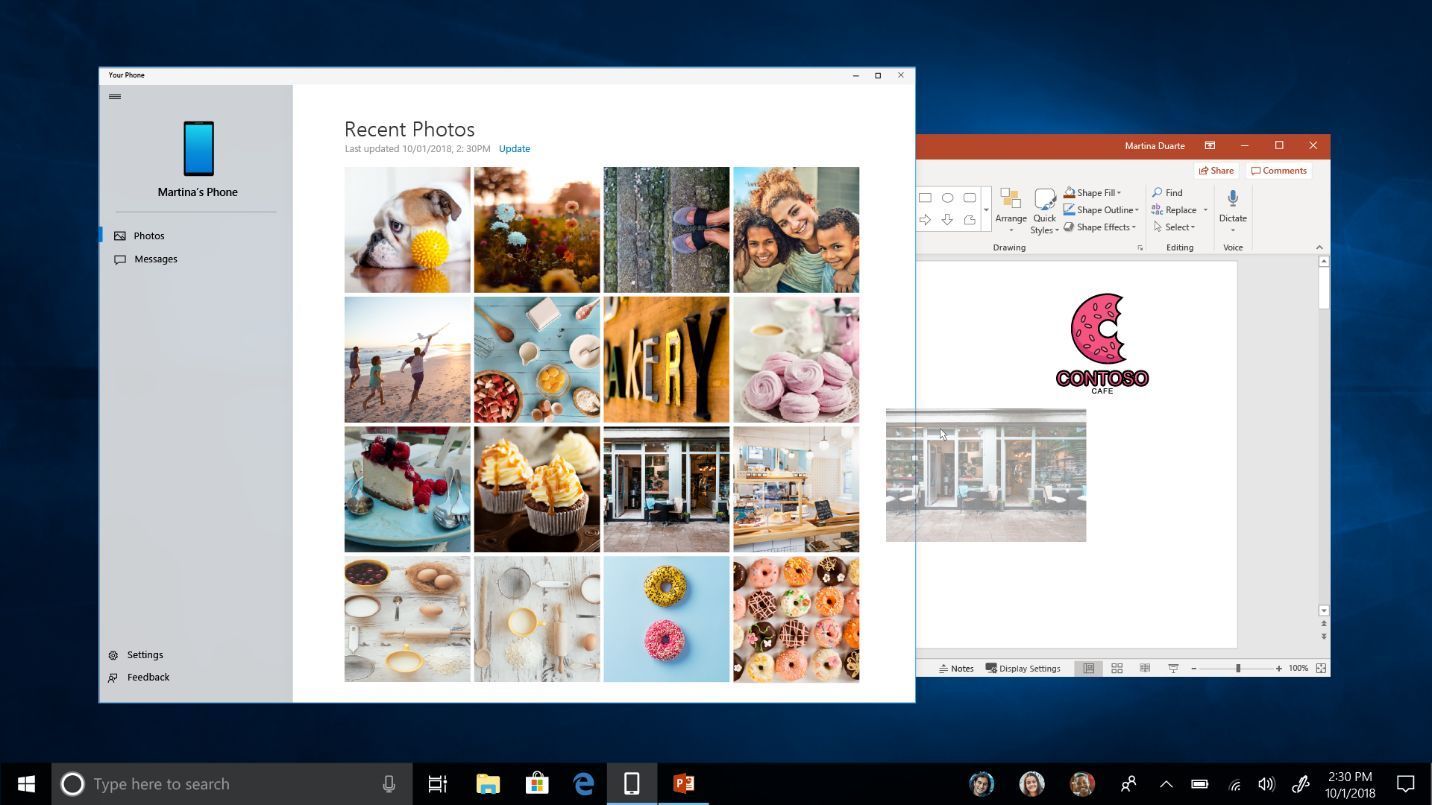
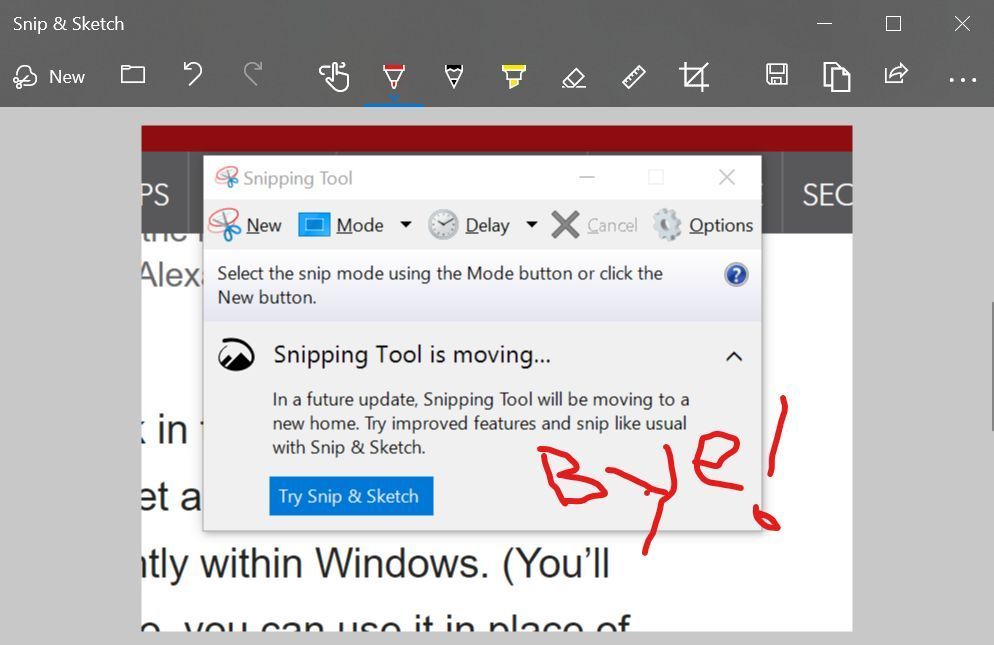
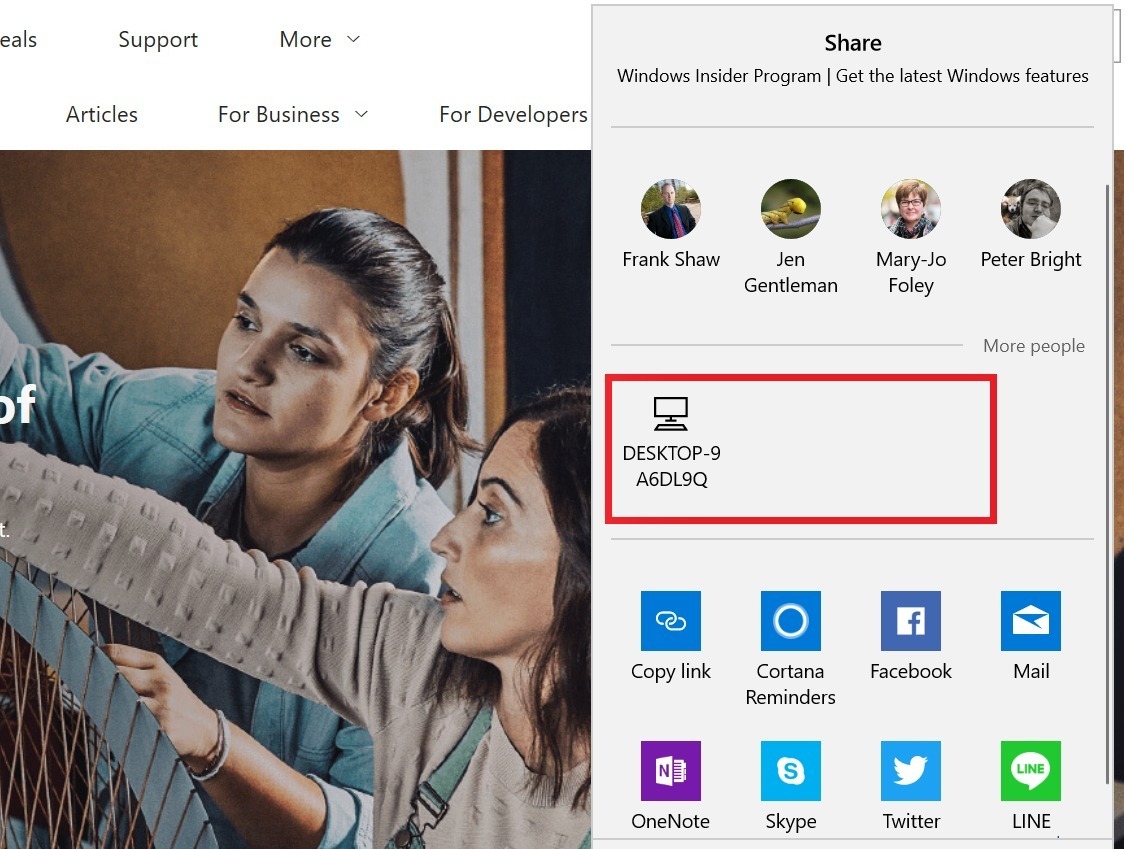
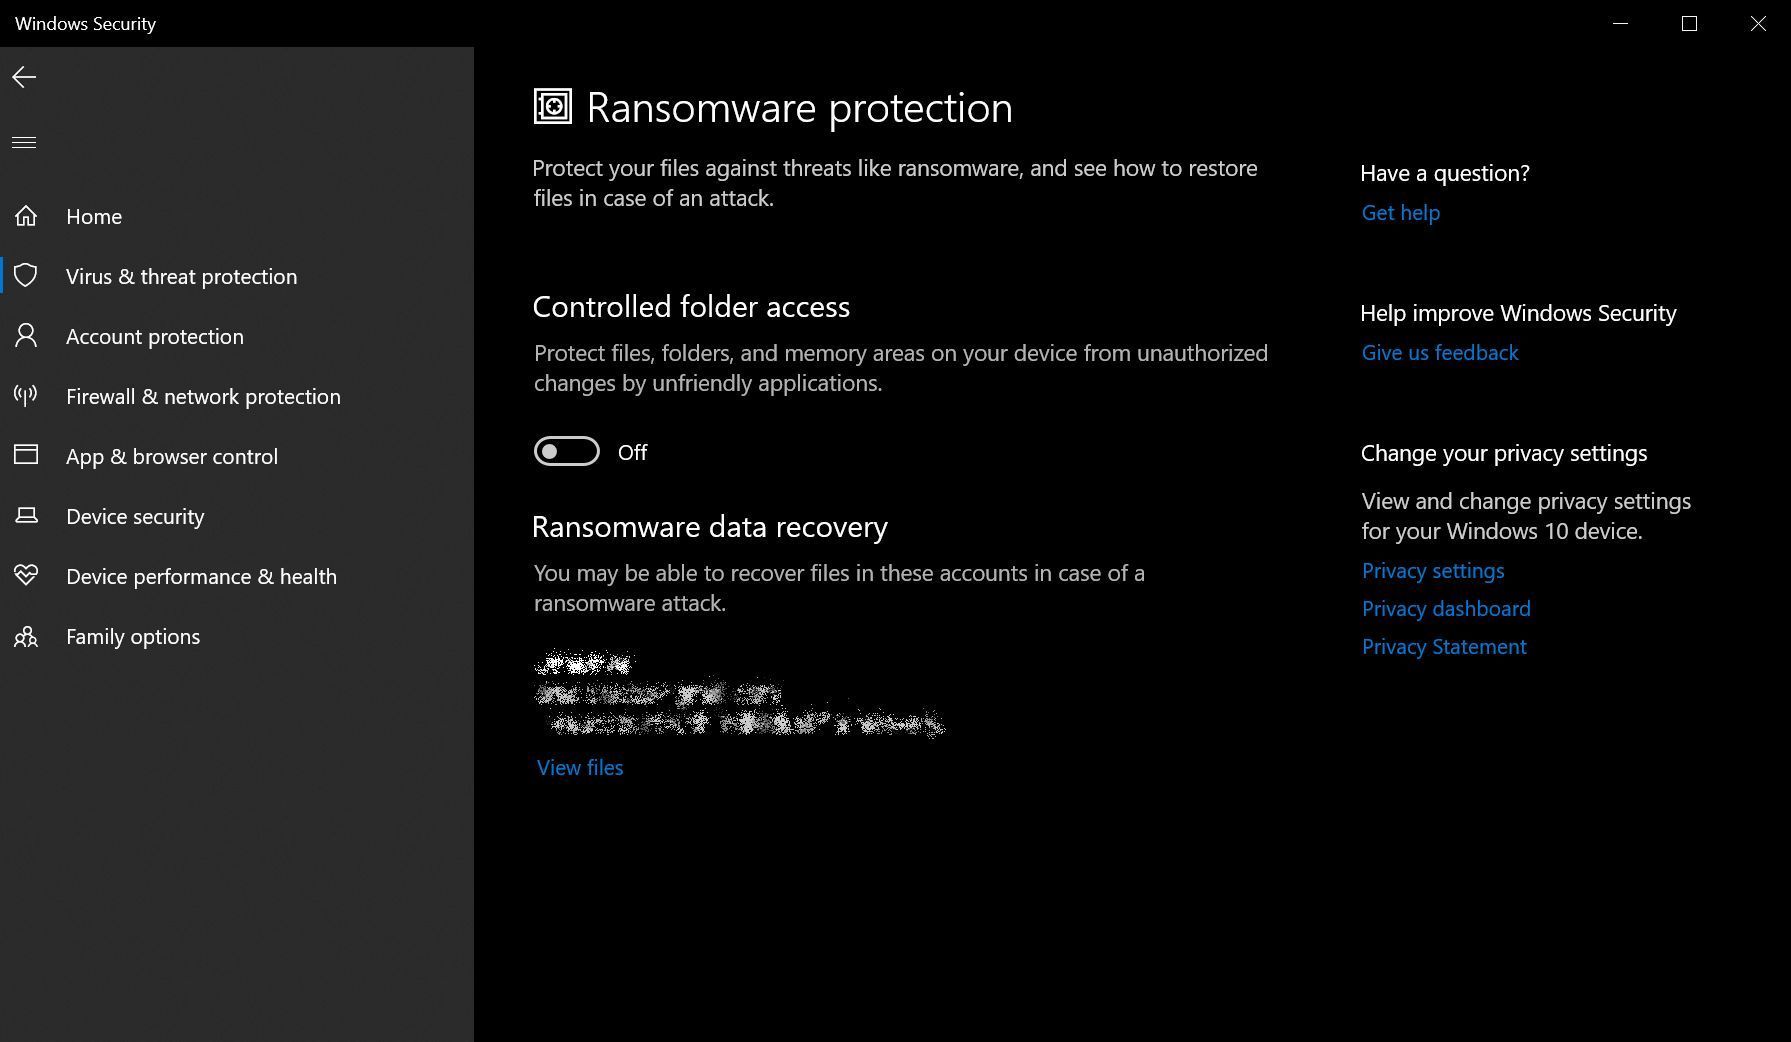
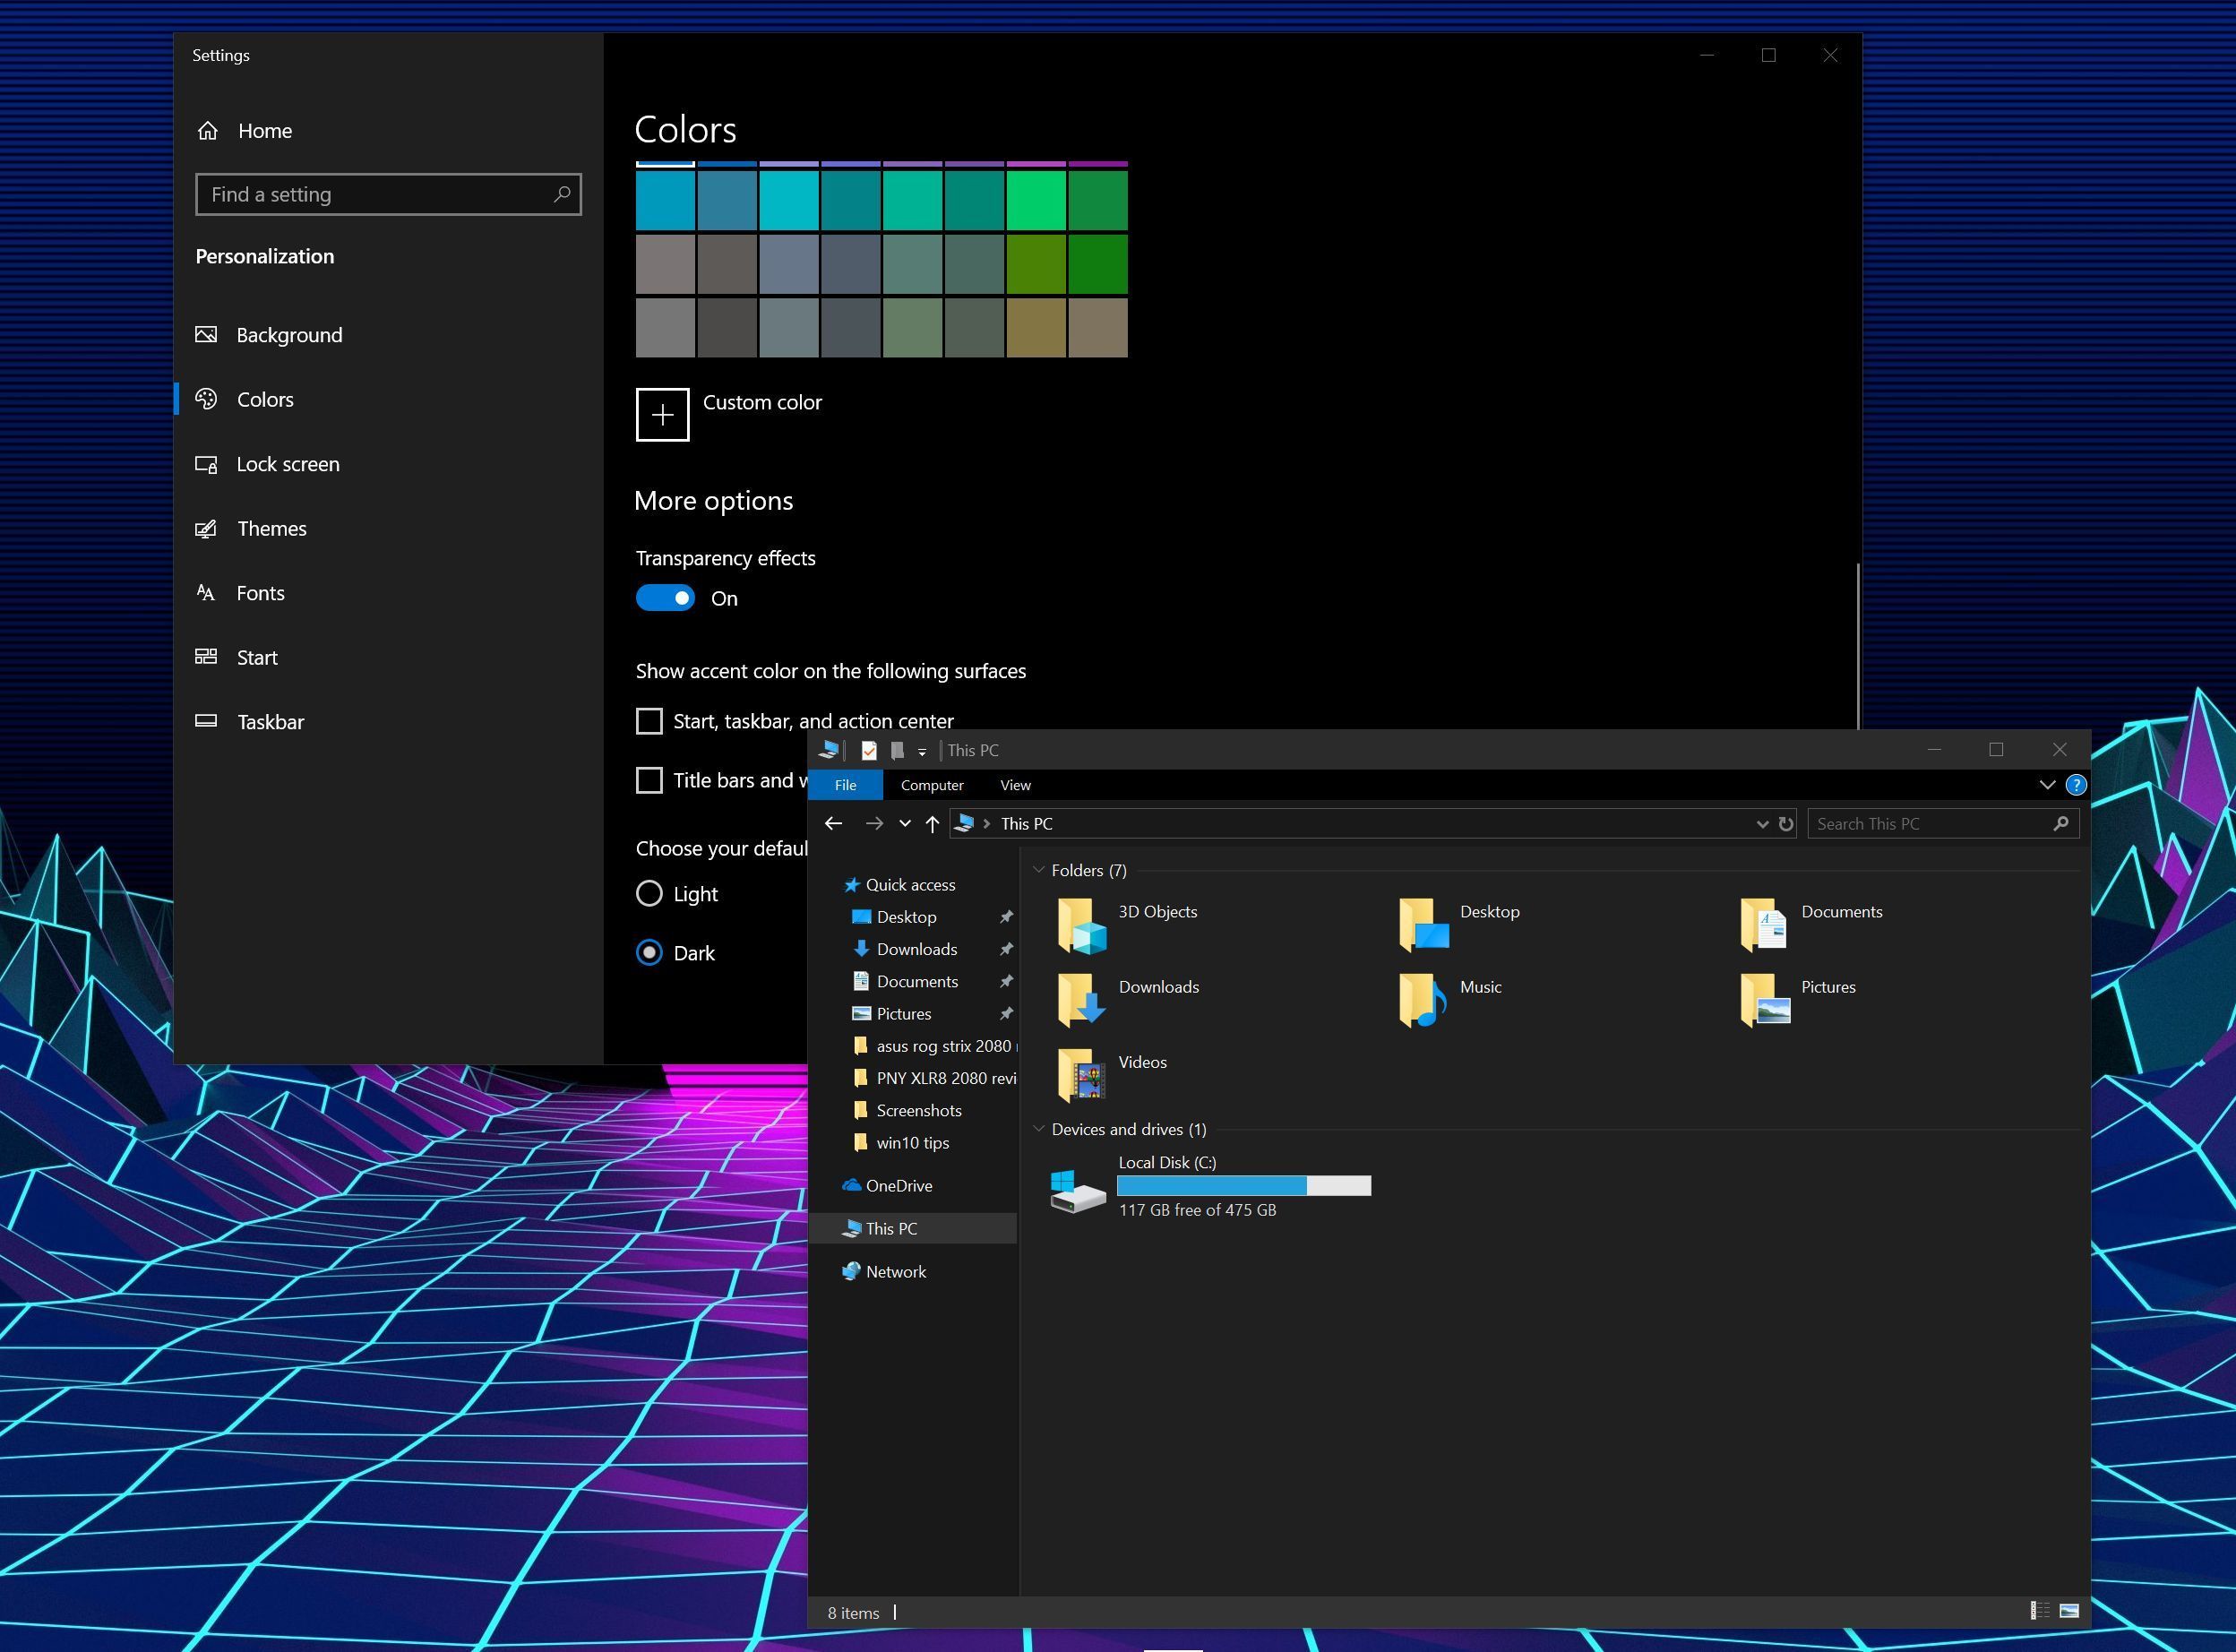
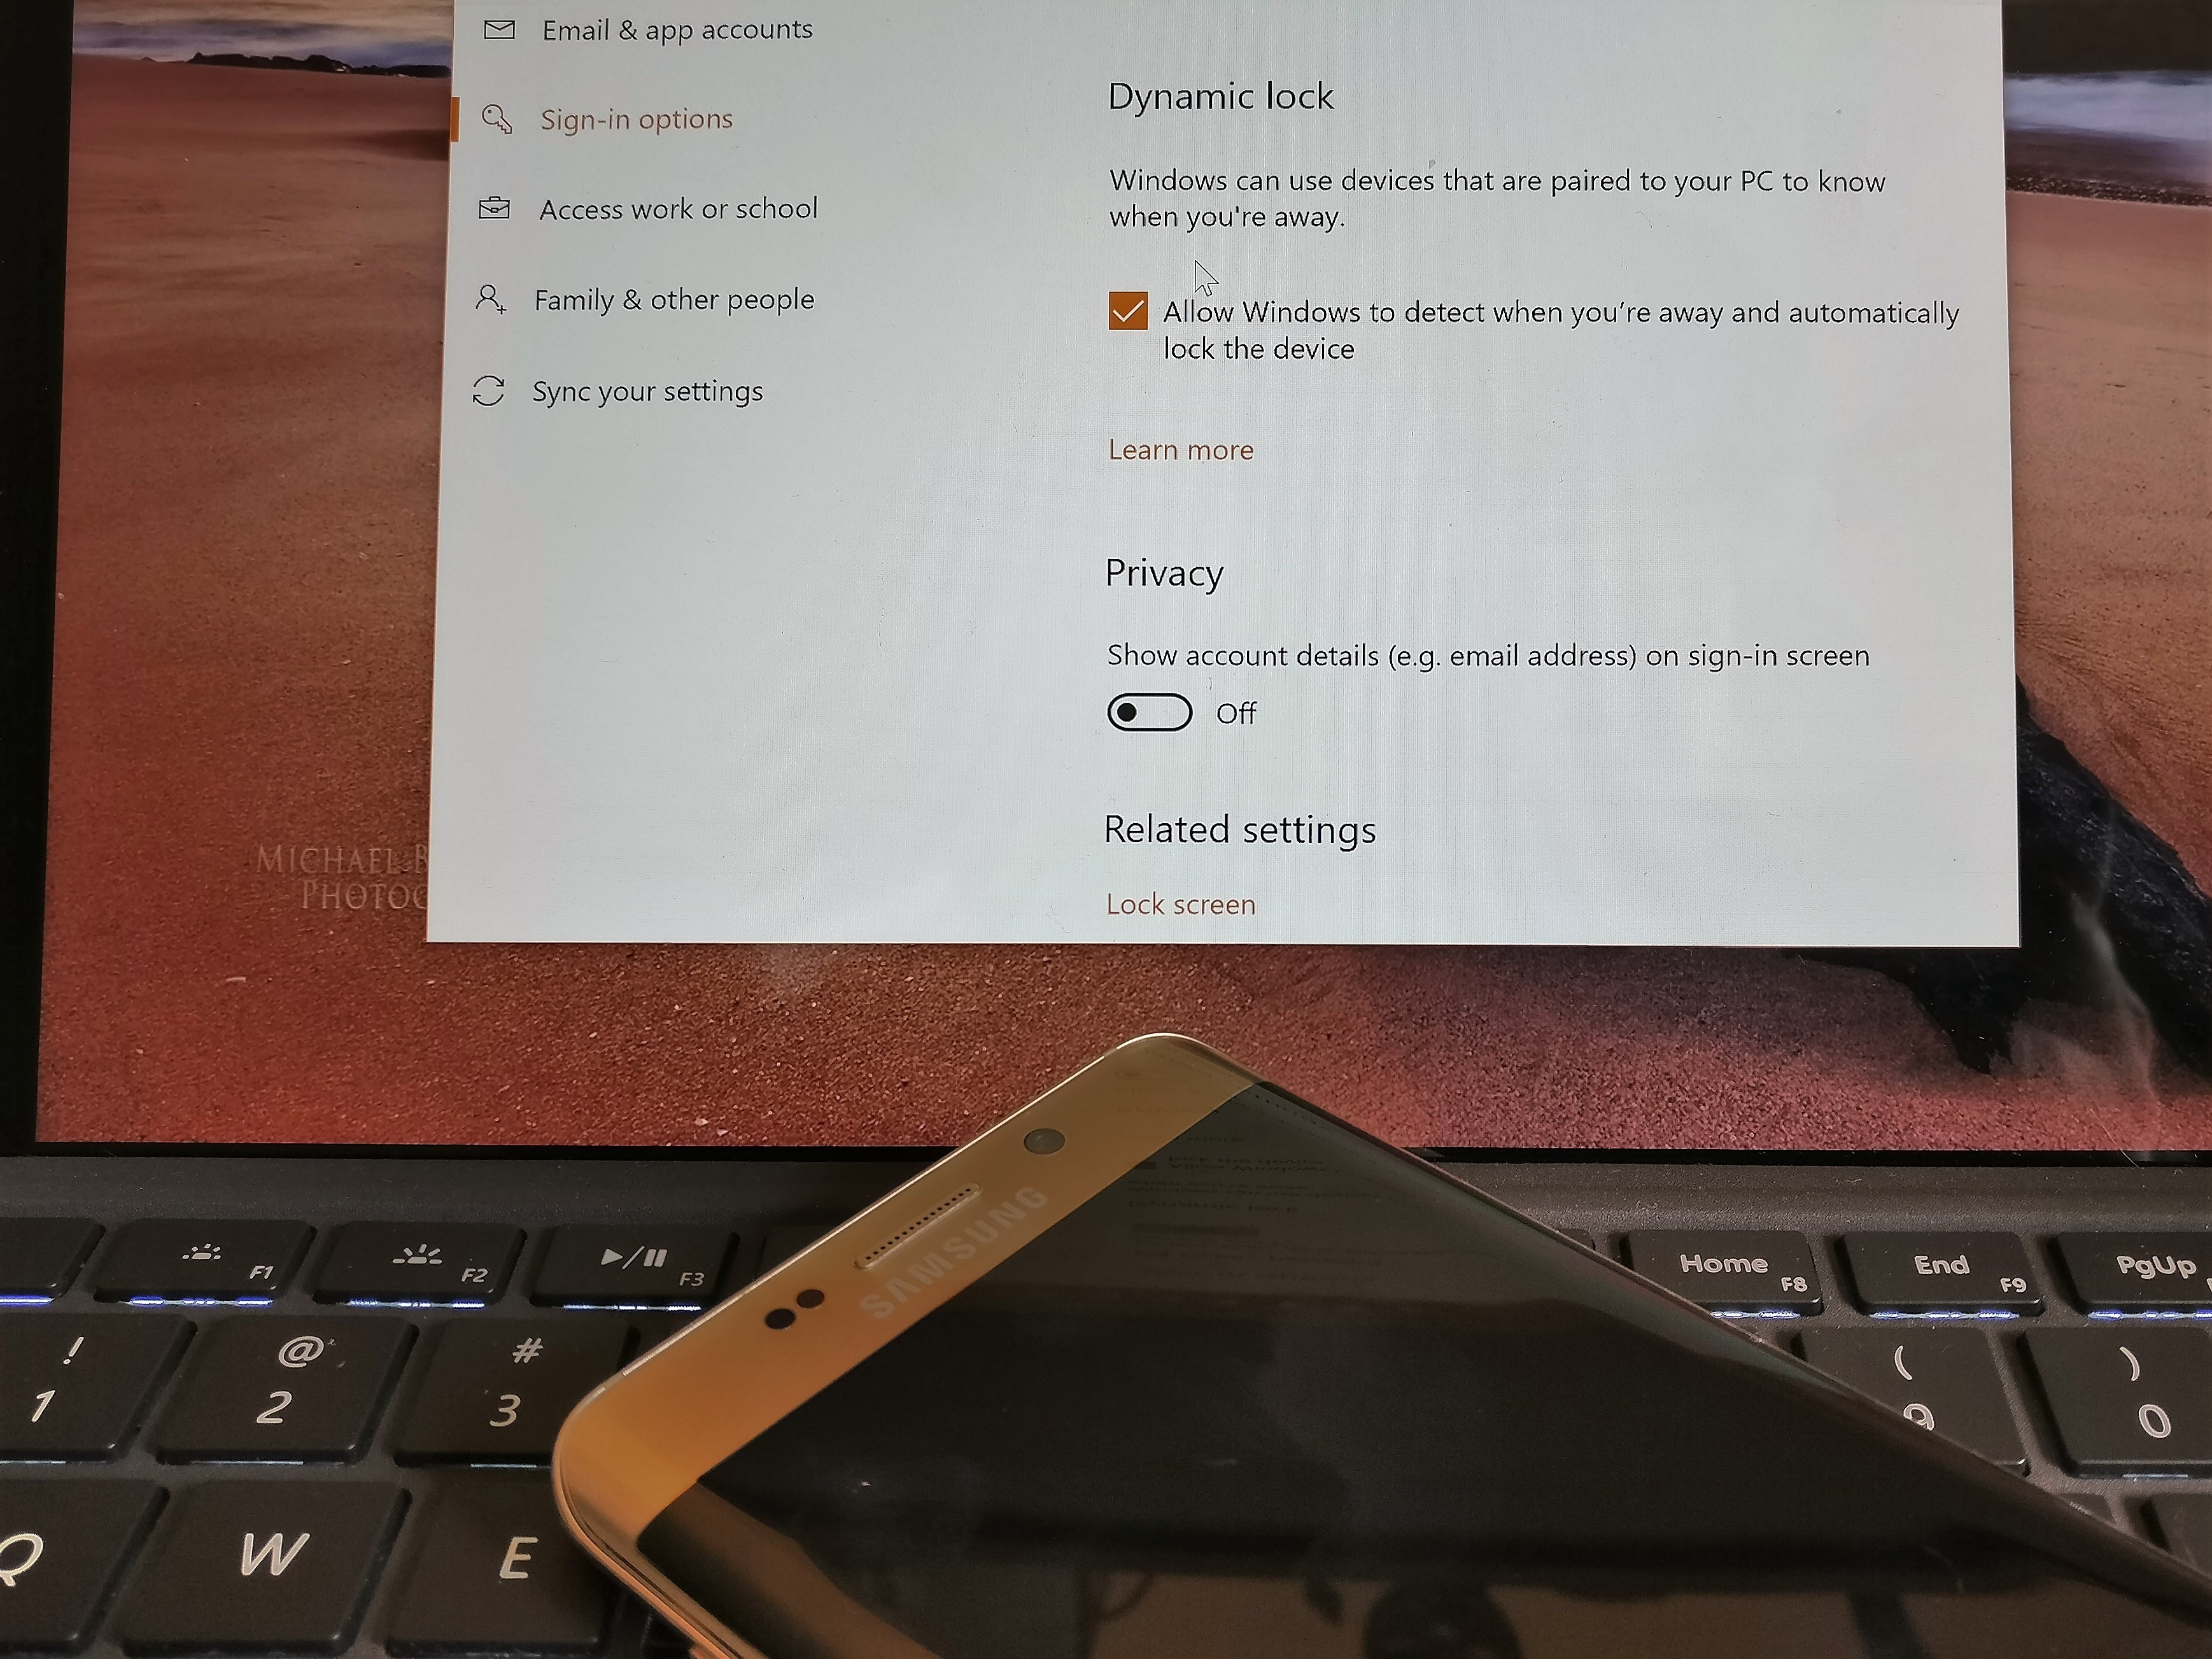
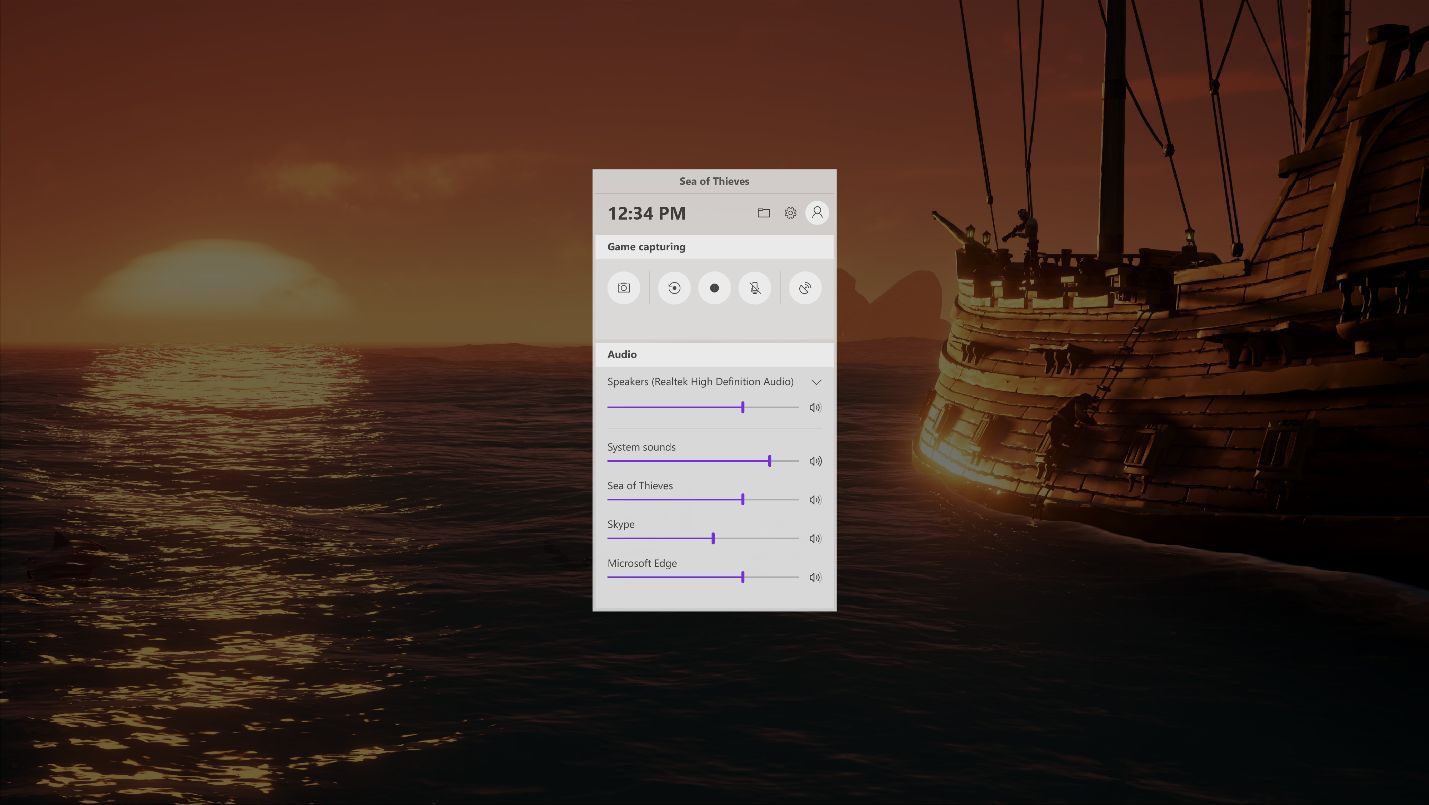
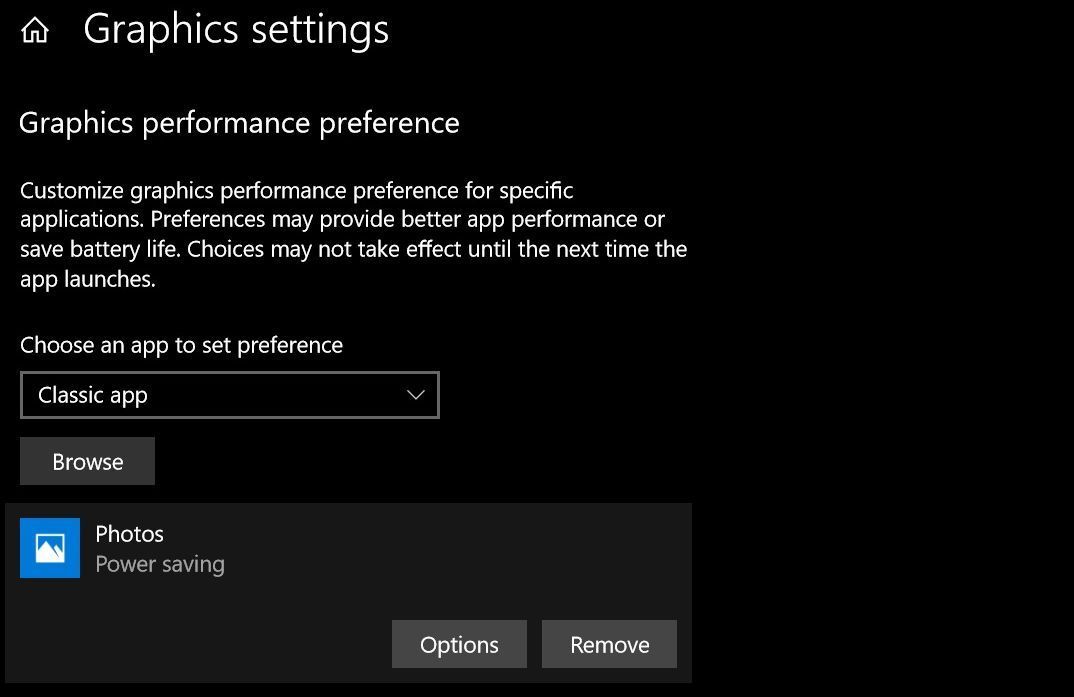
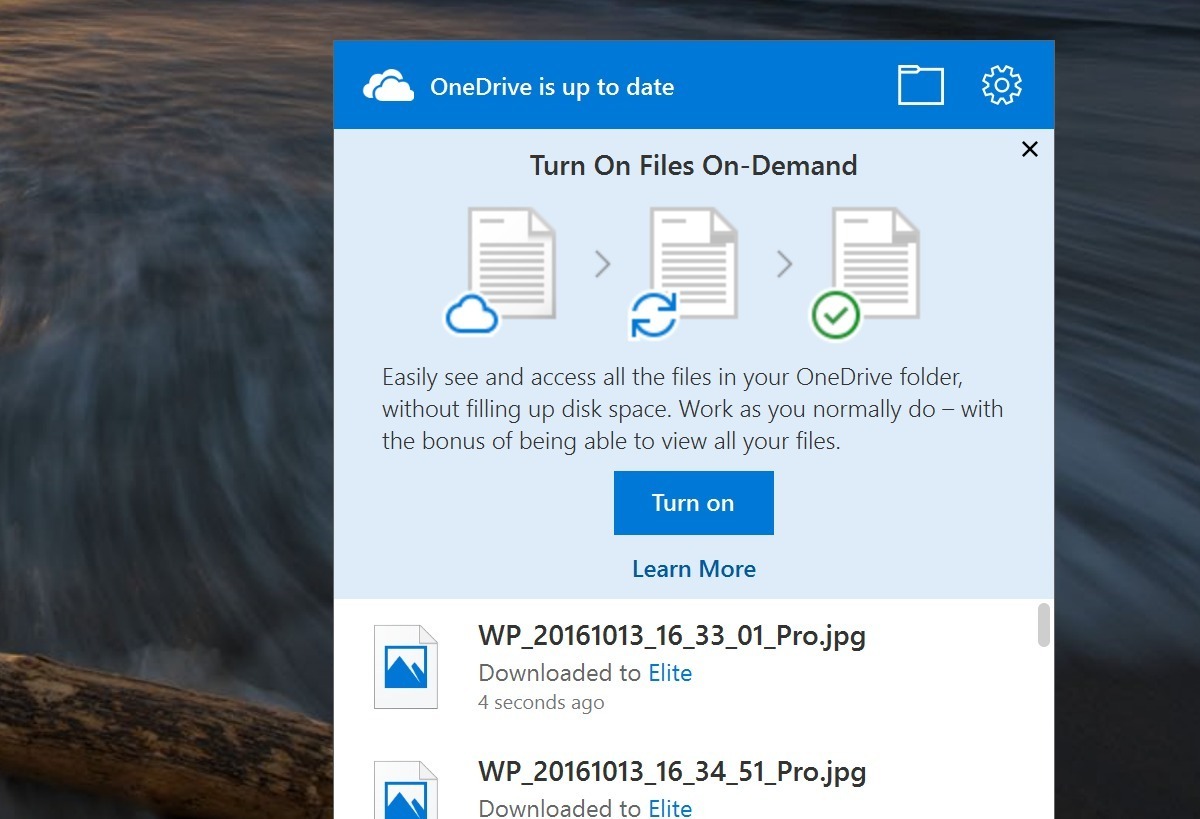
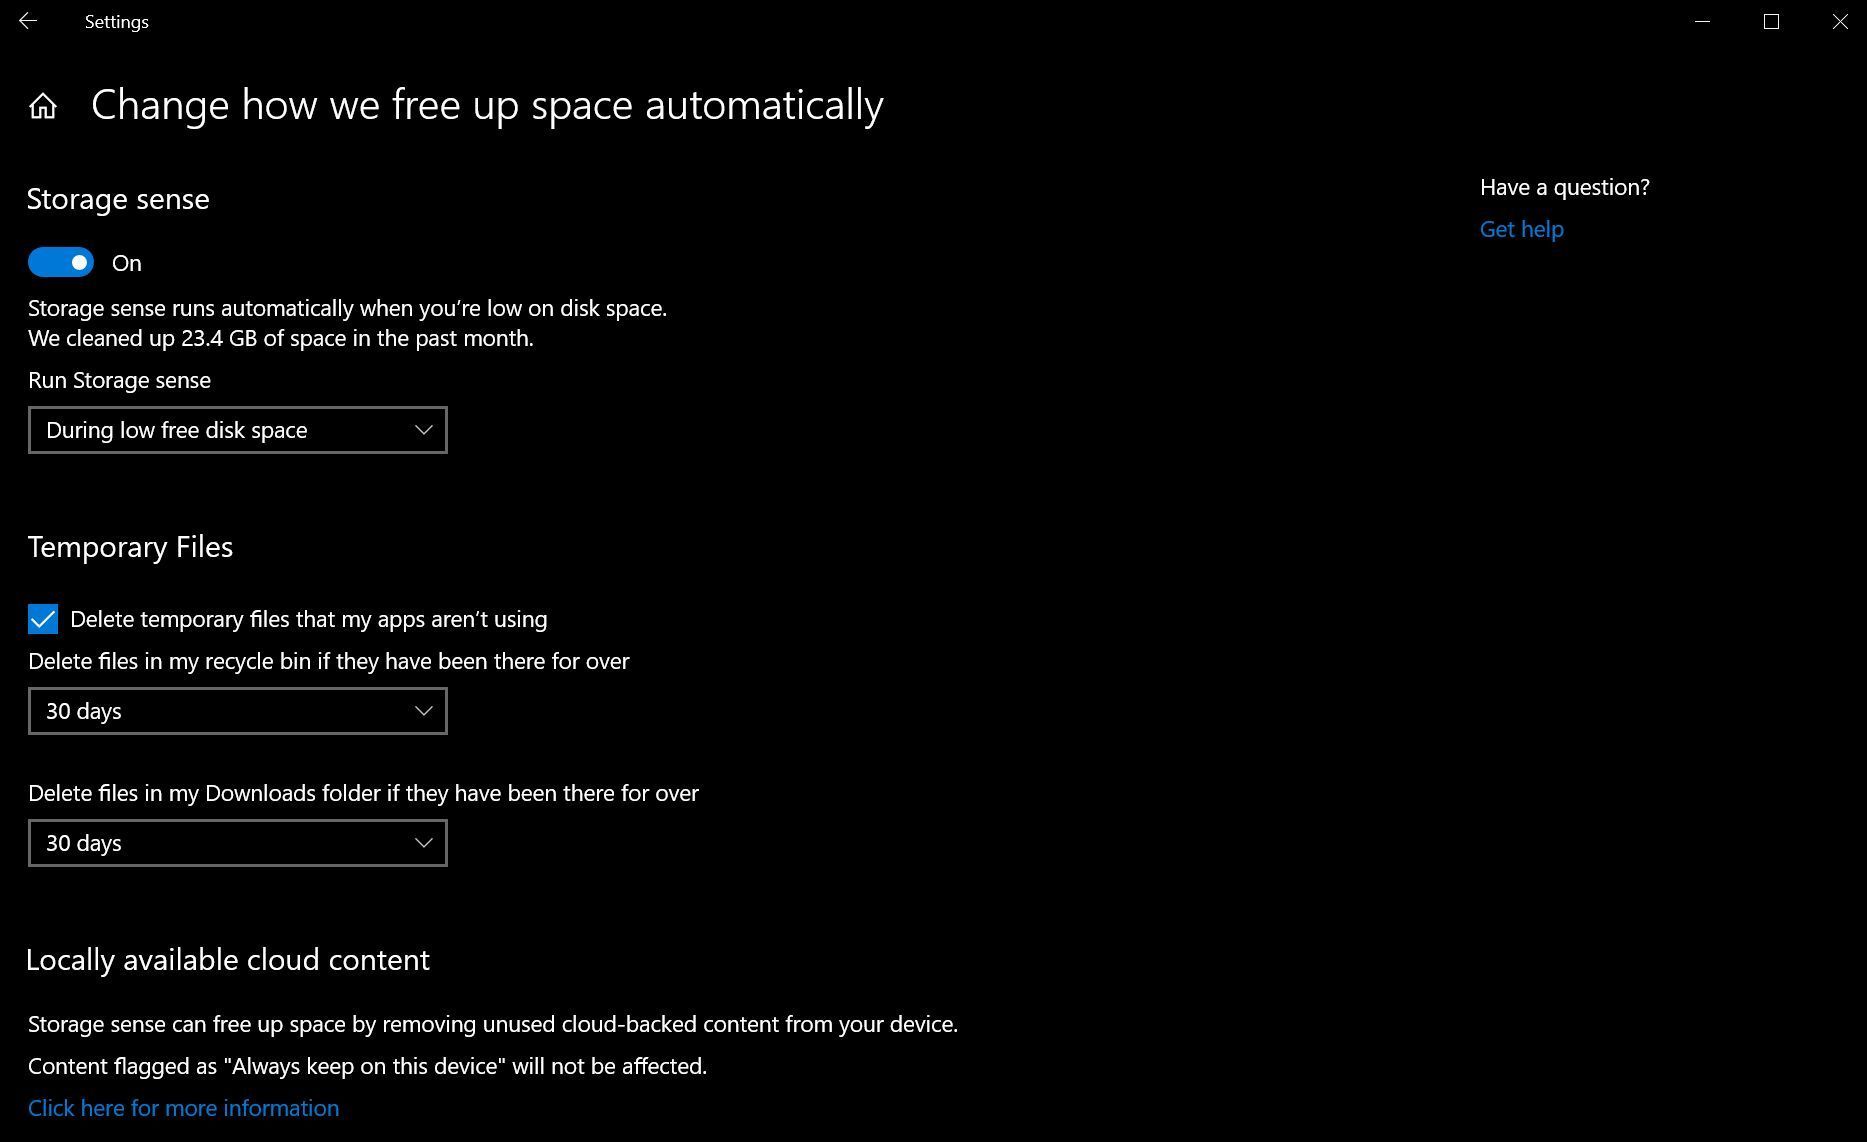
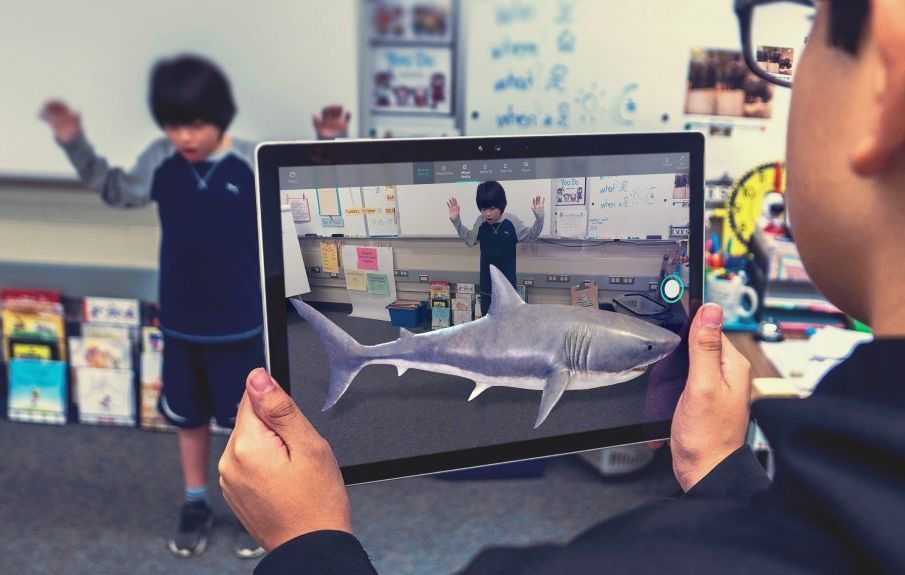
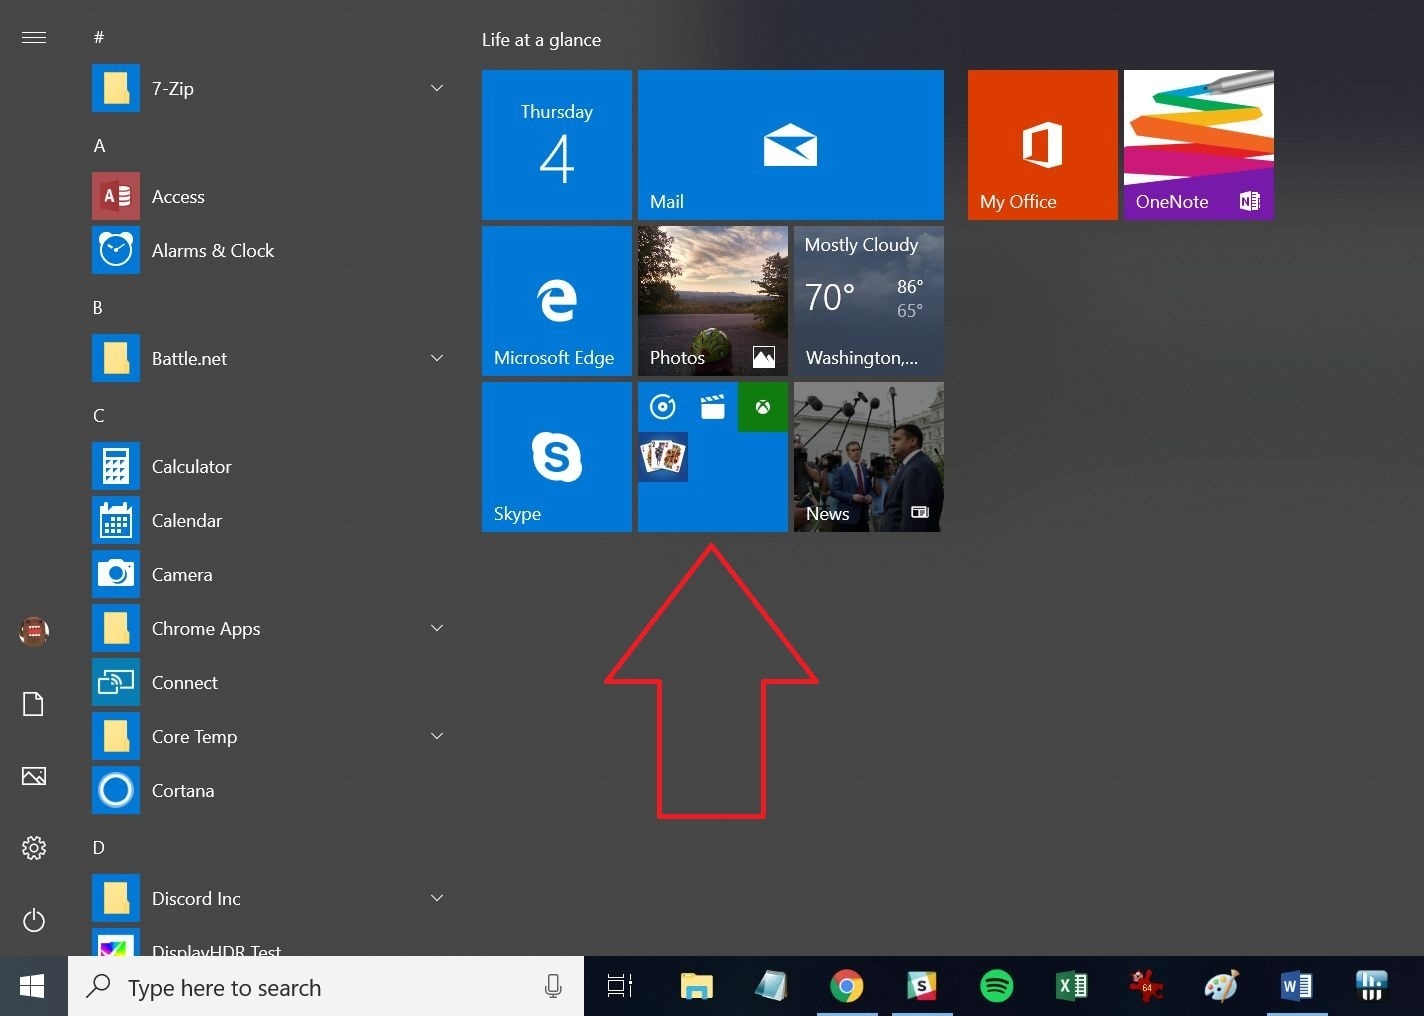
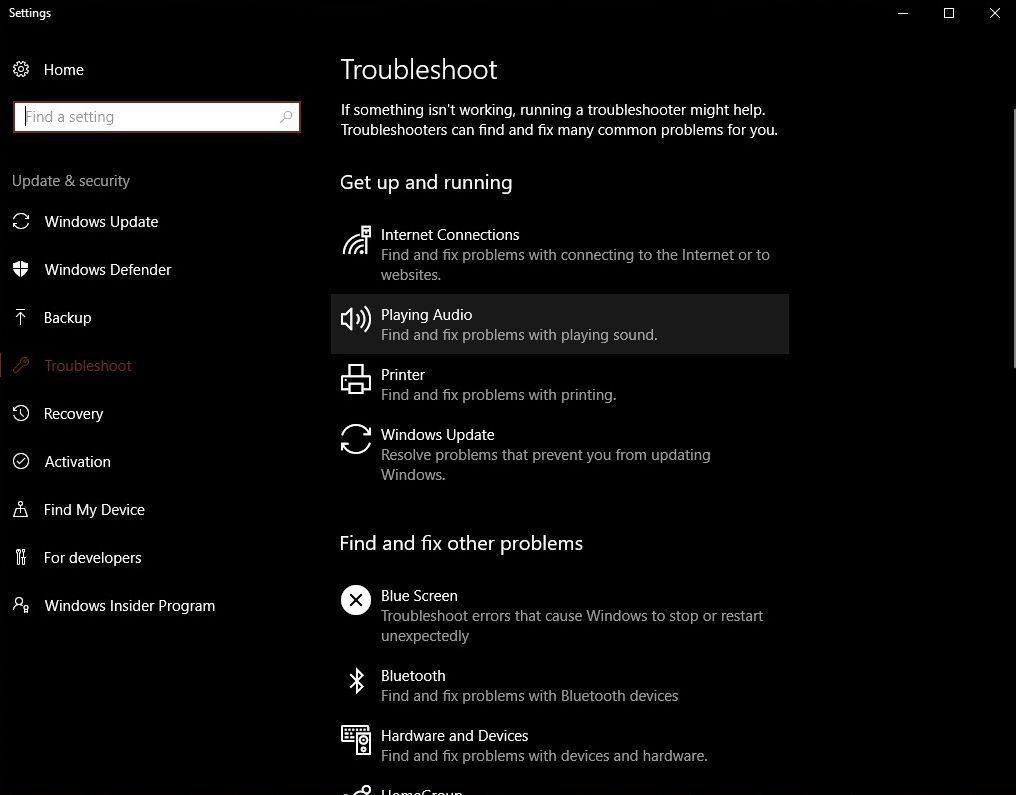
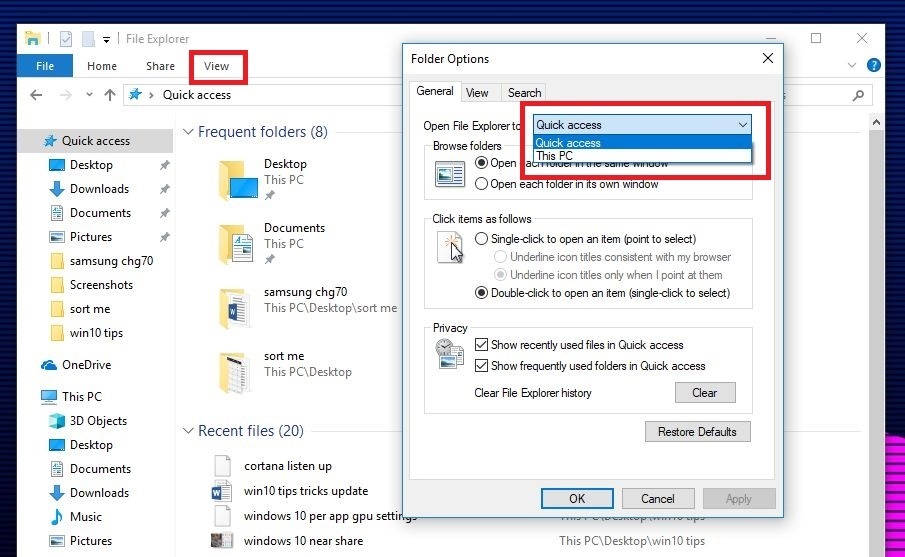
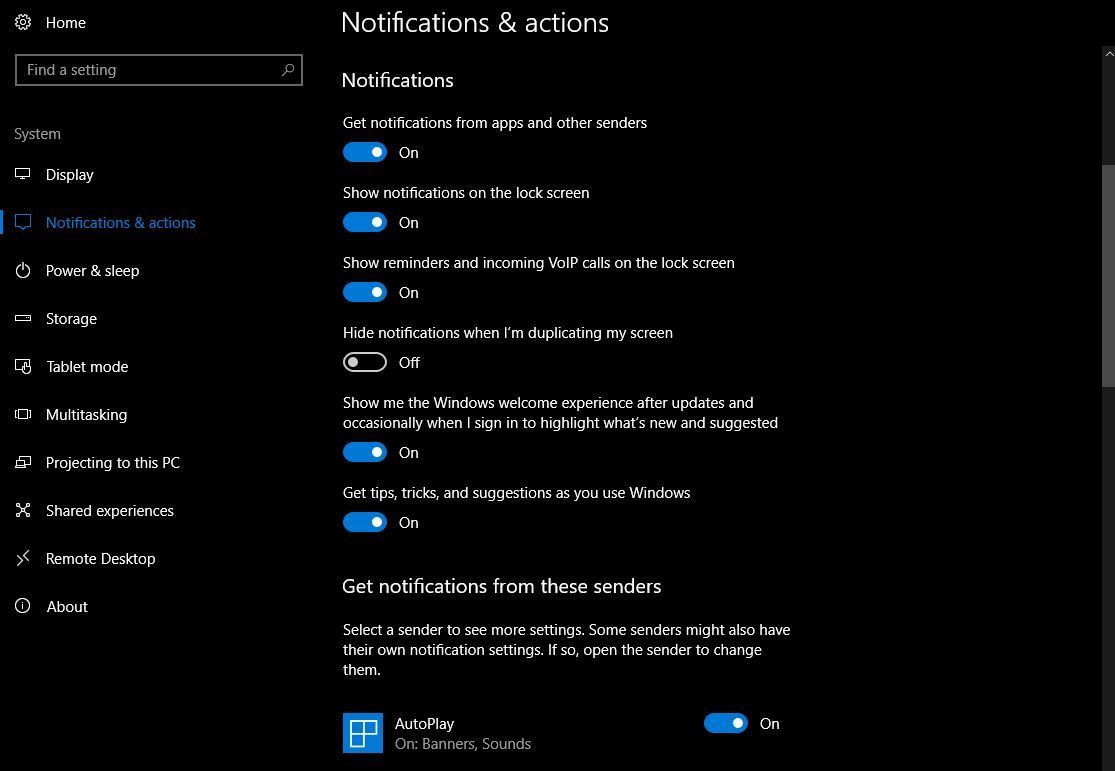
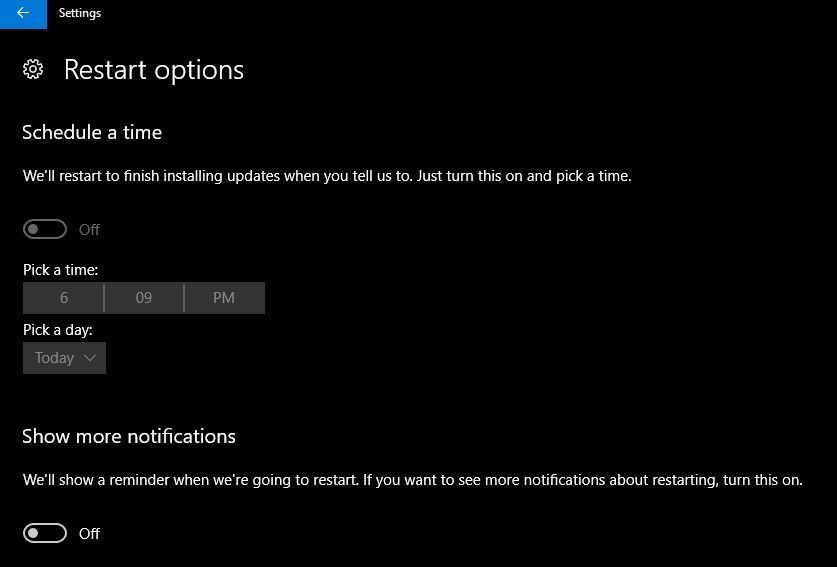
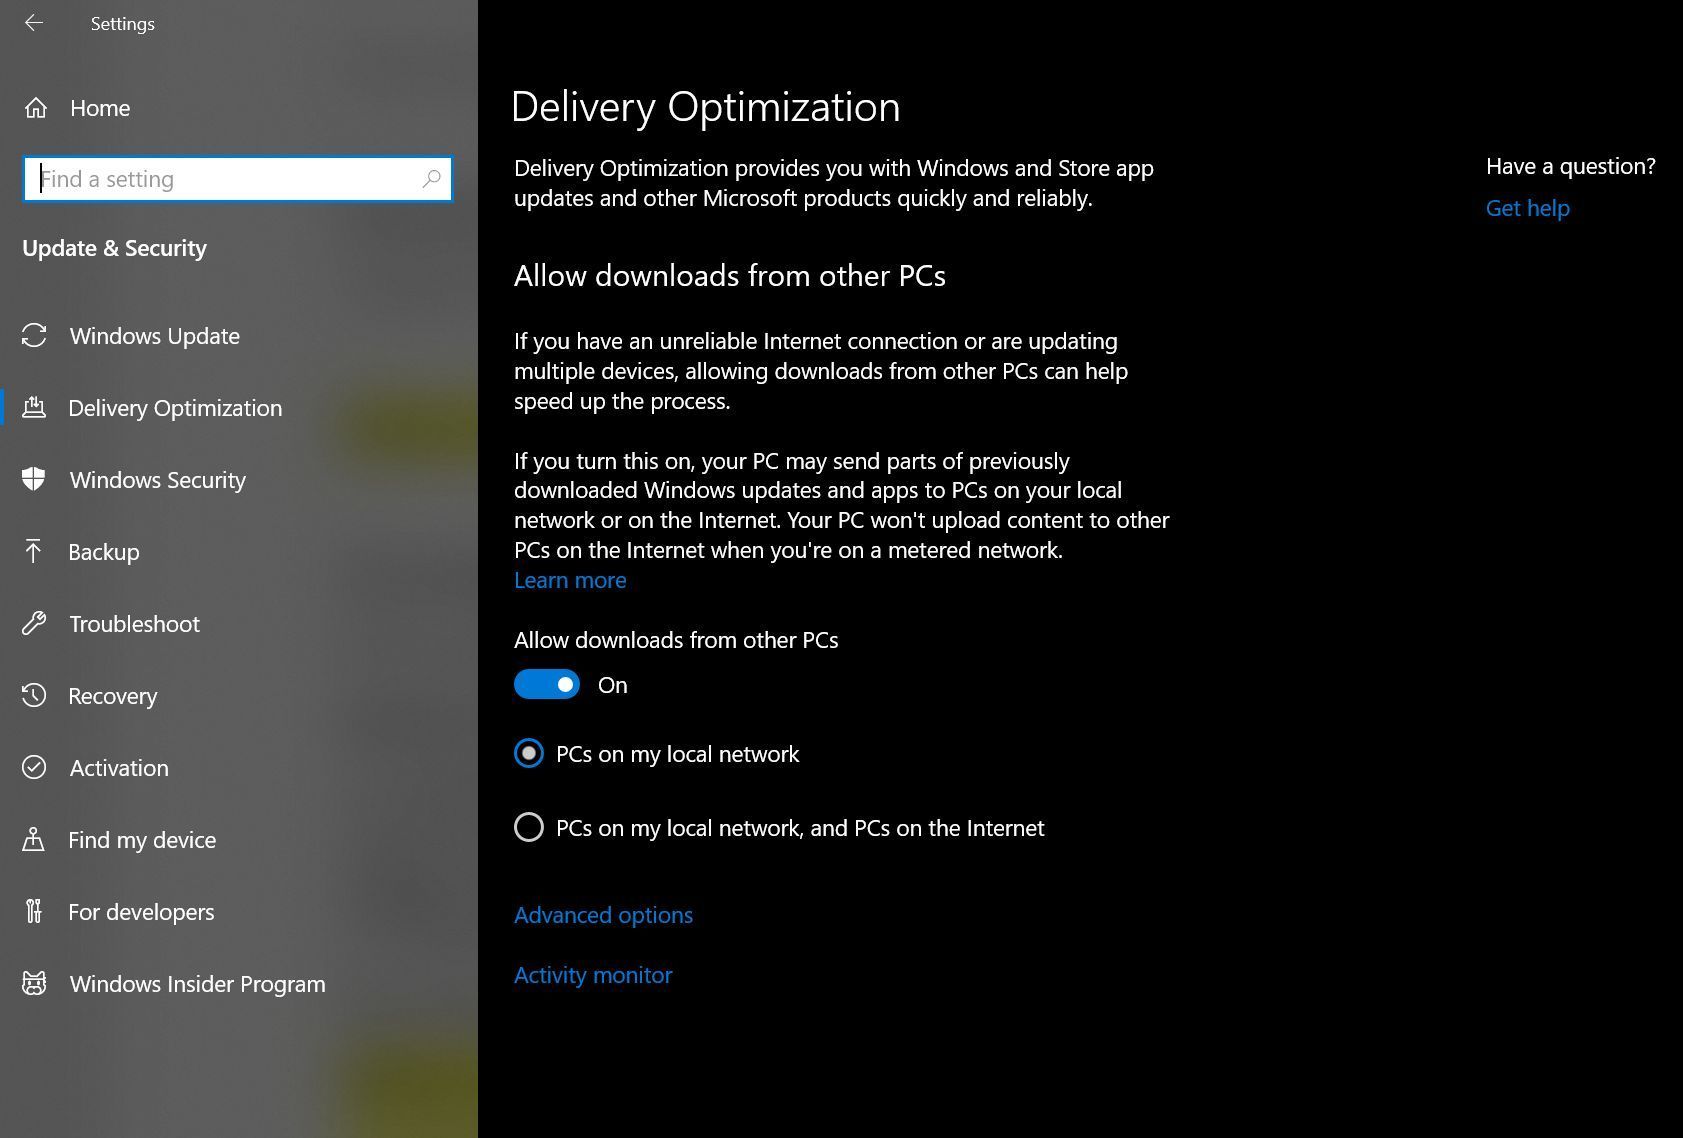

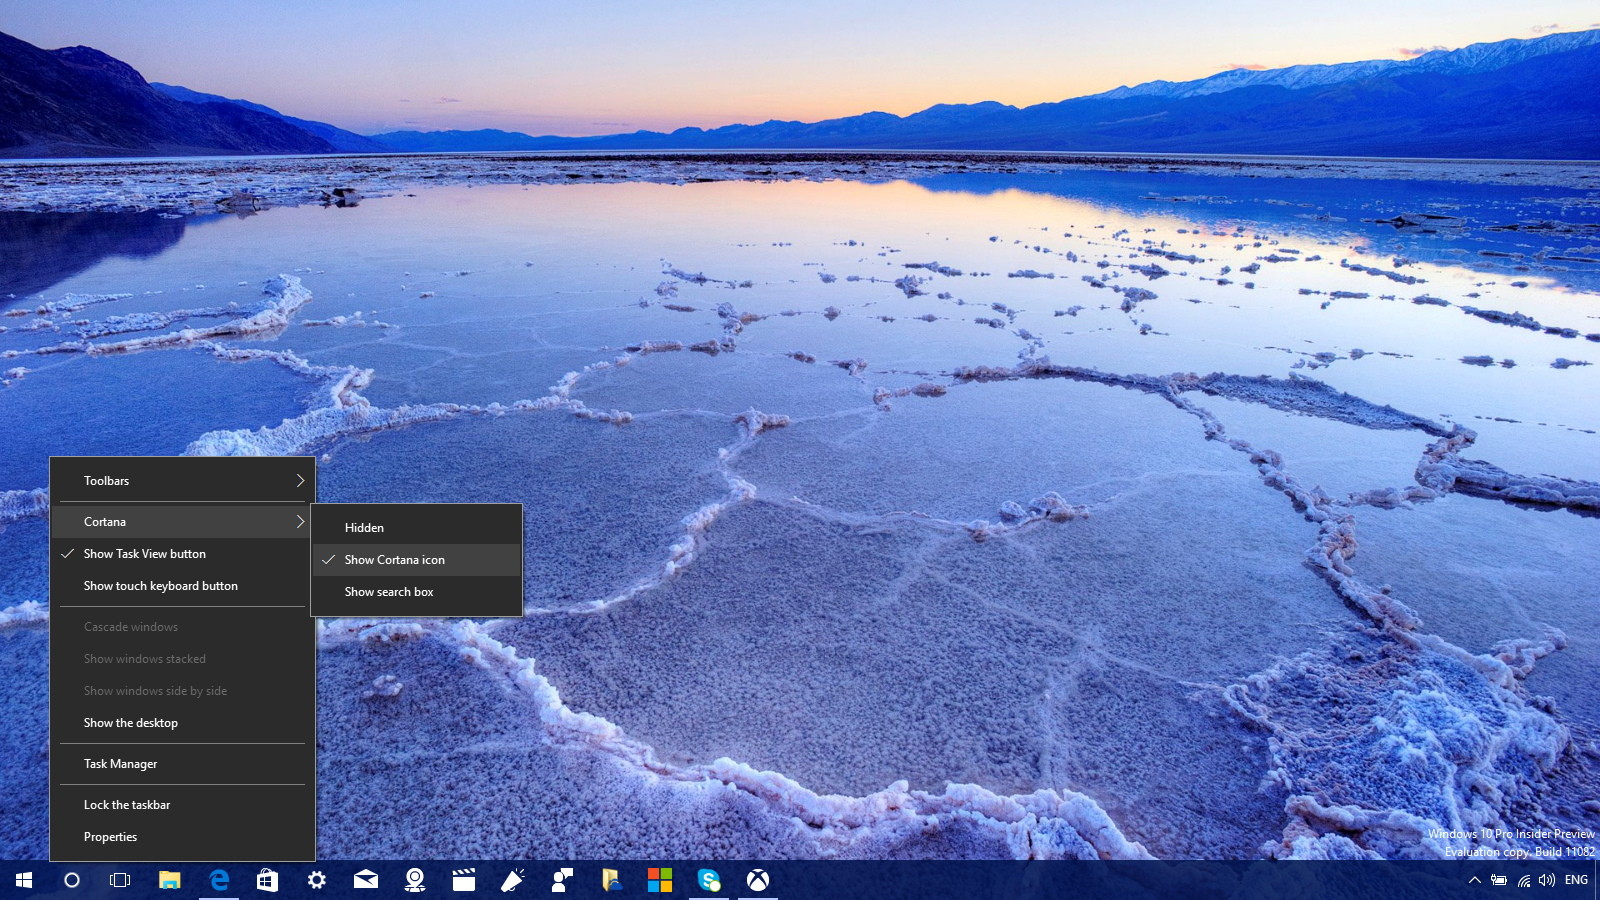

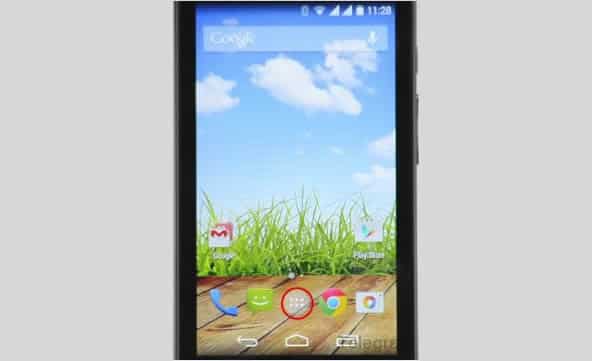
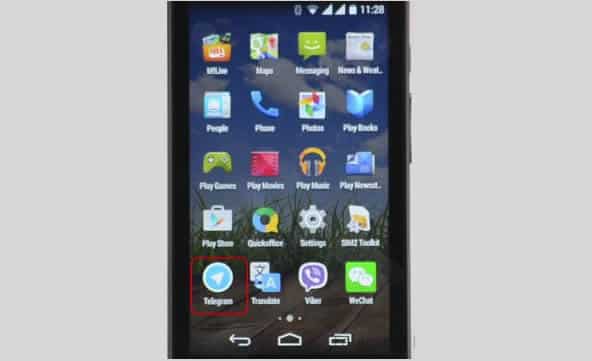
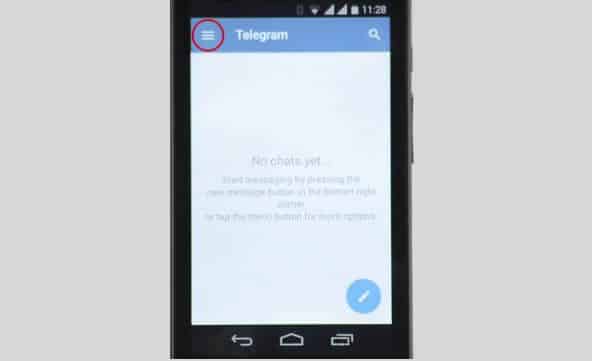
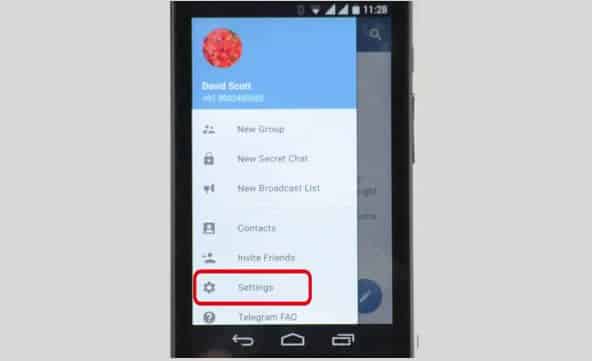
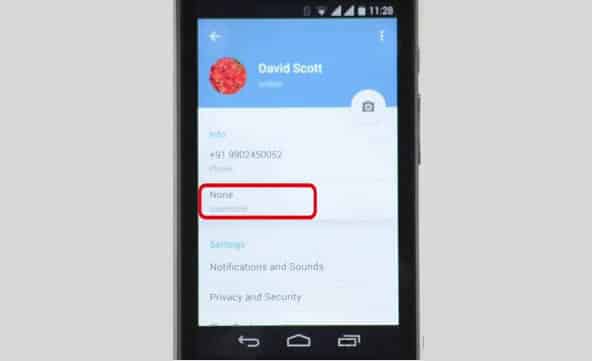
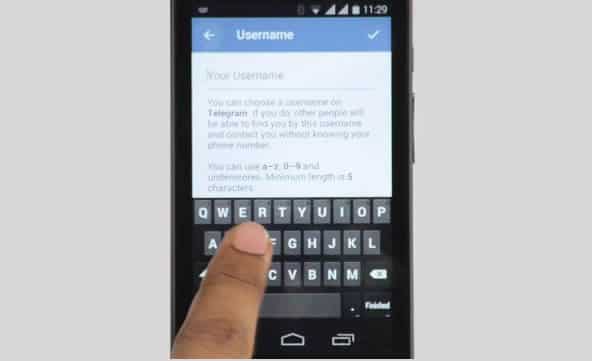
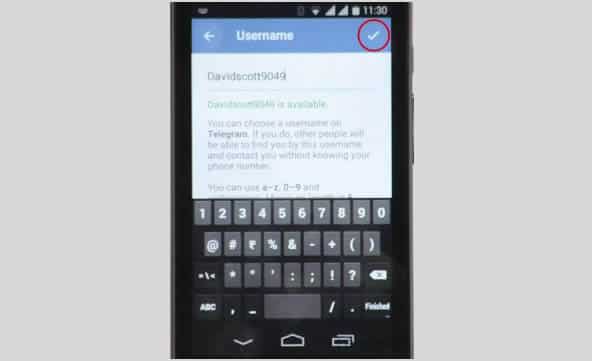
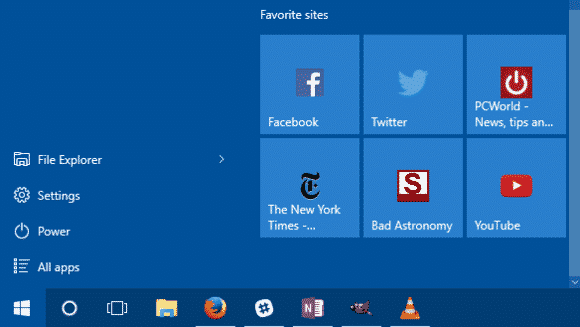
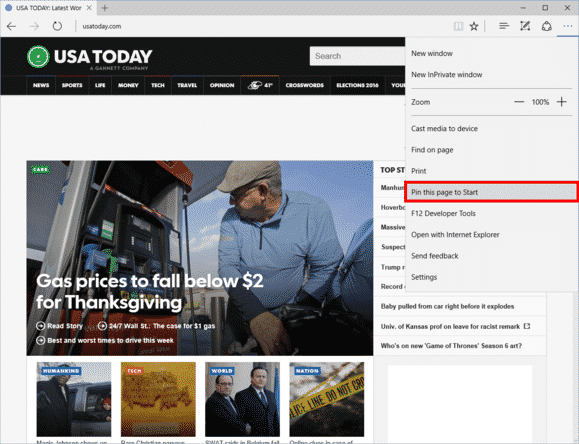
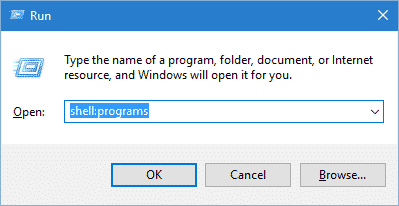
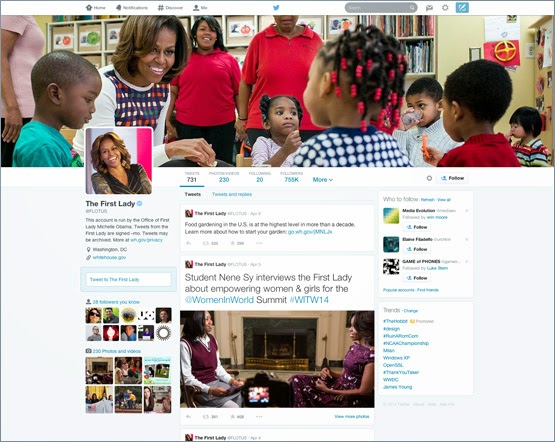

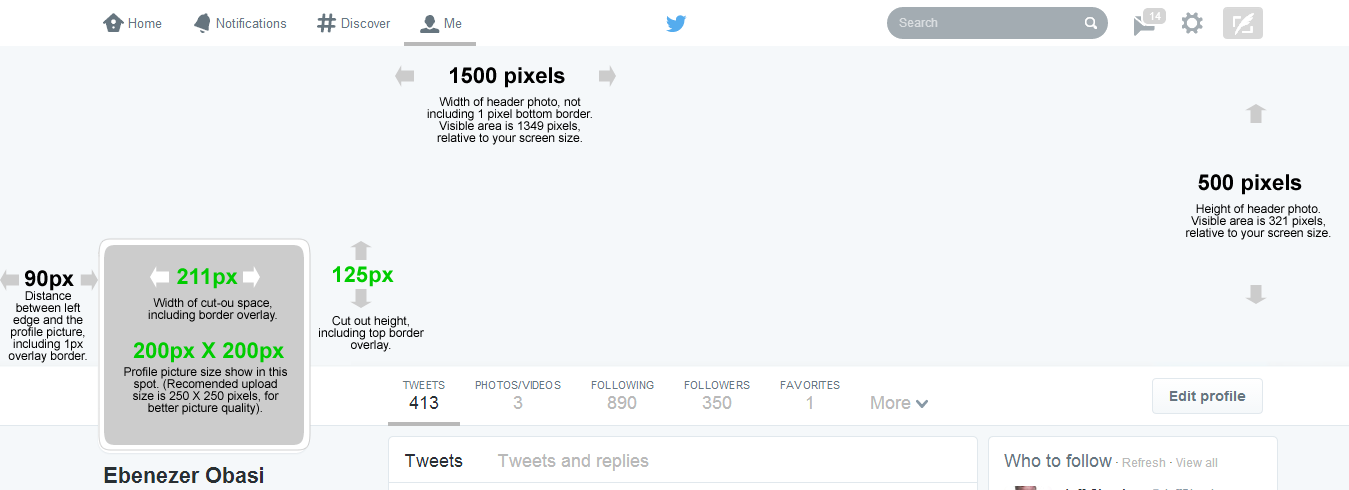
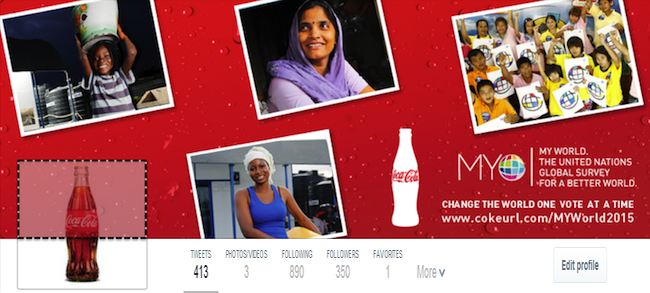
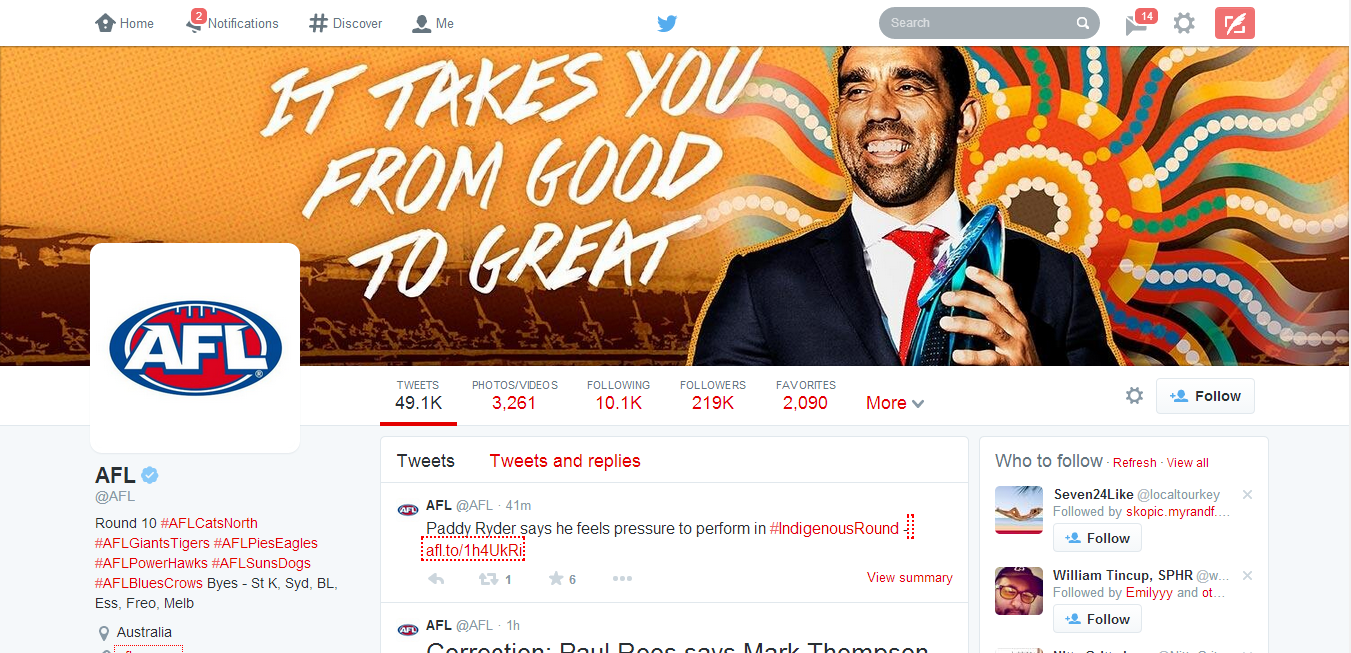
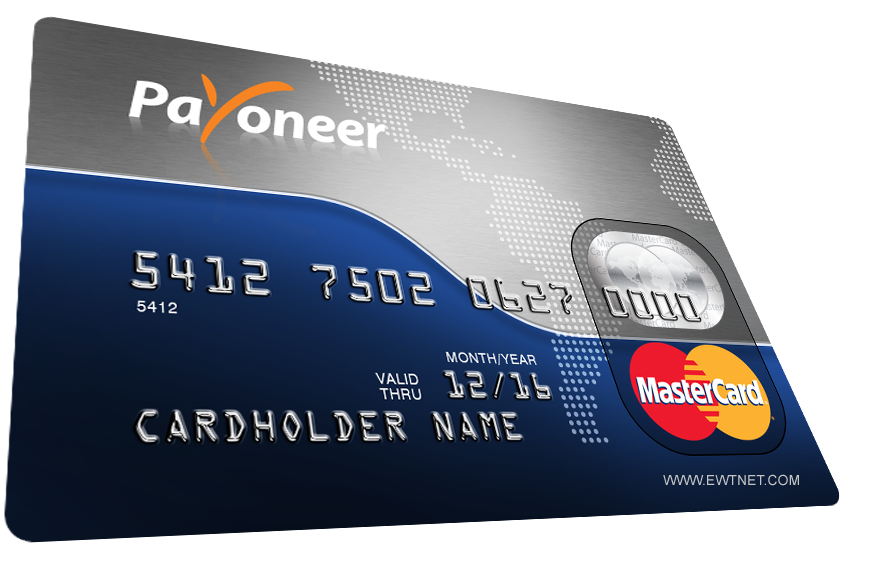
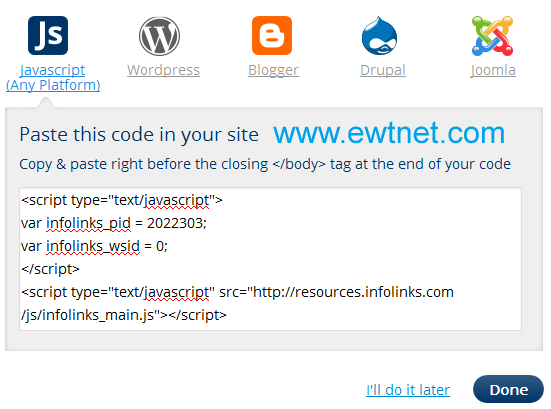
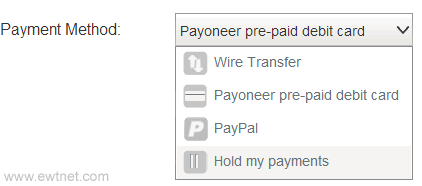
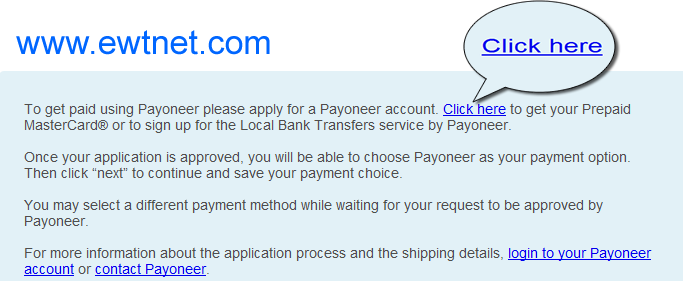

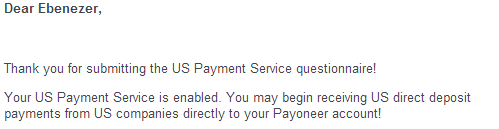
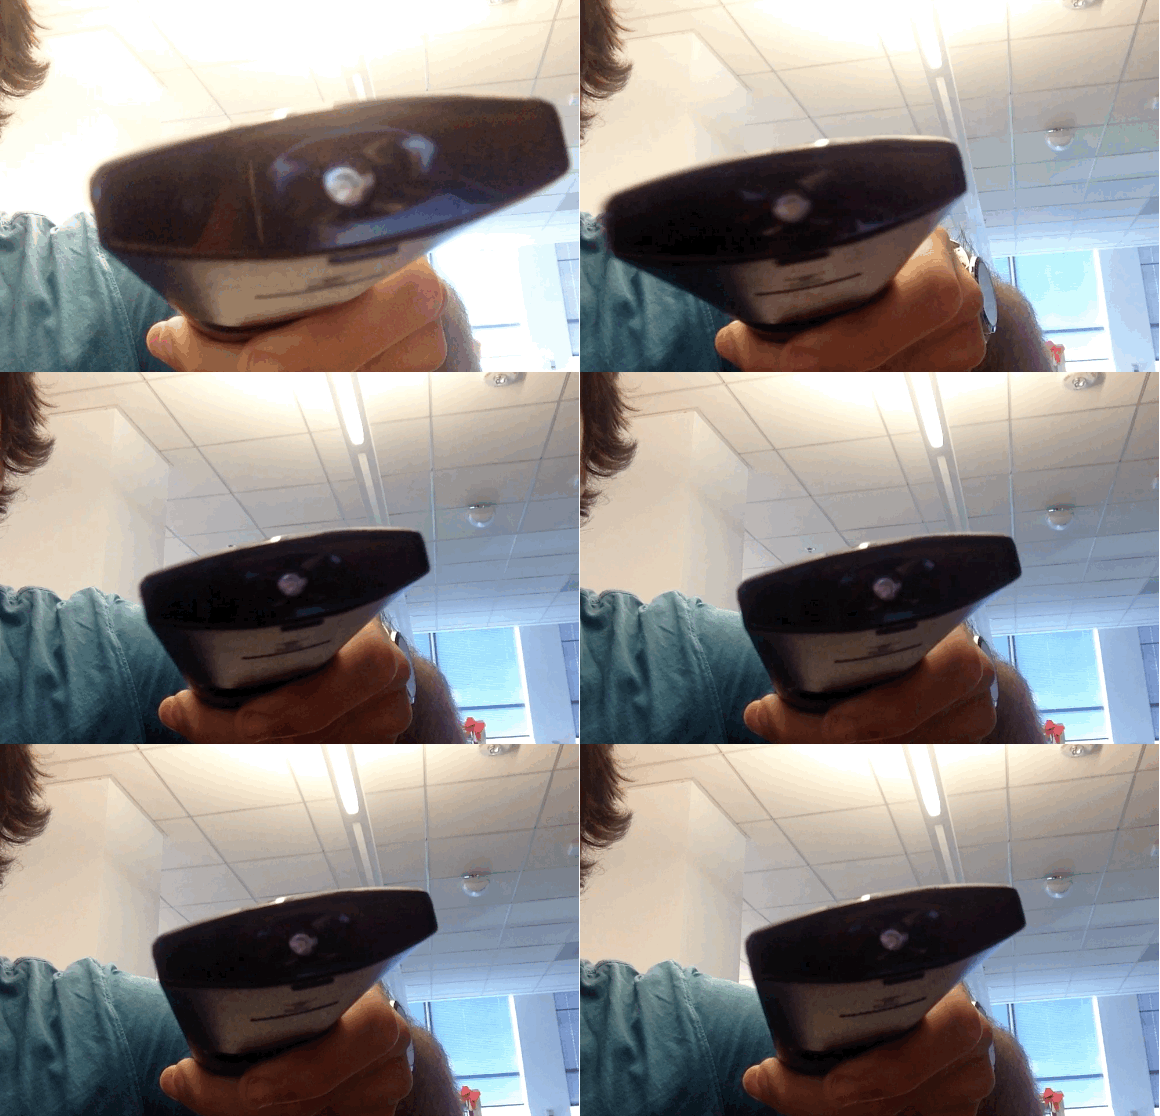
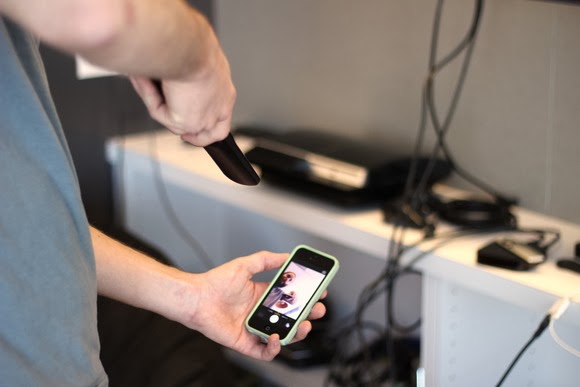

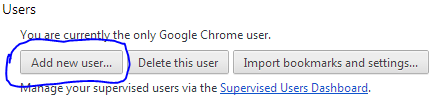
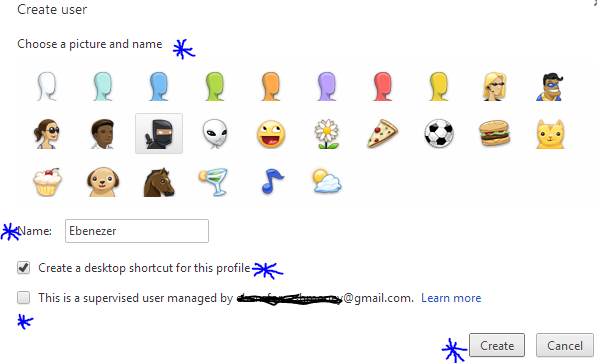
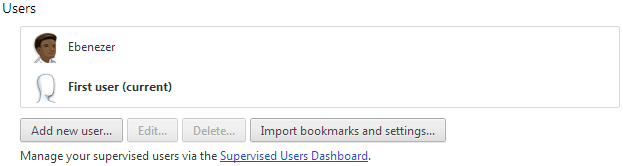
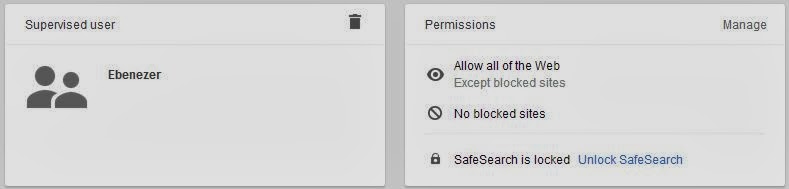



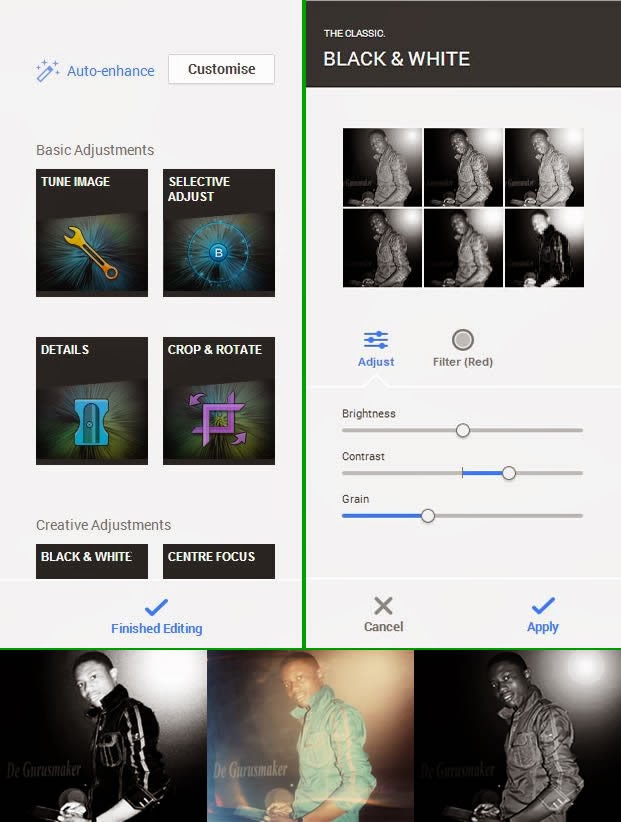
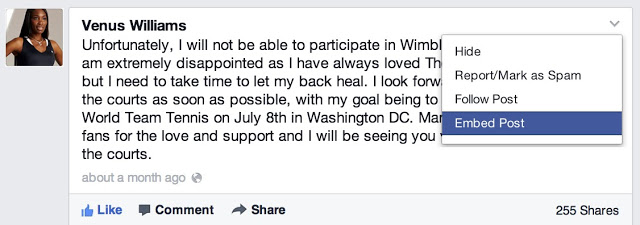
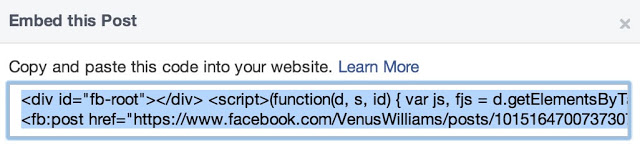
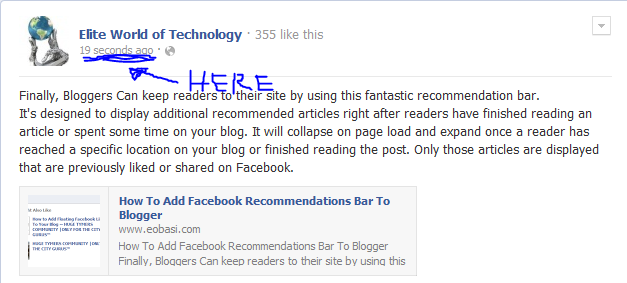
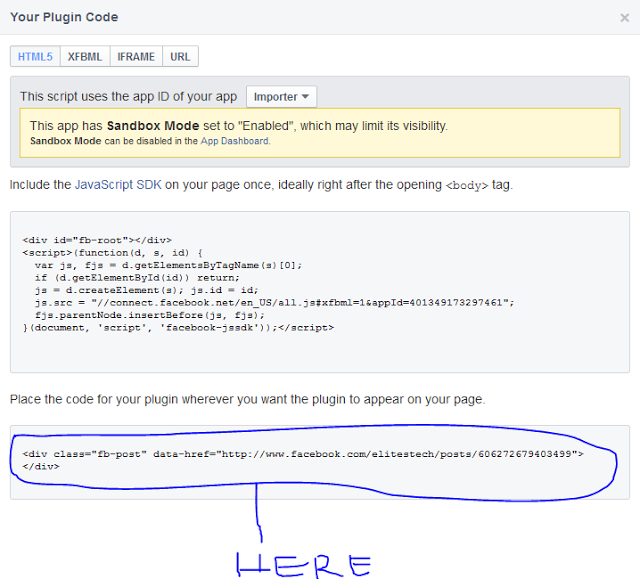


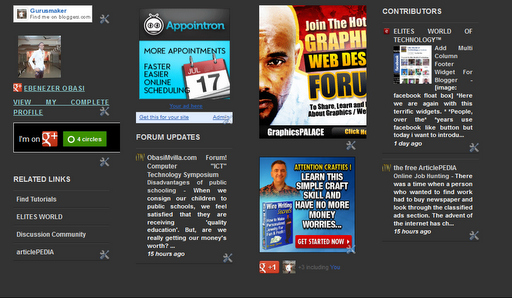
 You can observe that there a total of four columns by default and you can add as many widgets as you want to each column. If you wish to increase or decrease the number of vertical columns then follow the steps below.
 Security breaches of mind-numbing size like those at LinkedIn and eHarmony.com set
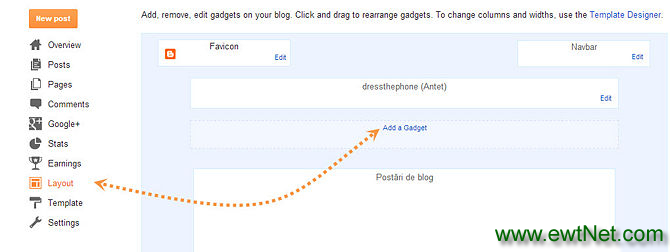
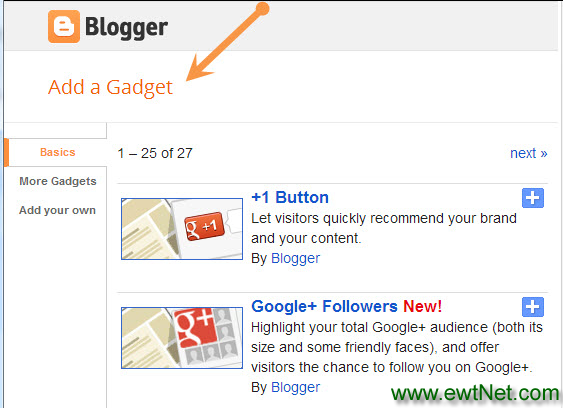
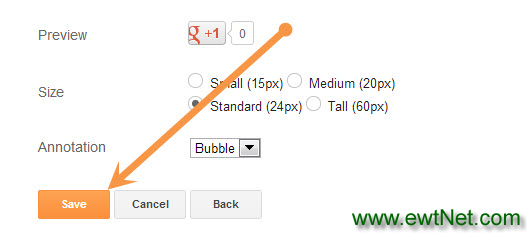
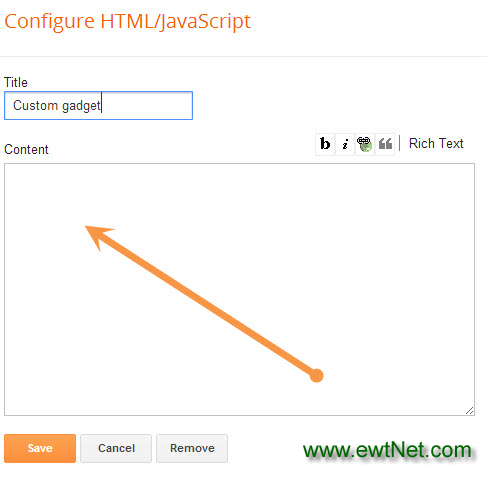
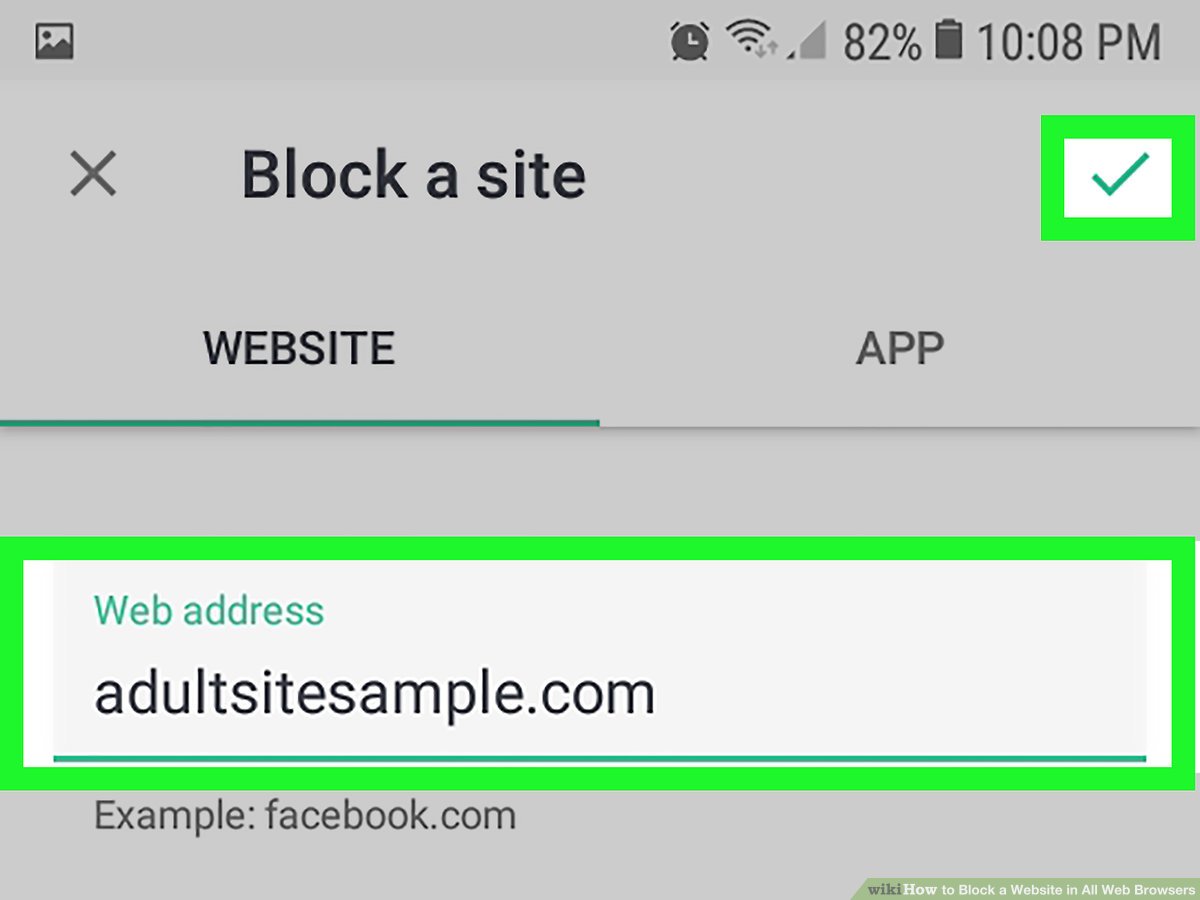

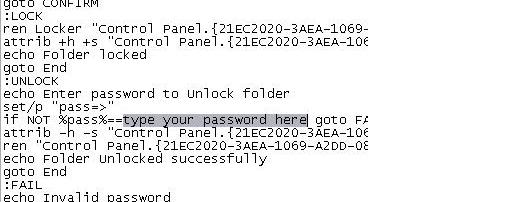


You must be logged in to post a comment.