Tag: protection

  • How to Protect Your Social Network Accounts from Hackers

    How to Protect Your Social Network Accounts from Hackers

    A tech journalist learned a tough lesson recently. But using two-factor log-ons help guard your Google, Facebook, and Twitter accounts from being hijacked. If you haven’t read about Wired reporter Mat Honan’s ordeal at the hands of malicious hackers, take some time and read it now. (I’ll wait.) His story about how a passel of juvenile hackers managed to get into his Apple account and wipe all the data off his iPhone, iPad, and Mac— as well as hijack his Google, Twitter, and Amazon accounts – should be required reading for anyone who uses those services, and especially those of us who’ve blithely linked our social media accounts together using the same e-mail address. Honan didn’t do anything to tick those hackers off. He was targeted simply because they coveted his @mat Twitter handle. Which means that the same thing could happen to you or me just as easily, and we wouldn’t know we’d been jobbed until far too late.
    One thing Honan notes with regret is his failure to turn on two-factor authentication for his Gmail account. If he’d done that, anyone who tried to access his e-mail would have also had to enter a six-digit PIN, which is randomly generated and sent via text message to his phone.
    So your first order of business for today: Setting up two-factor authentication for Google. To do that, you’ll need to go into your Gmail Settings (it’s the icon that looks like a little gear in the upper right corner of your inbox). From there:

    1. Select Settings, then Accounts and Import.
    2. Under Change account settings select “Other Google Account settings”.
    3. That will take you to a Web page for your Accounts. Select Security from the left-hand menu. You may be prompted for your password again.
    4. Under “2-step verification” you’ll see “Status: OFF.” Click the Edit button next to that. That will take you to a Web page wizard that will walk you through the process of having a six-digit verification code sent to you via text or a robo-call.


    Enter the code into the appropriate box, and you’re all set – for that device, anyway.
    Admittedly, this is not as easy as simply using a password. You’ll have to do this for every device and every application that uses your Gmail logon, and every device and application doesn’t work exactly the same way. For example, I was able to log on to Gmail using a PIN on my desktop, laptop, and iPad, but not my Android tablet or Windows smartphone. For those, I had to set up separate one-time-use “subtokens” that look something like this: fztz dgpm oxfi uthb.
    You’ll need to go back to the Accounts Security page and select the Edit button next to “Authorizing Applications and sites” to set up disposable passwords for each device and app. You can also use this tool to manage your list of trusted devices and applications, and revoke access to them at any time.
    So that covers Google. What about Facebook? Here, too, you can beef up your security settings with two-factor authentication. This will prompt you to enter a similar SMS code whenever you log onto Facebook from a new device. The drill is remarkably similar:

    1. Go to your Facebook Account Settings page (found under the down arrow next to the Home tab).
    2. Select Security from the menu on the left.
    3. Under “Login Approvals” click edit and put a check in the box that appears (see below). You may have to adjust your browser settings to accommodate the cookie that Facebook wants to deposit.
    1. In the dialog box that appears, click “Set up now.” You may be prompted again for your Facebook password and to add your mobile phone number if you haven’t provided one already.
    2. Click Continue. If you’ve done this correctly you should receive a six-character PIN. Enter that and the name of your device into the dialog boxes that appear.

    Like Google, this won’t work with every device or application Facebook supports (like the Xbox or Skype). So again you’ll have to generate a disposable app password, which you can do via the same Security Settings dialog box. If you have an android device, you can download a free Code Generator app that can produce usable passcodes without having to send you a text.
    Twitter does not offer two-factor authentication at this time. But you can make it harder for attackers to reset your password by changing a setting in your profile that requires you to provide additional info, such as an e-mail address or phone number, when requesting a new password.
    From your Twitter profile page, click Edit your profile. Then go into your Account settings, scroll to the bottom, and put a checkmark in the box next to “Require personal information to reset my password.”

    The flaw in all of these schemes: If the attackers manage to get hold of your phone as well as your log-ons. Then, my friend, you’re totally screwed.
    Credits:
    For more computing news, visit ITworld. Story copyright © 2011 ITworld Inc. All rights reserved.
  • Protect Yourself From DNSChanger

    Protect Yourself From DNSChanger

    If the DNSChanger rootkit has infected your PC, you’ll lose access to the Internet when the FBI shuts down DNSChanger’s surrogate DNS servers. Here’s how to determine whether you’re infected, and what to do if you are.

    In July the Internet Systems Consortium will permanently shut down DNS servers deployed to serve as temporary surrogates for rogue DNS servers shut down as part of Operation Ghost Click, an FBI operation that brought down an Estonian hacker ring last year. If your PC is one of the more than 1 million computers infected that carry DNSChanger you might unknowingly be relying on one of the FBI’s temporary servers to access the Internet, and if you don’t eliminate DNSChanger from your PC before the FBI pulls the plug on its servers, you’ll be left without Internet access. Read on to learn how to discover whether you’re infected with DNSChanger, and what you can do to eliminate it from your system.

    How to Tell Whether DNSChanger Has Infected Your PC

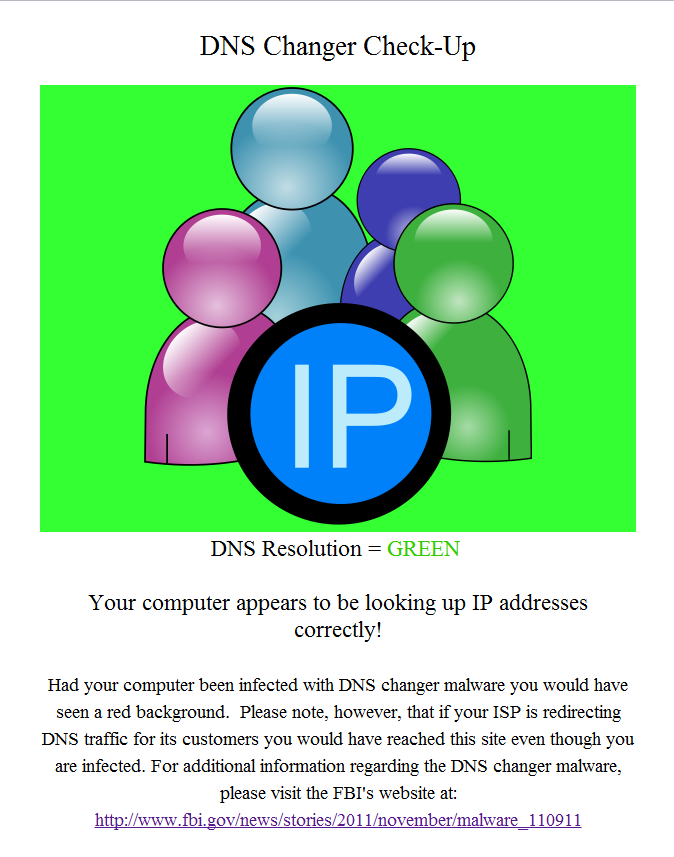
    The DNSChanger Check-Up websites will automatically check which DNS servers you’re using; it will let you know that your PC is clean by flashing a green background.To figure out whether you’ve been infected with DNSChanger, just point your Web browser to one of the (admittedly amateur-looking) DNSChanger Check-Up websites that Internet security organizations maintain across the globe. The link above will take you to a DNS Changer Check-Up page in the United States that the DNS Changer Working Group maintains; if you live outside the United States, you can consult the FBI’s list of DNSChanger Check-Up websites to find an appropriate service for your region.
    Unfortunately, if your router is infected, those websites will think that your PC is infected, even though it may be clean; worse, if your ISP redirects DNS traffic, your PC may appear to be clean even though your DNS settings may have been maliciously altered. If you want to be certain that your PC is free of DNSChanger malware, you need to manually look up the IP addresses of the DNS servers that your PC contacts to resolve domain names when browsing the Web.
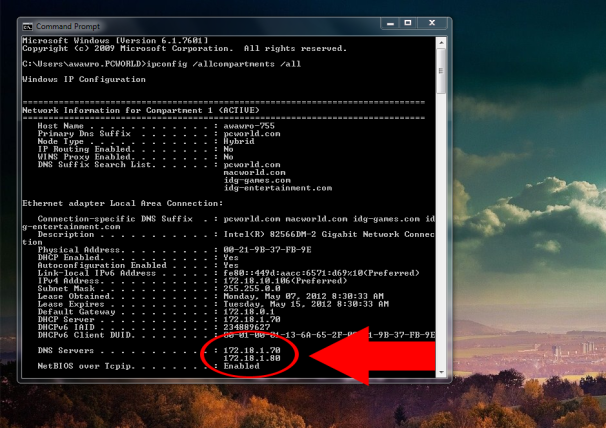
    To look up which DNS servers your Windows 7 PC is using, open your Start menu and either run the Command Prompt application or type cmd in the Search field. Once you have a command prompt open, type ipconfig /allcompartments /all at the command line and press Enter. A big block of text should appear; scroll through it until you see a line that says ‘DNS Servers’, and copy down the string(s) of numbers that follow (there may be more than one string here, meaning that your PC accesses more than one DNS server).
    Use the /ipconfig command; click for full-size image. 
    Use the /ipconfig command to look up the IP addresses of the DNS server(s) that your PC is using.
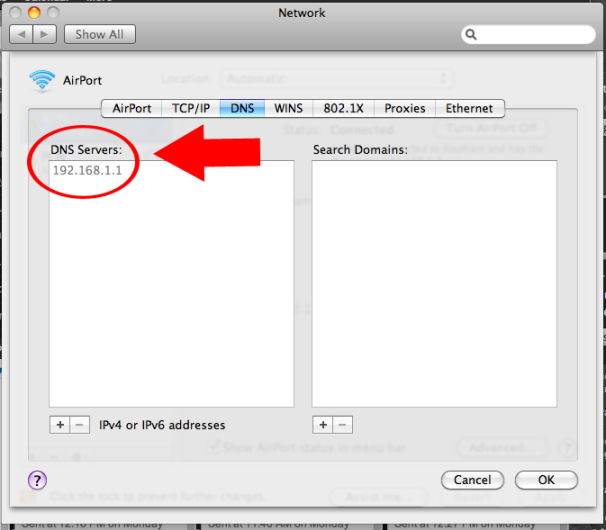
    It’s even easier for Mac OS X users to determine the IP addresses of the DNS servers that their PC uses. Open the Apple menu (usually located in the upper-left corner of the screen) and select System Preferences. Next, click the Network icon to open your Network Settings menu; navigate to Advanced Settings, and copy down the string(s) of numbers listed in the DNS Server box.
    The Advanced Network Settings menu's DNS tab; clcik for full-size image. 
    Mac users can find their DNS server IP address(es) under the DNS tab of the Advanced Network Settings menu.
    Once you know the IP addresses of the DNS servers that your PC is using, head over to the FBI DNSChanger website and enter those addresses into the search box. Press the big blue Check Your DNS button, and the FBI’s software will tell you whether your PC is using rogue DNS servers to access the Internet.

    What to Do If Your PC Is Infected by DNSChanger

    If your PC is infected with DNSChanger, you’ll have to do some intensive work to get rid of it. DNSChanger is a powerful rootkit that does more than just alter DNS settings; if you’ve been infected with DNSChanger, your safest course is to back up your important data, reformat your hard drive(s), and reinstall your operating system. For more information, consult our guide to reinstalling Windows.
    If you’re leery of reformatting your entire PC, you can try rooting out the DNSChanger rootkit with a free rootkit removal utility such as Kaspersky Labs’ TDSSKiller. As the name implies, Kaspersky released the program to help PC owners seek and destroy the TDSS rootkit malware, but it also detects and attempts to eliminate DNSChanger and many other forms of rootkits.
    If the infected PC is on a network, you’ll have to check every other PC on the network for signs of infection, and then check your router’s settings to ensure that it isn’t affected (DNSChanger is programmed to change router DNS settings automatically, using the default usernames and passwords of most modern routers). To do this, copy down your router’s DNS server IP addresses (located in your router’s settings menu; read “How to Set Up a Wireless Router” for more information) and check them against the FBI’s IP address database mentioned above. If your router is infected, reset the router and confirm that all network settings are restored to the manufacturer’s defaults.
    When you’re done, repeat the steps outlined above to verify that your PC is no longer infected with DNSChanger. With all traces of this vicious malware eliminated, you should have nothing to fear when the FBI shuts down the ISC’s temporary DNS servers in July.

  • Lock and Protect your Computer with a Secret Key

    Lock and Protect your Computer with a Secret Key

    With so many cracking tools coming up to break windows password, it’s very difficult to protect your personal computer from unauthorized access. Even BIOS passwords is easy to crack. Nothing is secure and safe these days.
    Now no more worries, I just found a simple trick by which you can easily protect your windows from unwanted usage. This really cool and hidden feature of Windows lets you maintain your privacy of data on your computer even if you are not around.

    What it does is that it adds an extra secret key along with your windows password. So when your computer is started, it first asks for the secret key and then the windows password. Windows password can easily be hacked but you cannot get around this secret key which we will be going to store in a removable devices such as USB drive etc.
    Here goes the step-by-step procedure for achieving an extra level of protection.
    1.) Open run dialog box.
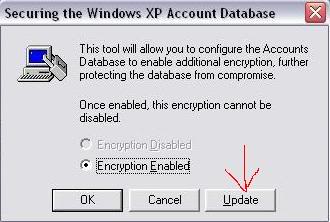
    2.) Type SYSKEY and click OK.
    3.) Check the Encryption Enabled radio button.
    4.) Click on Update.

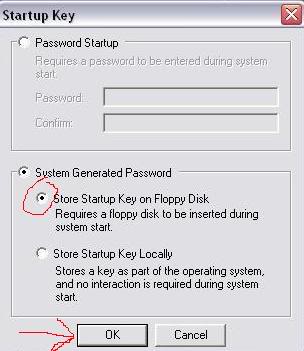
    5.) Under System Generated Password choose Store Startup Key on Floppy Disk.
    (Now many of you must be thinking that this tutorial is waste. Where in the hell should be get Floppy no? Don’t worry; you don’t require any Floppies for this. Just insert your USB device and change its Drive Letter to A:. I am using my IPOD shuffle for this purpose. You can use your Pen Drive. Read further to learn how to change Drive Letters.)
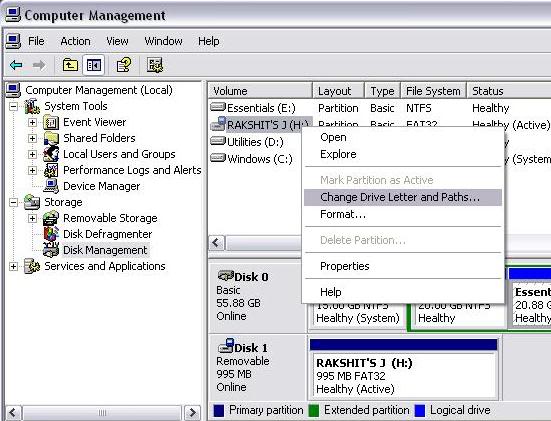
    6.) After you have inserted your USB device, right click My Computer -> Manage -> Storage -> Disk Management.
    7.) Now you will see all storage volumes there. Choose your USB volume, right click on it and select option Change Drive Letters and Paths…

    8.) From the long list of available drive letters choose A:.
    9.) Now return back to SYSKEY, choose Startup Key on Floppy Disk and click OK.

    10.) No 10th Step. You are done.
    The next time you start your computer, you’ll have to insert this USB device when asked and then only you can login to your account. You can also see a registry file named StartKey stored in your USB device.
    I am still looking for the possible ways to login to my personal computer just in case if my IPOD (USB device) is broken or unavailable. If you have idea to break this protection, please share that with us. It will be useful as well.