Tag: windows pc

  • Install Windows 10/8/7 From USB Flash Drive with UEFI Support

    Install Windows 10/8/7 From USB Flash Drive with UEFI Support

    When you are planning to install Windows 10, Windows 8.1 or Windows 7 on a PC, one of the requirements involves creating media to boot your computer into the setup wizard. This is especially true if you are performing a fresh installation of Windows. In which case, your boot options are DVDs and USB drives.

    Since most PC these days hardly come with an in-built DVD drive, your options are further limited to either using an external DVD drive or a USB flash drive.

    A lot of people, including me, will favor using a USB flash drive to install Windows 10. However, if you have newer hardware, it’s likely that you’re using Unified Extensible Firmware Interface (UEFI), instead of the legacy Basic Input/Output System (BIOS). If this is the case, you also have to ensure that the bootable media supports the firmware type before you can proceed with the installation.

    How is UEFI different from BIOS?

    The BIOS will soon be dead: Intel has announced plans to completely replace it with UEFI on all their chipsets by 2020. But what is UEFI, and how is it different from the BIOS we’re all familiar with?

    Both UEFI and BIOS are low-level software that starts when you boot your PC before booting your operating system, but UEFI is a more modern solution, supporting larger hard drives, faster boot times, more security features, and—conveniently—graphics and mouse cursors.

    Fortunately, if your device features a UEFI firmware, you have multiple ways to create a USB bootable media to install Windows 10, Windows 8.1 or Windows 7. You can use the Media Creation Tool, which is an easy-to-use utility made by Microsoft that downloads and copies the installation files onto a removable drive with support UEFI and BIOS. Or you can use WinToFlash, which is a freely available third-party tool that allows you to quickly create a media with support for UEFI firmware.

    [Further Reading: Create a Bootable Mac OS X Flash Drive]

    In this guide, we’ll try to walk you through the steps to create a bootable USB flash drive with support for both BIOS and UEFI. First we will try without a software, this should work for Windows 10, Windows 8.1 & Windows 7. However, some BIOS may not recognize your USB flash drive as a boot media, using the Media Creation Tool or WinToFlash software will resolve this.

    Supported Windows OS

    This guide has been tested with the following OS:
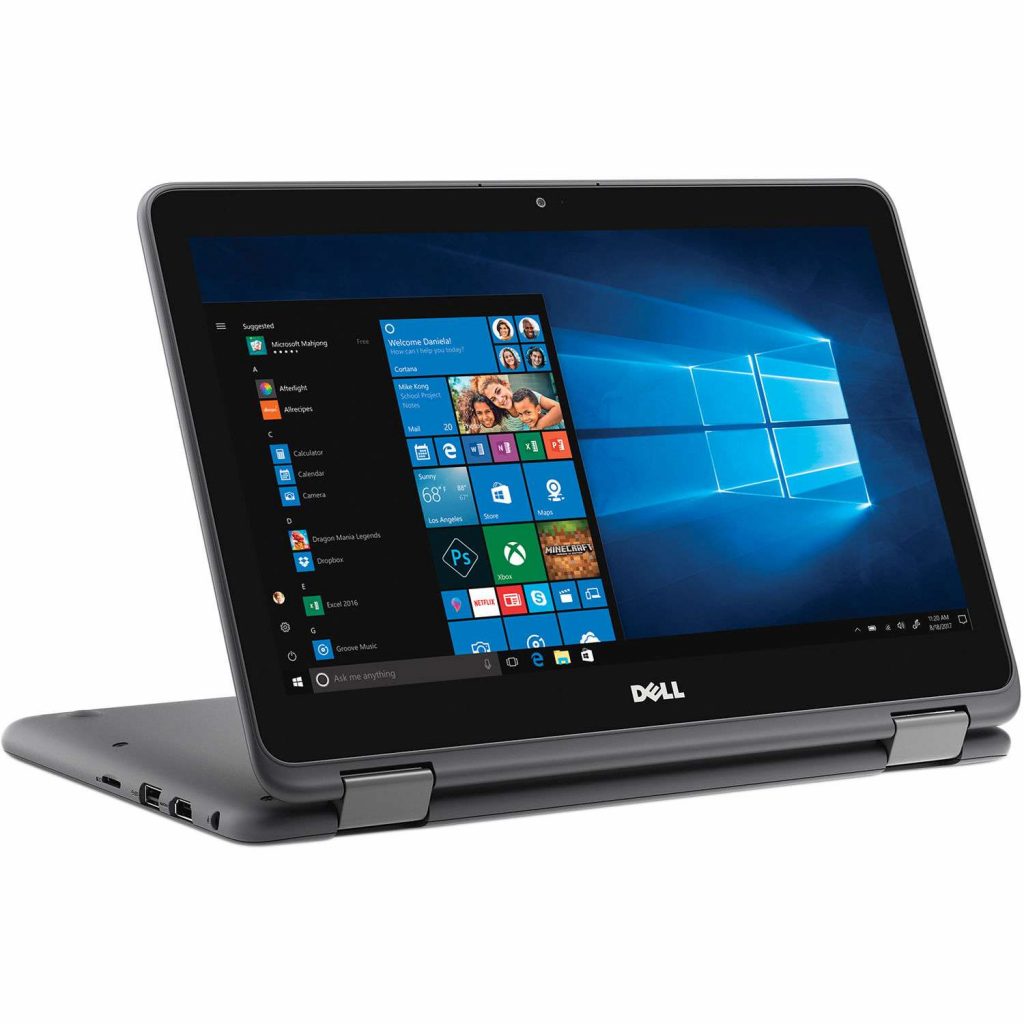
    Note, If you are performing a fresh installation of Windows 10 on a PC, you can skip straight to how to create a Windows 10 UEFI boot media using Microsoft Media Creation Tool.

    [Further Reading: How to Upgrade Windows 7 Starter into Windows 7 Home/ Professional/ Ultimate FREE!]

    You can always fall back to our troubleshooting guides should you encounter any problems while creating your bootable USB flash drive.

    What you need

    Before you begin, make sure you have an internet connection if you don’t already have a copy of the Windows OS install in a DVD, .iso or in a folder. You should also have sufficient data storage available on a computer, USB or external drive for the download. Other requirements may include:

    • A copy of the Windows OS install .iso, in a folder or DVD. You can use this page to download a disc image (ISO file) that can be used to update or install Windows 10, Windows 8.1 or Windows 7. The image can also be used to create installation media using a USB flash drive or DVD. Windows software download is free on the Microsoft OS download page but you might need to purchase a license for usage.
    • A blank USB flash drive with at least 5GB (or 4GB for Windows 8.1 and below) free space. This drive will be formatted, so make sure it doesn’t contain any important files.
    • Technician PC – Windows PC that you’ll use to format the USB flash drive
    • Destination PC – A PC that you’ll install Windows on

    Boot Windows from your USB flash drive

    Having met all the requirements above, any of the three methods below will get you a bootable USB flash drive. Make sure to pay close attention and ask any questions you may have on the comment section.

    Troubleshooting: file copy fails

    One of the most important thing to watch out for is the storage capacity of your USB flash drive. Windows 10 October release will require your flash drive to have at least 5GB storage capacity.

    Also, if you are using a modern PC and your device features a UEFI firmware, you will need to format your USB flash drive using FAT32 file system which has a file size limit of 4GB. The Windows image file (sources/install.wim) in Windows 10 October release exceeds this limit.

    Follow our Widows 10 boot media troubleshooting guide to walk around this problem.


    Create a Windows 10, 8 & 7 Bootable USB Flash Drive without using a Software

    Here’s how to create a bootable Windows installation USB drive starting with a Windows .iso file or a Windows Setup DVD without using a third-party software or Windows Media Creation Tool.

    Step 1 – Format the drive and set the primary partition as active

    • Connect the USB flash drive to your technician PC.
    • Open Disk Management: Right-click on Start and choose Disk Management.
    • Format the partition: Right-click the USB drive partition and choose Format. Select the FAT32 file system to be able to boot either BIOS-based or UEFI-based PCs.
    • Set the partition as active: Right-click the USB drive partition and click Mark Partition as Active.

    Step 2 – Copy Windows Setup to the USB flash drive

    Use File Explorer to copy and paste the entire contents of the Windows product DVD or ISO to the USB flash drive.

    Step 3 – Install Windows 10 / Windows 8.1 / Windows 7 to the new PC

    • Connect the USB flash drive to a new PC.
    • Turn on the PC and press the key that opens the boot-device selection menu for the computer, such as the Esc/F10/F12 keys. Select the option that boots the PC from the USB flash drive.
    • Windows Setup starts. Follow the instructions to install Windows.
    • Remove the USB flash drive.

    How to create a Windows 10, 8 & 7 UEFI boot media using WinToFlash Software
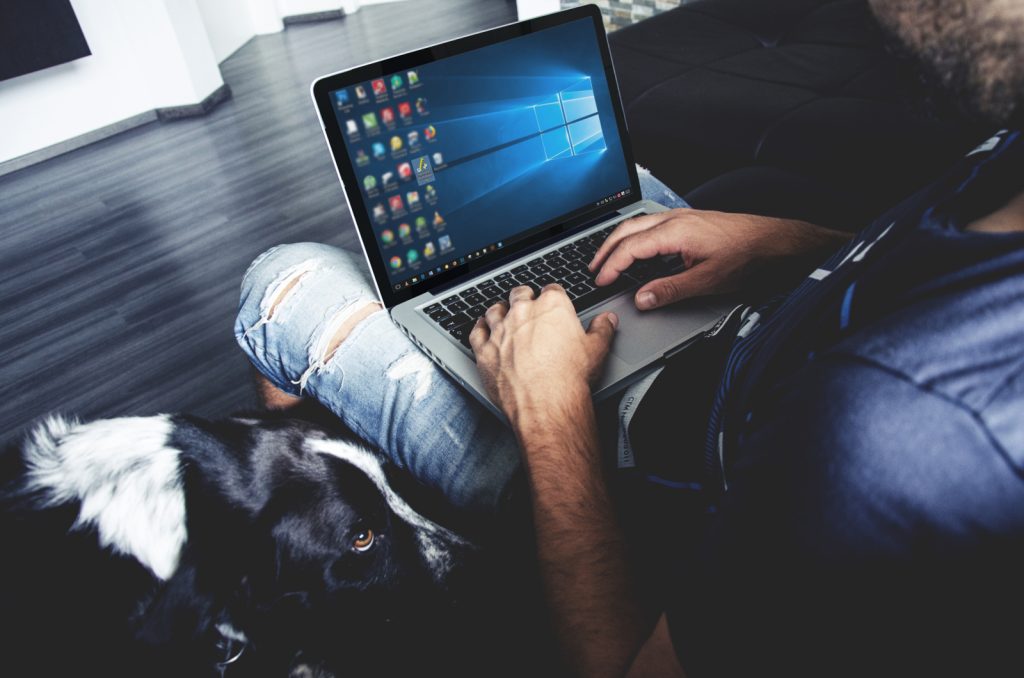
    Windows 10 WinToFlash software
    WinToFlash creates a bootable USB with any modern Windows Desktop [PHOTO CREDIT: EBENEZER OBASI]

    If for some reasons, copying Windows through file explorer didn’t work, you can use the WinToFlash tool to create an installation media with UEFI support. Of course, the Windows Media Creation Tool will equally work if your target is to install Windows 10 on a PC. However, it’s faster to use this tool if your already have a copy of the Windows OS install in a DVD, .iso or in a folder.

    To create a Windows install media with support for UEFI, connect a USB flash drive with at least 5GB (or 4GB for Windows 8.1 and below) of space, and then use these steps:

    Step 1 – Download & Install WinToFlash Software.

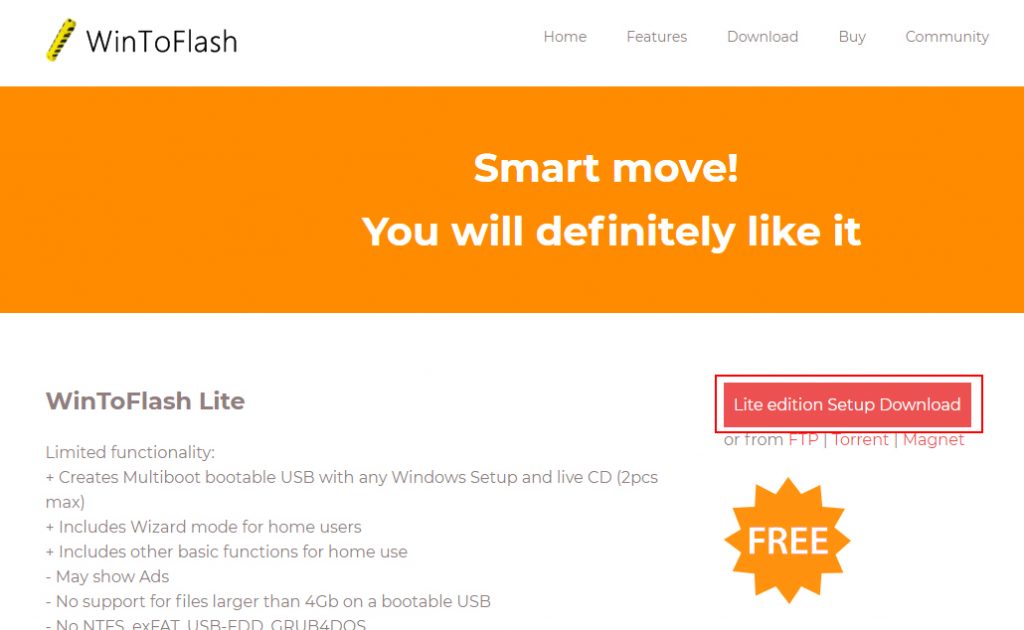
    Download the free lite edition of WinToFlash from the official website. Under “Download,” click Lite edition Setup Download.
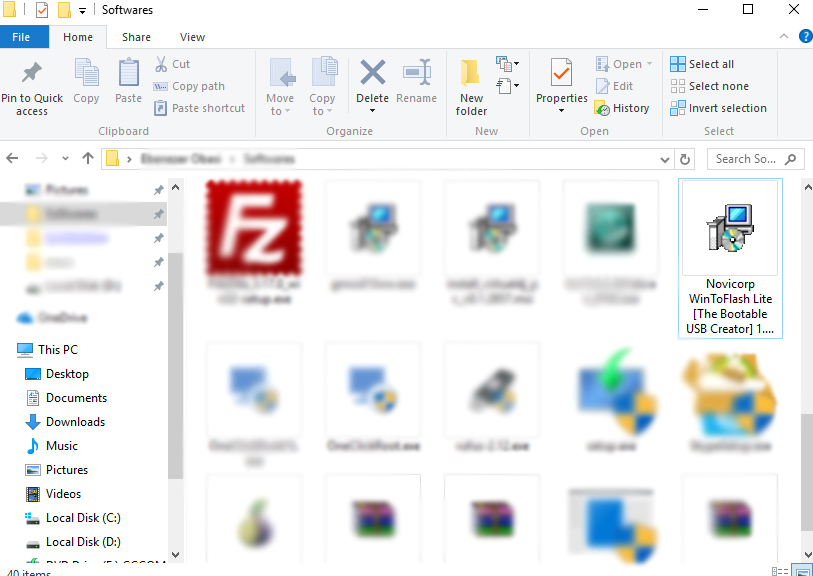
    After download is complete, open your download path and double-click the Novicorp WinToFlash Lite [The Bootable USB Creator] x.x.x Setup.exe file to launch the installation wizard.
    Follow the installation wizard to install WinToFlash on your PC.

    Step 2 – Set Windows source and destination media
    After installation, click on the Novicorp WinToFlash icon from your desktop to launch the WinToFlash tool and install Windows 10 OS and below from your USB Flash Drive.

    From the application start screen, click Windows Setup Bootable USB Wizard. Select the installation source of the Windows, if you have downloaded an ISO file or loading from a folder.
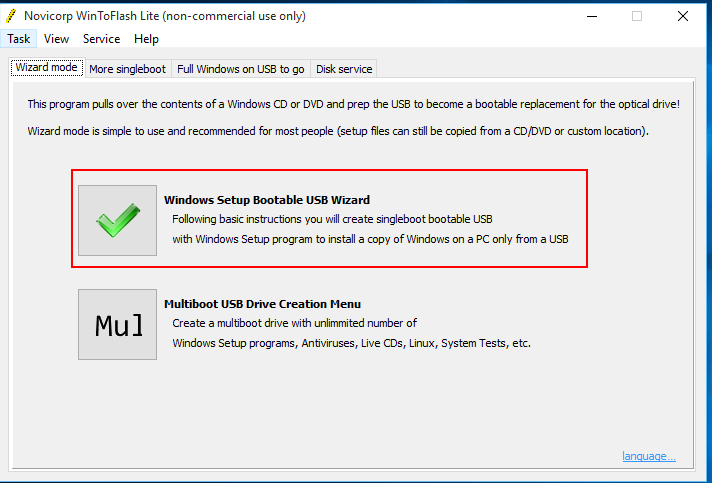
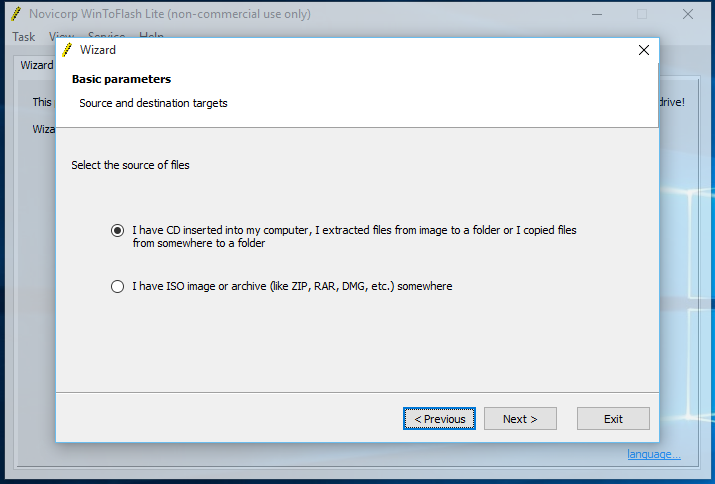
    Startup screen of WinToFlash tool. Select Windows Setup Bootable USB Wizard to load a single OS to your boot media.
    Specify Windows source path or file. If your OS is in a CD or extracted from image to a folder, go with the first option. Select the second option if the Windows software is an ISO image or archive.

    Click next to setup your Windows source and destination path.
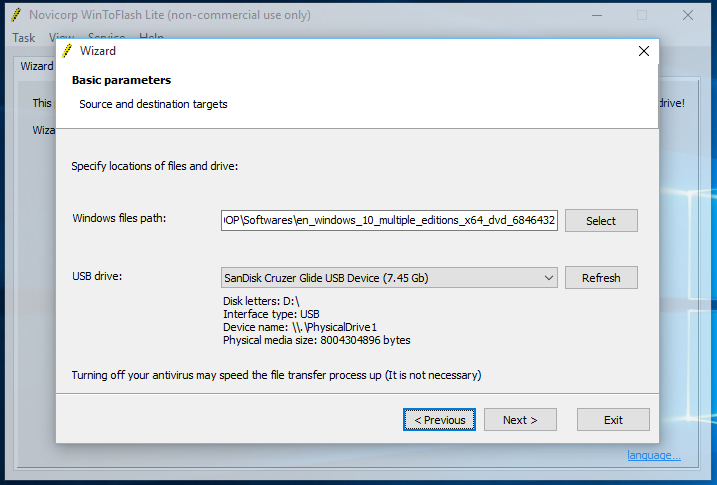
    Source and destination targets
    • The ‘Windows files path‘ specifies the path to the Windows installation files on your PC. This can be an ISO – archive or folder – CD path, depending on your selection on the previous screen.
    • Use the ‘USB drive’ drop-down to select the media you want to make bootable.

    Step 3 – Wrapping things up

    Click next and review all parameters. Make sure that you have chosen the right USB drive.
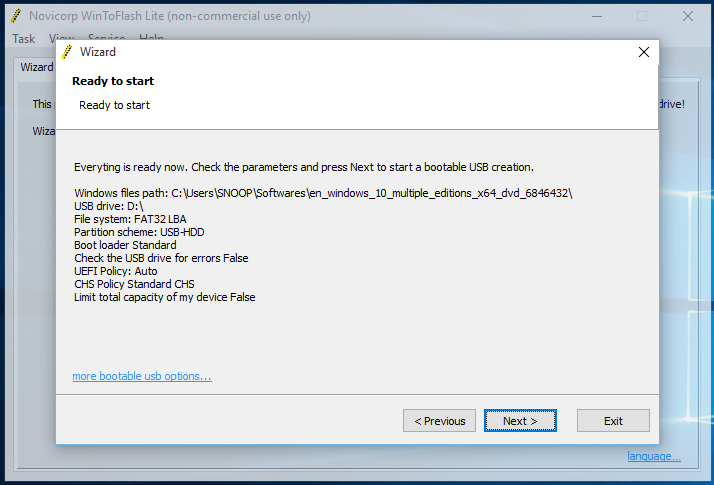
    Parameters overview
    Ensure that you have chosen the right media to avoid wiping important files from your flash drive.

    Complete settings by confirming to wipe USB flash drive and accepting WinToFlash terms (click on the images below to expand).
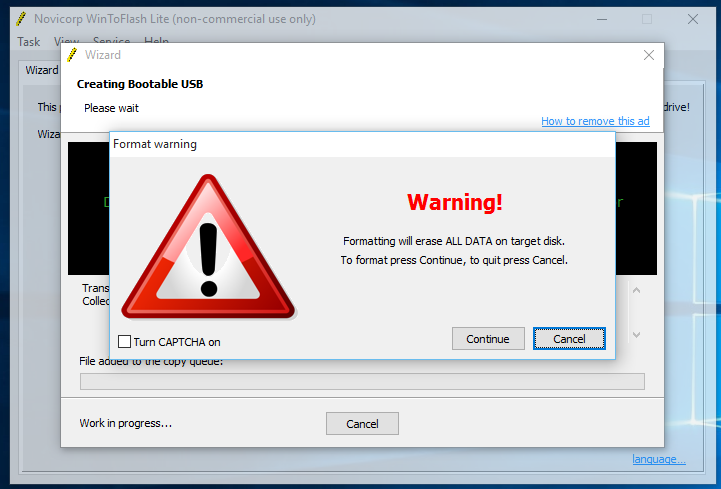
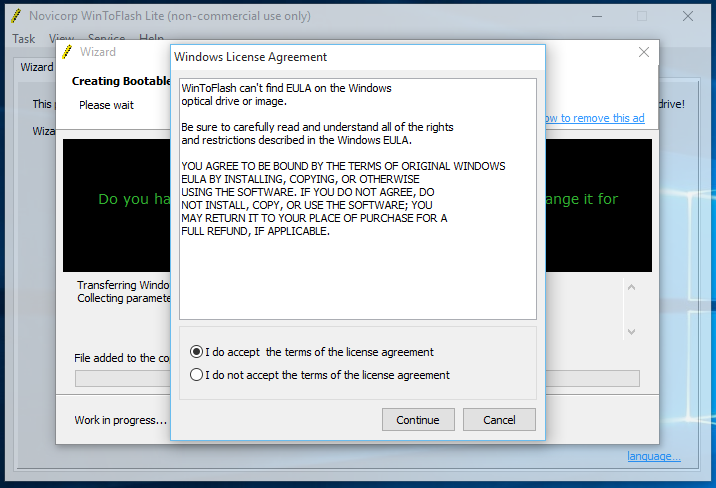
    After completing the steps, the WinToFlash tool will create a bootable media, which you can then use to install Windows 10 on devices using UEFI.
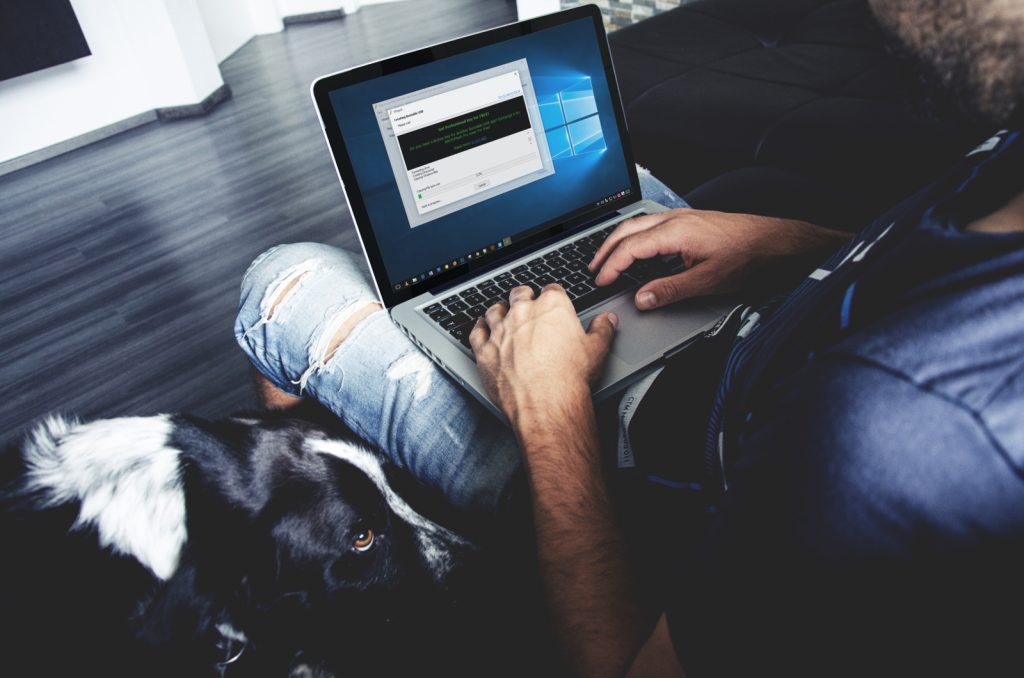
    Windows 10 installation progress on WinToFlash
    Windows 10 installation progress on WinToFlash.

    Once the USB bootable with support for UEFI has been created, you can start your device with the installation media to perform an upgrade or clean installation of Windows 10.


    How to create a Windows 10 UEFI boot media using Media Creation Tool

    If you’re planning to upgrade or install a fresh copy of Windows 10 on a system using BIOS or UEFI, you can use the Media Creation Tool to create a compatible bootable media. Just insert a USB flash drive with at least 5GB of storage to your computer, and then use these steps:

    • Open the official page.
    • Under “Create Windows 10 installation media,” click the Download tool now button.
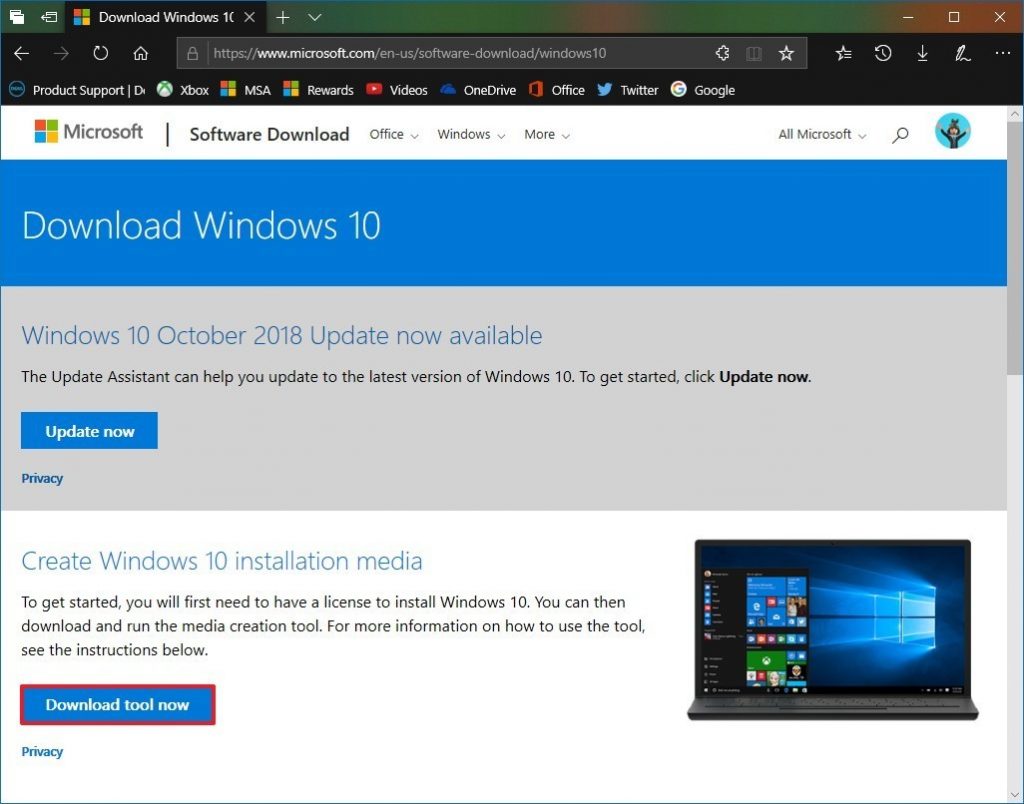
    • Click the Save button.
    • Click the Open folder button.
    • Double-click the MediaCreationToolxxxx.exe file to launch the utility.
    • Click the Accept button to agree to the Microsoft terms.
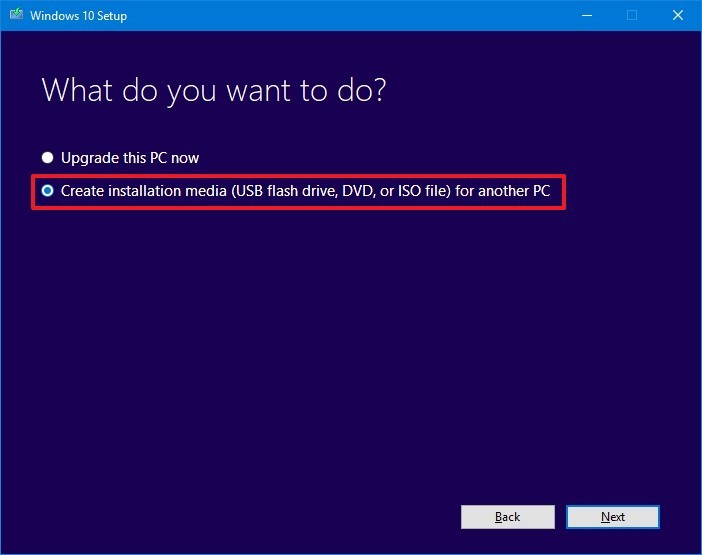
    • Select the Create installation media (USB flash drive, DVD, or ISO file) for another PC option.
    • Click the Next button.

    Select the correct language, architecture, and edition of Windows 10 if the default selection doesn’t reflect the desired options.
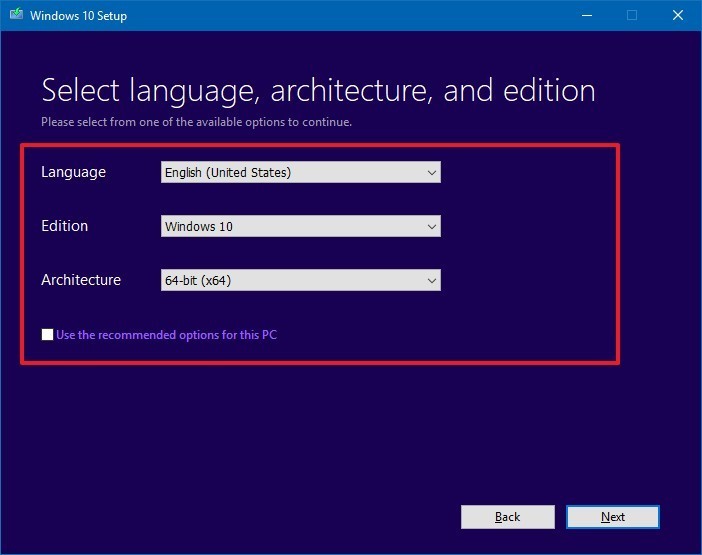
    Quick Tip: Under “Architecture,” you can select the Both option to create a bootable media that will work for devices using 64-bit and 32-bit processors. Also, if you’re unable to change these settings, make sure to clear the Use the recommended options for this PC option.

    • Click the Next button.
    • Select the USB flash drive option. (If you don’t see the drive, click the Refresh drive list option.)
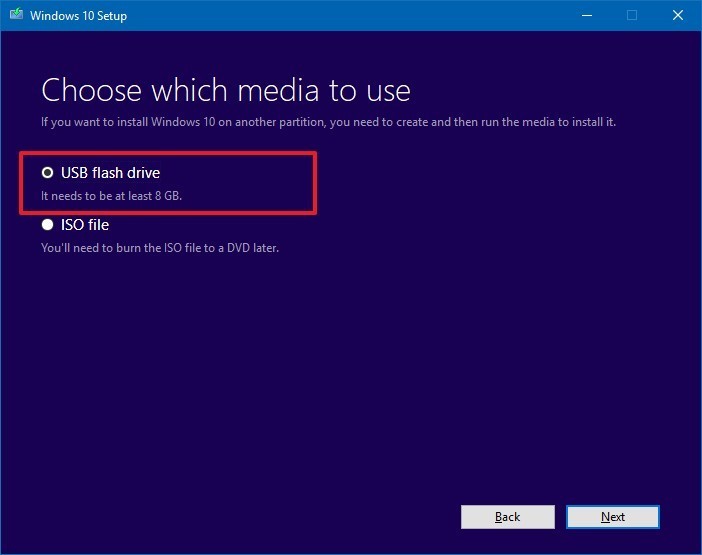
    • Click the Next button.
    • Select the removable drive from the list.
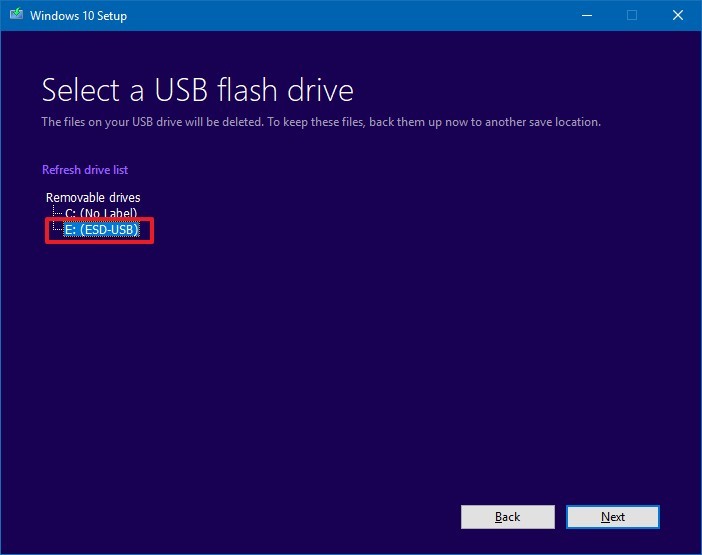
    Click the Next button. Once you’ve completed these steps, the wizard will download the Windows 10 installation files, and it’ll create the bootable media with support for UEFI as well as legacy BIOS.

    Troubleshooting Windows 10, 8 & 7 Boot Media

    UEFI systems cannot boot from NTFS and instead the device needs to be formatted with FAT32 which has a 4GB maximum size. If copy fails, it’s likely that the install.wim file on the media is larger than this file size limit. The solution is to split the WIM into multiple files using DISM.

    Split the Windows image

    Split a Windows image (.wim) file into a set of smaller (.swm) files. Use this procedure when you’re installing Windows from media that can’t handle the Windows image file size, for example:

    • DVDs (A standard single-sided DVD stores 4.7GB).
    • USB keys formatted as FAT32. FAT32 is required to boot many modern (UEFI-based) PCs, but has a maximum file size of 4GB.

    Split the file

    • Mount your Windows distribution ISO.
    • Launch Windows Command Prompt. The quickest and easiest way to do that is to type “CMD” into your Windows search box.
    • Right click on the resulting “Command Prompt” and “Run as Administrator”.
    • Copy everything except the Windows image file (sourcesinstall.wim) to the USB drive. Either drag from the mounted ISO and drop on the flash drive, or use the command below:
    robocopy D: E: /s /max:3800000000

    Where D: is the mounted ISO and E: is the USB flash drive.

    • Split the Windows image file into smaller files, and put the smaller files onto the USB drive:
    Dism /Split-Image /ImageFile:C:sourcesinstall.wim /SWMFile:C:sourcesinstall.swm /FileSize:3700

    where:

    • C:sourcesinstall.wim is the name and the location of the image file that you want to split.
    • C:sourcesinstall.swm is the destination name and the location for the split .swm files. The first split .swm file is named install.swm file. The file names for the next files include numbers, for example, install2.swm file, install3.swm file, and so on.
    • 3700 is the maximum size in MB for each of the split .swm files to be created. Kepp the size of the files below 4000 (4GB) to avoid getting the error 87 (invalid parameters) error.

    Note, Windows Setup automatically installs from this file, so long as you name it install.swm.
  • Windows 10’s Top 30 Tricks, Tips, and Tweaks in Pictures

    Windows 10’s Top 30 Tricks, Tips, and Tweaks in Pictures

    Windows 10 comes with a lot of amazing features but not all of them are readily available. Let’s dig a little deeper and unveil new tweaks, tricks and features that will change the way you use your PC.

    Have you heard? Windows XP is dead—it’s been officially dead for a while now—and if you haven’t already made the switch to Windows 10 on your primary operating system, this might be the final nudge you need (that’s if Jake’s experience with Windows 10 doesn’t convince you). By the way, you can install Windows 10 using your USB flash drive.

    Digging a little deeper into Windows 10 Features

    With it being free, and Microsoft pushing the update to users, most of you probably already have migrated to Windows 10. Its constantly evolving nature means fresh features arrive twice per year, and with all the new goodies come a legion of new tweaks and tricks—some of which unlock powerful functionality hidden to everyday users. Others simply let you mold the Windows 10 experience into the shape you see fit. Here are some of the most useful tweaks, tricks, and tips that we are able to put together.

    [Further Reading: How to Display your Favorite Websites on your Windows 10 Start Menu]

    However, you need to brace yourself as some of these may break as the operating system evolves given Microsoft’s new “Windows as a service” mentality. The idea is to keep this page updated overtime to reflect the OS’s current status.

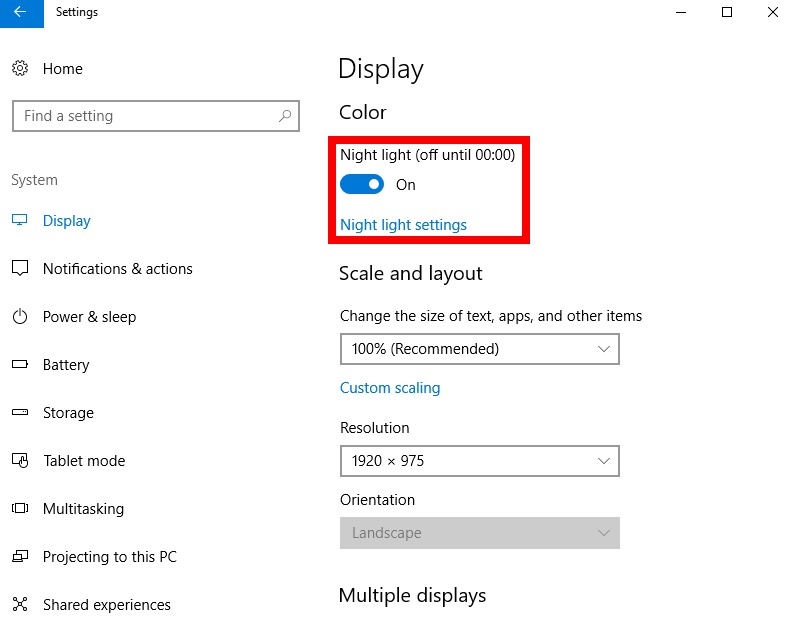
    Activate Windows 10 Night Light

    nightlight

    If you use an iPhone, iPad or macOS system you may use the built-in blue light feature ‘Night Shift’.

    The Night Light feature you’ll find in Windows 10 is pretty much Night Shift for Windows.

    Night Light makes the screen warmer in the evenings as it reduces the amount of blue light emitted.

    Various scientific studies show that exposure to blue light in the evening makes it harder to fall asleep because (like all artificial light) it affects the circadian rhythms that manage our body clock.

    Once preserve of late-night caffeine fuelled coders and over-worked, under-fed writers, screen temperature features have since become mainstream. Google’s Android and ChromeOS operating systems have one, as do iOS and macOS from Apple, and Microsoft’s Windows 10.

    Like those features, Windows 10 Night Light automatically warms the temperature of your display after sunset. This makes your laptop screen or PC monitor easier on your eyes and reduces disruption to your circadian rhythm, helping it to tick along nicely.

    In the morning, your display returns to its regular settings.

    Night Light is a system feature; you do not need to install a separate application like Flux to use it. This makes it very easy to automatically adjust the screen temperature in Windows 10.

    Night Light for Ubuntu will automatically adjust the amount of blue light your monitor or laptop display emits based on your location and the time of day.

    These features are said to help reduce eye strain by adjusting your screen’s color temperature during after-dark computing sessions. That makes it easier to fall asleep when you’re done.

    To activate Night Light, head to Settings > System > Display. Once you’ve done so, open the feature’s settings to fine-tune its behavior.

    Scroll any window even when they’re inactive

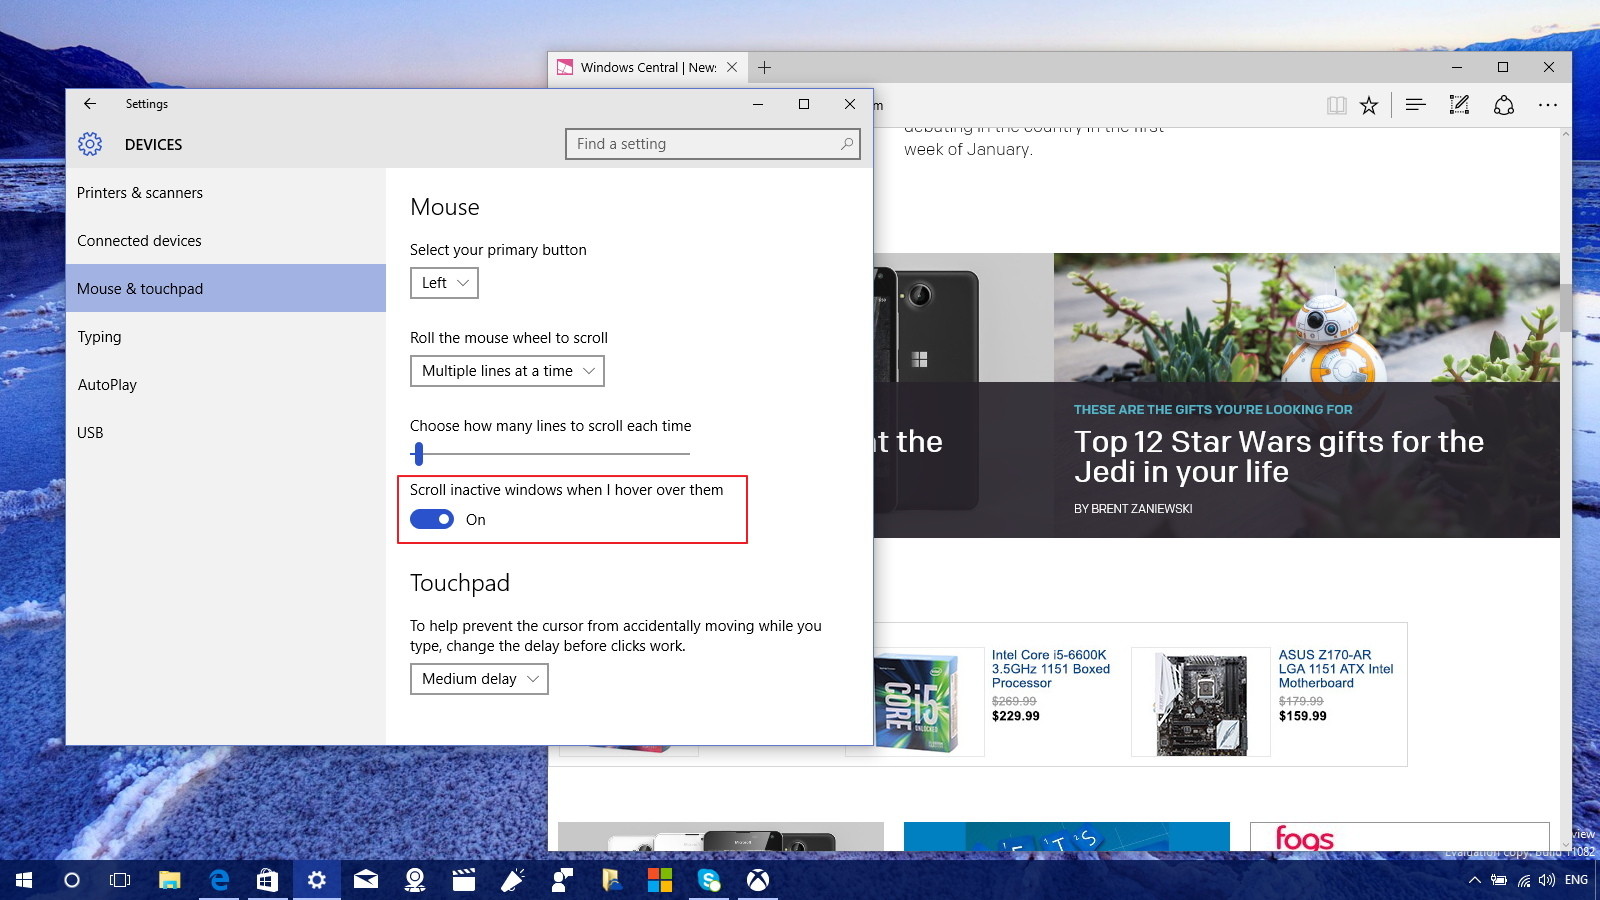
    scroll-inactive-windows10

    It used to be that Windows only allowed you to scroll active windows. Now in Windows 10, you can set an option to scroll both active and inactive windows by just hovering with the mouse cursor over a window.

    This feature is not a ground-breaking Windows 10 hack or tweak but it comes quite handy when time is in essence and your need to peek through your to-do list.

    Windows 10 inactive scroll feature is enabled by default, but if it’s not, go to Settings > Devices > Mouse & touchpad, and make sure to enable the Scroll inactive windows when I hover over them option.

    Find the hidden images

    Windows_10_Wallpapers_Lock_Screen_Backgrounds

    The lock screen and logon screen have some really cool images, which as it turns out, by default both rotate AND change.

    It may seems Microsoft has a CDN that updates these images based on what you click that you like or not. Want to save one or more of those images for future use? Here’s where they are hiding!

    • Open Explorer and browse to:
    %localappdata%PackagesMicrosoft.ContentDeliveryManager_[custom string of characters]LocalStateAssets
    • Copy all of the files to a new directory.
    • Open a command prompt in that directory.
    • Run this command ren . *.png and [enter]
    • Browse through them and find the ones you like!

    Make Cortana’s ears perk up

    cortana-listen-up

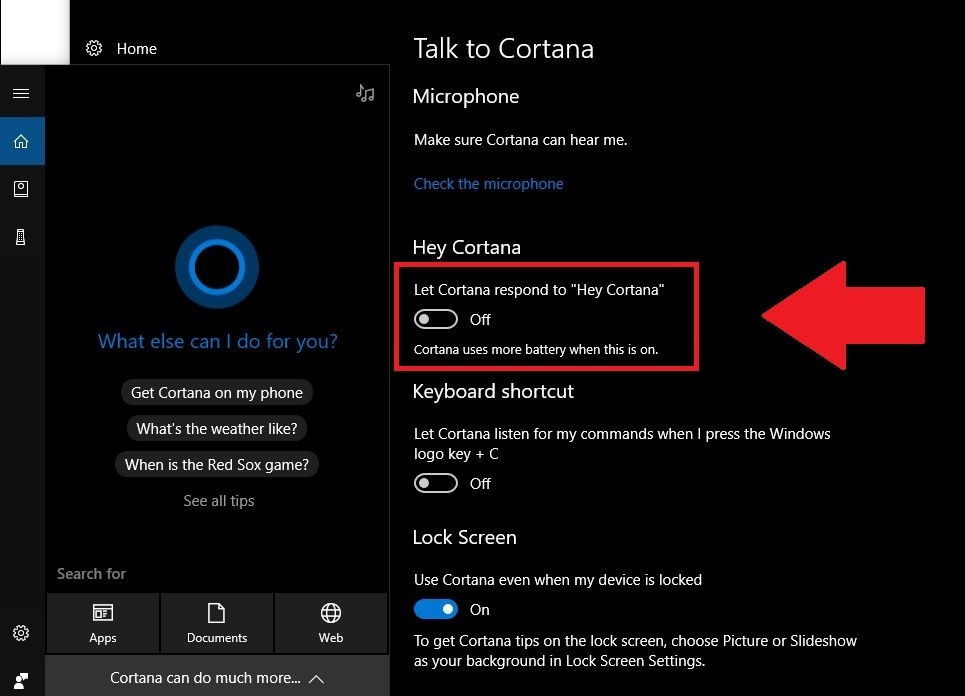
    Cortana’s finally made the leap to the PC in Windows 10, assuming many of the operating system’s search functions and dishing out just as much sass as the Windows Phone version. But by default, she doesn’t listen for your commands. But by default, she doesn’t listen for your commands.

    If you’d like to be able to just shout commands at your PC, launch Cortana by clicking the search field in the taskbar and select the three-lined options menu in the upper-left corner. Select Settings for the list, then simply enable the “Let Cortana respond when you say ‘Hey Cortana’” option. You’ll need an active microphone for this to work, of course.

    While you’re poking around Cortana’s options, you can dive into the Notebook menu to fine-tune exactly what personal data Microsoft’s digital assistant can access. Remember, however, that like Google Now, Cortana’s effectiveness is directly related to how much she knows about you.

    Enabling Cortana on the Windows lock screen lets you use voice commands to view and edit your schedule at a glance. It’s pretty handy! To turn on the feature, open Cortana and head to “Cog” icon > Settings > Use Cortana even when my device is locked.

    Secret, powerful new command line tools

    windows-10-command-prompt-options

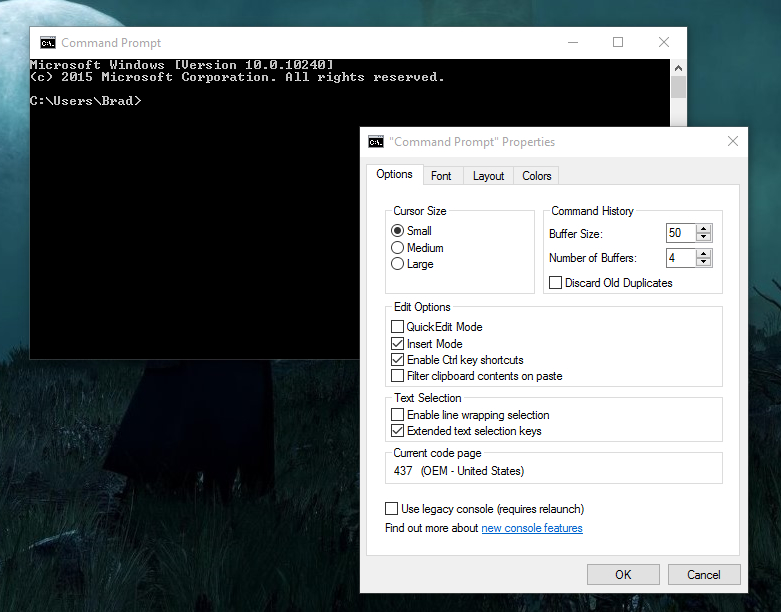
    Windows 10 packs a slew of nifty new command line features, including—hallelujah!—the ability to copy and paste inside the command prompt with Crtl + C and Crtl + V.

    To activate the goodies, open the command prompt. Right-click its title bar, then select Properties. You can find and enable the new features under the Edit Options section of the Options tab.

    Bash comes to Windows

    windows-10-bash-shell

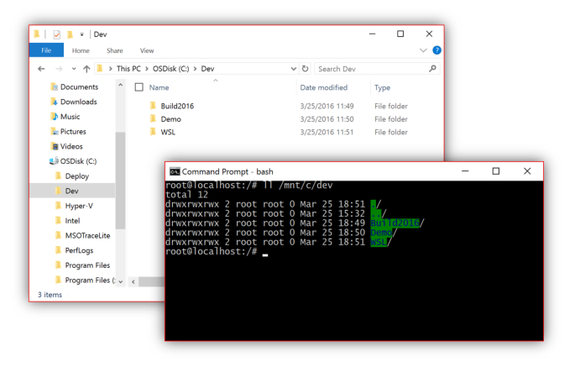
    If you got all hot and bothered over the ability to use keyboard shortcuts to paste text in the Command Prompt, wait until you get a load of this.

    The Windows 10 Anniversary Update added the full, legendary Bash shell to Microsoft’s operating system, thanks to a partnership with Canonical, the company that guided Ubuntu Linux’s development. And it’s running natively, without virtual machines or containers. With the right tricks, you can even use Bash to run graphic Linux applications or even the Unity desktop itself right inside Windows—though those unintended features are definitely limited. Look for Ubuntu, Fedora, and SUSE Linux entries in the Windows Store to start using Bash in Windows.

    Windows 10 Audio Source Switching

    windows-10-audio-source-switching

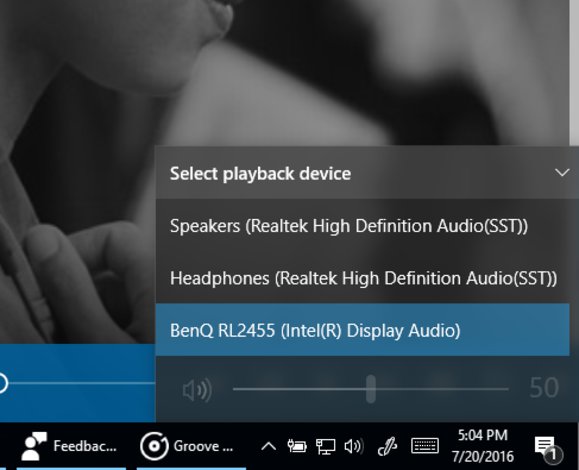
    Windows 10’s in-taskbar volume controls pack a niche, yet nifty touch: selectable sources. Clicking the audio device name in the volume controls summons a list of all connected audio outputs, meaning you can switch from your headphones to your speakers and back again without having to dive into the Control Panel. Yay!

    The April 2018 Update added more granular audio options to the Settings app too, breaking them away from the Control Panel even further.

    Activate Windows 10 Spatial Sound

    ella-headphones

    That’s not the only audio trick lurking within Windows 10. Windows Sonic for Headphones offers a virtual surround sound format that can make the audio coming from your headset feel more lush and atmospheric. The effectiveness of the feature varies depending on your gear and how sensitive you are towards audio cues.

    To activate Windows Sonic, right-click the speaker/audio icon in the system tray on the right side of your task bar, then select Spatial sound (none). In the window that opens, click the drop-down menu and select Windows Sonic for Headphones. Click , then OK, and you’re done!

    Windows Timeline

    windows-10-timeline-

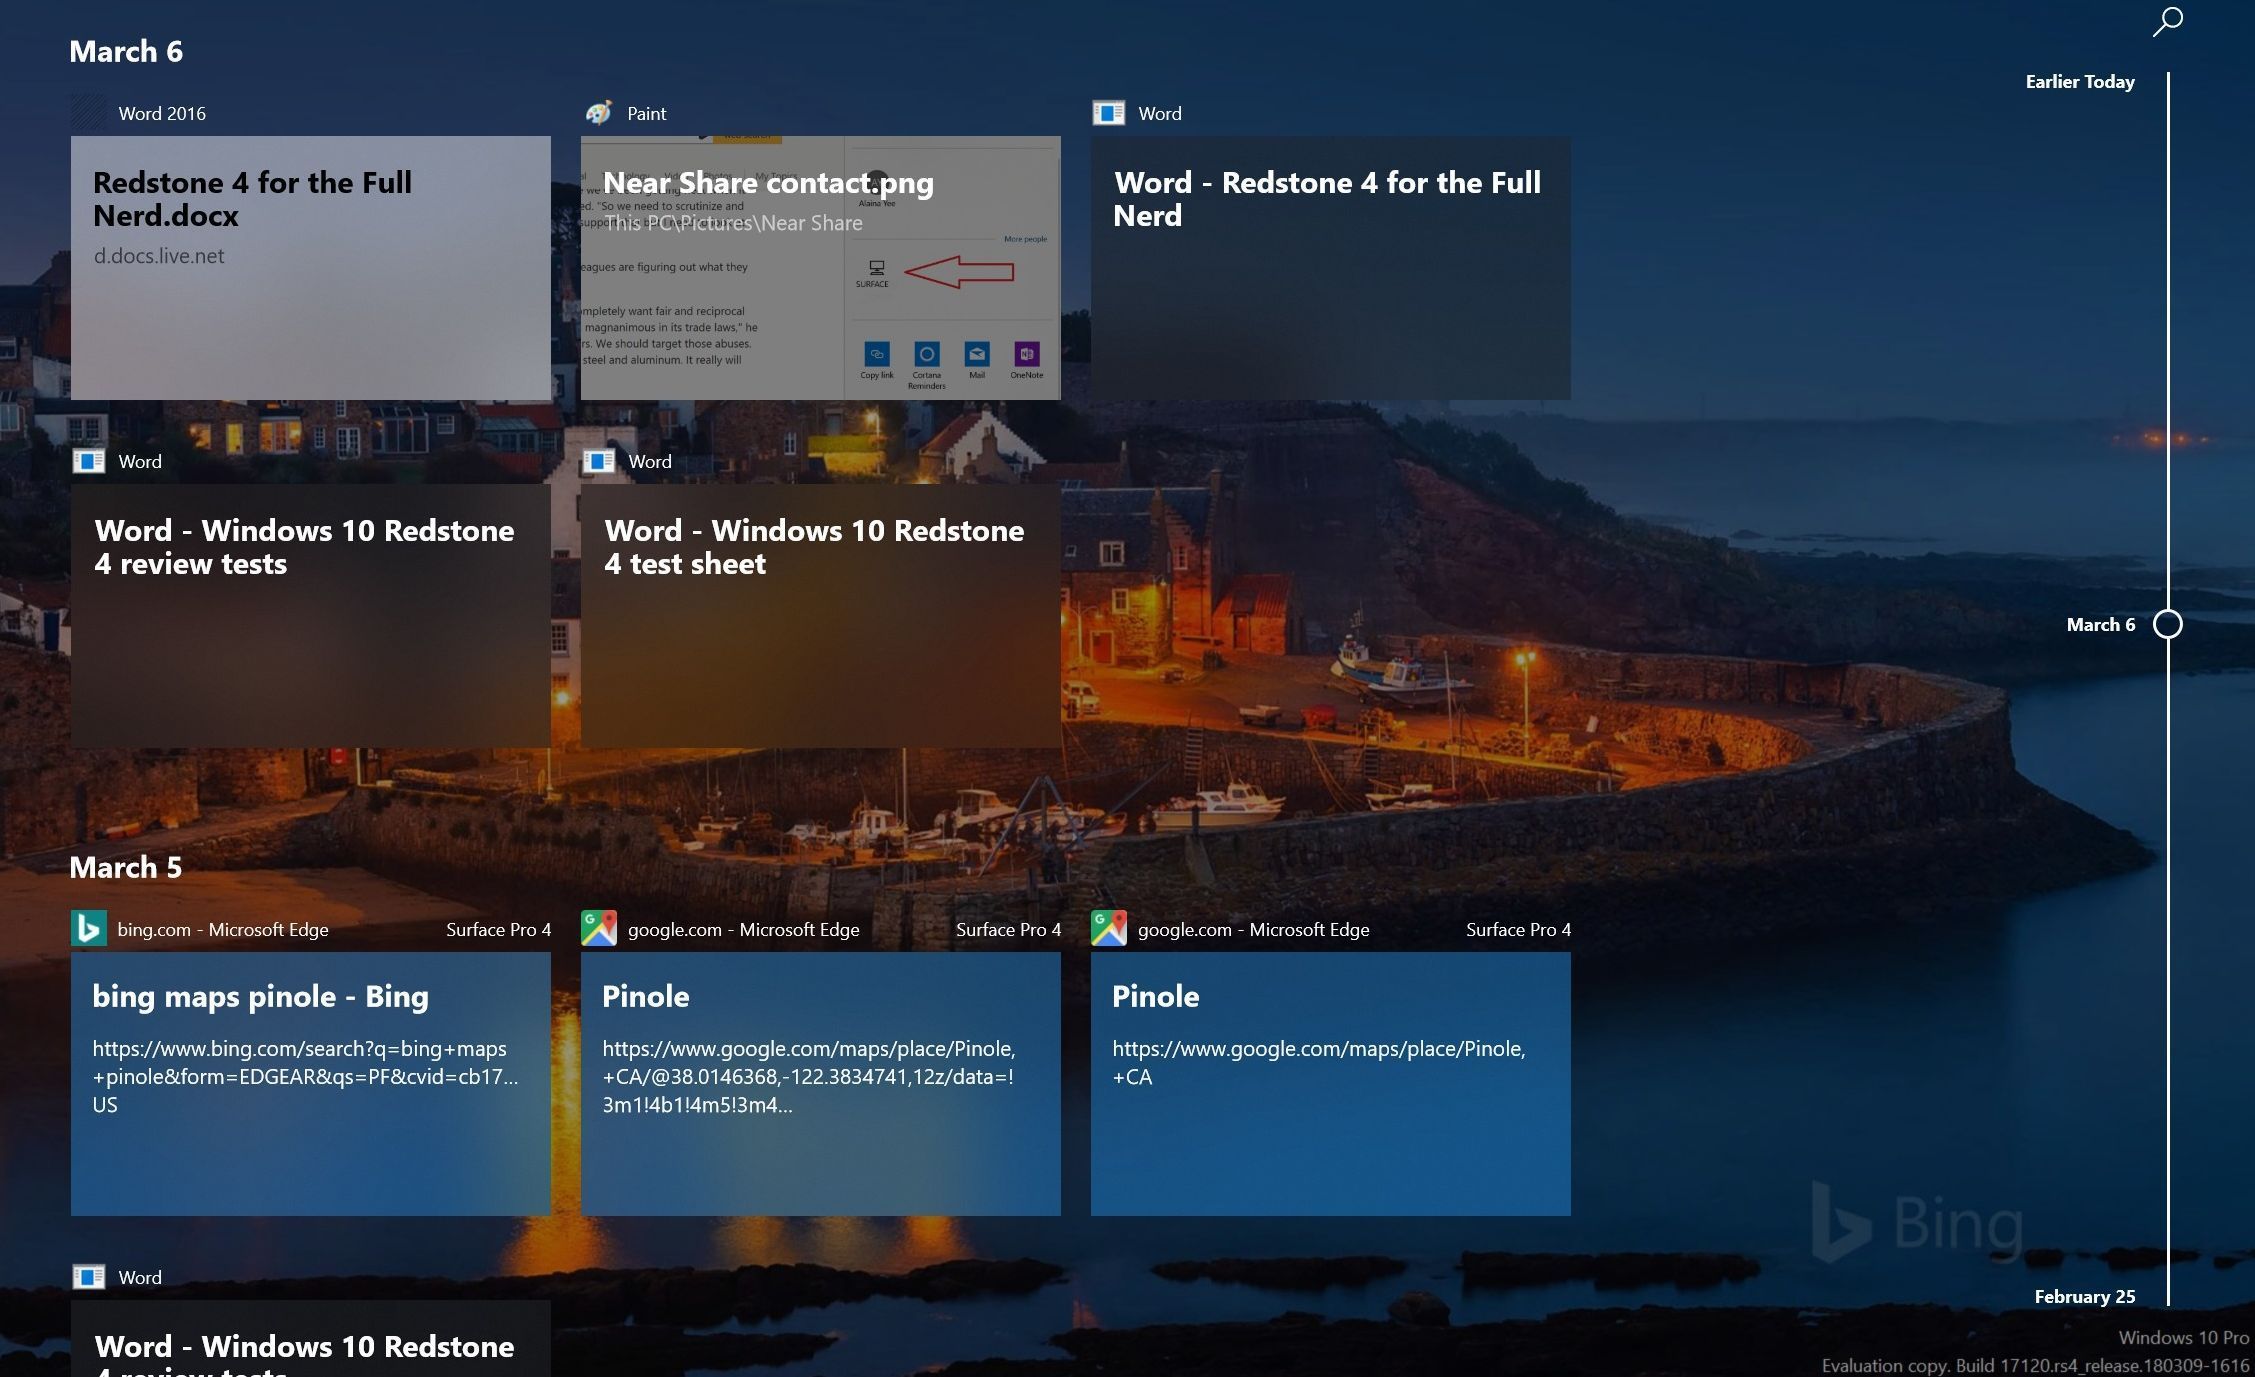
    Timeline helps you pick up where you left off. Clicking the Task View button in the taskbar or pressing Windows Key + Tab summons the feature, which displays a—you guessed it—time line of your activity in supported apps, stretching back over the past. Even more handily, Microsoft lets you group related apps together into “Activities” in Timeline, so that when you open that week-old budget document, for example, the presentations and websites you referenced at the time can be easily summoned as well. This even syncs across devices, so it could be especially useful if you use multiple PCs.

    The fly in the ointment: Only a limited number of apps work with Timeline currently, though Microsoft offers tools for developers to bake in support. That includes Office, Adobe’s Creative Cloud, and native Windows 10 apps like News and Maps, but Microsoft Edge is the only compatible browser. Bummer. You can deactivate Timeline by heading to Settings > Privacy > Activity History.

    Cloud clipboard

    cloud-clipboard

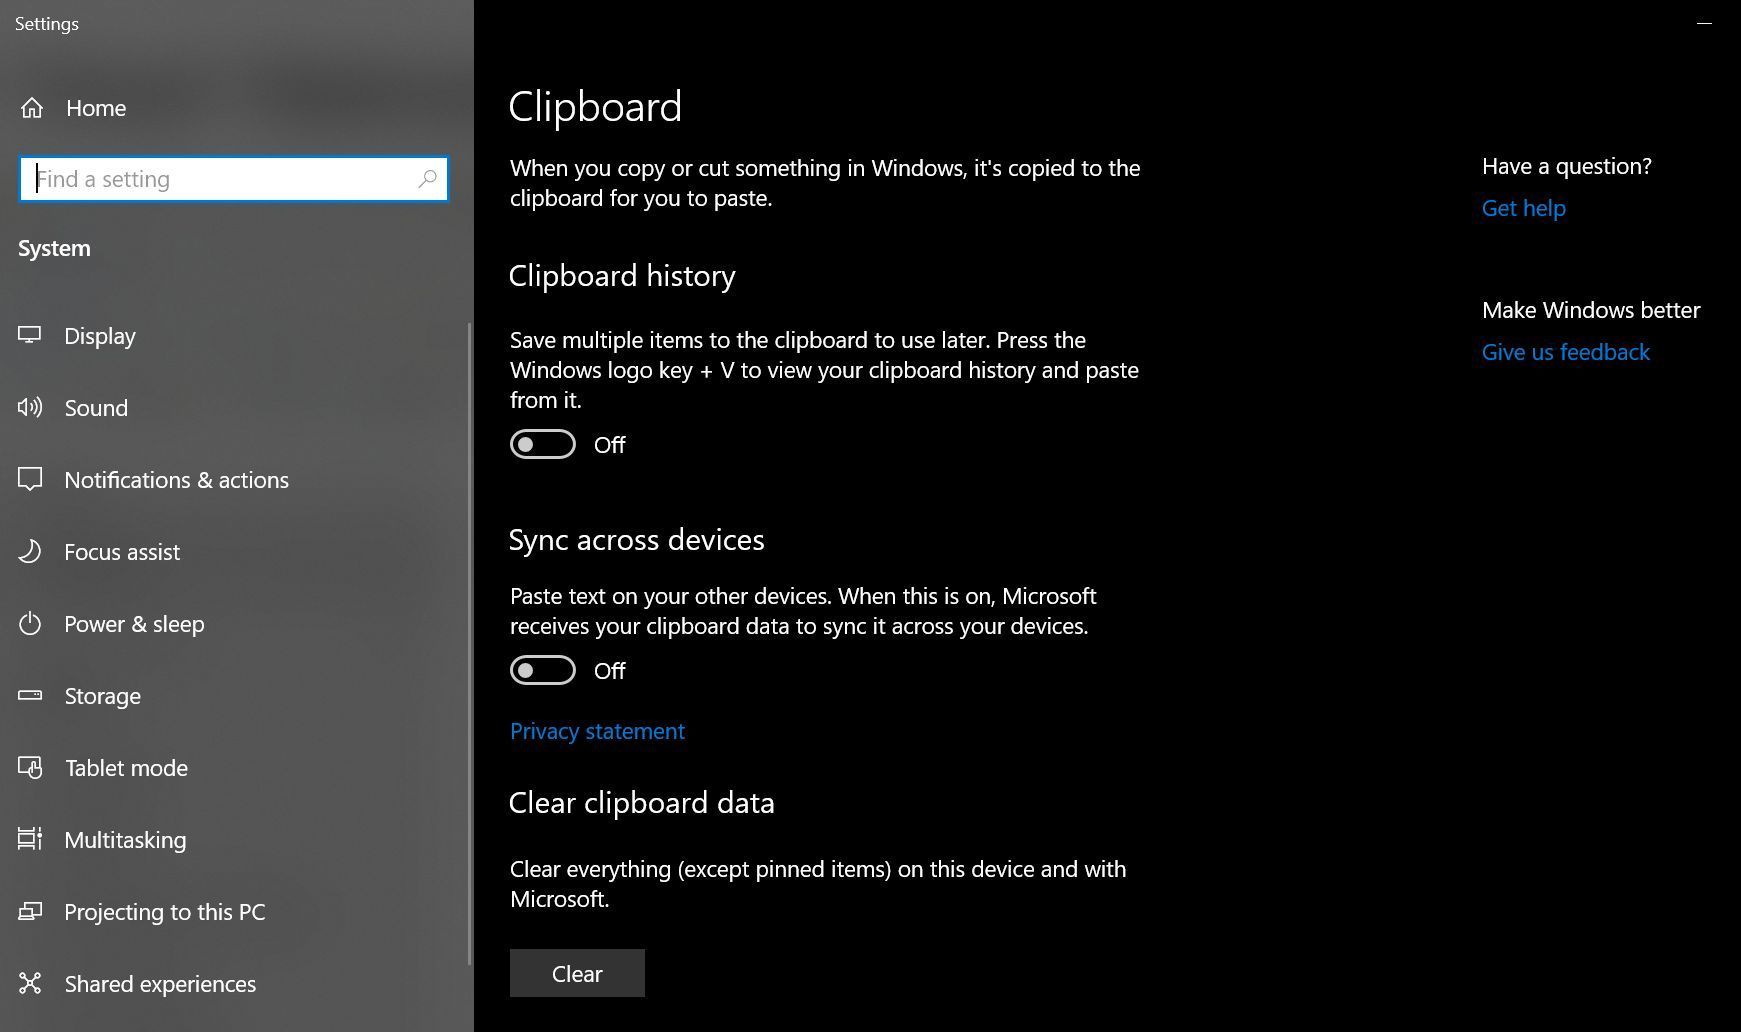
    Windows 10’s copy and paste functionality has been hit and miss for years, but now you can deploy that bugginess across multiple PCs with cloud clipboard—a genuinely useful feature introduced in the October 2018 Update. Head to Start > Settings > System > Clipboard and enable “Sync across devices” to start copying data on one PC and pasting it on another PC.

    While you’re in this menu, enabling “Clipboard history” lets you save multiple items to the clipboard so you can use them again later. Nifty stuff.

    Your Phone

    your-phone

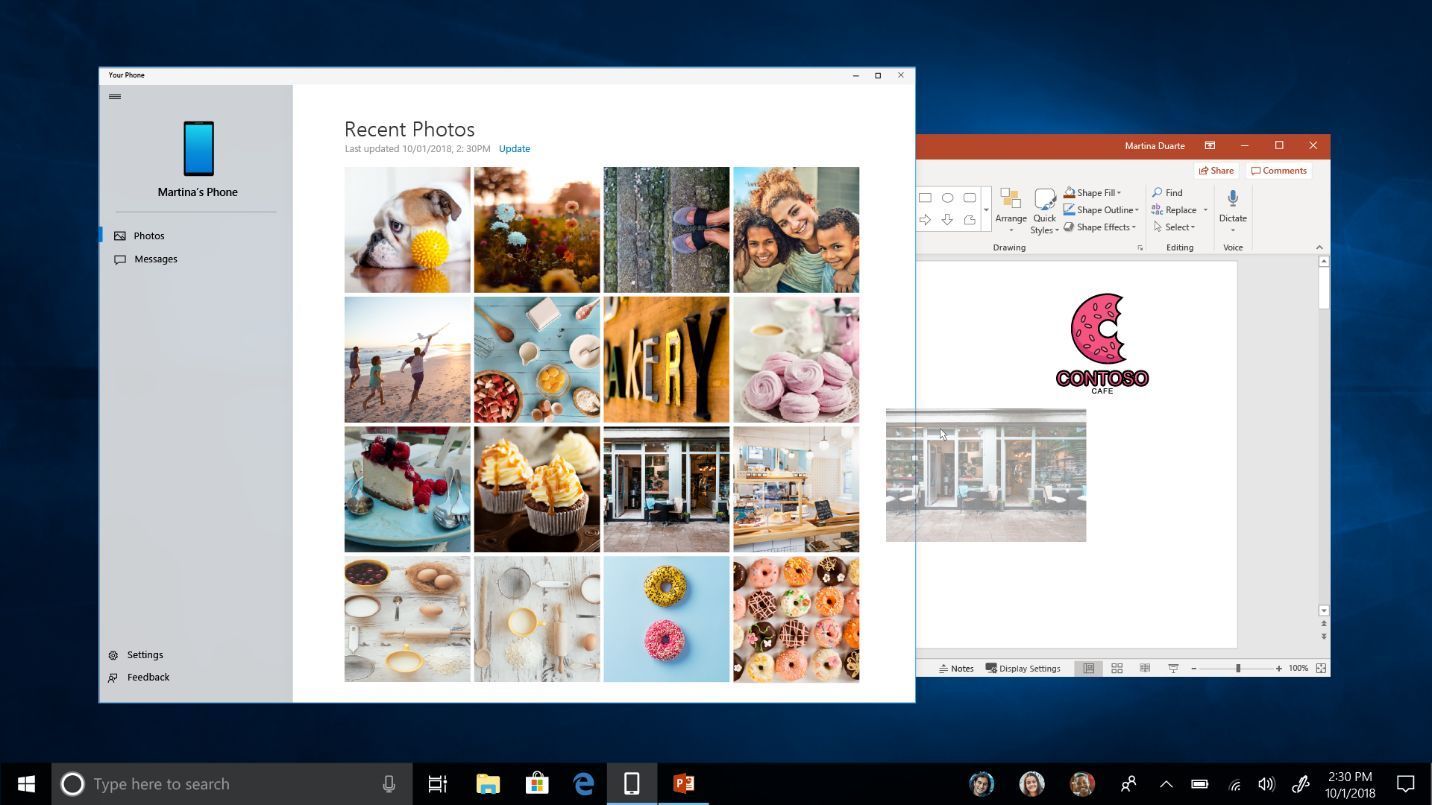
    Want to tie your phone and PC closer together? Download Microsoft’s Your Phone companion app for Android, and link it to your PC using the new Your Phone app from the Microsoft Store.

    [Further Reading: Learn how you can track the location of your Windows 10 PC, Tablet or Phone]

    Your Phone lets you open, view, copy, and share photos that you took on your phone, as well as send and reply to texts right on your PC. There’s an iOS version as well, but it’s much, much more limited.

    Snip & Sketch

    snip-sketch

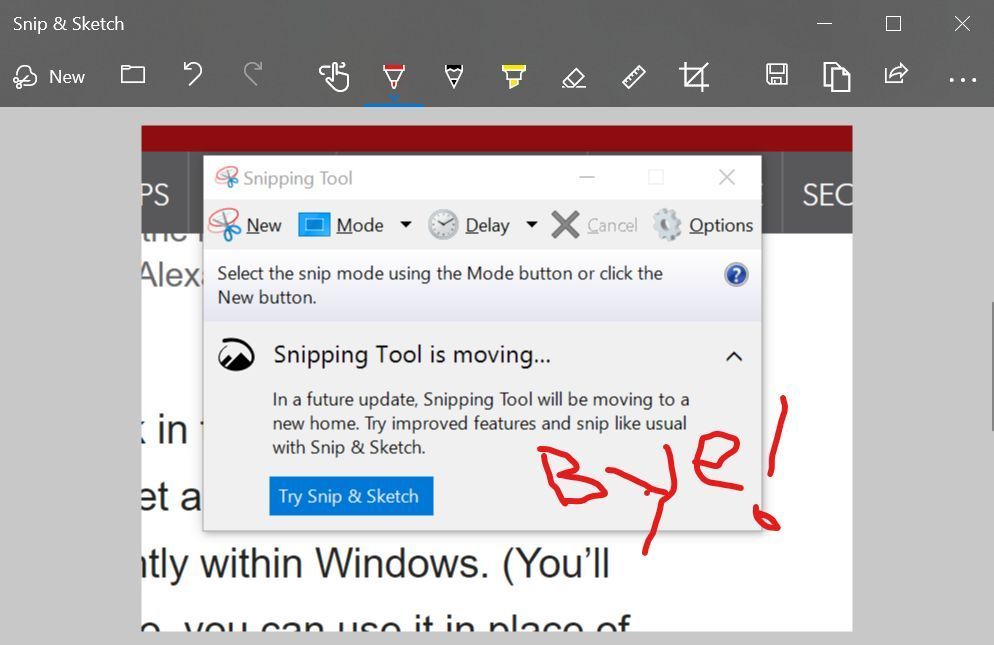
    The firmly entrenched Snipping Tool within Windows is finally getting replaced and upgraded. The October 2018 Update added Snip & Sketch, a new tool that lets you select a portion of the screen to copy when you press Windows + Shift + S. After doing so, the selected screenshot will be copied to your clipboard, so you can paste it into any image editing software—including the standalone Snip & Sketch app, which lets you annotate and share your marked-up images.

    Near Share

    windows-10-near-share

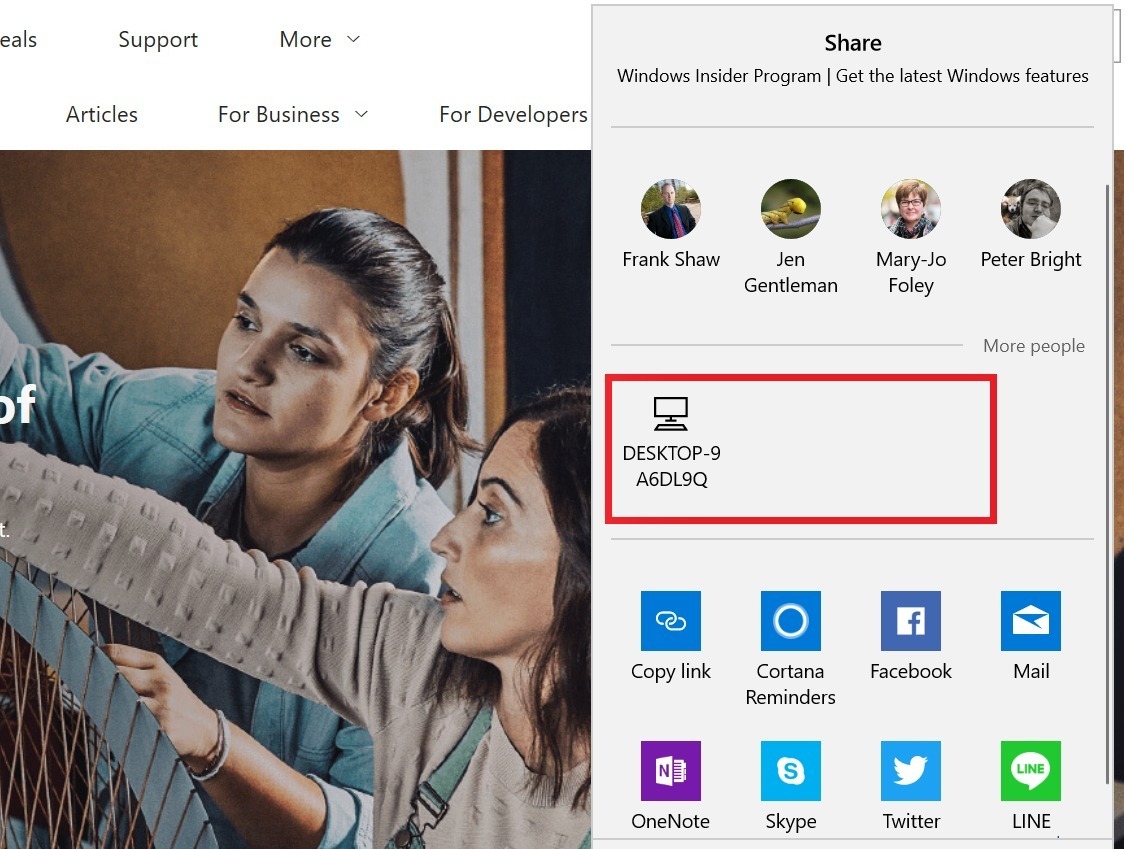
    Near Share makes it easy to share files and URLs with local PCs over the air, negating the need for flash drives or chat apps to pass something along. If you open the Share interface in Microsoft Edge or File Explorer, you’ll see PCs with Nearby Sharing enabled appear as an option if you have the April 2018 Update installed. Recipients receive a pop-up notification when something is sent. Think of it as an alternative to Apple’s Airdrop, albeit one without any mobile support.

    To use Near Share, your computer needs both Bluetooth and Wi-Fi working, and you’ll have to enable the Nearby Sharing option in Settings before you can start using it. Transfer speeds were pretty slow and Bluetooth-like in our tests, so you may still want to resort to alternative means to pass especially large files around. Microsoft says the feature automatically chooses to use Wi-Fi or Bluetooth depending on what’s available, and what’s faster.

    Ransomware protection

    ransomware-protection

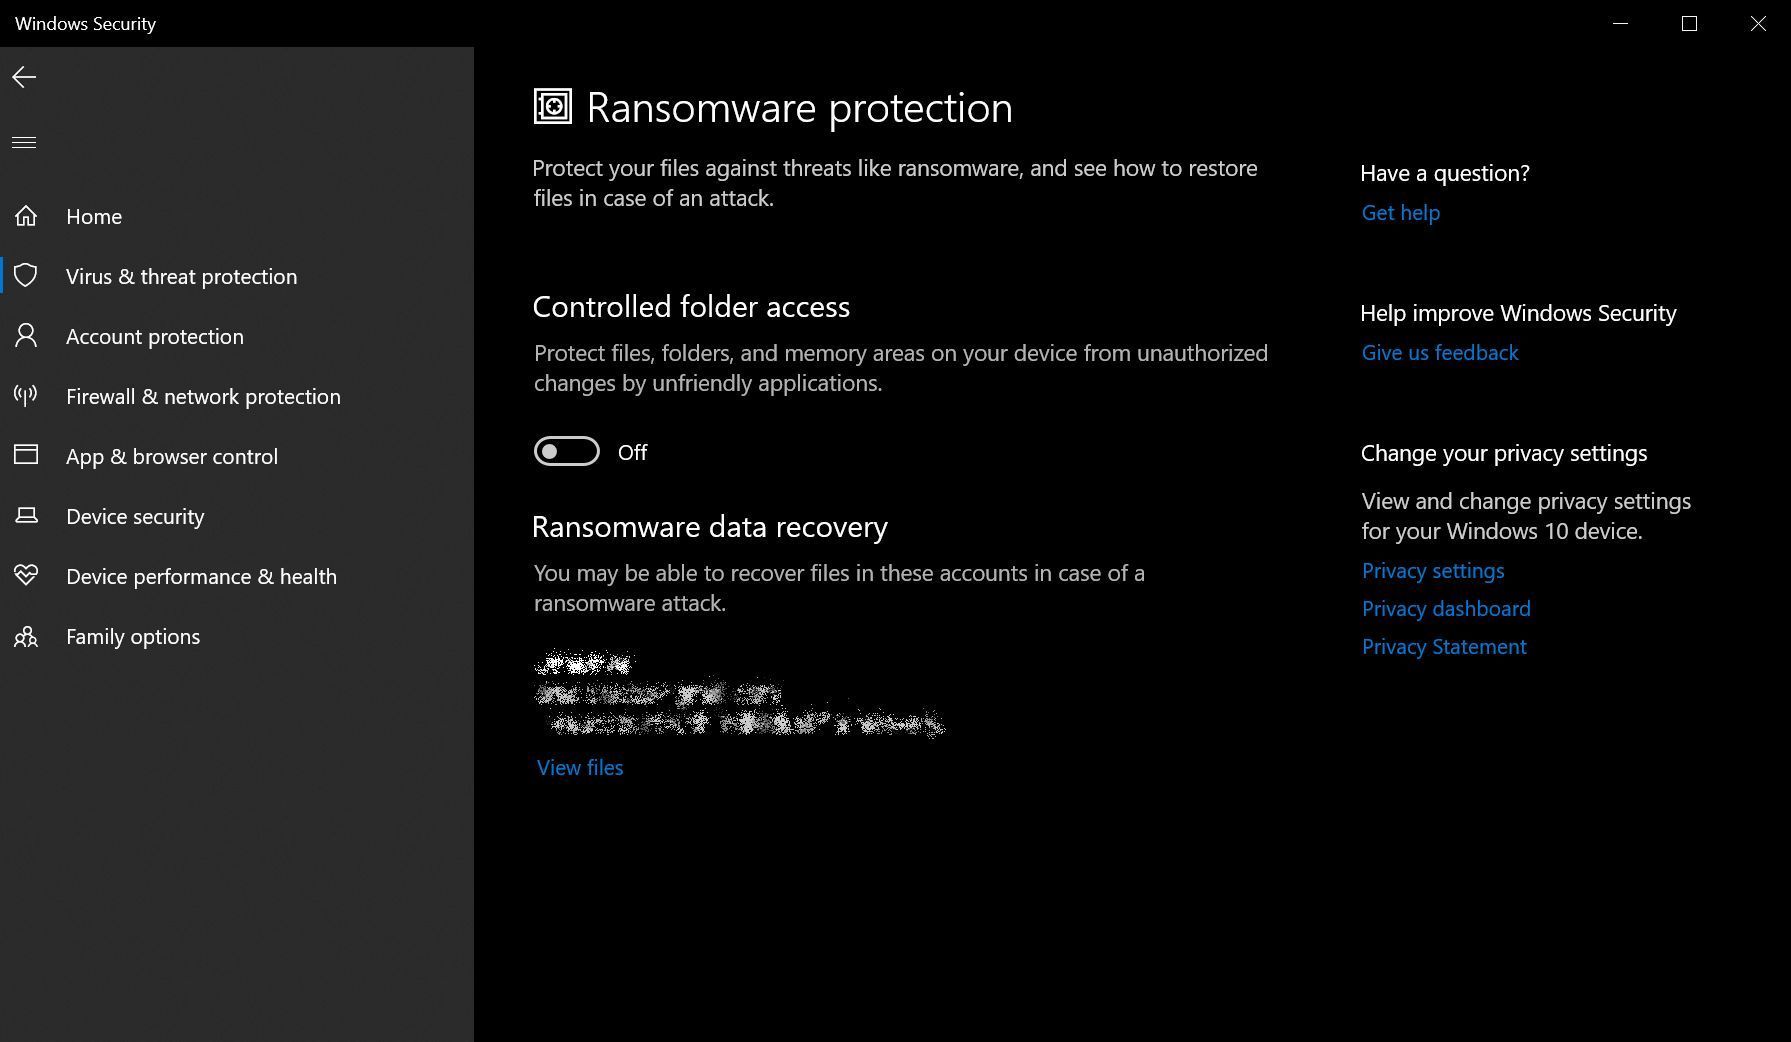
    Ransomware is a growing problem. It infects PCs, encrypts your files, and holds everything hostage until you pay a ransom—hence the name. The best defense against ransomware is frequent backups and strong security software, but Windows 10 now includes basic protection right in your operating system.

    Controlled Folder Access “protects your files and folders from unauthorized changes by unfriendly applications.” Your Documents, Pictures, Movies, and Desktop folders are protected by default, though you can block other folders manually or whitelist trusted software to access your locked-down info. You can tweak Controlled Folder Access by opening the Windows Security app (formerly Windows Defender), heading to the Virus & threat protection tab, and clicking the “Manage ransomware protection” link at the bottom.

    Dark theme

    dark-theme

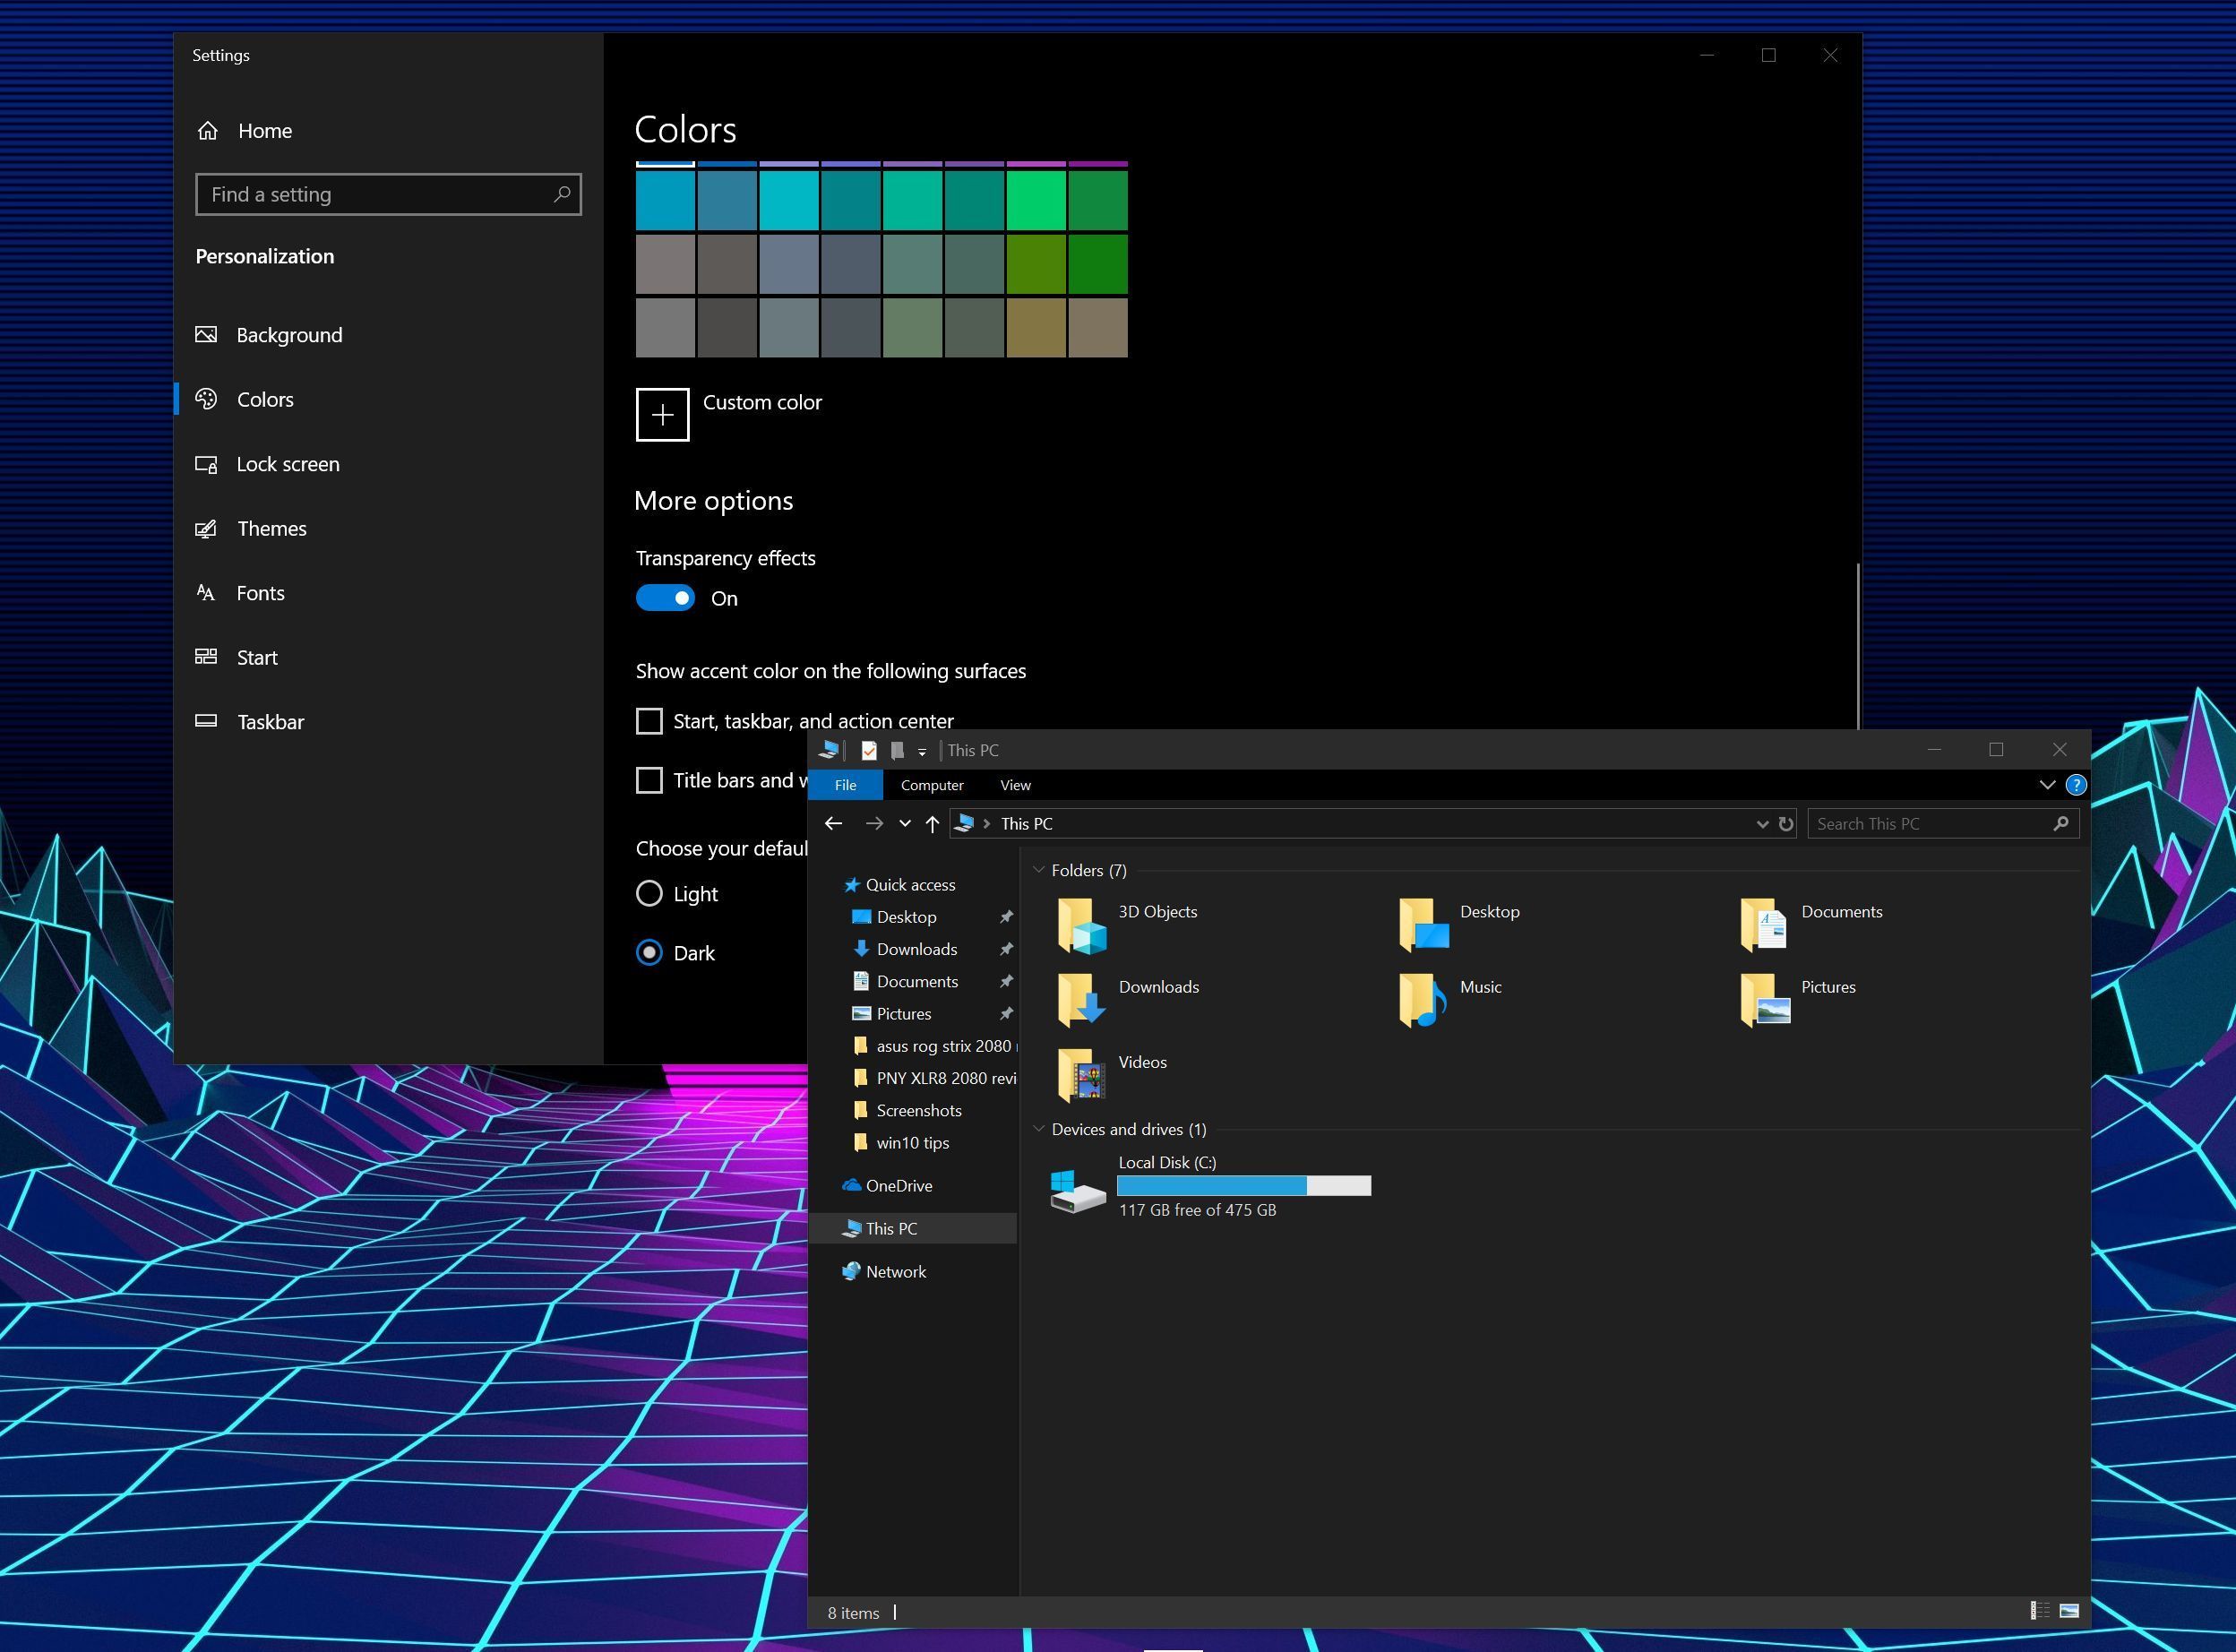
    If you love dark themes, you love dark themes. Light themes sear your eyeballs. Fortunately, Windows 10 now supports a dark theme.

    Head to Start > Settings > Personalization > Color and select the “dark” option under “Choose your default app mode.” The Windows 10 October 2018 Update extended the dark theme to include File Explorer, too. Enjoy!

    Enable Windows 10 Dynamic Lock

    dynamic-lock

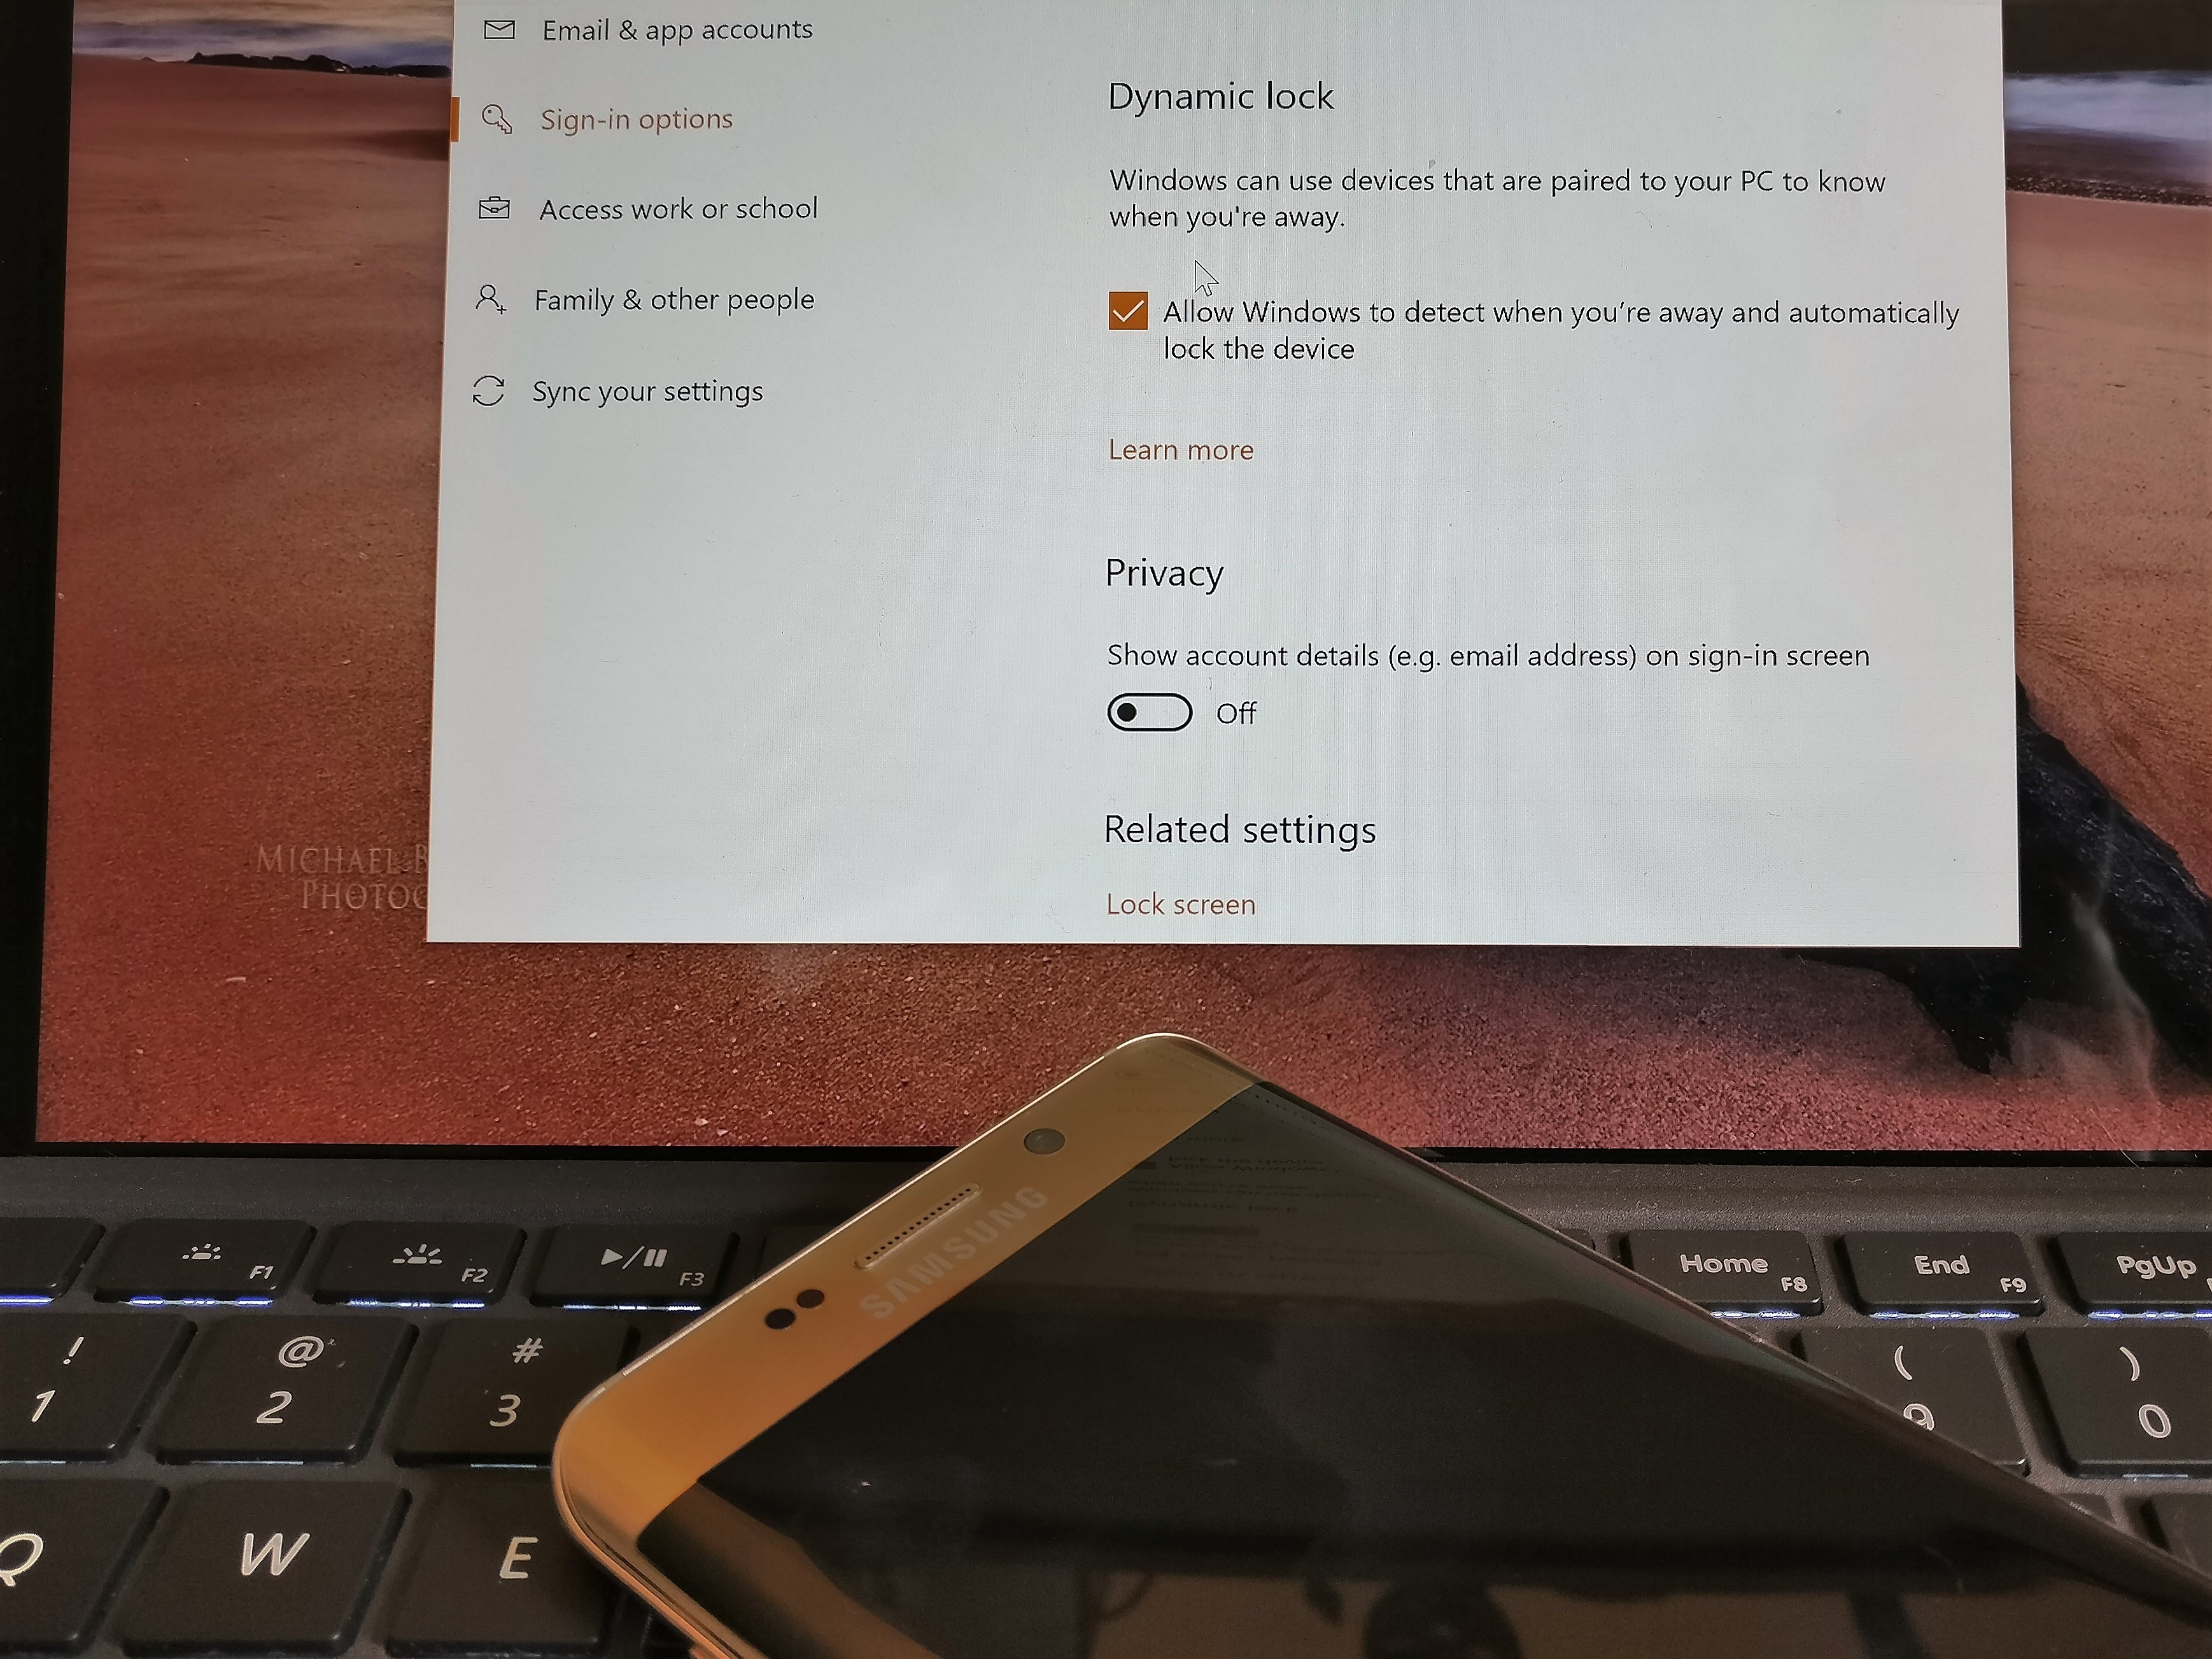
    Say goodbye to Windows + L. Dynamic Lock is a handy feature that pairs your PC with your phone over Bluetooth, then automatically locks your computer when you wander away from it.

    To start using it, marry the two devices in Control Panel > Hardware and Sound > Devices and Printers, then activate Dynamic Lock at Settings > Account > Sign-in options.

    Game Bar

    game-bar

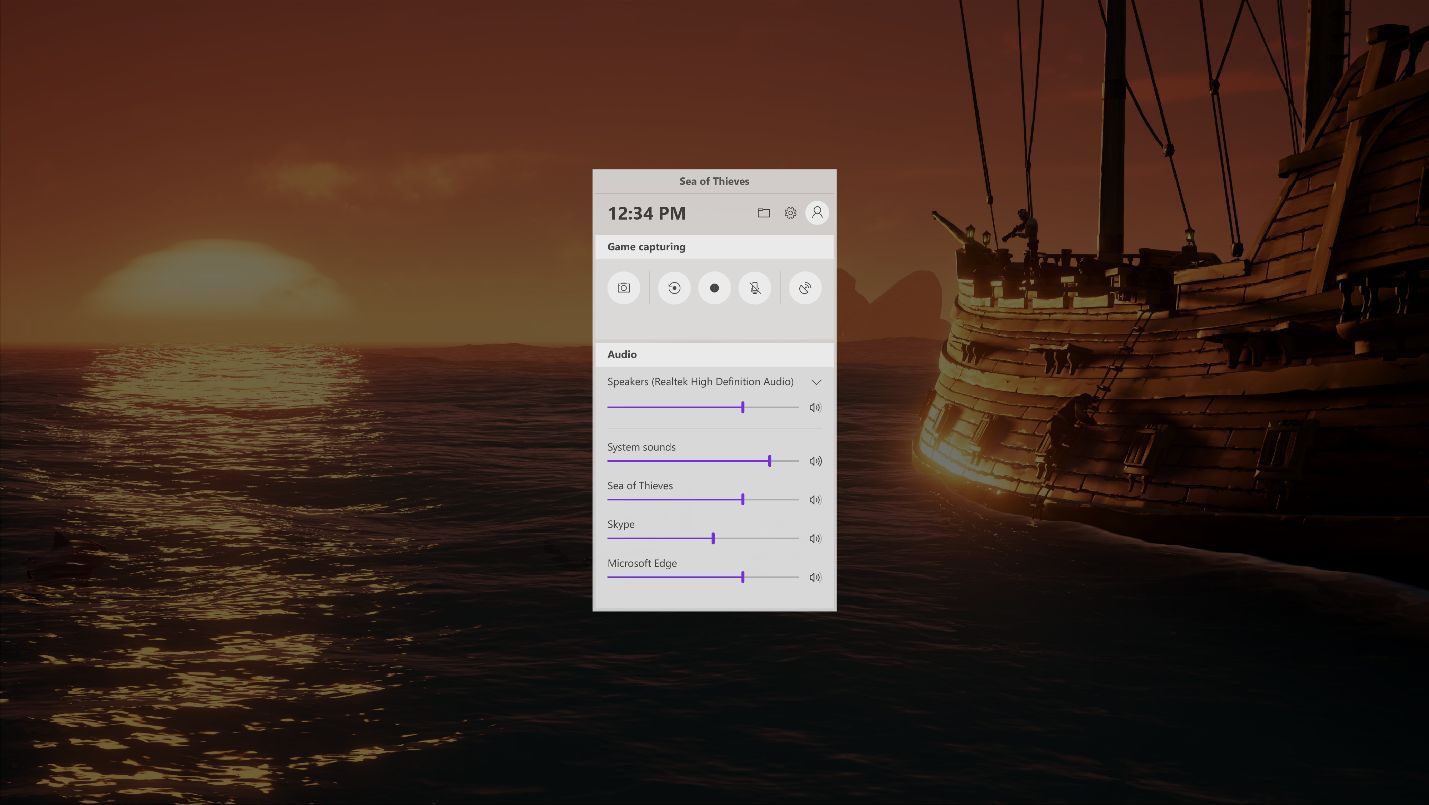
    If you’re into playing around on your PC, Windows 10’s Game Bar—summoned by pressing Windows + G in-game—holds all sorts of nifty extras. It’s always been able to take screenshots or videos of gameplay clips, but as of the Windows 10 Creators Update, the Game Bar also offers easy-peasy Beam game streaming and the intriguing Game Mode, which can improve performance on resource-limited systems. The October 2018 Update overhauled the interface yet again, adding inline volume controls.

    The Game Bar’s handy even if you don’t actually play, as it can be used to record video of any app—not just games. Windows 10 also has a dedicated Gaming section in its Start menu Settings to let you tinker with options, including Xbox networking and parental controls.

    Per-app GPU management

    windows-10-per-app-gpu-settings

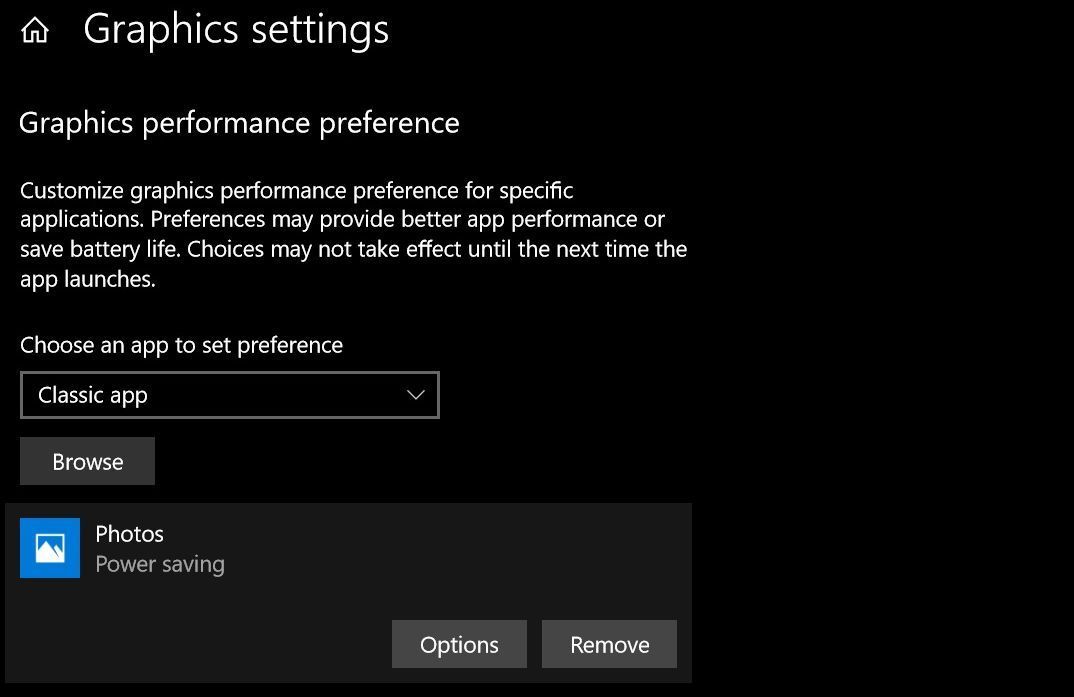
    The Windows 10 April 2018 Update added the ability to tell Windows which graphics hardware—discrete or integrated—to use when you open specific apps. It sounds niche, but the feature could prove pretty helpful if you’ve got a gaming laptop and want it to last longer.

    By default, booting up a game switches over to discrete graphics, which use a lot more energy than the graphics cores integrated in Intel chips and AMD Ryzen APUs. But a lot of indie and retro games play just fine on integrated graphics. With Windows 10’s per-app GPU management, you can manually tell the system to stick to the more power-efficient option for games that don’t need the extra oomph.

    Go to Settings > Display, then click the Graphics settings link at the very bottom of the page to start tinkering.

    OneDrive Files on Demand

    onedrive-files-on-demand

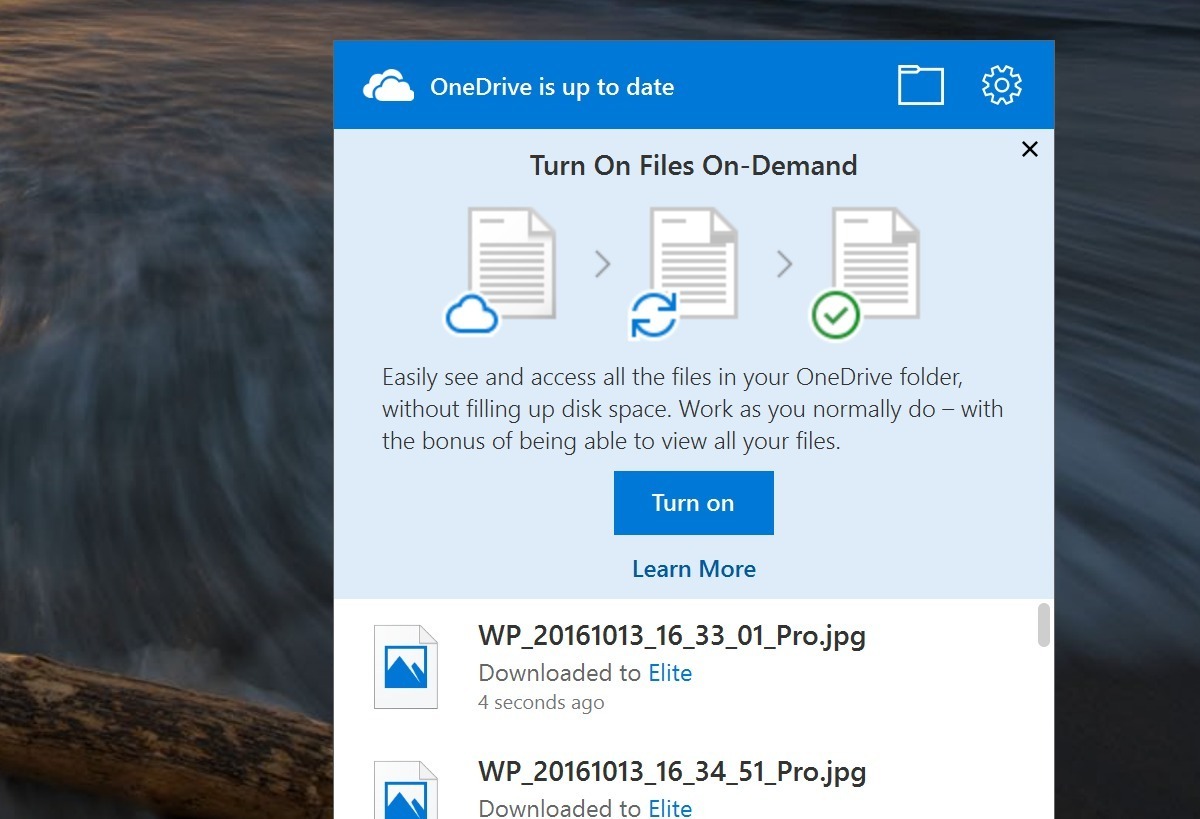
    It’s back, huzzah! OneDrive Files on Demand resurrects Windows 8.1’s “placeholder” feature for the cloud storage service baked into Windows 10. OneDrive Files on Demand shows all of the files you have stored in OneDrive in a folder on your PC, but they’re just pointers synced with the cloud—not actually files installed on your PC. Unless you want them to be. You can select which files and folders to make available locally.

    Storage Sense

    storage-sense

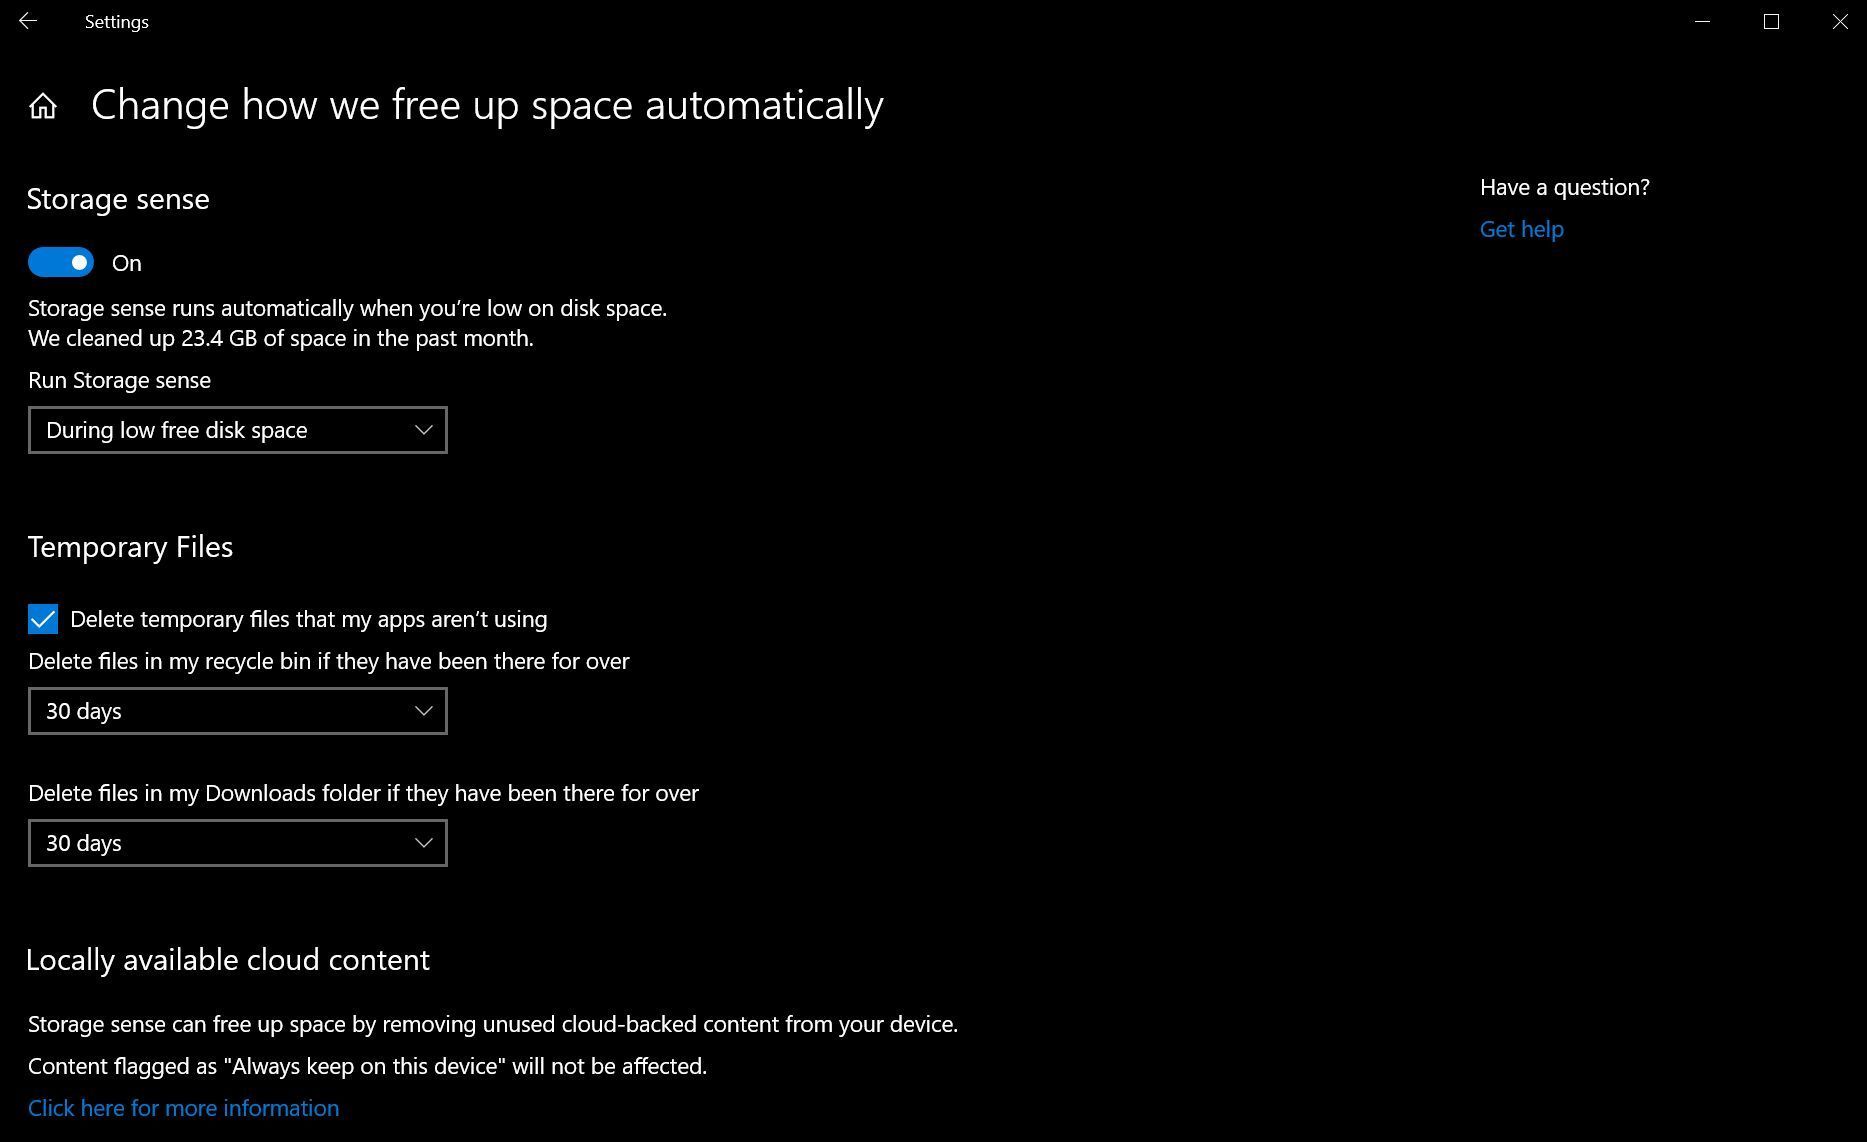
    Over time, your PC can quietly fill with needless junk without your even realizing it, as the Recycle Bin and temporary files suck up your storage. Storage Sense helps combat the creep. Head to Settings > System > Storage and enable the Storage Sense option to have Windows start automatically clearing out unneeded temporary files, and deleting any files in your Recycle Bin over 30 days old. You can tweak those options using the Change how we free up space link underneath the option.

    The October 2018 Update added the ability to have Storage Sense send long-untouched files from anywhere on your computer to your OneDrive cloud storage, freeing up space on your hard drive. It could be a useful addition if you’re close to filling up your local storage, but keep an eye on your available OneDrive space—cloud storage isn’t free. Fortunately, the feature includes granular controls.

    Mixed Reality

    windows-mixed-reality-viewer-app

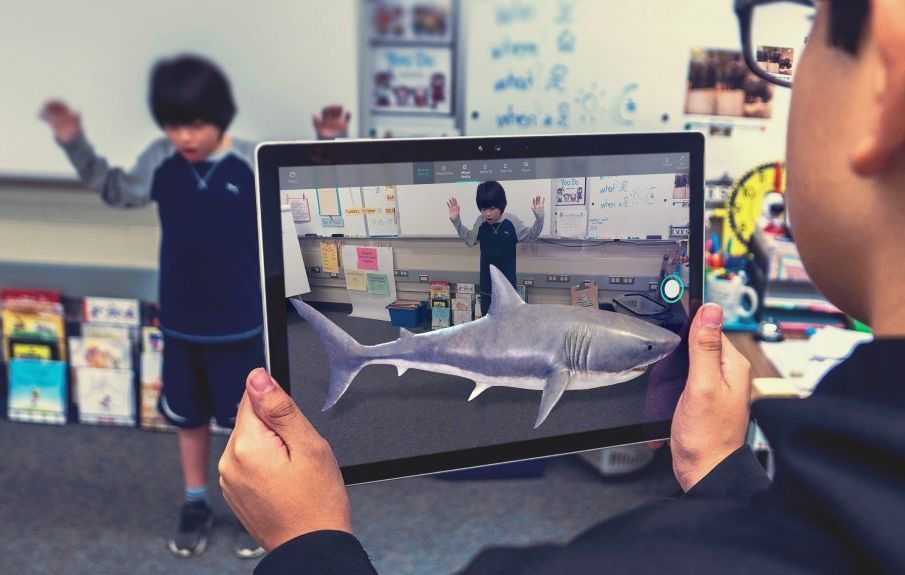
    The Fall Creators Update added “Mixed Reality” to Windows 10. The most obvious use for it is in the legion of new Windows Mixed Reality headsets, but you can check out the benefits even if you don’t have one of those. The Mixed Reality Viewer app lets you drag digital 3D objects you’ve created in the Paint 3D app into the real world, using the combined might of your device’s camera and display. It’s not really augmented reality since you can’t interact with the objects, but it’s closer to “Mixed Reality” than the headsets are.

    Somewhat related, the nifty Story Remix tool in the Photos app lets you add fantastic 3D animations to videos you’ve captured, among many other talents. It’s pretty sweet!

    Start menu folders

    start-menu-folders

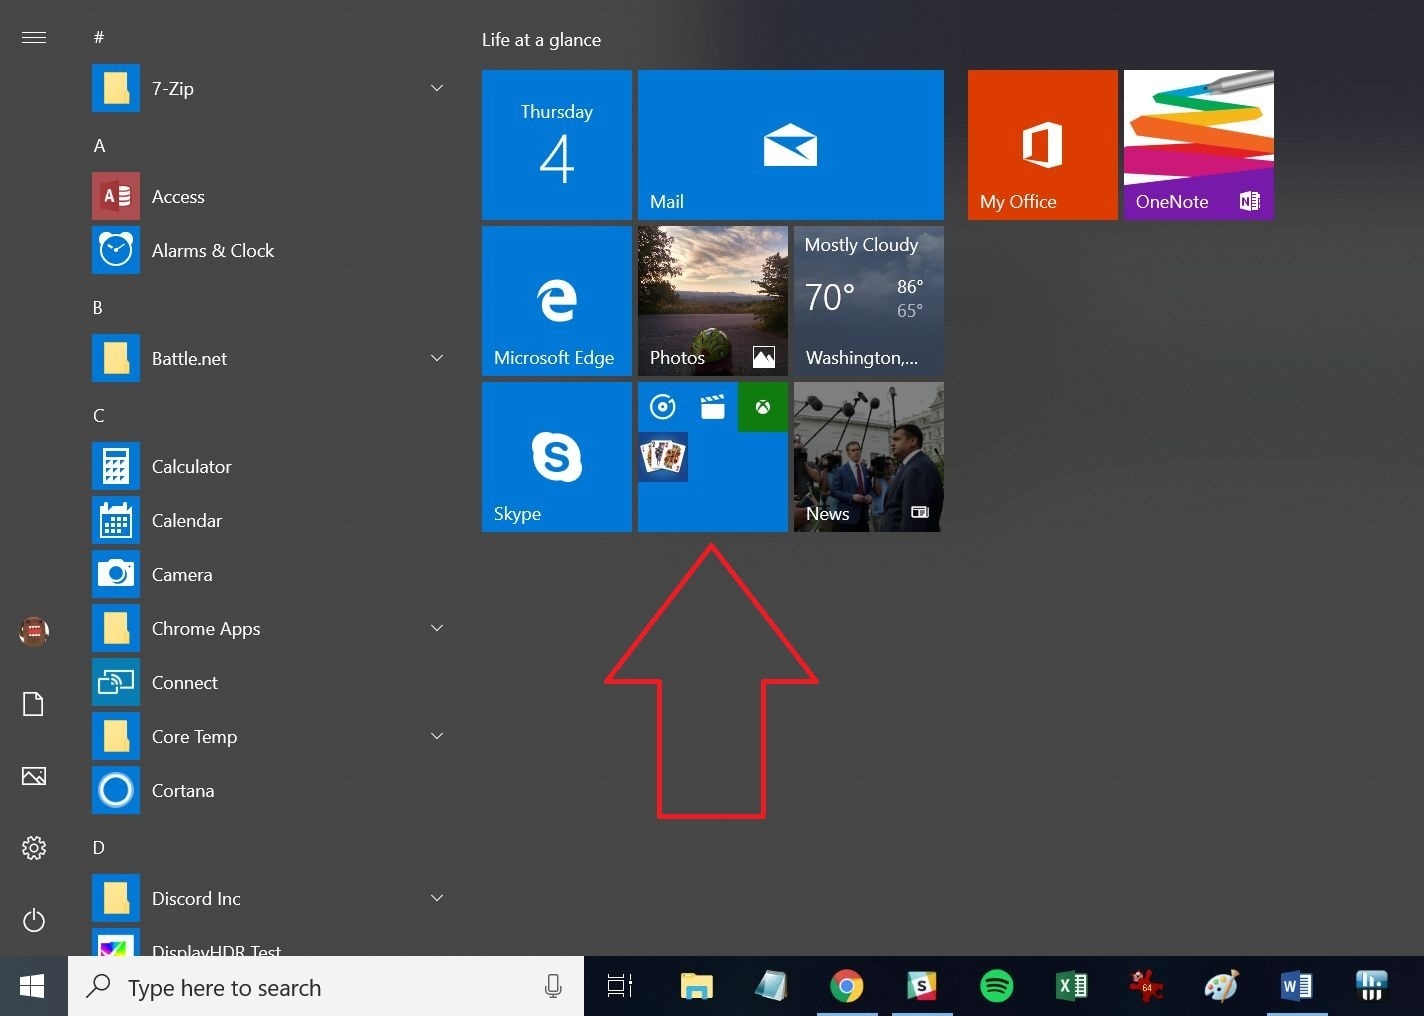
    What’s old is new again: You can create basic Start menu folders in Windows 10, organizing Live Tiles into clusters. Simply drag your Start menu apps on top of each other to create folders that expand when clicked on. As of the October 2018 Update, you can now name the folders you create, but you have to expand it open to see the option.

    Troubleshooting, troubleshot

    windows-10-troubleshoot

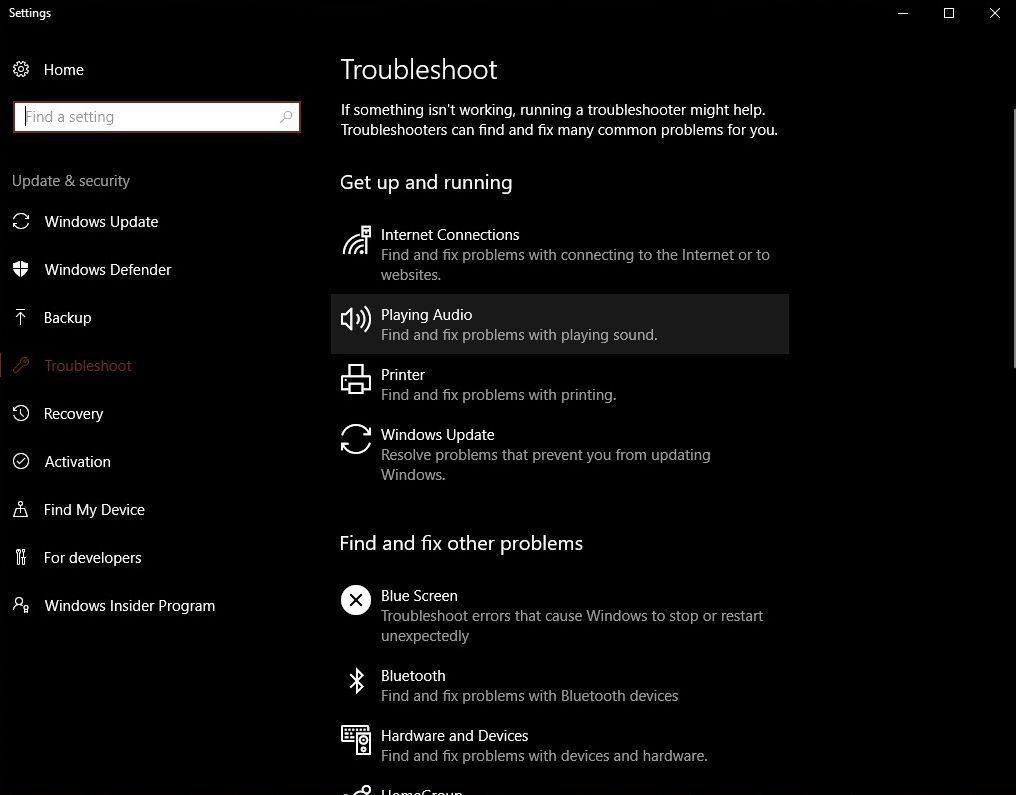
    The Windows 10 Creators Update added a helpful touch for distressed PC users. The operating system’s consolidated all of its troubleshooting tools in a single location: Home > Update & Security > Troubleshoot. If you run into trouble, run there first.

    Turn off File Explorer’s Quick Access view

    windows-10-file-explorer

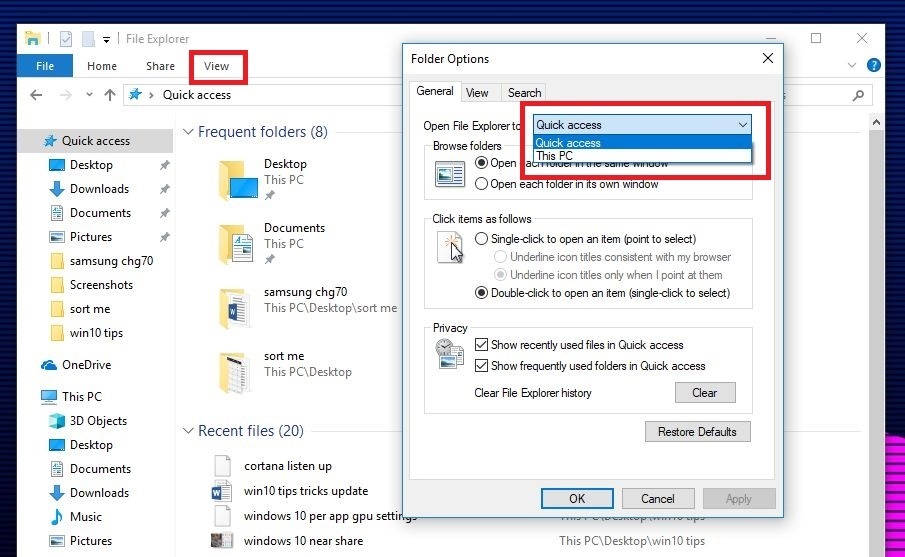
    When you open File Explorer in Windows 10, it defaults to a new Quick Access view that shows your most frequently accessed folders and recently viewed files. I love it, personally, but if you’d rather File Explorer defaulted to the “This PC” view found in Windows 8, here’s how.

    Open File Explorer, then select View > Options from the Ribbon. A Folder Options window will open. Click the “Open File Explorer” drop-down menu at top, then select the “This PC” option. Click OK and you’re done!

    Manage notifications

    windows-10-notifications

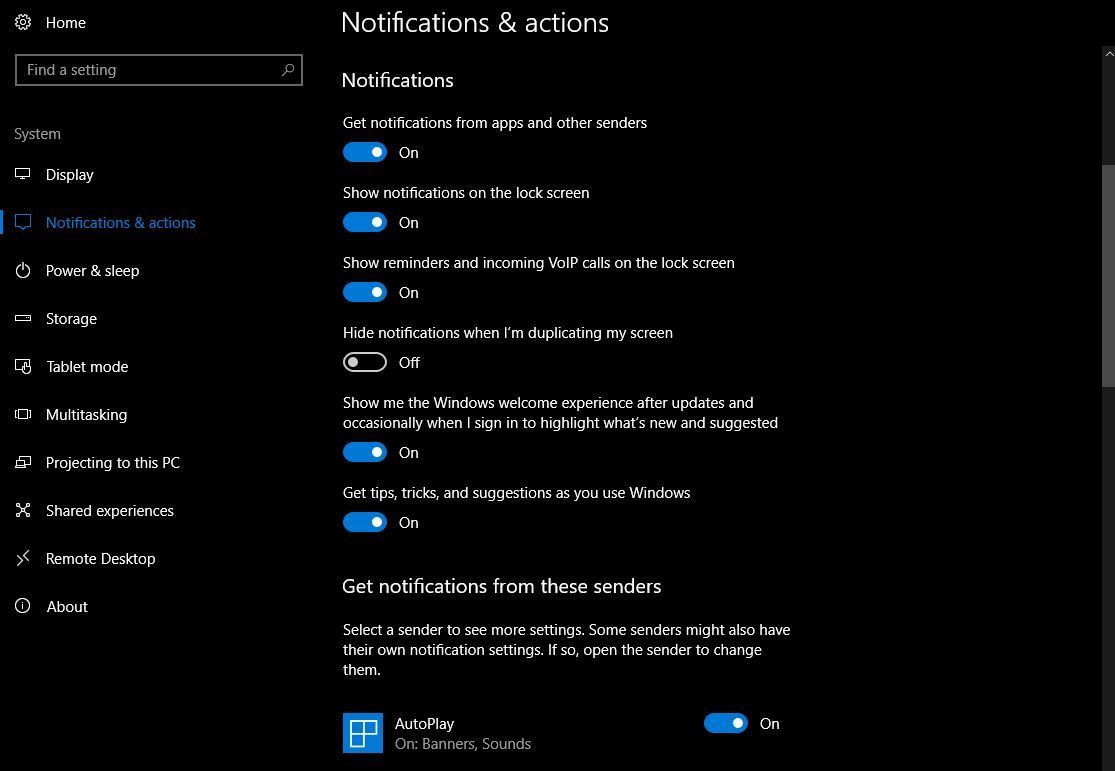
    Windows 10’s Action Center houses and manages the notifications spawned by your system’s various apps. You might not want every Windows Store app you install barking at you all the time, however, or maybe you don’t want to see any notifications while you’re in presentation mode. You might just want to silent the annoying ads that the Get Office app spawns. Fortunately, those are easy to tweak.

    To tinker with you your notification settings, head to Start menu > Settings > Systems > Notifications and actions. Individual Windows Store apps, like the Mail app, tend to have more granular notification options in the Settings menus inside the apps themselves.

    Schedule your restarts

    windows-10-restart-schedule

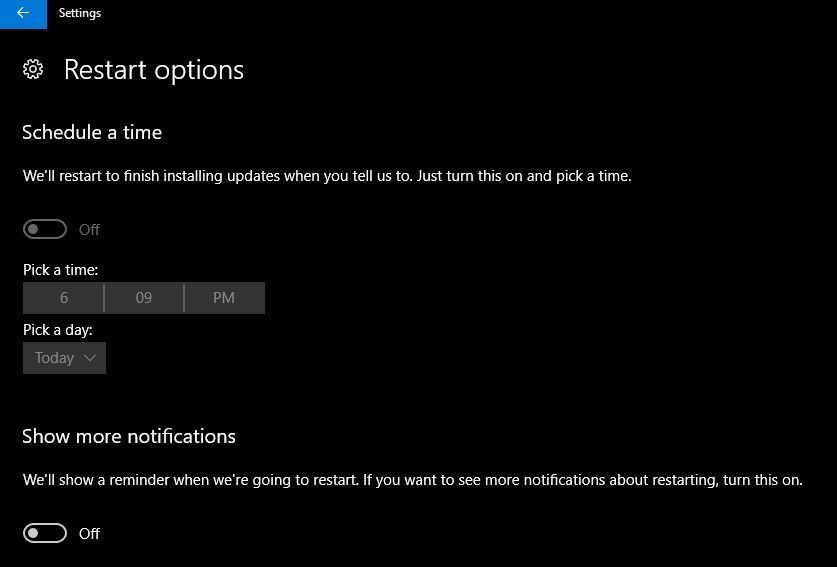
    This is wonderful. If you’ve got pending updates that require you to reboot your PC, Windows 10 will allow you to schedule a specific time for it to do so. Finally!

    Open the Settings option in the Start menu, then head to Updates and Recovery > Windows Update > Restart options to see the scheduling screen above.

    Get Windows updates from other sources

    delivery-optimization

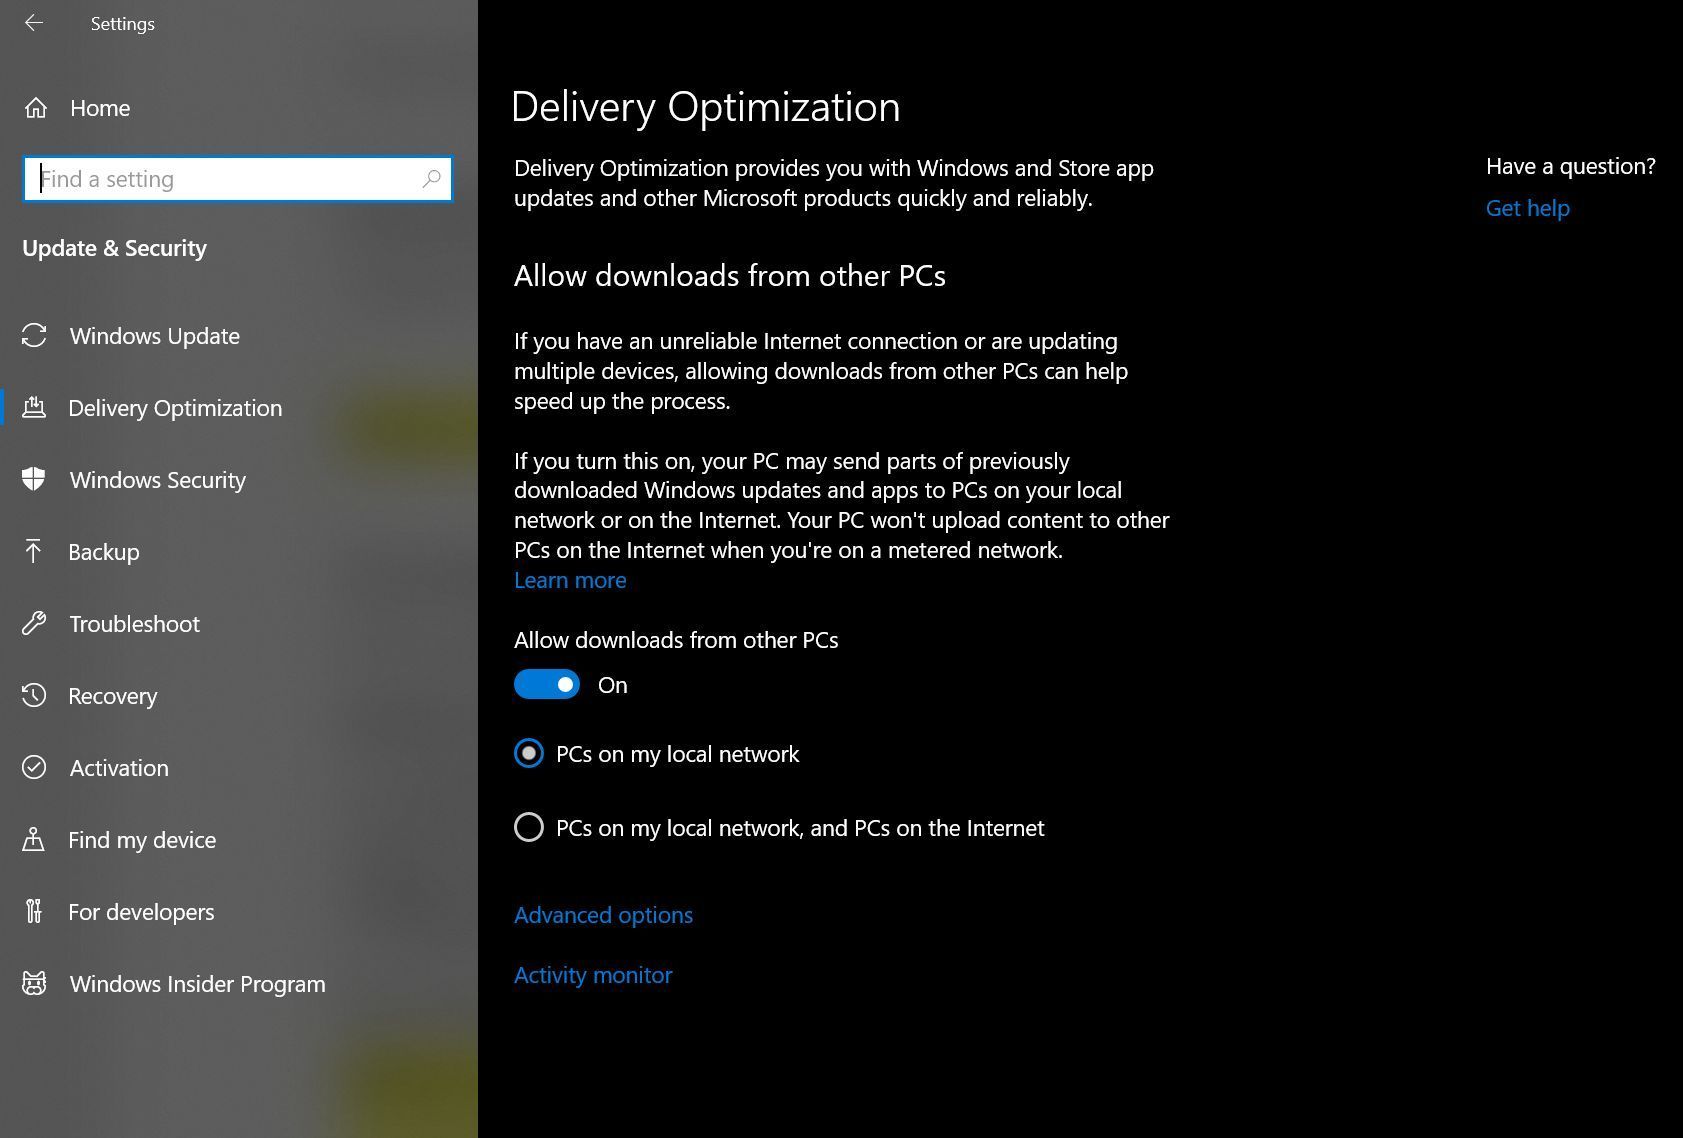
    But the Windows Update upgrades don’t end there. Windows 10 introduces a new option that lets you download updates using peer-to-peer technology, rather than Microsoft directly. It could help you get that hot security patch faster when everybody’s hammering Microsoft’s dedicated servers, or save you bandwidth in a computer-crowded house—just download the new patch once from Microsoft, then share it among the PCs under your care.

    To tinker with the setting, head to Start > Settings > Update & Recovery > Delivery Optimization. By default, “Get updates from more than one place” is enabled and configured to grab updates from PCs on both your local network and the Internet at large. If you don’t like the idea of your PC using your bandwidth to share Windows Updates with strangers, be sure to disable it. If you leave it active, the “Advanced options” link lets you fine-tune how Windows uses your network to download and share updates, as you can see above.

    Seize control of Windows Updates

    thinkstockphotos

    While the ability to schedule installation times for updates is very welcome indeed, not everyone is happy about the way Windows 10 handles patches—specifically, that you can’t refuse them. Windows 10 Pro users—but not Windows 10 Home users—can delay downloading updates for some time, but eventually, Microsoft will force them on you.

    There are some actions you can take to exert control over your Windows Update experience, however. Most notably, if you’re using Wi-Fi for connectivity, you can set Windows 10’s Wi-Fi connections as metered to download updates when you’d like to, rather than when Microsoft wants you to. The Active Hours feature lets you tell Windows specific times not to install updates. And if you ever encounter a borked update that refuses to play nice with your PC, Microsoft’s released a tool that allows you to choose individual updates so they won’t be downloaded again.

    Those workarounds aren’t a replacement for being able to manually choose the Windows Update you’d like to install, but they should help ease the sting a little, at least.

    Fresh keyboard shortcuts!

    keyboard

    Windows 10 packs a handful of fresh keyboard shortcuts, all tied to newfound abilities inside the revamped operating system. There are many more than we can list here, so head over to our guide to Windows 10’s keyboard shortcuts to learn all about them. If you really want to get fancy, augment those hotkeys with Windows 10’s new touchpad gestures for true shortcut mastery.

    Declutter your taskbar

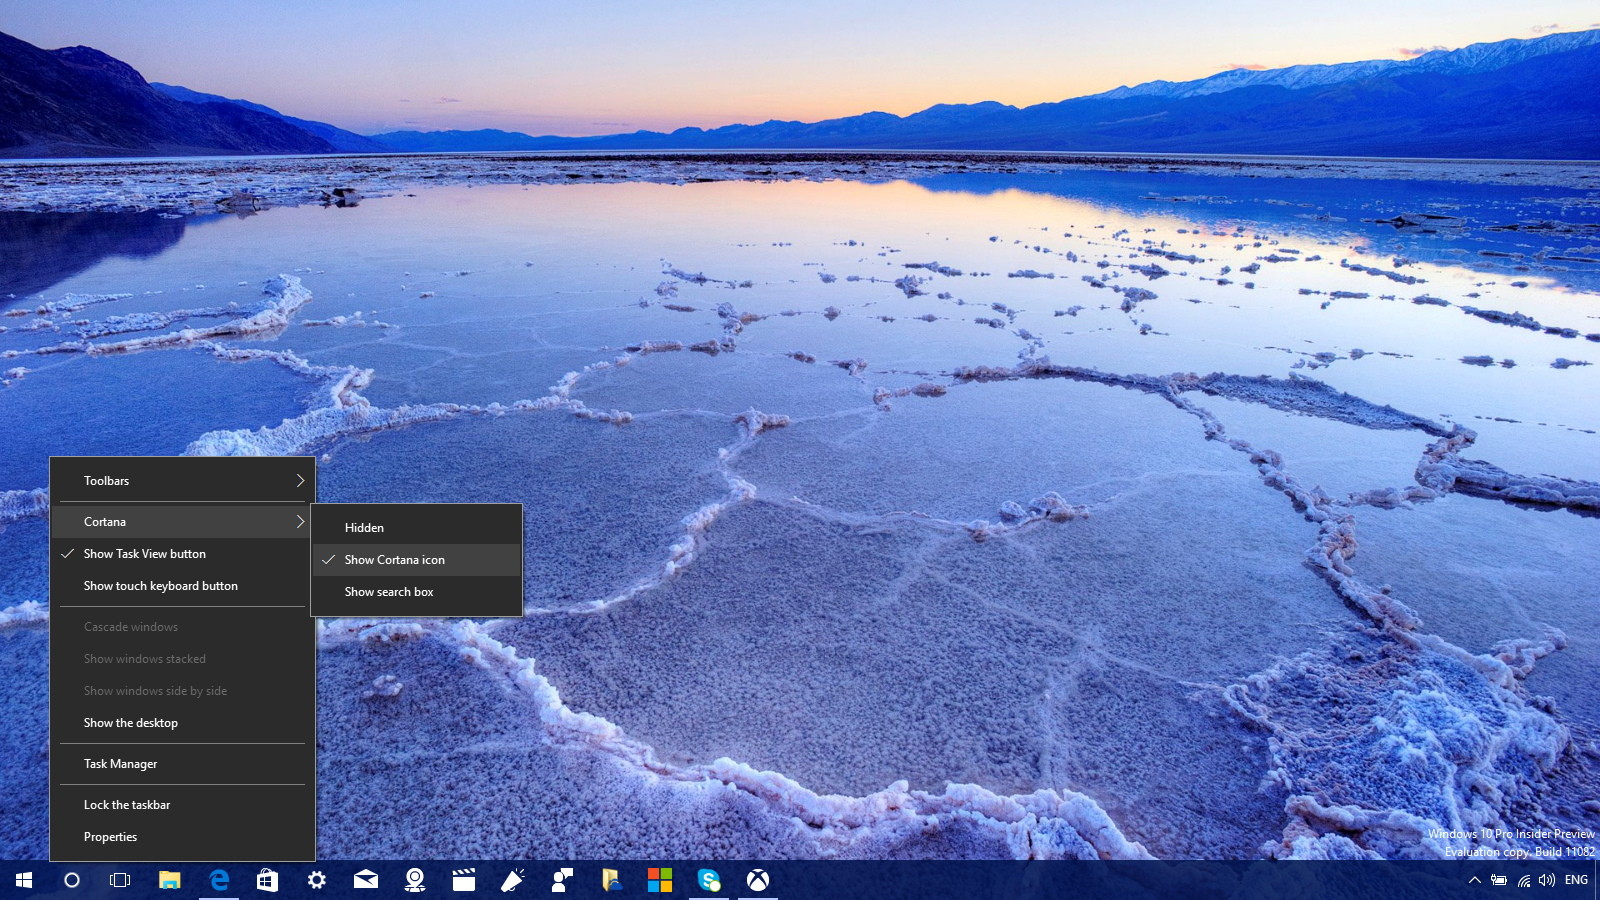
    show-cortana-icon-windows-10-taskbar.jpg

    Two of Windows 10’s standout features are its Cortana search integration and newly added virtual desktop support—but they claim a sizeable chunk of your taskbar. If you don’t care about either (or don’t mind using Windows key + Tab to leap through virtual desktops) you can reclaim that onscreen real estate.

    Everything starts by right-clicking an empty section of your taskbar. Select Cortana, and choose to Show Cortana icon only. You can also remove the Cortana and Task View buttons from the same Taskbar menu.

    Thank You!

    We feel the need to thank you following through with this long episode of top 30 Windows 10 trick, tips and tweaks. The article doesn’t stop here; share your ideas with us on the comment section.

    We look forward to seeing you again!

  • Windows 10’s Touchpad Gestures for Laptops

    Windows 10’s Touchpad Gestures for Laptops

    If you really want to get fancy, augment those hotkeys and use Windows 10 like a ninja, try new Windows 10 touchpad gestures for laptop.

    Microsoft changed Windows for the better when it introduced trackpad gestures in Windows 8. The new gestures made controlling your PC a far more fluid experience, helping you get things done more efficiently without the need for mouse-like buttons at the top of the touch area.

    In Windows 10, Microsoft improved on Windows 8’s foundation. Beyond integrating existing gestures, the company added new touch controls and dumped items that wouldn’t make any sense in Windows 10, like swiping in from the right edge for the Charms bar (since Windows 10 doesn’t have a Charms bar).

    The only requirement for using these gestures is that you have a precision touchpad, so some older laptops won’t be able to use them.

    If you’re not sure if your touchpad supports gestures, open the Settings app and go to Devices > Mouse & touchpad. Under the “Touchpad” heading it will say “Your PC has a precision touchpad” if you can swipe and tap instead of clicking.

    • Select an item: Tap on the touchpad
    • Scroll: Place two fingers on the touchpad and slide horizontally or vertically
    • Zoom in and out: Place two fingers on the touchpad and pinch in or stretch out.
    • Right-click: Tap the touchpad with two fingers, or press on the bottom right corner
    • Open Task View: Place three fingers on the touchpad and swipe up (away from you).
    • Show desktop: Place three fingers on the touchpad and swipe down (towards you). Reverse the movement to get all your windows to return.
    • Switch between open windows: Place three fingers on the touchpad and swipe right or left (this is the same as pressing Alt + Tab).
    • Drag an open window: Double-tap and then drag from the title bar
    • Open Cortana: Tap the touchpad with three fingers. If you’d rather this gesture opened Action Center instead, you can change this default in Settings > Devices > Mouse & touchpad.
  • Data Recovery Software: Top 3 Features of EaseUS & How to Use on PC

    Data Recovery Software: Top 3 Features of EaseUS & How to Use on PC

    Latest Data Recovery software from EaseUS

    EaseUS data recovery software is an industry-leading tool to get back lost document and files. It comes with different versions, depending on your specific needs. Here are the top 3 features of EaseUS data recovery wizard free.

    EaseUS Data Recovery Software Is Free to Use

    Price is always a major concern when shopping for computer software. However, with EaseUS Data Recovery Wizard, you have the luxury of keeping your data safe and secure, and that too without making your pocket any lighter.

    The free version provides you with all the necessary features. Be it hard drive recovery, recycle bin recovery, RAW recovery, or recovery of data from external memory sources, EaseUS is a very reliable option.

    Although there are paid versions of the data recovery software too that comes with additional features such as improved technical support and greater allowed volume of recoverable data, etc., but most users find the free data recovery software to be more than sufficient for their basic requirements.

    It Is Plain & Simple to Use EaseUS Data Recovery Tool

    EaseUS Data Recovery Tool was designed in such a way to provide its users with a simple and intuitive data recovery experience. This is apparent from the fact that using the data involves only a few straightforward steps.

    First, you simply needs download the software. The second step is to launch it. After this, run the scan, either the quick scan or the deep scan. The next step is to identify the intended file from the search results.

    Finally, select and click on the recover button to recover the file you have selected. And that’s it, the lost or corrupted data or file will be safely back on your computer.

    EaseUS Is Compatible with All Operating Systems

    Be it a Windows computer or a Mac, EaseUS Data Recovery Software works seamlessly. It supports both desktops and laptop devices. This is particularly good, because laptops are more prone to data loss and corruption, unlike desktop computers.

    Also, you can recover files from external storage devices such as SD cards, external hard drives, USB and pen drives, and digital cameras, to name a few.

    How to Recover Lost Files With Easeus Data Recovery Wizard Free

    Recently faced with the loss of files on one of my external hard drives, I tried a data recovery and here is how to use the free version of EaseUS Data Recovery Wizard.

    EaseUs Software Installation

    EaseUS software installation tips

    The software is available free of charge in its trial version. Be careful, however, this version does not recovery data more than 500MB (up to 2GB if you’re friends) and you have to go through the credit card box to buy the software.

    For my part, I had to recover data from my external hard drive on which I emptied an entire file by mistake and I knew that what I had to recover weighed less than 500MB. Once the software is installed, we can get down to business.

    Preparation for recovery

    EaseUS software tutorial

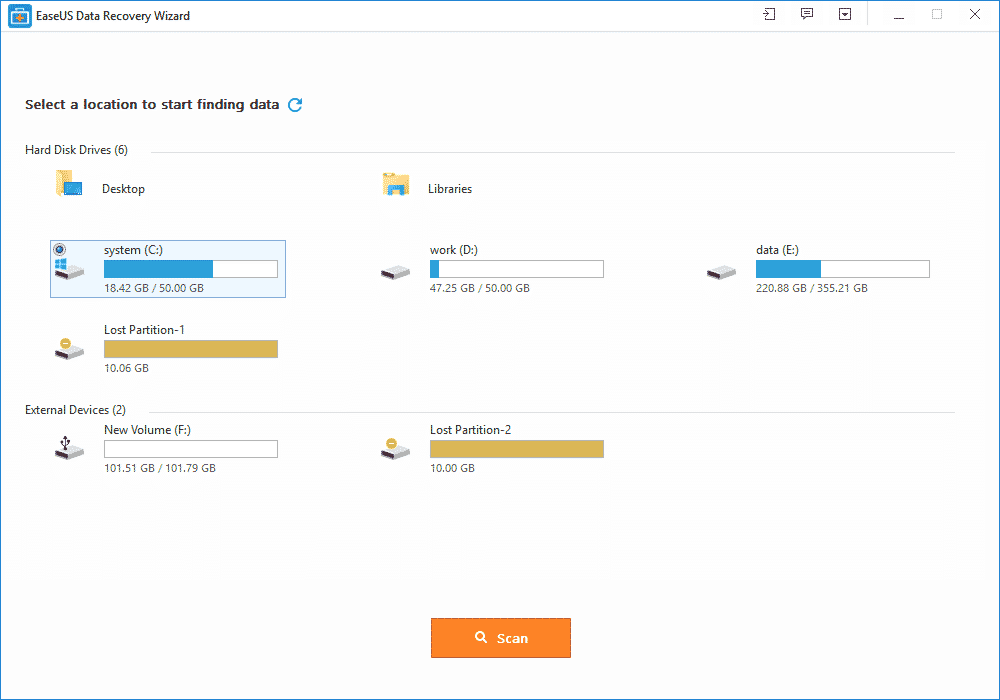
    Before recovering your data, first, scan your hard drive to determine which files can be recovered. To do this, simply select your device (internal/external hard drive, USB key, memory card …):

    But be aware that if you have emptied a folder by mistake, you can also select the folder in question to scan only it. This will not save you time, as the time is the same whether you are scanning the entire disk or just a folder.

    And then click Analyze at the bottom of the window. The scan starts and may take some time depending on the number of detected files and the size of your hard drive:

    From my test, EaseUS Data Recovery tool used about 2h30 approximately, throughout the duration of data analysis:

    This is the longest part of the process and the only thing to do is to take the trouble and wait … Once the analysis was completed, I was able to proceed to the attempt to recover my data.

    Using EaseUS Data Recovery Tool

    recover lost data with EaseUs app

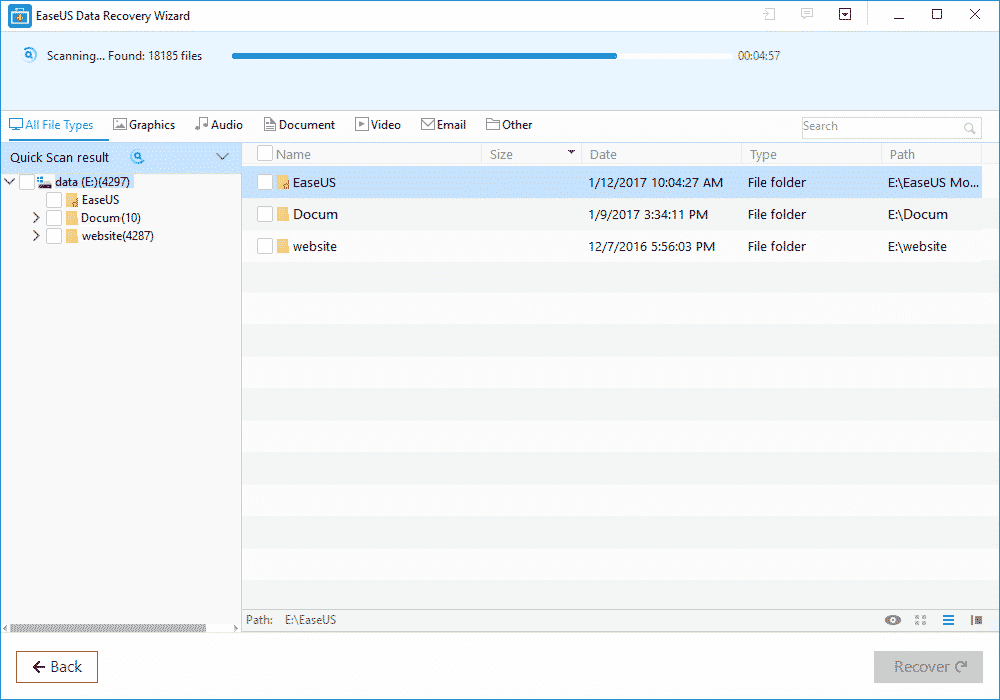
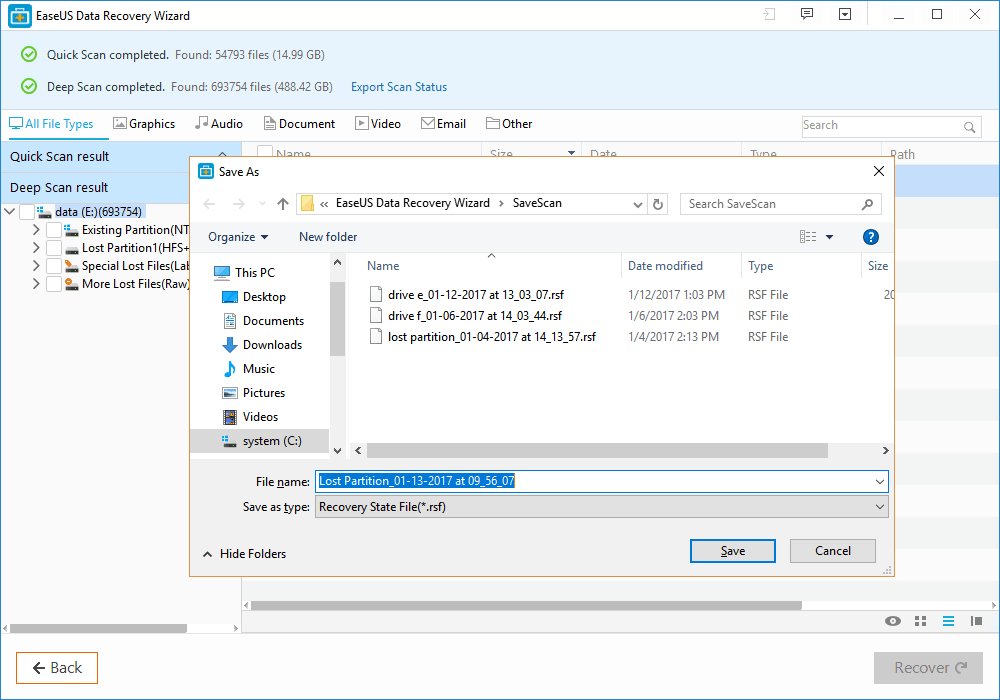
    To recover your data, once the deep scan is complete, you can browse the tree to the left to search for your files.

    The banner at the top will help you sort quickly and quickly identify where the most common file types are. Personally, I knew exactly where my files were located, so I only had to navigate to them and select them from the list:

    Do not ask me why, but there are many other files that seem to be in the folder when in fact there never was … Probably data previously written on this sector of the hard drive and have been crushed by others since! Once your files are selected, click Recover at the bottom right of the screen. The software asks you where you want to save them:

    Once you have validated, you will only have to go and retrieve your valuable data at the location you have indicated.

    For my part, I was able to recover my 2 files on which I spent a full evening to work on and I ended up very happy for the rest of the day!

  • Lenovo G505, HP 255 and 5 budget laptops for Nigerian college students—we picked the best

    Lenovo G505, HP 255 and 5 budget laptops for Nigerian college students—we picked the best

    Going to  college in Nigeria could be financially cumbersome towards the end of each semester—especially when it is imperative to get a new laptop and you didn’t manage your finance during the semester.

    Your bank account is nearly tapped out, and you still need to buy text books, handouts and lay in enough ramen noodles to last through the winter.

    Yeah, we’ve all been there. Fortunately, Moore’s Law is still in play, so today’s budget notebook is yesterday’s workhorse. Pretty much any modern laptop can handle the gamut of productivity chores—word processing, number crunching, email, and the like—but all of the machines in this roundup can also tackle media editing and encoding sessions, and deliver respectable entertainment experiences.

    To strike the best balance between performance and affordability, I gathered the top five laptops I could find for ₦60,000 or less. Benchmark busters they’re not, but they aren’t budget busters, either.

    Also Read: Infinix Diamond, Ankara Q2 and 6 ‘Premium’ Affordable Android Phones/Tablets you can buy for ₦9,999+

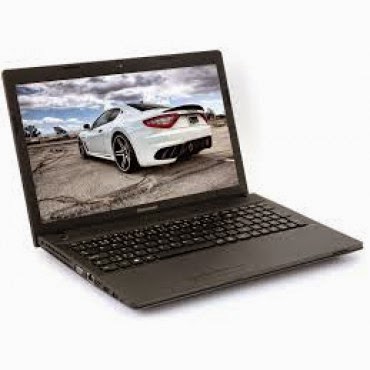
    Lenovo G505 (₦58,000) — Buy Online

    Working on an environment that demands great sound system? Lenovo G505 offers you the best option. Thanks to its stereo speakers with Dolby® Advanced Audio™ v2, graphics card options up to the speedy AMD Radeon 8570M VRAM, and optical disk drive options up to a Blu-ray Disc™ combo, the G505 offers stunning, stutter-free visuals and immersive sound for a fuller, more satisfying home entertainment experience.

    The AMD E1-2100 APU Processor powered laptop comes with a Windows 8 operating system and a RAM of 2GB. The pre-installed Bitdefender Anti‎‐Virus Plus gives maximum security to the user for 1 year and can be renewed afterward.

    Key Specifications:

    • Windows 8 OS
    • 4GB DDR3 RAM
    • 1TB (1,000GB) Hard Drive
    • AMD E1-2100 APU Processor
    • 15.6-Inch, HD Display
    • Inbuilt Wireless Adapter
    • AMD Radeon Graphics
    • DVD RW Optical Drive

    The actual price for Lenovo G505 is currently ₦86,400 but can be bought online for ₦58,000 (discount rate). See product page for full specification and purchase.

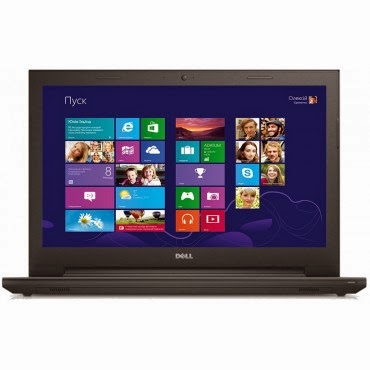
    Dell Inspiron 3541  (₦59,990) — Buy Online

    Dell Inspiron 3541 is a well packaged Windows 8.1 laptop with an AMD E1-6010 Dual Core Processor, Free Dell Sleeve, Microsoft Office 365 Personal, 8GB Flash Drive and 2 years free call service with Skype.

    The device is suitable for gaming and performing high resolution display tasks, boasting of 15.6-Inch (1366×768) HD display unit and AMD R2 dedicated graphics card.

    Key Specifications:

    • Windows 8.1 OS
    • 2GB DDR3 RAM
    • 500GB Hard Drive
    • AMD E1-6010 Dual Core Processor
    • 15.6-Inch (1366×768) HD
    • DVD RW Optical Drive
    • Inbuilt Wireless Adapter

    You can purchase or see complete features and specification of Dell Inspiron 3541 on the product page.

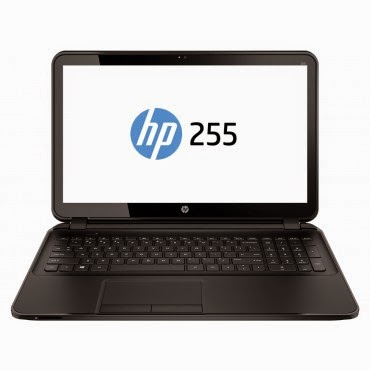
    HP 255 G2 (₦58,600) — Buy Online

    HP 255 is a multi-tasks Windows 8 laptop powered by a 1 GHz, AMD E1-2100 Dual Core Processor and 2 GB RAM, certainly not the fastest PC on this list but the 15.6 Inch, HD display unit will make up for its shortcoming.

    The laptop has a 500 GB storage space, DVD RW Optical Drive and yes, it has an inbuilt wireless adapter.
    Key Specifications

    • Windows 8.1 OS
    • 2GB RAM
    • 500GB Hard Drive
    • AMD Dual-Core E1-2100 APU with Radeon HD 8210 Graphics (1 GHz, 1 MB cache)
    • 15.6-Inch (1366×768) HD
    • Intel HD Graphics
    • DVD RW Optical Drive
    • Inbuilt Wireless Adapter

    The actual amount for this device is ₦75,000 but can be purchased online for just ₦58,600. See pricing and full specifications.

    Also Read: Sony & Samsung Tablets Dominate the Top 5 Most Expensive Android Tablets in Nigeria

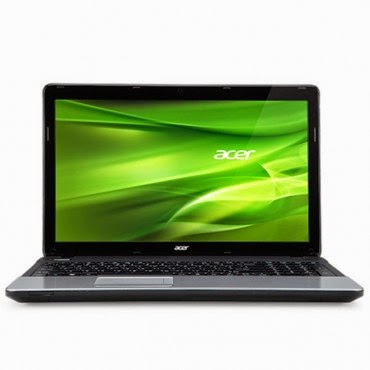
    Acer Aspire E1-510 (₦53,500) — Buy Online

    When it comes to producing quality PCs, Acer is second to no one. Acer Aspire E1-510 carries the same DNA, featuring a durable plastic case and a 4-cell Li-Ion with extended life capacity—if you are in an area where electricity is an issue, you might want to stick with this product.
    The practical yet stylish notebook is loaded with powerful and useful features like multimedia tools and convenient connectivity features‎‎.‎‎ This is a stylish notebook which comes with 15.6 inch, HD LED Backlit display‎‎,‎‎ powered by Intel Pentium processor with Linux OS to provide a faster and user friendly experience‎‎.‎‎ It has Intel HD Graphics that deliver ultimate graphics needed for gaming‎‎,‎‎ 500GB Hard disk drive also provides ample space for storage‎‎,‎‎ HDMI and USB 3.0 ports for faster data transfer.‎‎
    Key Specifications
    • Linux OS (Windows 8.1 & 7 OS Compatible)
    • 4GB DDR3 RAM
    • 500GB Hard Drive
    • Intel Celeron Processor
    • 15.6 Inch, Active Matrix TFT Color LCD
    • 4-cell Li-Ion Battery
    • DVD RW Optical Drive
    • Inbuilt Wireless Adapter
    The researcher friendly laptop is on sale for ₦53,500 online and ₦71,500 in most shops offline. See full product specifications and pricing.

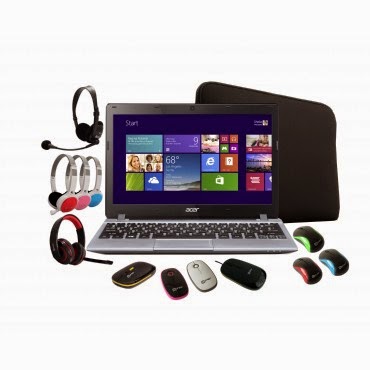
    Acer V5-123 Mini Laptop (₦49,900) — Buy Online

    If you think the products listed above are a little above your budget and you don’t mind sacrificing the option of listening to another Davido’s single, you can bite the bullet and go with an Acer mini laptop without a CD Drive.
    The Aspire V5 Series puts inspiring performance in a thin and light form. A choice of elegant views adds to the charm. Breathe life into your entertainment and enjoy hands-on control with Acer Aspire V5-123. Its built-in speakers sweeten the deal with splendid sound. The laptop features;11.6-Inch WXGA HD, AMD Radeon trade; HD display with 2GB RAM and a 500GB hard drive which provides enough space for you to store your files, data, photos, and music. You can connect to the world wherever you are with your laptop, the WiFi enables you to browse and surf the web, you can also transfer data to other devices via bluetooth. This laptop comes with a free mouse, bag and headset.
    Key Specifications:
    • Windows 8.1 OS
    • 2GB RAM
    • 500GB Hard Drive
    • 11.6-Inch WXGA HD Display
    • Intel HD Graphics
    • Inbuilt WiFi 802.11 bgn Adapter
    Although Acer Aspire V5-123 has no CD Drive, you can still connect a CD Drive via the USB port. Saving over ₦10,000 compared to other products listed above. Purchase or see more about this product on its product page.
  • Nifty Windows 10’s keyboard shortcuts

    Nifty Windows 10’s keyboard shortcuts

    Windows 10 adds all sorts of nifty new features designed to appeal to PC power users, but it also includes some nifty newcomers that you can’t actually see—fresh keyboard shortcuts!

    The details come courtesy of Brandon LeBlanc of Microsoft’s Blogging Windows blog. If you install Windows 10 be sure to check these out.

    • Snapping window: Windows key + Left or Right — LeBlanc says: “(Can be used with UP or DOWN to get into quadrants.)” Quadrants is the new Snap view mode that pins apps to the four quarters of the screen.
    • Switch to recent window: Alt + Tab – LeBlanc says: “Hold shows new Task View window view, let go and switches to app.”
    • Task view: Windows + Tab – LeBlanc says: “New Task view opens up and stays open.”
    • Create new virtual desktop: Windows key + Ctrl + D
    • Close current virtual desktop: Windows key + Ctrl + F4
    • Switch virtual desktop : Windows key + Ctrl + Left or Right
    The Command Prompt and its Experimental Properties tab in Windows 10.

    If you want to start using Windows 10’s greatly enhanced Command Prompt hotkeys (copy-pasting via the keyboard, yesssss) then be sure to check out Scott Hanselman’s extensive post on the topic.

    Windows 10’s newfound support for keyboard shortcuts in the Command Prompt isn’t enabled by default, however. To enable it, right-click the Command Prompt’s title bar and select Properties. Open the new-to-Windows-10 “Experimental” tab and check the box next to “Enable experimental console features.” Finally, check the boxes next to “Enable new Ctrl key shortcuts” and “Extended edit keys,” then click OK.

  • Trend Micro CWShredder Review & Free Download

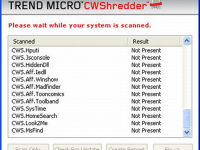
    Trend Micro CWShredder Review & Free Download

    A quality product called CWShredder from Trend Micro released to remove traces of coolwebsearch virus from the pc, this was one of the major virus released by hackers it creates auto bookmarks to your browser mostly to the porn and other related websites and it also changes the default home page and when you attempt to change it back it reverts the changes also it impacts system performance too which causes windows to crash and reboot very often this symptom has been noticed on vast number of pc’s. Download CWShredder today from EwtNet and safeguard your pc.

    • Effective hijack removal tool
    • Quick fix for browser related hacks
    • A quality product from major antivirus company
    • Focused on browser protection
    • Improves browser & system speed
    • Efficient in removing coolwebsearch virus
    • Fast and low on using system resources
    • Small size file and quick install
    • Easy navigation
    • Provides for all major browser

    Click on the download button to begin the download

    File Size: 207 KB (rar)
  • Trend Micro Hijackthis Review & Free Download

    Trend Micro Hijackthis Review & Free Download

    HijackThis is a security tool which generates logs with files that are required and point to malware files & un important files, if you are picky and need control of manually deleting files instead of letting the security software take control of deleting files, hijack this is a good option. But it is extrememly important to use tool with extra caution as you might end up deleting some important files too. Download free Hijackthis tool at EwtNet

    • Lite tool with control over deleting files
    • Fast and effecient
    • Does a good job in finding virus effected files
    • Need good technical understanding to use this tool while deleting files
    • User friendly design

    Click on the download button to begin the download

    File Size: 1.34 MB