With interactive documents, you can choose from a range of predefined options for data, instead of typing the data from scratch each time. If you write lots of letters to the same few correspondents, generate electronic data-entry forms, produce documents with boilerplate language, or find yourself typing the same phrases over and over, wouldn’t it be convenient if your documents were already partially formatted and allowed you to make selections from drop-down menus instead of copying and pasting from documents you created earlier? I’ll show you how to use the Content Control tools within Microsoft Word to create templates that you can use every day.
How to Find Word’s Content Controls
Content Controls let you add interactive elements to your Word documents, but you might not even know they exist because they’re accessible only from the Developer tab in Word’s Ribbon, and that tab is disabled by default. To enable it in Word 2010, choose File > Options > Customize Ribbon. In the right-hand panel, locate and click the Developer checkbox and click OK. In Word 2007, choose File > Word Options and then click the Show Developer Tab in the Ribbon checkbox (from the Popular set of options) and click OK. Now select the Developer tab, locate the Controls group, and click Design Mode. You’re ready to set up your controls.
Select a Date Using the Date Picker Control
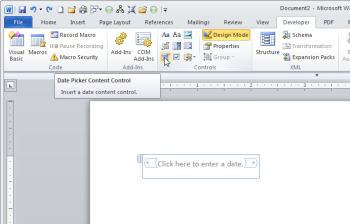
Hover your mouse over the icons in the Controls group, and a label will pop up identifying each control. The Date Picker Content Control creates a placeholder that you can use to choose a date from a calendar.
The Date Picker Content Control will display a small calendar that allows the user to choose a date.Click the icon to add this element to your document. Turn off Design Mode, and you’ll see a box labeled ‘Click here to enter a date.’ The calendar will appear when you click the down arrow on the control. Pick a date, and that date will appear automatically in the document.
The Date Picker has some handy settings you can configure. To see these, click Design Mode once again. Click the Date Picker control and then click the Properties button (it’s in the Controls segment of the Ribbon). Use the Properties dialog box to format the control (for instance, to have the month spelled out instead of being represented numerically). You can also use Properties to lock the content control so that it can’t be deleted, or you can add a title to the control telling the user about its purpose (“Select a date for a meeting,” for example).
Finally, you can format the control with a Word style so that the date looks the way you want it to. If you use styles, and the style set changes, the date’s text formatting will automatically change to match the new style set.
Add a Content Control to Manage Text Entry
Use the Plain Text Content Control as a placeholder for a user to enter text into the document.The Plain Text Content Control creates a designated place for someone to enter text into a document. You can preformat the text in this control using a defined style, so that any text the user enters there will appear a certain way. You can also elect to permit or disallow carriage returns. On top of that, you can leave this control as is, lock it so that it cannot be deleted, or set it so that it automatically disappears once its contents have been edited. In the last mode, the content control will appear in the document until someone has typed text in it; as soon as they do, the content control will vanish, but the text typed into it will remain.
Select an Item From a List of Options

Populate the Drop-Down List Content Control with items for the user to choose from.With some documents, you’ll want to pick from a limited number of options presented in a list. In these cases, creating a template with the Drop-Down List Content Control or the Combo Box Content Control is the way to go.
Click the Drop-Down List Content Control to add it to the document. For this control, you can not only type a title and use a style to format its contents, but also format it so that it cannot be deleted. To prepopulate the control with a set of choices, select the control and then click Properties. Now click Add in the Properties dialog box, and type an entry for the list (for this example, leave the display name and the value the same). Repeat this step with each entry for the list, and click OK when you’re finished.
When you click Design Mode and return to the document, you’ll see the words ‘Choose an item’ in gray. Click that text, and a drop-down box will appear with the words in your list. Click one of these items, and the word will appear in the document.
Use the Check Box Control to Create Checklists
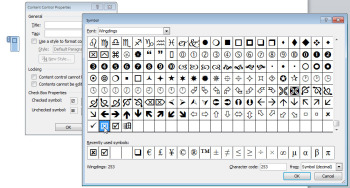
You can change the symbols used in the Check Box Content Control.The Check Box Content Control allows a user to place a checkmark to indicate their selection of an item. To add one to your document, click the Check Box Content Control and then click Properties. A Check Box can toggle between two states when clicked on: selected, represented by an X inside a box, and not selected, which shows a blank space inside the box.
To change these symbols, open Properties, click the Change button, and choose a font from the dialog box (I suggest something from the Wingdings family.)
Add Quick Parts to a Document
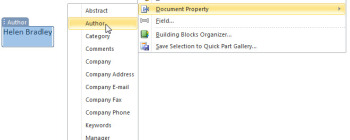
The document properties on the Insert tab are another form of content control–these are populated from data stored in the document.Some document properties, such as the author’s name, are stored in every Word document, but usually they don’t display in the document. Here’s an easy way to add that information so that it does appear: While you’re in Design Mode, select the Insert tab on the Ribbon. Click Quick Parts and then Document Property. Finally, choose the property–Author, for example–to insert that information into the document automatically. Choose the Developer tab and click Properties while this control is selected, and you can set the text style or other properties for the control.
To see where the Author data is sourced from, click File > Options. You’ll see User Name in the Popular group of settings; this is the value that populates the document’s Author property. If you change this information, you must restart Word for the change to take effect.
Put Controls to Work in a Document
You’ve probably already come up with a thousand ways to use Word’s Content Controls. If you haven’t, think of any documents you create on a regular basis that include repetitive data-entry tasks: memos, fax covers, shipping documents, and so on. Include a Date Picker control anywhere in the document template that calls for a date. Add a Drop-Down List control to pick an item from a predefined list. Use a Check Box control to select or deselect various options.
Using Content Controls not only helps you complete documents quickly, but also allows you to preset a document’s layout so that you don’t need to align everything perfectly every time you create it.
Once you’ve created your template, save it by choosing File > Save As > Save as Type, and choose Word Template (*.dotx). Be sure to click the Templates link in the top-left corner of the Save As dialog box to store the template in the Templates folder. Type a name for the template, click Save, and close it. In the future, you can create a new document based on this template by choosing File > New > My Templates and then clicking the desired template to open it.