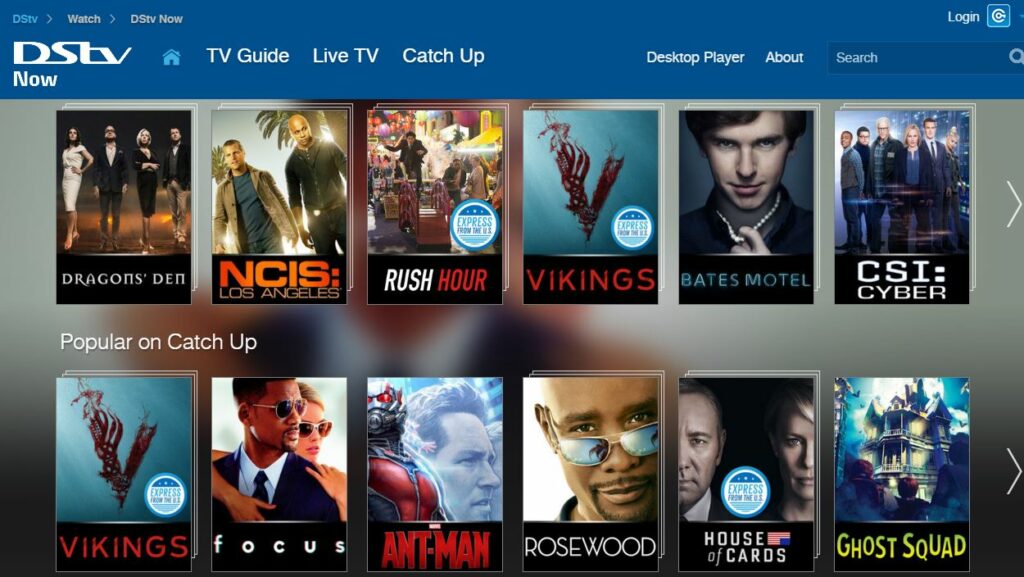
Being able to connect and watch DSTV on your mobile device with your Dstv decoder has a lot of advantages. You will be able to keep up with your favorite programs without being glued to your TV.
Thanks to intuitive thinking, the DSTV Now platform lets DSTV users pair their mobile device, laptop, or smart TV to their DSTV decoders. In this article, we explore a comprehensive tutorial on how to connect your DSTV decoders to your mobile device, laptop, or smart TV using DSTV Now.
Requirements to Connect and Watch DSTV on Your Mobile Device
Before connecting your decoder to your mobile device, laptop, or smart TV, ensure you meet the following requirements:
An active DSTV subscription
The DSTV Now App
An Android device (smartphone or tablet)
Steps to Connect and Watch DSTV on Your Mobile Device
1. Download the DSTV Now App
Visit the Google Play Store or the Apple App Store on your mobile device.
Search for “DSTV Now” and download the app.
2. Register and Sign Up on the DSTV Now Platform
Open the DSTV Now app.
Register for an account if you don’t have one, or sign in if you already do.
3. Insert Your Smart Card Number
Navigate to the settings or account section within the app.
Enter your DSTV smart card number to link your decoder with the app.
Streaming
Once you’ve registered on the DSTV Now platform and inserted your smart card number, you can start streaming. You’ll have access to all the channels included in your DSTV subscription.
Features of the DSTV Now App
Reminder Feature: Syncs with your phone’s reminder app to notify you when your favorite programs begin.
Kid Access Feature: Allows you to set a PIN for certain channels to restrict content you don’t want your kids to watch.
How to connect your DSTV Decoder to your phone
The DSTV Now app has a reminder feature, that syncs up with the reminder app on your phone. It provides you with accurate reminders when the program begins. The DSTV Now app also has a kid access feature that lets you set a pin on certain channels, that contain content you do not want your kids to watch.
There you have it – a comprehensive tutorial on how to connect your DSTV Decoder to your Android device.
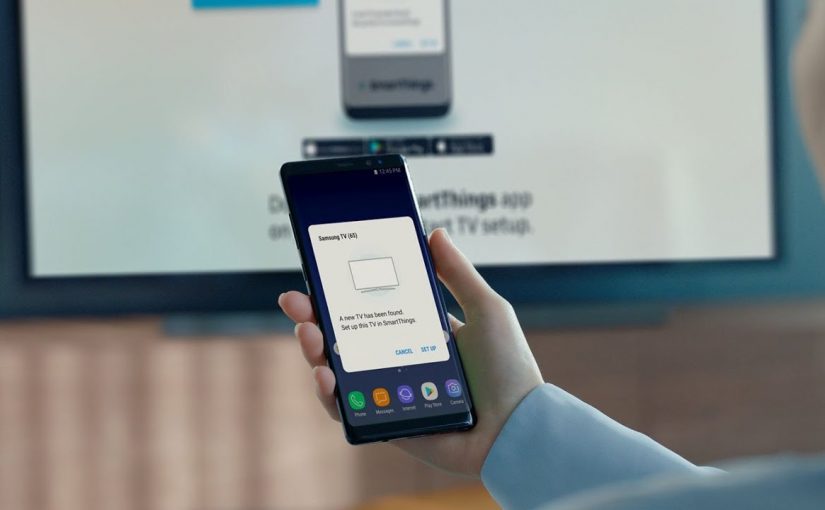
Over the years, there has been an observable increase in the size of a smartphone and tablet display. Smartphones and tablets have grown into gadgets that we can use to entertain ourselves using media content. Despite these observable increase in the size of smartphone and tablet display, there comes a time when you desire to project stuff from your smartphone or tablet display onto a bigger display. In this article, we explore a tutorial on how to connect your mobile phone to a smart TV, allowing you to view contents on your smartphones unto a bigger screen.
In this tutorial, we explore four different methods for connecting your mobile phone to your smart TV. This Tutorial covers how to connect Android mobile phones to smart TV’s and how to connect iPhone’s to smart TV’s.
How To Connect Your Mobile Phone To Your Smart TV Using HDMI Cable
Connecting your smartphone to your smart TV using an HDMI cable, is a universal method of connecting smartphones to a smart TV. It works for both Android and IOS devices. It is a very reliable method to project content from your mobile phone to a smart TV. It lets you transfer both audio and video from the same source.
Some smart TVs feature HDMI 2.1 while others feature HDMI 2.0. The minimum requirement to stream 8K content from your mobile phone to a smart TV is an HDMI 2.0 port.
Smartphones usually do not feature HDMI ports, so you are required to purchase an HDMI to USB C, Micro USB or Lightning ports. You connect one side of the HDMI cable to your smart TV and the other part housing the adapter to your mobile phone.
Connect Your Mobile Phone to Your Smart TV Using USB Cable
Just the way you connect pen drives to your smart TV, you can also connect your mobile phone to your smart TV using USB cables. Smartphones usually come with cables, with one end featuring either a USB A, USB C or lightning and the other end being USB A.
You are required to connect the USB A port to your smart TV and the other end of the cable to your mobile phone. Your smart TV will then read your mobile phone as a storage device. You will be able to view photos, audio files, and video from your mobile phone.
Connect Your Mobile Phone to With Wireless Casting on Android
Casting eliminates cords. Casting lets you connect your mobile phone to your smart TV without using cords. Casting is a process of wireless streaming content from your mobile phone or tablet, by connecting to the same WiFi network as your television.
Some mobile phones come with inbuilt casting features, while other mobile phones require you to download third-party apps. In case your mobile phones need third-party apps, Allcast is a highly recommended app for casting.
Apart from using casting apps on mobile phones, there are streaming devices you can use to add the functionality to your smart TV. Google Chromecast is an example of such streaming devices.
Using Apple Airplay
Similar to casting on Android, Airplay is a feature designed for devices running any OS designed by Apple. It lets you connect your iPhone to your Smart TV wirelessly.
Airplay only works between Apple devices. You are not allowed to wirelessly connect your iPhone to smart TV’s not made by apple. Similar to casting on Android, both the Apple TV and iPhone must be connected to the same network.
There you have it – a comprehensive tutorial connect your phone to your smart TV. If you have questions, feel free to drop them in the comment section below.
In this article, we explore a comprehensive tutorial featuring procedures to change wireless security on a laptop. Here we explore inevitable steps to take in changing the security/password of a wi-fi router using your laptop. You would also learn how to change your Wi-fi router’s security type here. The steps taken are listed below.
1. Open Your Router’s Configuration Page
You can access your Router configuration page if your laptop is connected to the router. You can connect your laptop to your router using an Ethernet cable or The Router password. In a situation where you have forgotten the password, using an Ethernet cable is preferable because you will not be required to input any password.
After you might have connected your laptop to your router, you are to input the IP address on your browser, to gain access to its software platform. The Standard Router Addresses are 192.168.1.1, 192.168.0.1, 192.168.2.1, or 10.0.1.1(Apple) or 10.0.0.1. Enter any of these Addresses and hit enter.
If you find it difficult to access your Router’s software platform using the already mentioned IP addresses, you can source for the exact I using the command prompt. Once Command prompt is opened, type ipconfig and hit enter. Now look for active connection in the list and find your Router Default Gateway address. The Default Gateway is your Router’s IP address.
If you are still finding difficult to source for your Router’s gateway address, you advised to reset your router for about 30 seconds, to restore it back to factory settings. After which you are to look up the default address for your Router’s model and enter it into your browser URL box
2. Enter Your Router’s Username and Password
Apart from the normal connection password, you are required to input a special username and password, to gain access to the admin platform. Please note that the default Username for most routers is “admin” or “userAdmin” and the default password is “admin”, “password” or your current Wi-Fi’s password. If you changed your the username and password before now, you are required to input the one you enrolled.
3. Open The Wireless Section
Once you have successfully gained entry to your Router’s software platform using your browser, you ate presented with different tabs that perform different functions. Since you want to change your Router’s wireless security, you are required to click on the Wireless tab.
4. Change the password
By now you should be in the Wireless tab on your Router’s admin page. In the Wireless tab, Look for the box labeled “Password”, “Passphrase” or “Shared Key”. Some Routers require you re-enter the admin password, for confirmation. You are advised to create a very strong password, featuring letters, numbers, and symbols.
5. Change Your Security Type
Please note that there are three main types of wireless encryption: WEP, WPA, and WPA2. If you desire the most secured network, you are required to make use of WPA2. Using this network type, you may experience problems connecting to older devices. If you run into these problems, you are advised to switch to WPA.
6. Change Your Network Name
If you desire to have a unique Router name, you have the option to set a unique name here. This will make discovery very easy, you won’t have to guess your Router’s name, in a situation where they are many similar Routers in the same space.
7. Save your Settings
After you might have successfully carried out all the steps listed above, the next step will be to save the changes you made to the security setting. This way all changes made will take effect. The save button is usually located on the top or bottom of the page. Locate it and click on it to save changes. You can now go ahead to test the new password.
There You have it – a comprehensive list of procedures to change wireless security on a laptop. If you have any questions, feel free to drop them in the comment section below.
i Dual booting Linux with Windows 10 on your PC, means having both operating systems installed on your PC. This process involves you partitioning your hard disk and installing the operating systems on different partitions, This way you will able to use both operating systems on your PC simultaneously. In this article we explore a tutorial on How to Dual Boot Linux with Windows 10 on your PC
Requirements
1. Two USB flash drives or DVD-Rs
Since we will be installing tow operating systems on our computer, you are required to purchase DVDs of both operating systems. You are required to purchase a Windows operating system DVD and a DVD containing the Linux Ubuntu operating system.
Apart from installing the operating systems using DVD, you could also install them from a bootable flash drive, which is a way faster. If your laptop doesn’t support booting from USB, you are advised to install the operating systems using DVDs, as mentioned earlier.
2. A Windows 10 license
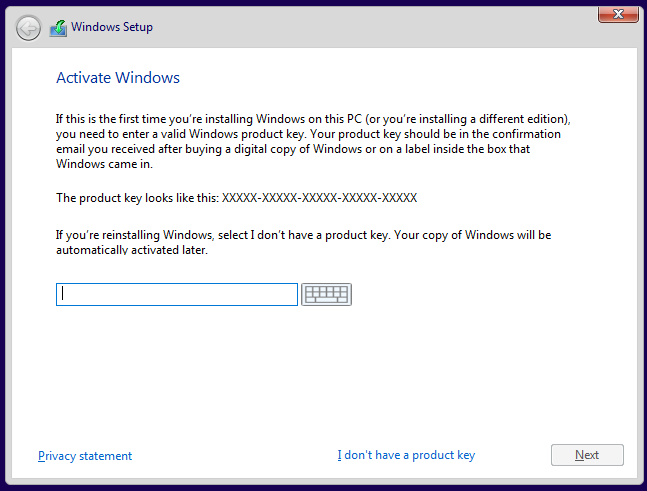
Installing the Windows 10 OS on a computer that didn’t come with Windows 10 OS on default, requires a Windows license key, so if your computer didn’t come with the Windows 10 operating system on default, you will be required to input a license key. If your computer came with the Windows 10 operating system, you won’t be required to input any. The Windows 10 license key, will be provided to you by the retailer.
3. Windows 10 Creation Tool
If you are installing the Windows 10 operating system from a bootable flash drive, you are required to download a windows 10 media creation tool. The Windows 10 media creation tool provides a step by step guide to creating a Windows 10 media on a USB. You can also use to create windows media on DVDs.
4. Etcher Software
Similar to the Windows Media Creation tool, The Etcher software lets you load a Ubuntu media unto a bootable flash drive or DVD. The Etcher software is supported on Linux, MacOS, and Windows.
Please Note that you are required to download the Ubuntu ISO Image, you will load in the bootable flash drive. Once it has been downloaded, you are required to launch the Etcher software, next click on Select image and then point to the already downloaded Ubuntu ISO image downloaded. Now Select your flash drive, from the list of storage locations provided. Click flash and the Etcher software will convert your bootable flash drive, into a Ubuntu installer.
After you have successfully met all the requirements above, purchased or created a bootable device for both operating systems, you proceed to install both operating systems on your computer. The steps to installing the operating system are listed below:
How to Install Windows and Ubuntu on Your PC
Just as a reminder, before we get started with the installation, you should have already created windows installation media, created a Ubuntu installation media and made a backup of your important files.
Creating a dual boot of Linus and Windows OS can be done in two ways. Its either you install the windows 10 OS first, and then using a ubuntu installer to resize the partition and installation will proceed in the empty space. Or you install Ubuntu first and then install the Windows 10 OS in the smaller partition on your hard disk.
Installing Windows
If you already installed Windows OS on your PC, you are required to skip this step and move straight to installing Ubuntu on your PC, otherwise, continue with the steps listed below:
1. Insert the Windows Installation in you have: As mentioned earlier, its either you use a DVD with the Windows 10 OS inside or you use a bootable flash containing windows 10. If you have a windows 10 DVD, insert it in your DVD player, If you have a bootable flash drive, plug it into your USB port and follow the steps below.
2. Click on the boot menu key: PC’s have different boot menu keys, you have to look out for the boot menu key assigned to your PC. The boot menu key is usually displayed on the bottom of your screen when you power your PC on. If you are unable to locate the boot menu key for your computer, you advised to search it on Google, to make things faster.
3. Change Boot order: Changing boot order means changing the device your PC boots, On default, your PC is set to boot from your hard disk. If you using a Windows 10 DVD, you are required to set your PC to boot from your disk drive. If you are booting from a bootable flash drive, you are required to set your PC to boot from the bootable flash drive. IF you don’t know how to do this, you advised to research on Google or contact your manufacturer.
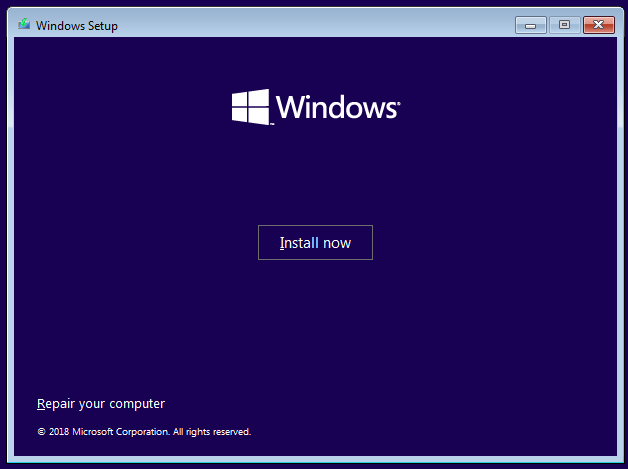
4. Press any key on your keyboard and proceed with the installation: After you might have successfully booted your installation media, you will be prompted to press any key on your keyboard, to proceed with the installation.
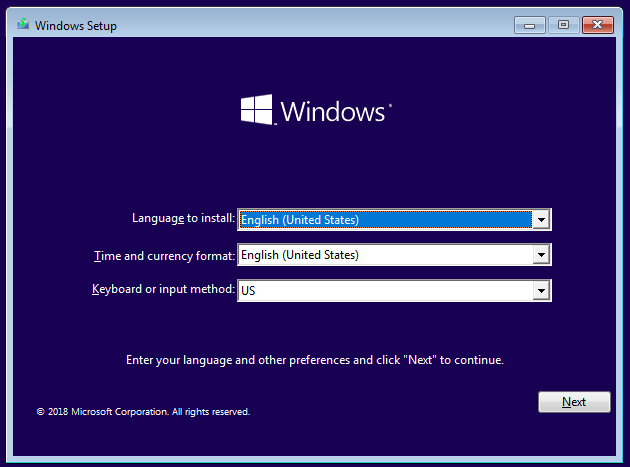
5. Follow the on-screen prompts: You will be presented with different on-screen prompts. Prompts that will require you select your preferred language, inserting your product key and lots more. These are basic steps that do not require any expertise.
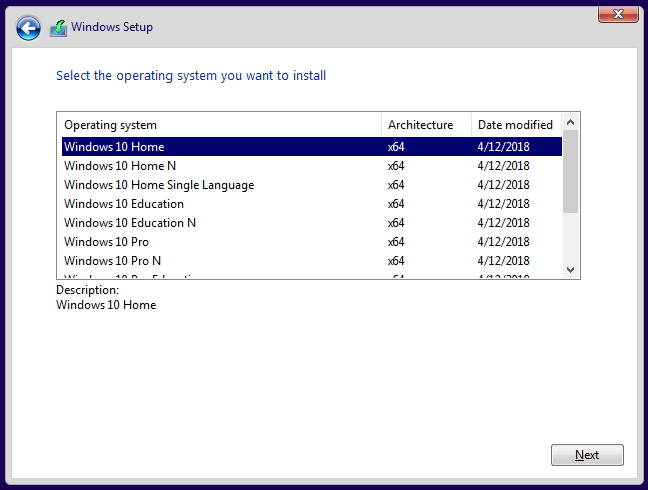
6. Select the version of Windows 10 you wish to install:
During the installation process, you will be required to select the version of Windows 10 you wish to install. Here you will be provided with the option to install windows 10 x64 and Windows 10 x86. Please note that installing windows 10 x86 is the same thing as installing windows 10 32 bit and installing windows 10 x64 is the same thing as installing windows 10 64 bit. Here you will also be required to select windows 10 home, professional and other versions. Please, note that the windows 10 pro is the most powerful version of Windows 10.
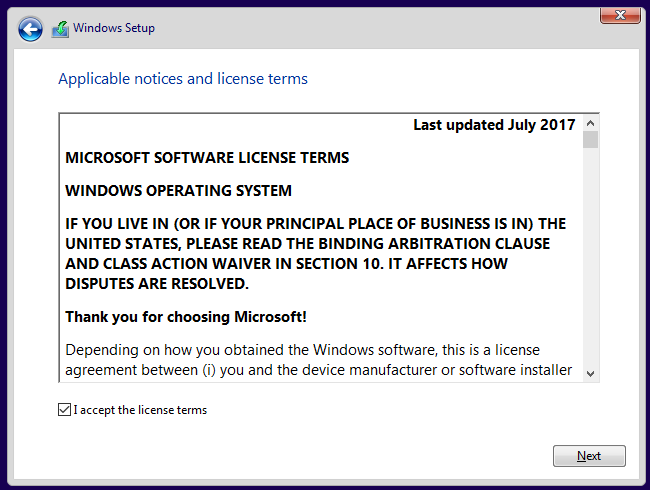
7. Review License terms and click next
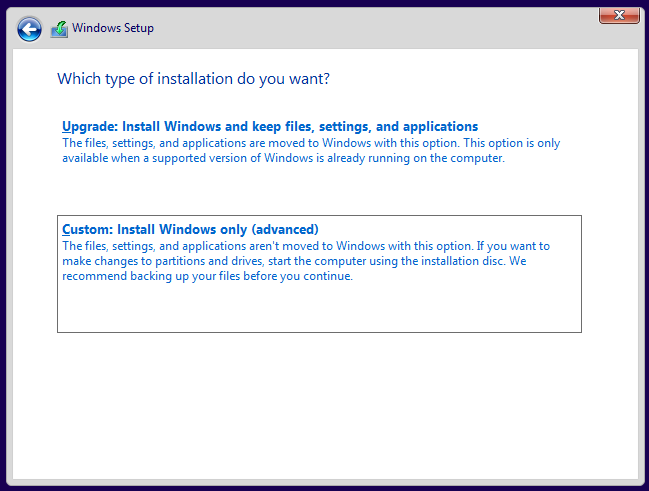
8. Click on custom install: After reading the license information, you are required to select the type of installation you want. You have options to upgrade, keeping all your files or doing a custom advanced install. You are advised to do a custom install. You will able to select the drive you want to install the windows 10 OS.
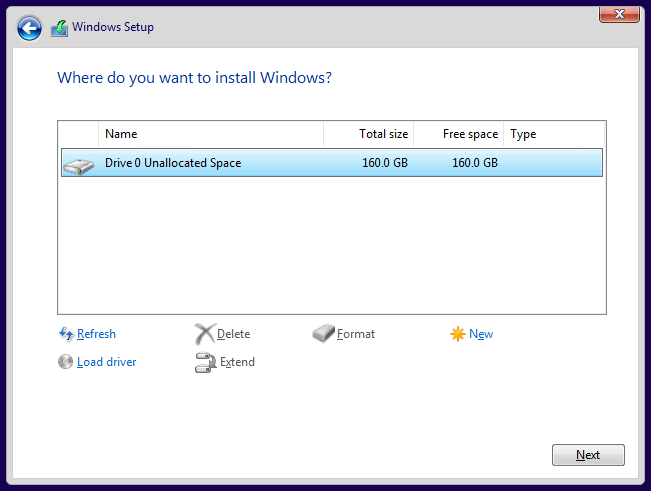
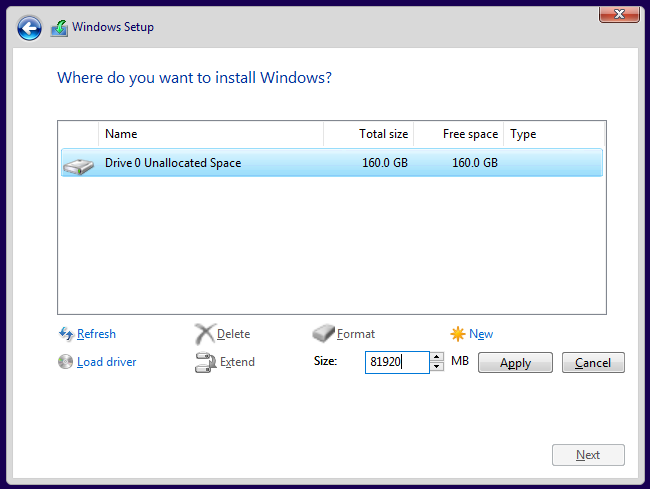
9. Allocate Storage For Installation of Windows 10
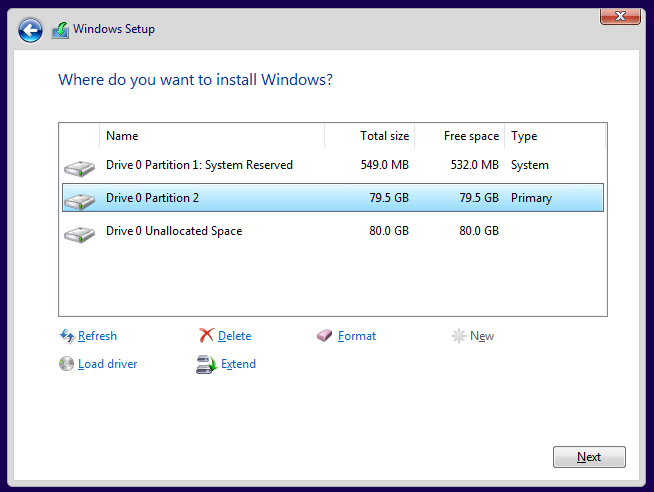
Our sample hard drive has not been allocated or partitioned before. If your hard drive isn’t like this or has been partitioned before, you are required to highlight all the partitions and delete them. Your entire hard drive will be unallocated. Click continue to create a new partition.
You are advised to create a partition with up to 80GB to accommodate the windows operating system.
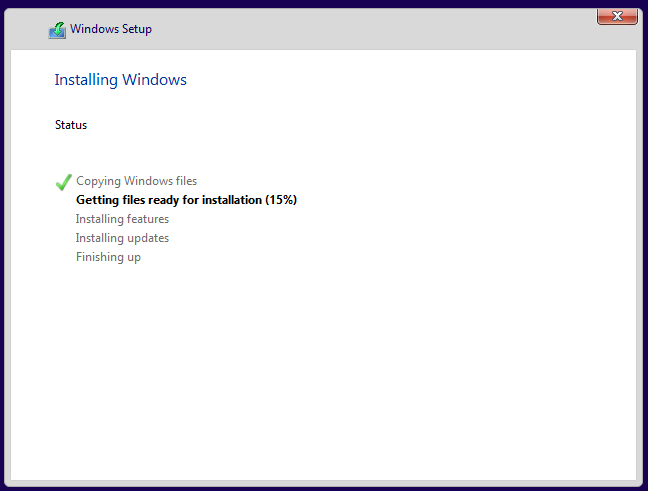
10. Click Next, to confirm partitioning and to begin windows installation.
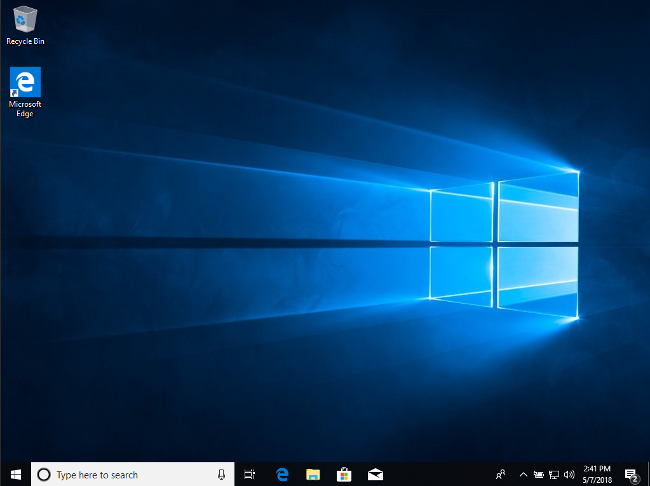
Now that you have successfully installed the Windows 10 operating system on one of the partitions, the next step is to install Ubuntu on your hard drive.
Installing Ubuntu
At this point, we assume you already have the Windows 10 operating system installed on your hard drive. The next step is to install Ubuntu on the other partition you created. Installing Ubuntu will be done using the installation media you created earlier.
1. Insert Installation Media into your Computer: You are to insert the installation media in your computer. If the installation media was created on a DVD, you are to insert it into your CD ROM, if the installation media is on a bootable flash drive, you insert it via your USB port.
2. Click on the boot menu key: PC’s have different boot menu keys, you have to look out for the boot menu key assigned to your PC. The boot menu key is usually displayed on the bottom of your screen when you power your PC on. If you are unable to locate the boot menu key for your computer, you advised to search it on Google, to make things faster.
3. Give priority to Your Installation Media: After you must have successfully entered the boot menu on your computer, the next step is to give priority to your installation media. If you are booting from a DVD plate, you are to give priority to your CD ROM, select boot from CD ROM. If you are booting from a bootable flash drive, you are required to give priority to your flash drive, select boot from flash drive.
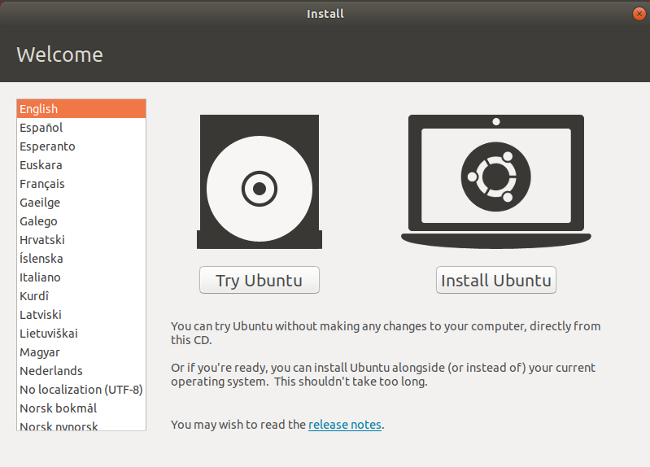
4. Install Ubuntu: After you have successfully prioritized your Boot device, your computer will be booted into the Ubuntu installation interface. Here you are provided with the option to either try ubuntu or install Ubuntu.
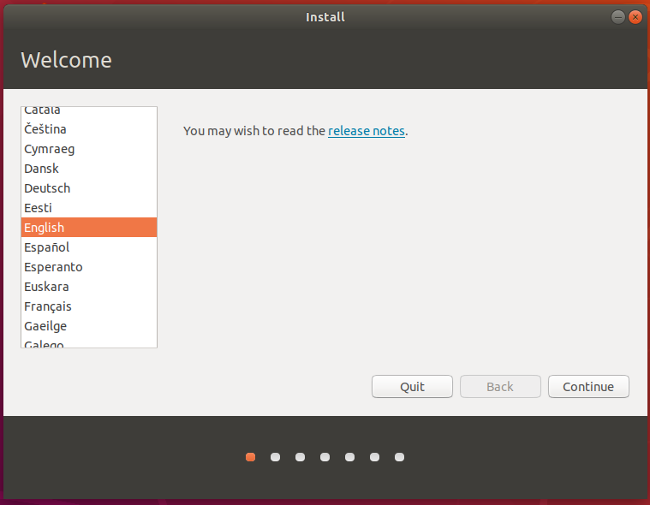
5. Select Your Preferred Language: After you might have clicked the install Ubuntu button, you will be required to select your preferred language. Here you are to select the language you understand.
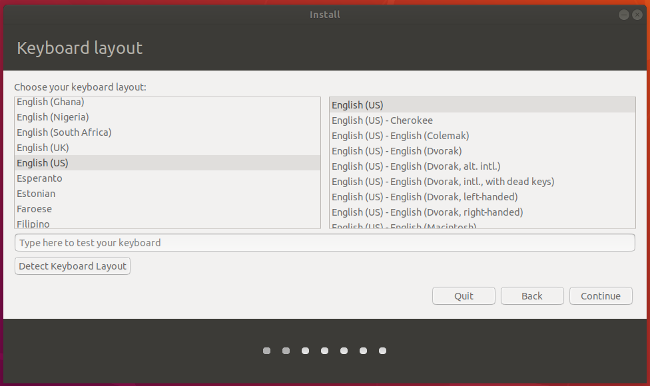
6. Select Your keyboard layout: Despite being an output component of the computer, the layout configuration software plays a huge role, in key placement. Here you have options to choose from the different layout assigned to different languages. After you have selected your preferred keyboard layout, you are advised to click continue.
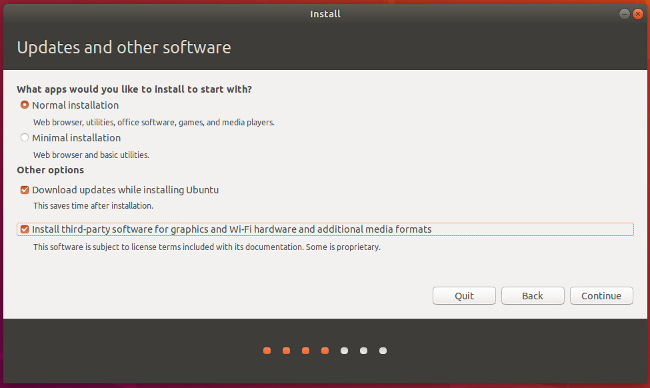
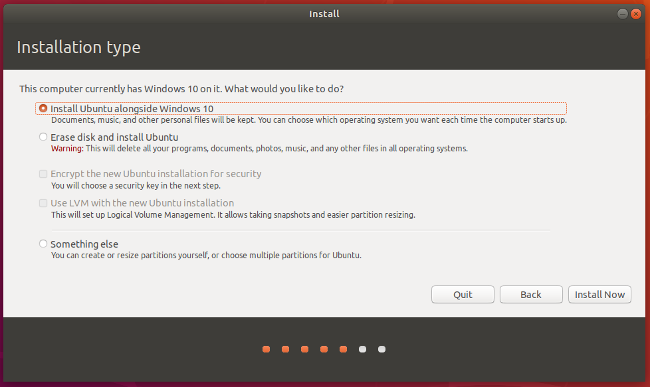
7. Select Installation Type: Installing Ubuntu, you provided with Normal Install Option, as well as Minimal installation option. If you select normal installation, Ubuntu will be installed alongside a web browser, utilities, office software, games, and wallpapers. Minimal Installation installs Ubuntu alongside a web browser and utility software.
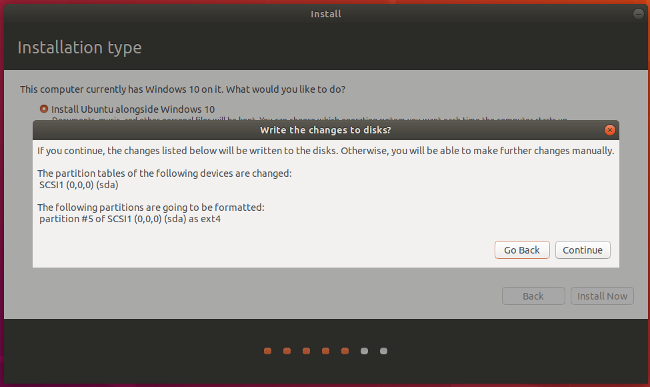
8. Install Ubuntu Alongside Windows 10: You are provided with the option to either install Ubuntu alongside Windows 10 or erase the hard disk and install Ubuntu.
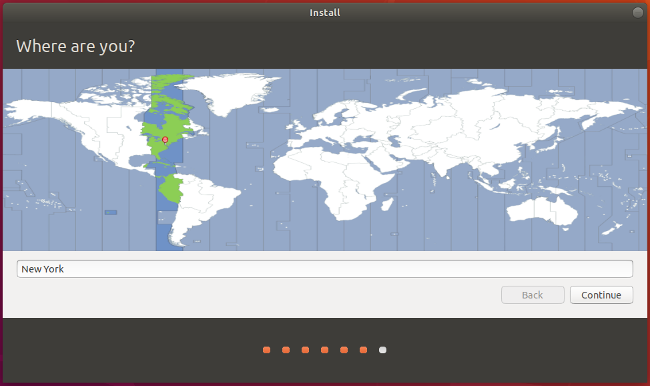
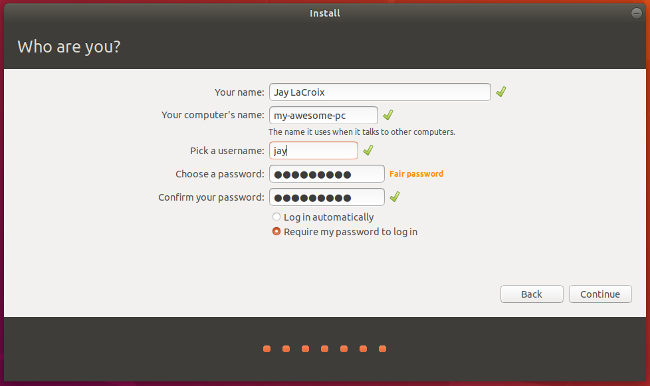
9. Follow in the On-Screen prompts provided: You will be required to confirm Ubuntu installation, select time zone and fill in your Particulars, to setup login security.
10. Reboot Your PC: After you might have successfully installed Ubuntu on your PC, You will be provided with the option to continue testing or restart. You are required to click the restart button, to begin using Ubuntu.
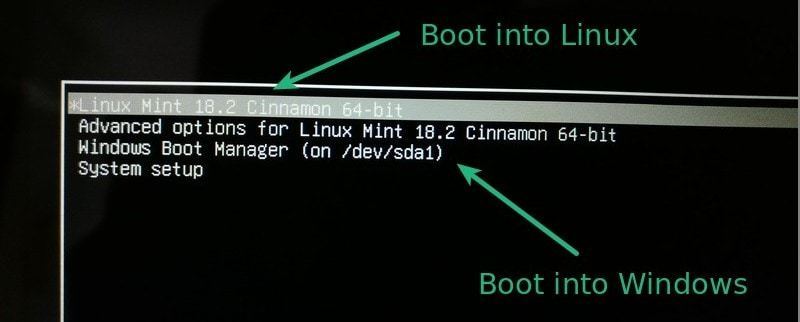
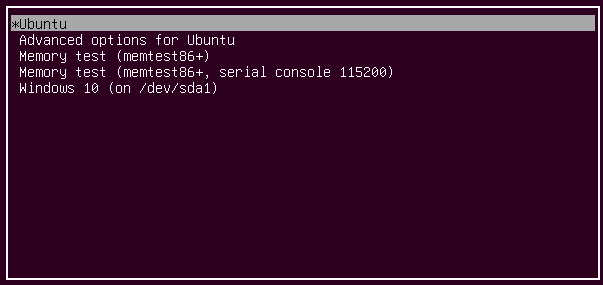
Note: After you might have successfully followed all the steps provided in this tutorial, you will be provided with the dual boot screen, where you will be given the option to either boot into windows or boot into Ubuntu.
There you have it – A complete and comprehensive tutorial on How to Dual Boot Linux with Windows 10 on your PC. If you have questions, feel free to drop them in the comment section below.
The presence of a yellow exclamation mark on your windows connectivity icon means just one thing, your network connection has issues. As simple as resolving it may sound, there may be some occasions where resolving such network issues becomes very difficult. This is where the Network Diagnostics tool comes into play. The network diagnostic helps windows users troubleshoot network problems, and also provides solutions to fixing them. In this article, we explore a tutorial on how to run Windows Network Diagnostics.
The windows diagnostics tool is a highly recommended tool, in troubleshooting fixing the network problem. It is very effective in fixing DNS problems and also helping users find the cause of network termination.
The procedures for using the Windows Network diagnostics tool is a very easy and straight forward. These steps are listed below.
1. Click the start button on your keyboard, and type ”fix network” in the search box provided.
2. From the list of search results provided, click ” Find and fix networking and connection problems “
3. In the Network diagnostics window, click on the advanced option and run the program as an administrator. There is an option to apply repairs automatically here, you tick it if you want repairs to be applied automatically.
4. Choose the type of connection you want to diagnose for troubleshooting and click on the next. here windows will try to locate the network connectivity problem.
Note: Once the problem has been detected by the windows network diagnostics tool, you have the options of solving the problem yourself, contacting Microsoft online support, to get the problem solved remotely or restoring your windows machine to its default settings. You can also seek the help of a local technician, to help you fix the network problem.
There you have it – a complete and comprehensive tutorial on how to run Windows Network Diagnostics. if you have other questions, feel free to drop them in the comment section below.
As a windows OS user, there are times where you will be faced with the unidentified network error. The Error appears sometimes when you try to connect to a network, using your windows machine. There is no actual method of solving this problem, as this Error may be caused by a lot of things. In this article on how to fix unidentified network access on windows, we shall explore a list of troubleshooting steps you should follow when trying to fix this error on your windows machine. This these steps are listed below.
1. Turn Off Airplane Mode
The first step in the troubleshooting process is to disable Airplane mode. As you might already know, Airplane mode when activated, disable all network access, this means you will not be able to access any network on your windows machine. In turn, this may result in the unidentified network no network access error on your windows machine. To turn off the airplane on your windows machine, please follow the steps listed below:
Press Windows key + A. This opens the ‘Action Center’.
Toggle off the airplane mode button.
2. Update Network Card Drivers
Outdated network card drivers could also facilitate the unidentified network error in windows operating system. If you already toggled off the Airplane mode switch, and you are still experiencing the problem, you are advised to update your network card drivers. Steps to update your network card drivers are listed below.
Press Windows + X or right-click on the Start button.
Click on Device Manager to open it.
Look for ‘Network Adapters’ and click on the forward pointing arrow to expand the list. Right click on all the Network drivers and update them one by one.
3. Disable the Security software temporarily
In the quest to giving your computer absolute protection, security software may disable your internet connectivity. This is common with Anti-virus software or Firewall software. In solving the unidentified network error, you also advised troubleshooting your security software, by temporarily disabling it, to see if the problems stop. To disable your security software, you are to right click on the Anti-virus icon located in your system tray icon section. Once you have disabled it, you are to try connecting to a network to see if it worked. If it didn’t, you can continue with the next step in troubleshooting
4. Switch off the Fast Startup feature
Microsoft has been able to make booting on the Windows operating system faster, using the fast startup feature. The fast startup feature is found on a recent version of the Windows operating system. The fast startup features is another facilitator of the unidentified network access error. Having tried the steps listed above, with no positive results, you are advised to turn off the fast startup feature on a windows machine., using the steps listed below:
Search for ‘Power Options’ in the Windows search bar. Open the Power Options window and among the tabs on the left, click on choose what the power button does.
Click on ‘Change settings that are currently unavailable’.
Uncheck ‘Turn on fast startup’. Shut down the system and reboot after 30 seconds.
5. Change your DNS servers
Your current DNS server may just be the reason your windows machine is plagued with the unidentified network access error. To change your DNS servers, follow the steps listed below:
Press Windows + X or right-click on the start button.
Click on ‘Network Connections’.
Right-click on your network connection (Ethernet or Wifi) and click on properties. It might prompt for administrator credentials.
Double-click on Internet Protocol Version 4.
Select ‘Use the following DNS server addresses’ and set but the preferred and alternate DNS server address as follows to use Google Public DNS:
Preferred DNS server: 8.8.8.8
Alternate DNS server: 8.8.4.4
6. Use Command Prompt
Already tried the steps listed above, and nothing seems to be changing, there are some commands you can run in command prompt, to salvage the situation. You are required to try the commands listed below, one by one, one at a time. Once you have successfully ran all the commands, you are to restart your windows machine.
ipconfig /release
ipconfig /renew
netsh winsock reset
netsh int ip reset
ipconfig /flushdns
ipconfig /registerdns
netsh int tcp set heuristics disabled
netsh int tcp set global autotuninglevel=disabled
netsh int tcp set global rss=enabled
netsh int tcp show global
7. Diagnose The Network
The network Diagnose feature, is another handy tool, that helps troubleshoot the problem of your network. You can diagnose the network using the features listed below:
Press Windows + X or right-click on the start button.
Click on ‘Network Connections’.
Right-click on your network connection (Ethernet or Wifi) and click on ‘Diagnose‘. It will start an automatic troubleshooter.
8. Change the Ethernet cable
Tried troubleshooting with the steps already listed above, and nothing seems to be changing? Your Ethernet cable may just be faulty. You are also advised to troubleshoot your ethernet cable. Try using another one. If the problem persists, you can proceed to the next step.
9. Set a static IP address
Press Windows + X or right-click on the start button.
Click on ‘Network Connections’.
Right-click on your network connection (Ethernet or Wifi) and click on properties. It might prompt for administrator credentials.
Double-click on Internet Protocol Version 4.
Select the radio button at ‘Use the following IP address’.
Check the IP address settings for others using the same network as yours and change your settings to the same.
Click OK to save the settings and exit.r
10. Use an external Network Adapter
Your Network chip may just be the facilitator of the problem. Having a faulty network chip on your windows machine can crumble your internet connection, you are advised to troubleshoot your network chip, using an external network adapter.
11. Restart your modem and router
Switch off both your modem and router keeping them physically connected.
Start the modem. Wait for 30 seconds after all the lights turn green.
Start the router.
This is called power-cycling.
12. Upgrade the router firmware
Having an outdated router firmware can also crumble your network connection, leading to the unidentified network error on your windows machine. You are advised to update the firmware on your router and try connecting again.
13. Disable Virtual Network Adapters
Launch Device manager on your windows machine
Navigate to Network Adapters and expand it
Right-click and disable them
14. Run the built-in troubleshooters
Having exhausted the troubleshooting steps listed above, and nothing seems to change, running the built-in troubleshooters on your windows machine, may just be the answer to your problem. Here are the steps to running the built-in troubleshooters on your windows machine. To activate the run box on your windows machine, simply hold windows key and R together i.e windows key + R.
In the run box, you are to run each of the commands independently.
msdt.exe -id NetworkDiagnosticsWeb
To open the Incoming Connections Troubleshooter
msdt.exe -id NetworkDiagnosticsInbound
To open the Network Adapter Troubleshooter:
msdt.exe -id NetworkDiagnosticsNetworkAdapter
Conclusion: Upon troubleshooting your device, with the steps listed in this article on how to fix unidentified network access on windows , there is a high chance you might solve the unidentified error on your windows machine. If the problem persists, you are advised to contact windows support theme or visit a technician.
Partitioning hard drives, with a functioning operating system, is carried out using some built-in features. You can partition your hard drive or SSD using the command prompt, Windows disk management or a third party software. However, partitioning a new hard drive or SSD without OS is an entirely different thing. Here you do not have the luxury you have on a fully functioning OS. There is no software installed, you are given a plane slate, with no tools.
Despite the fact that it sounds impossible, Partitioning hard drives or SSDs without OS is actually possible. In this article, we explore a tutorial on how to partition a new SSD or Hard drive without OS.
Please note that for you to partition the hard drive or SSD without OS, you will need a bootable device, to boot the hard drive or SSD without an operating system. In this article, I will demonstrate how to partition a new hard drive or SSD using a bootable device containing windows OS. The steps are listed below.
How to Partition a new SSD or hard drive without OS, During Windows Setup
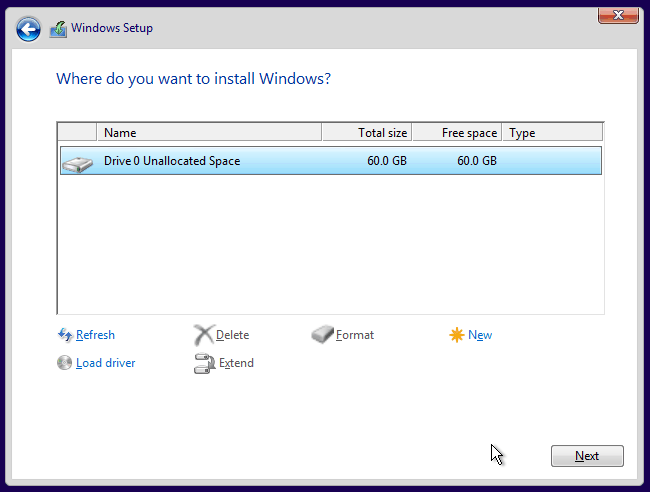
when installing windows OS, you are provided with the option to manage your hard drive or SSD space. Here you will be able to manage the partitions on your hard drive or SSD. You can create partitions or delete already existing partitions. As already mentioned, you will need a bootable device containing windows OS.
1 Insert the boot device into your computer. If your boot device is a disc, you are required to place it in your CD ROM. If it’s a bootable flash drive, you should plug it to any of the USB ports on your computer.
2. Follow all on-screen prompts until you are landed in the page where you can manage your storage space.
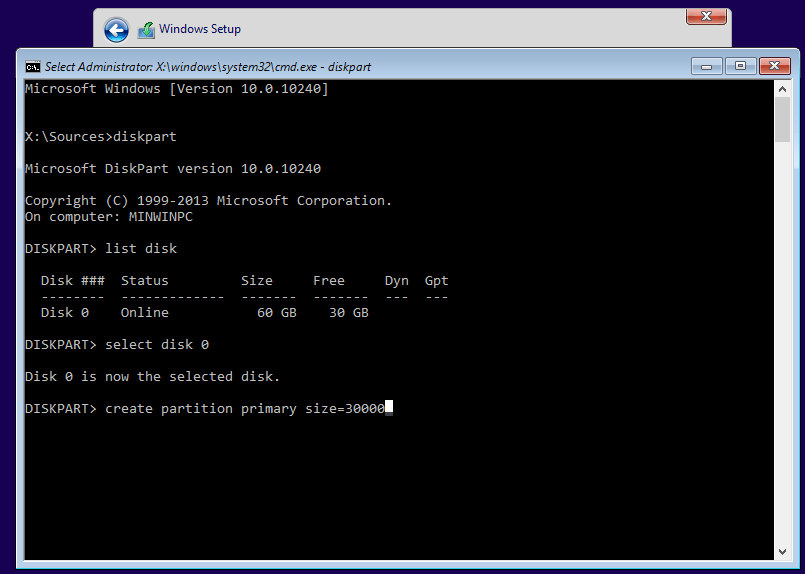
3. Once you are on the windows storage management page, press shift+F10 simultaneously to open a command prompt.
4. Type “diskpart” and press enter
5. At Diskpart>, run a few lines of commands to create a new partition:
List disk
Select disk [disk number]
Create partition primary [size=n]
Disk number and size is dependent on the configuration of your hard drive or SSD. Below is an example of how to use the above command line.
List disk
Select disk 0
Create primary partition size=60000
Note: Creating a partition of 6000MB means you are creating a partition of 60GB and also disk 0 is the name of the default partition that your hard drive or SSD has.
5. Hit enter
Note: You are advised to allocate more than 100GB to your new partition, because Windows update, installed programs, and other system files will keep consuming space on system partition
After you might have successfully carried out all the steps listed above, you will have a well partitioned hard drive. Steps listed above should be followed in order, to prevent complications.
It is no news that Facebook doesn’t allow users to download photo and videos from its platform. Uploading photos and videos may be straightforward, but downloading them is nearly impossible. This has lead to the development of several means of downloading media contents from Facebook.
Most of the methods available today, to download photos and videos from Facebook, requires you to download a browser extension, or you download special software. Downloading these browser extensions and software may be harmful to your computer because most of them come with malware, that can ruin your operating system and make your leak your information.
In this article, we explore a tutorial on how to download facebook videos without using browser extensions. We are going to explore three different methods.
How to Download Facebook Videos without Browser Extensions Using Downvid.net
Downvid.net is a website that allows users to download facebook videos, by pasting copied URLs in a special box provided. It features a very simple and minimal interface. Steps to downloading Facebook videos using Downvid.net is listed below.
Log in your facebook account
Navigate to the post containing the facebook video you wish to download
Copy the URL to the post
Launch downvid.net on your computer, using your browser
Paste the link in the box provided
Select the video quality you desire
Click on download
How to Download Facebook Videos without Browser Extensions Using FBDOWN.NET
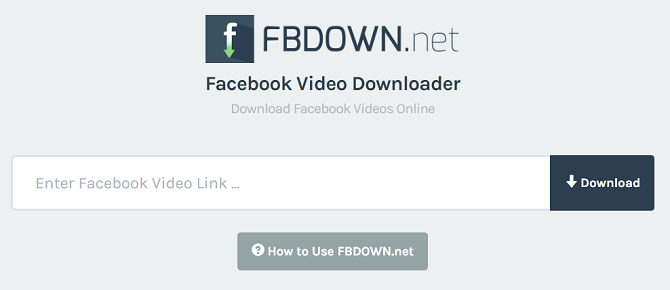
Similar to downvids.net, FBdown.net is another website that allows users to download facebook videos seamlessly. Steps to downloading Facebook videos using this platform are very similar to that of downvids.net. They are listed below.
Log in your facebook account
Navigate to the post containing the facebook video you wish to download
Copy the URL to the post
Launch fbdown.net on your computer, using your browser
Paste the link in the box provided
Select the video quality you desire
Click on download
How to Download Facebook Videos Using Savefrom.NET
Famous for Youtube video downloads, savefrom.net is yet another platform that lets people download facebook videos easily. It offers a very simple and minimal interface. Similar to the method used in downloading youtube videos on this platform, downloading facebook videos here, requires copying and pasting the Video URL. The steps are listed below.
Log in your facebook account
Navigate to the post containing the facebook video you wish to download
Copy the URL to the post
Launch savefrom.net on your computer, using your browser
Paste the link in the box provided
Select the video quality you desire
Click on download
As you might have already observed in the steps listed in methods presented in this tutorial, downloading Facebook videos with browser extensions, is a straightforward thing. All you have to do is select one of the methods listed here and follow the steps given.














You must be logged in to post a comment.