We participate in marketing programs, our editorial content is not influenced by any commissions. To find out more, please visit our Term and Conditions page.
We participate in marketing programs, our editorial content is not influenced by any commissions. To find out more, please visit our Term and Conditions page.
This is another fantastic blogger widgets I would like to share with you, it cost me a sleepless night to be able to set this up. With just a few steps we can setup this amazing widget on your blog.
Don’t save the template just yet, replace the following:
http://your-post-link1,2,3,4,5 with your links to your post. http://your-image-link1,2,3,4,5 with your post image link. Post content summary and post title with your post title and summary.
Now save your template and view your amazing blog!!
Having a high page rank is a good way of marketing your blog or website to advertisers.
Here I’m going to showcase to you some of the links that will help you increase your page rank.
But before I continue I would like to introduce you to a website you can check your website or blog page rank they also give suggestions on what you need to do to increase your website grade.
Websitegrader provides you with a complete website analysis, ranging from a full SEO analysis to the a complete details of your website social media activities. With Websitegrader, you can compare your website with another website or blog and also receive updates regarding your website via email. Features:
Computerworld – Sergey Brin, CEO and co-founder of Google, wears Google Glasses during a product demonstration at the Google I/O 2012 conference last month. (Image: Stephen Lam / Reuters)When one talks of computers today, he or she could be referring to a laptop, a desktop or maybe even a smartphone. However, if Google’s latest plan stays on track, the definition of a computer could broaden significantly. At its Google I/O developers conference in San Francisco, the company threw a lot of effort behind the unveiling of a prototype of its so-called Google Glass computerized eyeglasses. The Android-powered eyeglasses are equipped with a processor, memory, camera, GPS sensors and a display screen. Google co-founder and CEO Sergey Brin said the Google Glass development effort is all about “doing brand new risky technological things that are really about making science fiction real.” In that world of science fiction, he said, computers won’t always look like what we now expect from the term. The next generation of computers won’t necessarily sit on one’s desk or lap or in one’s hand. The devices may not have a have a monitor and/or keyboard. Someday – probably in the near future – computers will be worn, whether incorporated into glasses, or in a piece of jewelry such as a bracelet or something else, analysts say. “Google Glass changes the way we will look at computers,” said Patrick Moorhead, an analyst at Moor Insights & Strategy. “It isn’t just research, it’s a workable prototype.” “Glass serves to stretch the technology ecosystem to even greater lengths, Moorhead said. “I believe that in five years we will see many different form factors and brands of wearable computers. We will have computers embedded in our glasses of course, but also in our jewelry and watches.” Moorhead noted that the U.S. military, especially the Special Forces units, already use wearable computers to for communications and GPS tasks. That technology hasn’t yet reached consumer or business users, he added. Google’s research efforts could hasten the mainstream use of the technologies. “As we see real devices in use that we previously saw only in movies and books, it will expand the possibilities even further,” said Moorhead. “We can go beyond the glasses and visualize computers in our jewelry, in our watches and even inside our bodies.” Charles King, an analyst at Pund-IT, said such new computing form factors are an extension of the current mobile trend, taking GPS-enabled smartphones, growing compute power and multiple new communications capabilities to the next level. “It’s the ever smaller and ever more powerful mobile technologies,” he added. “It’s about the things we used to see and think about in relation to sci-fi novels or Star Trek. The idea of highly mobile and highly powerful computers is extremely intriguing.” King said he expects there will be great demand for what he calls “mobile computing lifestyle choices” in a few years. “It would not surprise me if we see a lot of this in, say, five years,” he noted. “As the technology becomes more sophisticated and cheaper, it becomes something everybody can afford.” “Some years ago, a smartphone like the Blackberry was considered something that only business professionals needed. It doesn’t seem farfetched to think we could see Google Glass widely adopted in five years,” King added. Rob Enderle, an analyst with the Enderle Group, pointed out that Google Glass or other wearable computers could be very useful in many workplaces — not just the next big thing to help users look cool or geeky. “They could be used regularly for things like taking inventory in warehouses, and for tasks on factory floors and other places where folks need to use computers and their hands at the same time,” Enderle said. At the Google I/O conference, the company said it is offering prototype versions of Google Glass, dubbed the Google Glass Explorer Edition, to developers for $1,500. Brin said he expects the glasses to be generally available in 2014 — at a lower price. “If the developer community can come up with interesting solutions, the sky’s the limit,” said King. Enderle said that wearable computers could be a big step toward a new generation of compute form factors that can be embedded inside the human body. Putting aside visions of Star Trek’s Borg initiative, Moorhead and Enderle agreed that wearable computers are a bridge to the first such computer implants. “It’s an interim step toward imbedding computers into people and creating some kind of biomechanical interface that bypasses the eyes,” Enderle said, adding that he believes that computer generation is some 25 to 50 years away.
“The change we are working toward … is one of the big changes we will see in computing this century. It will redefine personal computing by the time it has fully matured,” he added.
Sharon Gaudin
Author Biography:
Sharon Gaudin covers the Internet and Web 2.0, emerging technologies, and desktop and laptop chips for Computerworld. Follow Sharon on Twitter at @sgaudin, or subscribe to Sharon’s RSS feed . Her e-mail address is [email protected].
Mozilla’s new Firefox 13 browser may have just barely landed on users’ PCs, but already forward-looking fans can check out the beta version of Firefox 14–and the Aurora version of Firefox 15, too. Most notable in Firefox 14 are new security features that “make it easier for users to control their Web experience,” according to the official announcement late last week on the Mozilla blog. Several new features in the upcoming version of this popular free and open source browser are designed to make life better for users, in fact. The final version isn’t expected until July, but here’s a rundown of some key improvements you can expect.
1. HTTPS by Default
In the new Firefox 14 beta, HTTPS is enabled by default for Google searches to help protect users “from network infrastructure that may gather data, modify or censor search results,” Mozilla explained. This feature also stops third-party sites from gathering search data when you click on items on a search results page. “We look forward to supporting additional search engines as they enable SSL searches,” Mozilla wrote.
For sites with an EV certificate, Firefox 14 displays a green lock icon and the site owner’s name (Click image to enlarge.)2. A New ‘Red Flag’
Also included in the latest Firefox beta is a new way to display the verified identity of a website in the browser’s Awesome Bar, or URL field. Specifically, a globe icon positioned next to the domain indicates a site not using SSL encryption, while sites with SSL encryption include a lock icon and show “https.” Sites that have an Extended Validation (EV) certificate, meanwhile, are indicated by a green lock icon and include the name of the site owner. Sites with mixed http and https content show a gray triangle icon as a warning. Bottom line: a quick visual guide to the security level of the site you’re visiting, making “spoofing” of secure sites much more difficult.
3. More Control Over Plug-ins
The upcoming Firefox 14 lets users control how plug-ins like Flash and Quicktime play through a new feature that can add a “play” button to all plug-in content; users can then simply click “play” to begin viewing immediately. “Future releases will include more specific customizations and a robust interface; for now, you can experiment with the feature by selecting plugins.click_to_play to ‘true’ in about:config,” Mozilla explained.
4. Better Lion Support
For Mac users, Firefox 14 now offers native full-screen support of OS X Lion 10.7, providing “a richer and more immersive browsing experience,” as Mozilla puts it.
5. URL Auto-Complete
Last but not least, Firefox 14’s Awesome Bar now auto-completes URL domains as you type them, potentially making the process quicker than ever. There are also a few key new features for developers in the Firefox 14 beta, including a pointer lock API and pseudo class lock. And what of Firefox 15? The Aurora version of that software is now available as well. The most notable new addition there is native PDF support–a feature Google’s competing Chrome browser has had for some time. Neither of these new browser releases is designed for production purposes, of course, but if you’re interested in checking them out, they’re both available as free downloads for Windows, Linux, and Mac. Firefox 14 beta can be found in Mozilla’s beta channel; the early Firefox 15 is on the Aurora page.
Important Notice: Tweet this article with the bookmark social media share below to stand a chance to win an ipad or start making money with your twitter account (it works only with your twitter account and the more articles you tweet the more you stand a chance to win an Ipad)
With interactive documents, you can choose from a range of predefined options for data, instead of typing the data from scratch each time. If you write lots of letters to the same few correspondents, generate electronic data-entry forms, produce documents with boilerplate language, or find yourself typing the same phrases over and over, wouldn’t it be convenient if your documents were already partially formatted and allowed you to make selections from drop-down menus instead of copying and pasting from documents you created earlier? I’ll show you how to use the Content Control tools within Microsoft Word to create templates that you can use every day.
How to Find Word’s Content Controls
Content Controls let you add interactive elements to your Word documents, but you might not even know they exist because they’re accessible only from the Developer tab in Word’s Ribbon, and that tab is disabled by default. To enable it in Word 2010, choose File > Options > Customize Ribbon. In the right-hand panel, locate and click the Developer checkbox and click OK. In Word 2007, choose File > Word Options and then click the Show Developer Tab in the Ribbon checkbox (from the Popular set of options) and click OK. Now select the Developer tab, locate the Controls group, and click Design Mode. You’re ready to set up your controls.
Select a Date Using the Date Picker Control
Hover your mouse over the icons in the Controls group, and a label will pop up identifying each control. The Date Picker Content Control creates a placeholder that you can use to choose a date from a calendar. The Date Picker Content Control will display a small calendar that allows the user to choose a date.Click the icon to add this element to your document. Turn off Design Mode, and you’ll see a box labeled ‘Click here to enter a date.’ The calendar will appear when you click the down arrow on the control. Pick a date, and that date will appear automatically in the document. The Date Picker has some handy settings you can configure. To see these, click Design Mode once again. Click the Date Picker control and then click the Properties button (it’s in the Controls segment of the Ribbon). Use the Properties dialog box to format the control (for instance, to have the month spelled out instead of being represented numerically). You can also use Properties to lock the content control so that it can’t be deleted, or you can add a title to the control telling the user about its purpose (“Select a date for a meeting,” for example). Finally, you can format the control with a Word style so that the date looks the way you want it to. If you use styles, and the style set changes, the date’s text formatting will automatically change to match the new style set.
Add a Content Control to Manage Text Entry
Use the Plain Text Content Control as a placeholder for a user to enter text into the document.The Plain Text Content Control creates a designated place for someone to enter text into a document. You can preformat the text in this control using a defined style, so that any text the user enters there will appear a certain way. You can also elect to permit or disallow carriage returns. On top of that, you can leave this control as is, lock it so that it cannot be deleted, or set it so that it automatically disappears once its contents have been edited. In the last mode, the content control will appear in the document until someone has typed text in it; as soon as they do, the content control will vanish, but the text typed into it will remain.
Select an Item From a List of Options
Populate the Drop-Down List Content Control with items for the user to choose from.With some documents, you’ll want to pick from a limited number of options presented in a list. In these cases, creating a template with the Drop-Down List Content Control or the Combo Box Content Control is the way to go. Click the Drop-Down List Content Control to add it to the document. For this control, you can not only type a title and use a style to format its contents, but also format it so that it cannot be deleted. To prepopulate the control with a set of choices, select the control and then click Properties. Now click Add in the Properties dialog box, and type an entry for the list (for this example, leave the display name and the value the same). Repeat this step with each entry for the list, and click OK when you’re finished. When you click Design Mode and return to the document, you’ll see the words ‘Choose an item’ in gray. Click that text, and a drop-down box will appear with the words in your list. Click one of these items, and the word will appear in the document.
Use the Check Box Control to Create Checklists
You can change the symbols used in the Check Box Content Control.The Check Box Content Control allows a user to place a checkmark to indicate their selection of an item. To add one to your document, click the Check Box Content Control and then click Properties. A Check Box can toggle between two states when clicked on: selected, represented by an X inside a box, and not selected, which shows a blank space inside the box. To change these symbols, open Properties, click the Change button, and choose a font from the dialog box (I suggest something from the Wingdings family.)
Add Quick Parts to a Document
The document properties on the Insert tab are another form of content control–these are populated from data stored in the document.Some document properties, such as the author’s name, are stored in every Word document, but usually they don’t display in the document. Here’s an easy way to add that information so that it does appear: While you’re in Design Mode, select the Insert tab on the Ribbon. Click Quick Parts and then Document Property. Finally, choose the property–Author, for example–to insert that information into the document automatically. Choose the Developer tab and click Properties while this control is selected, and you can set the text style or other properties for the control. To see where the Author data is sourced from, click File > Options. You’ll see User Name in the Popular group of settings; this is the value that populates the document’s Author property. If you change this information, you must restart Word for the change to take effect.
Put Controls to Work in a Document
You’ve probably already come up with a thousand ways to use Word’s Content Controls. If you haven’t, think of any documents you create on a regular basis that include repetitive data-entry tasks: memos, fax covers, shipping documents, and so on. Include a Date Picker control anywhere in the document template that calls for a date. Add a Drop-Down List control to pick an item from a predefined list. Use a Check Box control to select or deselect various options. Using Content Controls not only helps you complete documents quickly, but also allows you to preset a document’s layout so that you don’t need to align everything perfectly every time you create it. Once you’ve created your template, save it by choosing File > Save As > Save as Type, and choose Word Template (*.dotx). Be sure to click the Templates link in the top-left corner of the Save As dialog box to store the template in the Templates folder. Type a name for the template, click Save, and close it. In the future, you can create a new document based on this template by choosing File > New > My Templates and then clicking the desired template to open it.
Between its use of SPDY by default and speed gains through Mozilla’s “Project Snappy,” Firefox 13 has been generating excitement for some time already. Now, the final version of the software is here at last.
Mozilla on Tuesday launched this latest version of its popular free and open source browser, which comes packed with numerous significant new features that promise to make life better for users in myriad ways. If you already use Firefox, this new update will likely be on its way to you automatically through Mozilla’s now nearly silent update process, which debuted in the Windows version of Firefox 12. If you’ve been using something else to browse the Web, though, this would be a great time to give Firefox a fresh look. The video below offers an overview of what’s new, but here are a few key reasons why Firefox 13 is well worth checking out. 1. Speed Though SPDY has been included in Mozilla’s browser since Firefox 11, Firefox 13 marks the first time it’s been enabled by default. Designed as a successor to HTTP, SPDY reduces the amount of time it takes for websites to load, so “you will notice faster page load times on sites that support SPDY networking, like Google and Twitter,” according to today’s official announcement on the Mozilla blog. 2. Security SPDY also delivers a boost in security to Firefox 13 thanks to the fact that it encrypts all communication with SSL so as to make browsing more secure. 3. A New Home Those of us who have been using Firefox for some time will notice a freshly redesigned home page in version 13. Now included, for example, are icons at the bottom of the page that provide easy access to bookmarks, history, settings, add-ons, downloads, and sync preferences via one-click shortcuts. http://www.youtube.com/embed/HRp4a_24cp8?feature=player_embedded 4. A New Tab Experience Firefox 13 also offers a better experience when you open a new tab, similar in many ways to how Google’s Chrome browser does it. Specifically, you’ll see thumbnails of your most recently and frequently visited sites. The software also lets you customize the New Tab page by adding or removing thumbnails based on the pages you visit most. 5. More Speed I wrote last month about Mozilla’s “Project Snappy,” and several key improvements from that effort combine to give Firefox 13 yet more speed. For example, when restoring a browsing session, Firefox first loads the tab you are currently viewing, then it loads background tabs on demand when you click them. “It’s an improvement that makes Firefox start faster and use less memory,” Mozilla explains. Also resulting from Project Snappy are an improved mechanism for reducing Firefox’s memory usage, a faster “first paint” when the browser is launched, and several other improvements. 6. It Speaks Your Language Last but not least, Firefox 13 adds support for the Khmer language, making the browser accessible to an additional 15 million users around the globe. Firefox is now available in more than 85 languages. Want to see the full release notes for Firefox 13? They’re available on the Mozilla site. Want to give the software a try? It’s a free download for Windows, Linux, or Mac.
Important Notice: Tweet this article with the bookmark social media share below to stand a chance to win an ipad or start making money with your twitter account (it works only with your twitter account and the more articles you tweet the more you stand a chance to win an Ipad)
If the DNSChanger rootkit has infected your PC, you’ll lose access to the Internet when the FBI shuts down DNSChanger’s surrogate DNS servers. Here’s how to determine whether you’re infected, and what to do if you are.
In July the Internet Systems Consortium will permanently shut down DNS servers deployed to serve as temporary surrogates for rogue DNS servers shut down as part of Operation Ghost Click, an FBI operation that brought down an Estonian hacker ring last year. If your PC is one of the more than 1 million computers infected that carry DNSChanger you might unknowingly be relying on one of the FBI’s temporary servers to access the Internet, and if you don’t eliminate DNSChanger from your PC before the FBI pulls the plug on its servers, you’ll be left without Internet access. Read on to learn how to discover whether you’re infected with DNSChanger, and what you can do to eliminate it from your system.
How to Tell Whether DNSChanger Has Infected Your PC
The DNSChanger Check-Up websites will automatically check which DNS servers you’re using; it will let you know that your PC is clean by flashing a green background.To figure out whether you’ve been infected with DNSChanger, just point your Web browser to one of the (admittedly amateur-looking) DNSChanger Check-Up websites that Internet security organizations maintain across the globe. The link above will take you to a DNS Changer Check-Up page in the United States that the DNS Changer Working Group maintains; if you live outside the United States, you can consult the FBI’s list of DNSChanger Check-Up websites to find an appropriate service for your region. Unfortunately, if your router is infected, those websites will think that your PC is infected, even though it may be clean; worse, if your ISP redirects DNS traffic, your PC may appear to be clean even though your DNS settings may have been maliciously altered. If you want to be certain that your PC is free of DNSChanger malware, you need to manually look up the IP addresses of the DNS servers that your PC contacts to resolve domain names when browsing the Web. To look up which DNS servers your Windows 7 PC is using, open your Start menu and either run the Command Prompt application or type cmd in the Search field. Once you have a command prompt open, type ipconfig /allcompartments /all at the command line and press Enter. A big block of text should appear; scroll through it until you see a line that says ‘DNS Servers’, and copy down the string(s) of numbers that follow (there may be more than one string here, meaning that your PC accesses more than one DNS server). Use the /ipconfig command to look up the IP addresses of the DNS server(s) that your PC is using. It’s even easier for Mac OS X users to determine the IP addresses of the DNS servers that their PC uses. Open the Apple menu (usually located in the upper-left corner of the screen) and select System Preferences. Next, click the Network icon to open your Network Settings menu; navigate to Advanced Settings, and copy down the string(s) of numbers listed in the DNS Server box. Mac users can find their DNS server IP address(es) under the DNS tab of the Advanced Network Settings menu. Once you know the IP addresses of the DNS servers that your PC is using, head over to the FBI DNSChanger website and enter those addresses into the search box. Press the big blue Check Your DNS button, and the FBI’s software will tell you whether your PC is using rogue DNS servers to access the Internet.
What to Do If Your PC Is Infected by DNSChanger
If your PC is infected with DNSChanger, you’ll have to do some intensive work to get rid of it. DNSChanger is a powerful rootkit that does more than just alter DNS settings; if you’ve been infected with DNSChanger, your safest course is to back up your important data, reformat your hard drive(s), and reinstall your operating system. For more information, consult our guide to reinstalling Windows. If you’re leery of reformatting your entire PC, you can try rooting out the DNSChanger rootkit with a free rootkit removal utility such as Kaspersky Labs’ TDSSKiller. As the name implies, Kaspersky released the program to help PC owners seek and destroy the TDSS rootkit malware, but it also detects and attempts to eliminate DNSChanger and many other forms of rootkits. If the infected PC is on a network, you’ll have to check every other PC on the network for signs of infection, and then check your router’s settings to ensure that it isn’t affected (DNSChanger is programmed to change router DNS settings automatically, using the default usernames and passwords of most modern routers). To do this, copy down your router’s DNS server IP addresses (located in your router’s settings menu; read “How to Set Up a Wireless Router” for more information) and check them against the FBI’s IP address database mentioned above. If your router is infected, reset the router and confirm that all network settings are restored to the manufacturer’s defaults. When you’re done, repeat the steps outlined above to verify that your PC is no longer infected with DNSChanger. With all traces of this vicious malware eliminated, you should have nothing to fear when the FBI shuts down the ISC’s temporary DNS servers in July.
With just a bit of work you can set up Android 4.0 on your Kindle Fire, transforming the device into a powerful general-purpose tablet with an unbeatable price tag.
With a vibrant 7-inch IPS display and a 1GHz dual-core processor, the $199 Kindle Fire can make for one lovely tablet. With a bit of work–but no hardware modifications–you can set up Android 4.0 on your Kindle Fire and thenceforth use the device as a powerful general-purpose tablet despite its incredibly low price. Email, games, Web browsing (with Chrome for Android or any other browser)–the Kindle Fire can do it all. This guide is directly based on the excellent guide written by XDA Developers user Kinfauns. Kinfauns’s guide and his Kindle Fire for Beginners guide are highly recommended reading, but they’re fairly lengthy. We’ve simplified the process and then tested it ourselves, so we can walk you through all of steps; but please use caution when tinkering with your gear, and understand that PCWorld accepts no responsibility for the consequences. That said, read on for a quick step-by-step procedure that you can follow to transform your Kindle Fire into an Android 4.0 tablet!
Ingredients
You will need:
A Kindle Fire with a full battery (if it’s not full, take time to recharge it fully).
A USB cable for connecting the Kindle Fire to your computer.
A Windows computer that you have Administrator rights for.
The Kindle Fire Utility, a third-party toolkit that simplifies many tasks and includes vital drivers.
An ICS (Android 4.0) ROM for the Kindle Fire. You can pick one from this list of ROMs. For this wow-to, we’ll be using AOKP, a well-regarded third-party ROM. The latest AOKP version at the time of this writing is build 38, but it’s a good idea to check for the most recent version.
[Optional] The Google Apps bundle, including Gmail, Google Play, and other essential Android apps. This is packaged separately from the ROM for legal reasons. If you download AOKP, you can find Google Apps for AOKP release 38, under GApps (the last link on the page).
A willingness to void your warranty and to use the Windows command line. This how-to does not use graphical tools.
Install the Kindle Fire Drivers
For this procedure to work, your computer must correctly recognize the Kindle Fire as an Android device. Here’s how to make that happen: 1. If your Kindle Fire is connected to your computer, unplug it. 2. The KFU zip contains a folder called Kindle Fire Utility. Unzip the contents of this folder into a new folder, c:kfu. 3. Run the install_drivers.bat file that’s in the c:kfu folder. Windows will pop up a UAC prompt, and then start the Kindle Fire Driver Installer. 4. As you step through the installer, you’ll receive a Windows Security alert warning you that the drivers are not signed. Install the drivers anyway. 5. The installer should complete successfully and show a confirmation dialog with the driver name:Kindle Fire driver installation confirmation.
Verify That the Drivers Were Successfully Installed
Before doing anything risky with your Kindle Fire, make sure that your PC fully recognizes it as an Android device: 1. Connect the Kindle Fire to your computer and wait for a few moments while Windows recognizes it (even if you’ve plugged it in before). 2. Run Device Manager (Click Start, right-click My Computer, and then select Manage > Device Manager). 3. You should see the Kindle Fire registered as an Android Composite ADB Interface, under Android Phone in the Device Manager tree. If you see this listing, you’re good to go. If this isn’t exactly what you see, you’ll need to do some troubleshooting; for that, refer to the original guide which has an extended troubleshooting section under the heading “What can I do if the drivers won’t load?”
Switch to Fastboot Mode
It’s still not too late to turn back. Up until this point, you haven’t done anything to the Kindle itself. But now you’re about to take the first step that involves making changes to the tablet. So, without further ado: 1. Make sure that the Kindle Fire is still connected to your computer. 2. Create a new subfolder, c:kfusoftware. 3. Unzip fbmode.zip into c:kfusoftware. It contains a single file, called fbmode (with no suffix). 4. Open a command prompt window, and copy fbmode into a user-writable location on the Kindle Fire using ADB: adb push C:kfusoftwarefbmode /data/local/tmp/ 5. Edit fbmode’s permissions so that it can run: adb shell chmod 755 /data/local/tmp/fbmode 6. Run fbmode to switch to fastboot mode: adb shell /data/local/tmp/fbmode 7. Using ADB, reboot the Kindle Fire: adb reboot At the end of this process, your command prompt window should look like this: Command prompt window after switch to fastboot mode. Your Device Manager should look like this:
The meaning of this notation is that the name of the device changes from Android Composite ADB Interface to Android ADB Interface. Finally, the Kindle Fire itself should look like this:
Kindle Fire screen after switch to fastboot mode. The Fire will simply display a logo and stay put. It’s not “stuck”; rather, it’s in fastboot mode, awaiting further instructions.
Install a Recovery Image
Next, you’ll install a recovery image–a miniature operating system that you’ll use later to flash the complete ROM. The recovery image will also come in handy for creating full backups of the device, among other things. 1. Copy the TWRP .img file into c:kfusoftware. At this writing, the latest TWRP image is named openrecovery-twrp-blaze-2.1.1.img. 2. Open a command prompt window at c:kfutools and install the image: fastboot -i 0x1949 flash recovery C:kfusoftwareopenrecovery-twrp-blaze-2.1.1.img 3. Change the boot mode to Recovery: fastboot -i 0x1949 oem idme bootmode 5001 4. Reboot into TWRP: fastboot -i 0x1949 reboot At this point, your command prompt should look like this: Command prompt window after installation of recovery image. And your Kindle Fire should look like this: Kindle Fire screen after installation of recovery image
Install a Custom Bootloader
You are well into the process now. Next, install the FIREFIREFIRE custom bootloader: 1. Take the FIREFIREFIRE Zip file and place it (still zipped) into c:kfusoftware. At this writing, the latest filename is called fff-u-boot_v1.4a.zip. 2. Copy FIREFIREFIRE into the Kindle Fire’s /sdcard directory: adb push C:kfusoftwarefff-u-boot_v1.4a.zip /sdcard/ 3. On the Kindle Fire, press the Install button. Navigate to /sdcard if needed (you should already be there by default), and select fff-u-boot_v1.4a.zip. 4. Swipe to confirm. You should get a success message: Custom bootloader success message. 5. Back up the stock OS so you can roll back to it at any time. In the root TWRP menu, select Backup, modify the options if you like (the defaults are fine), and swipe to confirm. Backing up will take a while, which is one of the reasons why starting the process with a full battery is so important. Backing up the stock OS can take a while.
Flash the Ice Cream Sandwich ROM
You’re almost there! Now you just need to copy the ROM and flash it. As noted at the outset, we used AOKP in our test runs, but different ROMs may have different flashing procedures. Read the documentation for the ROM of your choice. 1. Place the .zip files containing the ROM image and Google Apps into c:kfusoftware. 2. Push the ROM and Google Apps onto the device: adb push C:kfusoftwareaokp_otter_build-38.zip /sdcard/ adb push C:kfusoftwaregapps-ics-20120429-signed.zip /sdcard/ 3. In TWRP, select Wipe > Factory Reset. This will remove all existing files from the data and cache partitions, but it won’t affect the /sdcard directory, which contains media files. 4. In TWRP, select Install. Navigate to the ROM .zip file that you placed on the device, tap it, and swipe to confirm. This will take a few moments: Installing the Ice Cream Sandwich ROM. 5. Once that is done, tap the Back button in the upper right corner, and repeat the process with the Google Apps .zip file. 6. Tap Reboot System in the lower right corner, and boot into your brand-new Android 4.0 experience! If you wish, you can now remove the ROM and Google Apps .zip files from your device.
This is an article by Sharon Gaudin, Computerworld and felt I should share it with you so we can all put our views together. A year after Google+ was launched, it seems Google is saying it’s not really a social network after all. Now this might be confusing to the 150 million people who actively use Google+ every month. They catch up with colleagues and friends on Google+ Circles. They chat with family members in Google+ Hangouts. They post photos. They watch videos. So aren’t those the things you do on a social network? Google has other thoughts on this. According to a report from Mashable, Vic Gundotra, Google’s senior vice president of social business, and Bradley Horowitz, Google+’s vice president of product, said Google+ may be social, but it’s more than that. Instead of a social network, Google+ is an upgrade to all Google products. “Google+ is just an upgrade to Google,” Gundotra told Mashable. “People have a hard time understanding that. I think they like to compare us with other social competitors, and they see us through that lens instead of really seeing what’s happening: Google is taking its amazing products, and by bringing them together, they just become more awesome.” Google declined to comment. The company has been saying since last fall that Google+ will be woven into all of its products. Speaking on an earnings call last October, Google co-founder and CEO Larry Page said he wants to “transform the overall Google experience” with Google+. “This means baking identity and sharing into all of our products so that we build a real relationship with our users,” Page added. “Sharing on the Web will be like sharing in real life across all your stuff.” And that’s what Google started to do. Soon after Page made that statement, Google began integrating Google+ with Google Apps, the company’s cloud-based office suite. While Google+ is expected to be used across Google’s product portfolio, does that mean it’s still not a social network? No, not at all, according to Dan Olds, an analyst at Gabriel Consulting Group. “This is a great example of moving the goal posts while the football is in the air,” Olds said. “Google didn’t do much to scotch these comparisons when Google+ was being rolled out, but now, a year later, Google+ suddenly isn’t like Facebook at all? It’s major-league and masterful spin, but I don’t think it holds water.” He added that just because Google+ is being integrated across product lines, that doesn’t change what it is at its core. “It’s still a social network at heart,” said Olds. “Google+ is still a service that gives users a chance to share and connect with others, and that’s what social networks do. If you take the social networking out of Google+, then it’s just a console, right?” However, Brian Blau, an analyst at Gartner, pointed out that Google has never come out and said that it’s focused on competing with Facebook. “I think the sentiment over the statement is correct,” he added. “They may not be competing over a social network as a pillar of a business, but certainly they are competing for consumer mindshare on technologies like search, location and mobile.” And Blau also noted that Google is smart to make all of its products more social because that will bring in more information and, in turn, more money for Google. “Maybe what you are seeing is a change in definition of what it means to be a social network,” said Blau. “The direction you are seeing with Google is the natural direction for how social will be integrated into consumer technology, and enterprise too. It will be a feature versus a stand-alone product.” However, Patrick Moorhead, an analyst with Moor Insights & Strategy, said he’s not buying that Google doesn’t think Google+ is a social network. “This talk is nothing more than clever product repositioning,” he said. “Gundotra realizes now they cannot compete head-to-head with Facebook or Twitter, so he is attempting to change the playing field and lower expectations for everyone…. Google+ is a social network so long as it is a meeting place where users share their experiences, likes [and] dislikes, and others respond as if it’s a virtual conversation.” Sharon Gaudin covers the Internet and Web 2.0, emerging technologies, and desktop and laptop chips for Computerworld. Follow Sharon on Twitter at @sgaudin and on Google+, or subscribe to Sharon’s RSS feed. Her email address is [email protected]. See more by Sharon Gaudin on Computerworld.com. Read more about web 2.0 and web apps in Computerworld’s Web 2.0 and Web Apps Topic Center.
New GPS tech can track your every move. Should you fear it or embrace it?
Privacy fans, take note: A new technology, called Indoor Positioning System, could push your worry meter to the max. IPS allows pinpoint tracking of any Wi-Fi-enabled device, such as a smartphone or tablet, within a building. This means that an IPS service could easily track you–right down to, say, the table you’re occupying in a mall’s food court–as long as your mobile devices’ Wi-Fi is turned on. And, if you’re a typical device user, your Wi-Fi is always on, right? In short, we’ve moved far beyond using regular old GPS for location tracking. Indoor environments are challenging for low-cost location systems such as GPS, because the ways in which buildings are constructed–not to mention physical obstacles and even people’s bodies–interfere with GPS’s ability to pinpoint a location. Navizon ITS logoOne example of the new technology is the Navizon Indoor Triangulation Service, which MIT’s Technology Review blog discussed recently. Location services company Navizon says that ITS can provide accurate tracking of Wi-Fi-enabled devices, including smartphones, tablets, and laptops, anywhere inside a building or throughout a campus. (Triangulation by Wi-Fi hotspots helps to make location services more accurate.) As such services begin to grow, they might threaten your privacy. So, in many instances, if you don’t want an entity knowing the location of your mobile device, you should shut it off or ditch it completely. At the same time, however, device tracking could become hugely useful to you. Innovators have figured out how to take GPS-like navigation indoors so that people can not only quickly find the restroom in a department store or their departure gate at the airport, but also receive deals and discounts from retailers upon stepping over a shop’s threshold. Navizon wouldn’t comment for this article, but some of its competitors did. Let’s take a look at other companies working on IPS services.
Skyhook
Skyhook developed the first hybrid location system to use Wi-Fi positioning, GPS, and cell-tower triangulation to determine the coordinates of a device, even indoors. Since then, Apple (Skyhook’s biggest customer) and Google (Skyhook’s biggest competitor) have emulated the hybrid approach for their respective mapping apps. All sorts of mobile devices on the market–phones, laptops, ebook readers, digital cameras, and gaming devices–are location aware. In many cases, that’s because Skyhook software is baked into them. For instance, Apple, Dell, and HP laptops use the Skyhook system to change their clocks automatically when users take them across time zones. The laptops also let users pull up real-time information about what’s happening in a neighborhood that they happen to be in, and they can broadcast their location so that users can find them in case of theft. Skyhook’s SpotRank data-intelligence service predicts the density of people in predefined urban square-block areas worldwide at any hour, any day of the week. Image: Courtesy of SkyhookBut what’s really interesting about Skyhook is its ability to profile individual devices–not identifiable people, as CEO Ted Morgan is quick to point out–and know which ones are associated with certain kinds of people. For instance, if Skyhook sees that a device shows up at Wrigley Field four times in a season, it assumes that the person using the laptop is a sports fan. Or if a laptop or smartphone is detected in an airport several times a month, Skyhook guesses that the user is most likely a business traveler. “Because we’ve been running the location on about 100 million devices for the last four or five years, we have a tremendous amount of knowledge into overall human behavior–about where people are throughout the day, where they go, which street corners are busy, which ones are not at different times of the day,” Morgan says. Over time, Skyhook also figures out where all these devices live. Then, by mixing into device profiles publicly available data from the U.S. Census, for example, it adds demographic data such as age and ethnicity. This is a veritable gold mine of data that Skyhook can then package and offer to marketers who want to reach only select segments of consumers, or to developers and device makers who can use the software to deliver highly relevant real-time content to users. “We’re able to see at an aggregate level what 100,000,000 people are doing, so we can predict what areas of a city are getting busy or less busy, what types of people are in different areas of the city,” Morgan says. “So, if you want to know where to go out in Seattle tonight, I can tell you what the most active street corner is going to be, and I can tell you the high-level breakout of the type of people who will be there, because they’ve done that every Friday night for the last three years.” So just how does Skyhook do all this profiling of individual devices while maintaining the anonymity of the people using them? Morgan says that the company does not use device MAC addresses or phone numbers. “Every time a new phone registers on our system, we give it an ID like a license plate. There’s no way for you to know what it is. There’s no way for anyone to see it. If you were able to look into our system and see what my phone’s ID was, the only thing you’d ever find out about me is that I’m a middle-aged white guy who makes over $100,000,” Morgan says. “It would never say my name. It would never say where I’m from. There’s nothing that could ever figure out the user, and that’s the bar we have for privacy. Nobody could get into our system, even ourselves, to figure out the name of a user.”
Skyhook and Google
The main thing you need to know here is that Skyhook is suing Google currently. “Google recognized [the value of mapping the country’s Wi-Fi] and decided it wanted to have a similar system, so it copied the model,” says Morgan. “And because Google brings so much else to the table, where it’s giving away things for free [such as] maps and search and email, they became a competitor to us.” The problem, Morgan says, came about after Skyhook won deals with Motorola and Samsung, and Google forced those companies to back out of their contracts. Google did not respond to a request for comment. Even so, maps are undeniably a brilliant gem in Google’s crown–its turn-by-turn navigation is something that Android users universally adore. It only makes sense that the company would get involved in IPS services. In November, Google announced that it was taking Google Maps indoors. Now, if you go to select U.S. shopping malls, airports, and retail locations, or certain Japanese transit stations, you can use your Android mobile device to see where you are. The idea is similar to the physical kiosk maps you see in malls, except this one is on your phone and adds Google’s famous little blue pin so that you can quickly figure out how to get from the shoe department in Macy’s, for example, over to the men’s department.
Google Maps 6.0 for Android updates your indoor location as you move, and will even refresh the map when you move to a different floor. Image: Courtesy of Google Google Maps 6.0 for Android updates your location as you move, and it will even refresh the map when you move to a different floor. It also labels all sorts of helpful information, such as bathroom locations, ATMs, and airport gates. At launch, the application included floor plans for Tokyo’s Narita and 17 U.S. airports; stores of the retail chains Bloomingdales, Home Depot, Ikea, and Macy’s; and malls such as the Mall of America in Bloomington, Minnesota, Times Square Mall in Mt. Vernon, Illinois, and Liberty Fair Mall in Martinsville, Virginia. To enable indoor mapping, Google created a desktop tool that lets venue owners and business owners upload the floor plans of their locations. After doing so, they download an app from Google Play that lets them share publicly broadcast GPS, cell-tower, and Wi-Fi information with Google. With that radio-signal information in hand, Google can allow Android users to track their indoor locations on its maps. Currently Google isn’t pushing ads, discounts, or offers to consumers who use its IPS service. Since Google makes gobs of money on advertising, however, one can only imagine that we may very well see something like that at some point in the future. As for whether the service profiles devices the way Skyhook does, Google’s new privacy policy doesn’t exactly say. It does state that the company keeps a consolidated record of how you use its services so that it can improve them as well as serve you more-relevant search results and ads. Regarding location information specifically, Google’s privacy policy states: “When you use a location-enabled Google service, we may collect and process information about your actual location, like GPS signals sent by a mobile device. We may also use various technologies to determine location, such as sensor data from your device that may, for example, provide information on nearby Wi-Fi access points and cell towers.”
Wifarer
Wifarer is another company using IPS. Unlike Google, which so far provides only indoor maps and location awareness to users, Wifarer wants to give its users heaps of content, discounts, and deals related to where they are located. The company says that its service is essentially a private, customized version of Google’s IPS offering that lets venues control the content, the branding, and various ways to make money from their digital space. The Wifarer app for Android gives users heaps of content, discounts, and deals related to where they are located. Image: Courtesy of WifarerThe Wifarer software works with Wi-Fi systems that exist in public places such as malls, museums, and airports–that is, any location where it might help you to know your whereabouts so as to better find your way and receive relevant information or offers. If you have the Wifarer app installed on your Android phone (Apple has yet to allow the app into its ecosystem), the fingerprint radio frequency-based system determines your phone’s position within a few feet of where you’re using it. Currently beta testing in 25 venues, Wifarer expects to be up and running in 400 additional places by the end of this year. “One of the things about indoor positioning systems is that they open up a new vein of [intellectual property],” says Wifarer CEO Philip Stanger. That means IPS is seeing a tremendous amount of development; Stanger says that some exciting things will be coming down the pipeline in the next several months to a year. He won’t divulge what those developments might be, although they could include inventions such as displays that employ augmented reality and are triggered by users’ locations. Stanger, like many other people in the business of phone-finding technology, maintains that his product keeps user privacy intact. “Without giving away core IP and proprietary processes, I can say that the app calculates and displays its own positioning and location information entirely from within the app. This occurs when the app is turned on, and only when the app is turned on,” Stanger says. “Upon first download, a new user is given an anonymous user ID, and neither their MAC ID nor their IMEI number is ever recorded, monitored, or tracked. From then on, all transactions with and downloads from our system are identified by this UI (user ID) alone. Occasionally, and only when the app is on, location information of the UI is reported back to the system, mainly to verify positioning accuracy.” The fact that Wifarer works at all is pretty impressive, considering the technical hurdles involved. “The challenges are many, but most revolve around the variability of Wi-Fi due to environmental considerations,” Stanger says. “For instance, most Wi-Fi broadcasts at around 2.4GHz. Unfortunately the resonating frequency of water is also 2.4GHz, and people are comprised of mostly water. So, the more that people congregate, the more the Wi-Fi radio patterns vary. So the question becomes, how can we normalize patterns when the very usage we envisage generates disruptions to those patterns?” Stanger isn’t saying how his company has done it, only that it involves proprietary coding.
Nokia
Phone maker Nokia is also working on an interesting way to determine location in an indoor environment. As part of a consortium of 17 technology and media companies, Nokia recently participated in a demo showing how unused portions of the TV spectrum can deliver information to people according to their location. At the Imperial War Museum hangar in Duxford, UK, Scott Probasco, a Nokia senior manager, shows how a Nokia smartphone can connect to the Internet via TV white spaces and use an app to grab information about the planes on display. Image: Courtesy of NokiaAt the Imperial War Museum hangar in Duxford, UK, Nokia recently showed how a radio system box operating in UHF TV bands can connect to a TV white-space database to pinpoint which TV channels are available. From there, a Nokia smartphone can connect to the Internet via the TV white space and use an app to grab content. In the case of the museum demo, the content was information about the planes on display. This type of arrangement would allow museum visitors, for example, to gain access to a vast amount of information about exhibits depending on where they are standing–far more than the museum could ever include on physical signage. A similar system could be built out to push content to people in other places, such as retail locations; in this case, shoppers could receive offers and coupons, and participate in loyalty programs, just by walking around with an app on their phones. That isn’t going to happen overnight, however. Before services can use TV white spaces for location finding and content distribution, the necessary technology–including mass-produced chips inside phones and special wireless access points–must be standardized, which likely won’t occur for at least a few years. In addition, the system isn’t terribly precise, as the accuracy is good only at 25 feet to 50 feet. “We can use several well-known methods to refine this coarse location, for example taking signal-strength measurements from several access points and then mathematically combining these signals to estimate the location of the phone a bit more accurately,” says Scott Probasco, a senior manager at Nokia.
Broadcom
Before the end of the year, a new chip made by Broadcom, called the BCM4752, will be integrated in certain mobile devices coming to market. Although the company won’t identify the devices, the technology looks to be pretty mind-blowing.
Broadcom’s BCM4752 chipDesigned for smartphones, tablets, portable media players, and portable navigation devices, the BCM4752 chip is a Global Navigation Satellite System (GNSS) product that communicates with the U.S.-based GPS as well as with three of that system’s counterparts–the Russian GLONASS, the in-progress Quasi-Zenith Satellite System (QZSS) in Japan, and SBAS constellations of satellites. Access to more satellites means better location awareness, but what’s really fascinating about the Broadcom location platform is that, in addition to supporting IPS through Wi-Fi, Bluetooth, and NFC, it integrates measurements from device sensors–the accelerometer, gyroscope, magnetometer, and altimeter–into its positioning engine. Essentially, that means Broadcom’s technology can find your location without being connected to any kind of network. For example, after recording your GNSS coordinates as you enter a building, the technology could continue to track your device’s location simply based on these sensor outputs–how many steps you’ve taken, in what direction you took them, and at what altitude. According to Scott Pomerantz, GM and VP of Broadcom’s GPS line of business, the technology makes use of intelligent location software known as the Hybrid User Location Application to integrate measurements from GNSS, inertial sensors, its Wi-Fi products, its cellular modem, and many other RF components found in smartphones today. “We want to be able to do all of the position location locally, not necessarily depending on outside databases or other information; but, just with the device in your hand, we can recognize [the data that is] available and how to render [its] position,” Pomerantz says. While it’s one thing to have a phone capable of doing incredible things and quite another to build out infrastructure and applications that actually use it, Pomerantz says many location-aware apps will be able to make great use of the BCM4752 chip. The companies I spoke with represent just a sampling of those carrying out the location tracking of mobile devices. If this topic interests you, check out Polaris Wireless as another example: It provides high-accuracy, software-based systems for finding the location of mobile phones, and it can serve not only for activities like push advertising and social networking but also for asset tracking and fleet tracking, plus lawful interception by government agencies.
How Much Should You Worry About Privacy Issues?
Should it bother you that so many entities can see where you’re using your mobile device, or do features such as vastly improved navigation trump any such privacy concerns? I posed the question to a couple of experts well versed in the implications of this advanced technology. Rob Enderle, principal analyst for Enderle Group, sees the tracking of individuals as particularly useful for companies that have high security requirements or have issues with employee theft or time-card cheating. And, he says, when physical danger is an issue, knowing a person’s exact location can mean that help comes faster. “In those instances, when implemented properly, the reward clearly exceeds the risk,” Enderle says. “The utility and convenience for commercially available location-based services and wireless tracking usage outweigh, at this moment in time, individualistic notions of privacy,” says T. Jeff Vining, VP of government research and geospatial surveillance operational technology for Gartner, a technology research firm. “But when data is aggregated, then it will become a concern for privacy advocates and governments.” In short, this is a subject you’re going to want to track
I got this information from one of our contributor’s site this morning and felt i should share this with you, my readers. A few days back google announced a short online certificate course ‘Power Searching With Google’ this program is aimed at helping all Google users learn about the powerful advanced tools which Google provides to help the world find just the right information when the stakes are high.
The certificate, according to Google will be emailed upon successful passing of the online course by participants. Mobile phones according to Google will not be used for the classes.
Course Details
Power Searching with Google is a free online, community-based course showcasing search techniques and how to use them to solve real, everyday problems. It features:
Six 50-minute classes.
Interactive activities to practice new skills.
Opportunities to connect with others using Google Groups, Google+, and Hangouts on Air.
Upon passing the post-course assessment, a printable Certificate of Completion will be emailed to you.
Ready to get started?
Registration is open from June 26, 2012 to July 16, 2012. We recommend that you register before the first class is released on July 10, 2012!
New classes will become available Tuesday, Wednesday, and Thursday starting on July 10, 2012 and ending on July 19, 2012.
Course-related activities will end on July 23, 2012.
To register now for “Power Searching with Google Free Online Certificate Course” follow this link Power Searching with Google Free Online Certificate Course After registration, remember to sign into your email to confirm that Google has sent you a confirmation of your registration and course dates with activities.
The GreatCall Jitterbug Plus ($119, no contract required; price as of July 2, 2012), designed for seniors and anyone else who needs access to health or safety services, looks and functions like a simple, no-frills feature phone, but it has lifesaving technology behind it. The Jitterbug Plus improves on the previous Jitterbug model with photo-sharing capabilities, preloaded text messages, and a more sleek design. It also supports GreatCall’s 5Star Urgent Response personal emergency-response service. GreatCall CEO David Inns says that the company obtained feedback from customers on ways to improve the previous Jitterbug. One feature request that kept coming up was picture sharing. Jitterbug Plus owners can now share photos on Facebook, Picasa, and Shutterfly. It is easy to set up, too: You simply go to your Jitterbug.com account and fill out your profile credentials. Afterward, you can share photos with your social networks directly from the camera gallery. The 2-megapixel camera isn’t the highest quality; in my tests, photos looked a bit hazy and washed out. For social networking purposes, however, the Jitterbug Plus’s camera works just fine. The camera has no flash, so taking photos in dark environments might not turn out so well. The Jitterbug’s design is a bit of a throwback to older phones, with its clamshell shape and internal and external displays. The Samsung-built phone is smaller and lighter than previous iterations, though, and comes in an attractive red or silver color. On the Jitterbug Plus, you’ll find a few preinstalled text messages, such as “How are you?” and “On my way.” The alphanumeric keyboard offers large, easy-to-press keys with a clear font to make texting painless. Large ‘Yes’ and ‘No’ keys help you navigate the simple menu; for example, if you want to read a text message, you press ‘Yes’ to open it. As somebody who is constantly using advanced smartphones, I found that this extremely basic navigation system took some getting used to–I kept looking for ‘Back’ and ‘Home’ keys instead. But when I showed the Jitterbug Plus to a person who has never even attempted to use a smartphone, he loved the design, and said that it was much easier to use than the feature phone he already owned. He did not like how long it took to browse through the main menu, however. I also noticed that the navigation was a bit slow in that regard. The Jitterbug Plus has insanely long battery life, which is an important feature for its demographic. GreatCall claims that the phone has 25 days of standby time. Although I haven’t had the phone for 25 days, I haven’t needed to charge it since I received it about a week ago. One drawback is that the display has no battery-life indicator; you have to go to ‘Phone Info’ from the main menu, which is a bit unintuitive. For customers who are hard of hearing, the Jitterbug Plus has a very loud ringtone and audio speaker. Call quality overall was quite clean on my test calls. My friends on the other end of the line were similarly pleased with how clear I sounded.
Pricing and Additional Services
GreatCall offers a pay-as-you-go plan that starts at $15 per month for 50 minutes, and runs up to $80 per month for unlimited minutes and text messages. If you choose to go à la carte, text messages cost 10 cents each. Voicemail costs an extra $3 per month. Jitterbug Plus owners can add a number of wellness services to their plans, including 5Star Urgent Response ($15 per month), which gives you direct contact with a certified emergency-response agent, performs GPS tracking, and provides free 24-hour access to unlimited health advice from registered nurses. You can tack on other helpful services, too, such as automated check-in calls ($5 per month) and medication reminders ($10 per month). These services add up, but are invaluable to anyone who needs them. The Jitterbug Plus is meant for a very specific audience–one that I’m not yet a member of–so reviewing a product like this can be difficult. But I’ve seen other products that try to make an interface too simple, and end up leaving out some important features. GreatCall has done an excellent job of creating a phone that is both easy to use and full-featured, packed into a modern design.
Adobe announced Thursday that it would not provide a version of Flash for Android 4.1, dubbed Jelly Bean, or any updates thereafter. Google introduced version 4.1 this week at its I/O conference in San Francisco. The OS will be available in July. The Flash Player has never posed much of a security risk, because hackers have not used it as a pathway to Android. “There hasn’t been a piece of malware using the Flash Player technology as a vector,” Tim Armstrong, malware researcher for Kaspersky Lab, said. Adobe’s decision to wind down Flash on Android is not surprising. The company said in November that it would switch to Adobe AIR as the cross-platform runtime environment for mobile applications. Adobe believes AIR is the better option as Web developers move to HTML5, the latest version of the markup language used for presenting content on the Web. The company will continue to develop the Flash Player for PCs. Whether the technologies replacing the Flash Player will pose a greater security risk is not yet known, Armstrong said. “We can’t say yet whether these technologies could be leveraged for malicious purposes,” he said. In general, dropping Flash with Jelly Bean is not expected to have much of an impact on Android users, because almost 90 percent are running versions 2.1 to 2.3.7. By the time they upgrade to version 4.1, Flash alternatives are expected to be firmly in place. Adobe has also decided to limit access of the Flash Player on Google Play, the official Android app store. Beginning Aug. 15, only Android phones already running Flash will be able to get newer versions in the store. “Devices that do not have Flash Player already installed are increasingly likely to be incompatible with Flash Player and will no longer be able to install if from the Google Play Store,” the company said in its blog. Adobe’s latest announcement only involves Android, because Apple doesn’t use Flash in the iPhone or iPad. In 2010, Apple Chief Executive Steve Jobs, who died in October of complications from cancer, bashed Flash as too slow and a battery hog, arguing that HTML5 would become the better platform for showing video and other multimedia content. Adobe initially fought back, but later realized development trends for mobile apps were against Flash.
Spotify’s desktop application is a fantastic music manager and a good replacement for our itune. Here’s is a complete walkthrough on how to make spotify you default music application.
Are you tired of your current music-management software? Invest in a Spotify membership and declare independence from iTunes, Google Music, or any other music app you’re fed up with. iTunes in particular is becoming pretty bloated, especially for Windows users–but I’ve barely seen it over the past few months thanks to Spotify and the new ability to upgrade my iOS software on my iPhone itself.
As long as you’re already paying for Spotify Premium, make Spotify’s mobile app your phone’s default music player. Spotify’s hybrid approach–storing your most-played tunes on disk while letting you stream anything from its massive song library–gives you a much larger musical selection on the go. If you’re buying more than an album or two every month, it’ll also save you money. Here’s the fastest method to make Spotify your default music manager. Since iTunes is the thorniest music-management app to get rid of, I’ll use it as my example, but these methods should be just as easy (or even easier) on Android phones running other music-management apps.
Initial Housecleaning
The first step is to make room for Spotify to start managing your tunes by commanding your current music-management app to stop syncing your smartphone with your music collection. iTunes at least makes this process fairly easy: While your phone is synced to your PC, switch to the Music tab in the device management options, and uncheck Sync Your Music. iTunes will warn you that this action will delete all the music off your phone, but since that’s exactly what you want, click OK. Now you should have plenty of room to start syncing with Spotify. Next, set up Spotify as an iTunes replacement. This step is simple, since Spotify asks whether you want to automatically import your iTunes library the first time you open it. This procedure will not only bring all your local files into the application (as long as you’ve linked them with your iTunes library) but also import all your iTunes playlists. If you declined this option when you first started Spotify but want to import your iTunes library now, or if you merely want to import a library from another music manager, that’s simple enough. Open Spotify, navigate to File > Import Playlists, and then choose iTunes, Windows Media Player, or whatever other supported music application Spotify can find on your PC. Keep in mind that Spotify playlist imports sometimes require a bit of cleaning up; in my case, for example, Spotify attempted to sync the iTunes library of each of my computers separately, which resulted in quite a lot of copies of the same material. However, even with a manual check and some deletions, getting your Spotify application set up with all your iTunes music and playlists shouldn’t take more than 5 to 10 minutes.
Syncing
Once Spotify is set up on your computer, it’s time to start syncing your files onto your phone. Again, Spotify makes this step fairly straightforward, but the process involves quite a few more pitfalls that you need to be ready for. First, the good news: All you have to do is connect your phone to the same wireless network as your computer, open Spotify on your PC, and then select your phone under the Devices tab in Spotify’s left navigation pane. Click the big Sync this device with Spotify button, and select the playlists you want to download to your phone. The bad news is that Spotify syncing suffers from a few irritating hiccups. Since it syncs wirelessly, it’s much slower than iTunes syncing by USB. Syncing 3000 or so songs to the Spotify app on my phone took me almost 10 hours. By itself, that wouldn’t be a huge issue, since I could just leave my phone on overnight, but Spotify also stops syncing when you leave your smartphone inactive for too long. Here’s hoping that Spotify will patch this glaring error in a future update. For now, though, this limitation makes it difficult to have Spotify sync your whole library in the background. If you’re thinking of using Spotify as a straight replacement for your music app, and if you have a gigantic music library, syncing everything will be a time-consuming process. Instead, consider being more selective as to which playlists you listen to. Spotify syncing works much more elegantly if you don’t try to make it emulate iTunes exactly, so I suggest adding local files to Spotify gradually. Find 300 to 500 songs you know you’ll want to listen to regularly, and sync those first. Then, when you’re out and about, you can choose to save the music you find yourself streaming too often as an offline mode playlist. You probably won’t find more than 100 songs or so on any given day that you’ll want to add like this, so syncing them should be a fairly quick affair. Don’t worry about the syncing process eating up your bandwidth. Unless you explicitly tell it to sync over 3G, the Spotify mobile app will wait until you’re on a wireless network. You can just tell it what you want to have permanently downloaded, and it will add those items to your local library the next time you’re near a stable Internet connection.
A Few More Obstacles
You should keep some other small roadblocks in mind as you declare your phone’s independence from iTunes. Many of these obstacles are relatively minor and easily solved; you can’t delete the iOS default Music app, for instance, even if you don’t have any music synced with it. I suggest hiding it in a folder and ignoring it. Other issues, however, are slightly more serious. For the most part Spotify should import all of your music and give you access to Spotify’s library of millions of streaming songs, but if you’ve downloaded a lot of DRM-protected music from iTunes or another music store, things get more complicated. Since Spotify won’t be able to play your DRM-protected files, the service automatically matches those tracks with songs that reside in the global Spotify library. Thus, if you’ve bought, say, a Ratatat album with DRM on iTunes (as I did while writing this article), you should still be able to play it in Spotify by streaming it from Spotify’s library. On rare occasions, Spotify won’t be able to find a match for your DRM-protected music in its online library. At times, however, Spotify won’t find a match for one of your DRM-protected songs, and you’ll be unable to play your music. This occurrence should be fairly uncommon (in my library of 7000 songs, I had a grand total of five unplayable tracks, three of which were free iTunes “Song of the Day” selections I haven’t listened to in years), and you can fairly easily resolve the problem by stripping the DRM off of your iTunes track. You’ll need to go through your library and look for tracks listed in red; these are the songs on which you’ll have to remove the DRM. Also, as much as this method frees you from iTunes for everything but backing up your data, it ties you heavily to Spotify. If you ever stop paying for Spotify Premium, you’ll lose access to offline mode, which means that any music you haven’t synced from your local computer–including Spotify copies of your DRM-protected music–won’t be available on your phone any longer. Nevertheless, as an iTunes replacement, Spotify Premium is a great choice. Spotify comes with its own set of inconveniences and annoyances, but once you get past the basic setup it’s hard to argue with on-demand access to Spotify’s music library on the go. Happy listening!
Selling Products on Ebay is easy if you have the necessary tools. Selling products on Ebay is one of the best ways to start making money on the internet because you do not need a lot of initial capital. This article outlines some of the essential tools that you will need if you are considering starting your own internet based business selling products on Ebay.
Selling on eBay, for many, is a serious full-time home working business, rather than just a means of making a little extra cash. If you are serious about becoming a successful Ebay seller, then it is important that you get the tools discussed in this article as they will ensure that you succeed in your business.
Tools To Start Selling Products Online on Ebay
If you get these tools that you can use in your Ebay business, you will be able to make more sales and earn more profits from your business.
A Computer and Internet Connection
Obviously, you will need a computer and internet connection. You can’t start any internet business without a reliable computer and internet access.
Business Telephone Line
Starting and Ebay business means that you may need to communicate with your customers and send some documents. It is therefore important that you have your own business telephone line as well as a fax number.
Business Card
Getting some business cards with your contact details is also important. From the customer’s point of view, it’s professional when you include your business card with your shipments. This also means your customers have all your contact details if they need to contact you.
Startup Capital
You will need some money to get you started. Although selling products on Ebay doesn’t require you to spend a lot of money to get started, you need some capital nonetheless. You will need this to buy some of the tools discussed in this article.
Website or Blog
If you want to earn huge amounts of money selling merchandise on Ebay, then you can further enhance your chances of success by having your own website. It is ideal that you have your own domain for your website. To market your products effectively, you can then create links to your Ebay store on your website. By driving traffic to your website, you will increase traffic that goes to your Ebay store, and this will increase your sales.
Camera and Photo Editing Software
As a seller at Ebay, you will need to provide useful and accurate description of the products you will be selling. Having photos of the products is also important because potential buyers can see the product. You will therefore need to have a camera or smartphone with a good camera quality for taking photos of the products you will be selling. If you are selling physical goods, it is recommended that you have photos of these products next to the items’ description. You may also need some software that you can use to adjust and resize the photos.
Succeeding in making money online selling merchandise on Ebay requires that you take your business seriously and not as a hobby.
Blogging is very effective in attracting large volumes of traffic. However, if you really want to drive huge volumes of traffic to your blog, you will need to do more than just blogging. This article outlines the top seven secrets for driving traffic to your blog.
Create high quality content that is rich with your keywords and phrases. This brings two main benefits. First, high quality and useful content will keep your website’s visitors interested and they will visit your blog on a regular basis and will buy the products you sell on your website. Second, fresh content with your key words will improve your search engine ranking which brings traffic to your blog and website.
Optimizing your titles for search engines is also an effective way of driving traffic to your website. You will need to optimize your blogs titles and use all the keywords or phrases which people use while looking for information on the internet. This will make your website visible on search engines, and your website will also rank high for all your keywords, driving traffic to your website.
Use email marketing with your blog. This is an effective way of bringing readers back to your blog as well as to create a list. Having your own list is important because you can sell your products and services to your list. By using an auto responder, you can send emails to your list about updates to your blog, hence driving traffic to your blog.
Social book marking is yet another powerful way to drive traffic to your blog. If you rank high on some of the most popular social book marking sites, you can drive large volumes of traffic to your website.
RSS feed for blog traffic. RSS feed is another way you can use to keep people coming back to your blog because after people subscribe to read your RSS feed, they will get updates continuously. This means that you will be bringing readers back to your blog every time you make a new blog post.
You can use some of your blog posts and covert them into articles. All you have to do is to add more content to your blog posts if necessary, add a catchy article heading and convert it into an article. Writing and submitting articles is one of the most excellent strategies for traffic generation.
These six strategies can significantly increase the volume of traffic to your website and blog.
If you’re blogging then you will almost certainly have heard about keyword search optimization. There are many ways to get traffic to your blog, but the best free method is to appear in the search engines for relevant keywords. Searchers will then click through to your blog to find what you’re looking for. Although the search engines may include your site in results when you take advantage of keyword search optimization or not, you can give them a helping hand. By doing keyword research, finding highly searched keywords, and then using them appropriately in your content, you can make sure that the search engines rank you higher for these terms. Keyword Density When writing using keywords, the number of times you include a given keyword throughout the content is known as “keyword density”. For example, if your blog post is 400 words long and contains 4 instances of the keyword, this means that you’ve got a 1% keyword density (one instance of the keyword per 100 words). There is debate about how much you should use the keywords, but it’s often recommended you use them at least once per 100 words. Where you use the keywords is also important. You should include them: * At the beginning of the title, * Within the first sentence, * Within the last sentence, * And spread through the article body. Keep It Natural Although keyword search optimization is an important strategy for many bloggers, it’s also important to sound natural. After all, it’s not just the search engines looking at your content – there are real human readers too! And they’re likely to be turned off if it sounds like you’ve just stuffed in your keyword as many times as possible. This is why it’s important to work on writing a good blog post first, and worry about the keywords you’re including second. No matter how well you’ve incorporated keyword search optimization into your article, your site isn’t going to do well unless you can keep readers interested with well crafted, interesting content that’s written with their needs in mind. Too Many Keywords Can Have The Opposite Effect Although we all know that it’s useful to include keywords in your blog posts, including too many can even turn the search engines off. The giants like Google are well aware that bloggers and internet marketers are trying to improve their rankings with methods like this, so they won’t reward you for taking shortcuts and stuffing your content with too many keywords. If they did, it would be too easy for low quality rankings to get to the top of the rankings. Keywords Aren’t Everything Following on from the point above, it’s important to realize that Google is looking at a lot more than just keywords to rank your site. It takes into account who links back to your site, how you link to your own pages, how well your site is laid out and, importantly, whether your website actually delivers the information your visitors are searching for. Keyword search optimization is definitely something you should be incorporating into your blog posts if you want to take advantage of free search engine traffic. However, it’s also important to work on the quality of your blog. The visitors will follow.
A Popular Auto Responder Marketing Technique Marketing through auto responder series is a popular strategy to increase repeat website visits and sales. Here is a popular strategy. EZINE EBOOK Instead of trying to publish a small daily or weekly eZines, try publishing one large monthly eZine (similar to a monthly magazine) as an e-book format delivered via auto responder, preferably an Adobe .pdf file. You could have it made up of a large number of articles per issue and insert regularly featured areas throughout like inspirational quotes, industry tips, favorite sites and advice from the pros. You could also insert full-color graphics, multimedia components like audio / video file links and ads. Then you can charge a monthly rate, with an annual discounted package purchase, and sell advertising spots to sprinkle in your auto responder announcements for each issue and with an informational series to announce your monthly eZine to new prospects. In summary, by using customized marketing techniques like an eZine eBook, tailored to fit your own products and services, you can reach out and increase your website traffic and sales opportunities. Internet marketing can mean more ways to grow your business. Auto Responder Improvements Stuck in an auto responder rut with only your eZine going out regularly? Get out of the rut with some of these ideas for improvements. 1. Provide back issues of your eZine archives via your auto responder instead of hosting all your archives online. This will give your subscribers and web site visitors easy access to them and offers a chance to include graphics, audio and video and other components all rolled up in .pdf files for quick, easy download. 2. Help with tech issues and publish your entire web site, save it in a pdf file, and load it into an auto responder. Sometimes visitors don’t have enough time read your entire site or they lose their Internet connection or time online. So this way, they could print it out and read it offline. 3. You could offer your eBook via an auto responder. Often your visitors won’t have to download it or have the software to read it right away, so this way they can take it “to go”. 4. For a handy – -and nice legal – touch, you could include the terms and conditions to purchase transactions and load them into an auto responder that is triggered with each purchase. This could include return policies, purchases, refunds etc. Auto Responder Marketing Techniques The Internet offers many means of affordable marketing with auto responders. Here are a couple of popular ways of using them. DIRECTORY Some webmasters set up link or article directories on their sites. They create a directory on a specific industry topic, placing their own ad or banner along the top. Then they invite others to add their website links via a link exchange program, listing themselves in your directory. Or they invite articles to be submitted that include a resource box at the bottom of each with a link to the author’s website. This results on increased traffic as sites link up across the World Wide Web. Enter “link exchange software” or “article directory software” into a favorite search engine for help with each. TEACH A COURSE Some marketers write up a simple step-by-step instructional class in their area of expertise. Then they break it up into smaller portions or messages and set them up in an auto responder as email messages, including short ads within each message to invite sales & website visits. Then they invite website visitors to sign up through on online form or email subscription address offered through the auto responder service. As people sign up, they will learn more about the products and services through the teaching series. Do the Two-Step! Top sales pros confirm that it often takes seven or more communications or sales messages before prospective customers make a purchase. They also confirm that it’s generally easier to sell to a referral, because someone they know gave positive testimonial about their products or services. What would happen if you combined both of these powerful ideas? A nifty and thrifty two-step. Try this two-step tip: 1. Collect leads with your auto responder. Ask for mailing addresses and telephone numbers, too, for additional ways to follow up with each person. When you download the e-mail digest of everyone’s e-mail addresses and other information from those who requested additional information from your auto responder, follow up multiple ways. Send postcards. Call. Mail sales letters and other promotional pieces. 2. Publish a price list of all the products and services that you offer in an insert, direct marketing package and / or .pdf to be made available via auto responder. You could also include order forms, product descriptions, and other sales material. Then send to the people in #1 above with monthly updates, announcements of new sales and products / services, and a request for referrals. So why not improve your closing ratio and reach out even farther at the same time? Do the two-step! Word count: 828
A version of Chrome for iOS also was announced during the second day keynote for the company’s Google I/O conference.
Google kicked off the second day of its I/O conference by announcing offline text editing for Google Docs, and a version of its Drive storage service for Apple’s iOS. The search giant also announced a
version of its Chrome Web browser for iOS, and demonstrated it running on Apple’s iPad and iPhone.The offline text editing is available now in Google Docs, and Google is working on offline editing for its spreadsheet and presentation applications, the company said in its day-two keynote at the conference. The updates mean Google Docs users will be able to edit documents on a plane, for example, and then synch the changes to the cloud when they reconnect at the other end. The offline capabilities will step up the competition between Google and Microsoft. Google emphasized that Docs is a viable product for the enterprise as well as consumers: Five million businesses are using its cloud applications, it said. A Google Drive app for the iPhone, iPad and iPod Touch will be available from the App store later Thursday, Google said. It’s also developing a version for its own Chrome OS.
Chrome OS Improvements
In Chrome, Google Drive operates as the local file system, said Clay Bavor, director of product management for Google Drive. He showed how a user can search through a folder of scanned receipts and find a particular receipt using a keyword search. The receipts are stored as image files, but the Drive application uses optical character recognition to index the text in the receipts.
It can also index images. Bavor showed how a user can store their photos from a vacation in Egypt in Google Drive, for instance, and then search for “pyramid” and locate photos with pyramids in them, even though the photos are not tagged with the word “pyramid.”
New Ways to Collaborate
Google also showed how Google Docs and Google Drive can work together to allow “real-time collaboration.” It showed how three users can edit a text document simultaneously from three different devices, and have the changes all appear on each of the three screens.
Referring to users’ increasing tendency to use multiple devices, Sundar Pichai, Google’s senior vice president of Chrome and apps, said, “It’s not just at home: It’s the same person who leaves home and shows up at work, and they demand the same experience.”
The company also announced an on-demand computing service called the Google Compute Engine, which will compete with Amazon Web Services’ EC2 offering.
The Nexus Q has some pretty neat media streaming features, but is way too expensive–and the preview release is just plain buggy.
I finally got hold of one of the new Android 4.1 (Jelly Bean) smartphones capable of running the Nexus Q app you need to operate the preview release of the new Google media streamer–and a PC World colleague armed with a second Jelly Bean handset came by to help me test the device’s social networking features. The verdict: While it has some nice features–it’s cool to see a light show when you stream music to an HDTV– the Nexus Q is at this point too buggy. We were unable to implement guest access despite trying for two hours, and even the primary controlling phone sometimes lost network connectivity. Initial setup on the first phone went fairly smoothly. I had already hooked up the Nexus Q to my HDTV and to my home network using an ethernet cable connecting to a powerline switch, so when I downloaded and installed the free Nexus Q app from the Google Play store, it immediately found the device and established a link by having me log in to my Google account. Because the Android app can control multiple Q’s on the same network–much like the Sonos system–you have to give each one a name; the app proposes several common household rooms (e.g. kitchen, living room, media center) in a menu that also has a custom entry option. The app by default sets My Home as the name for your Nexus Q collection–the term it uses to denote your entire Nexus Q network (each Q appears as an entry in the collection). But you can change this name in the settings.
Sound and Light Show
After that, when I went to Play Music and tapped a streaming media icon on the top of the screen, I was presented with the option of streaming to my phone or the Nexus name I’d just created. Because I was hooked up to an HDTV, when I played music, Nexus Q created pretty dancing visuals on the screen–and the LEDs on the edges of the Q’s dome also pulsed in color and in time to the music. You can change the look of the light show by choosing one of half a dozen themes (e.g. warm, cold, blue), make it brighter or dimmer, or eliminate it completely from the settings menu in the Q app. You can add songs to the Q’s queue (pun unavoidable) or play them immediately by tapping on options in a menu that appears when you tap a track listing. You can fiddle with the queue, moving or deleting tracks, by tapping an option in Play Music. To play YouTube videos, you go through much the same routine after tapping the Android’s YouTube app. You are already signed in to your Google account, so accessing favorites and new videos on channels you’ve subscribed to is a breeze. Quality was good, at least while the Nexus Q was connected to the network using the ethernet cable and powerline switch. I didn’t download any movies or TV shows to check out how well the device works with the Google Play movie and TV app.
Guest Access Proves Elusive
So far, so good, but it was all downhill from there. I’m not sure what the issues are, but my colleague Mike was never able to put his Google Play music in the queue–and when we disconnected the ethernet cable to try connecting the Q via Wi-Fi, things really went south. Here’s how it’s supposed to work. In the Nexus Q app, I made sure a setting authorizing guest access was set to On, then tapped a link that created an e-mail message inviting Mike (using his Google account address) to play his music on my network. Mike got the message, which instructed him to download and install the Nexus Q app on his Android 4.1 phone. He then ran the app, which searches for existing Nexus Q devices. Once you find a Q that has granted you access, you can go to Play Music to add tracks to the queue via a pop-up menu and a streaming media icon, the same way I could from my phone. But the Nexus Q never showed up as a streaming device on Mike’s phone. He also got repeated messages saying the My Home collection and/or the Q itself was unavailable.
And while we were doing the testing, my own ability to stream music was intermittently impaired. A troubleshooting guide suggested connecting the Q to the network via its built-in Wi-Fi, so I disconnected the ethernet cable and rebooted the Q to start from scratch. But while I was able to restore its factory settings, setting up my 802.11n Wi-Fi network as the Q’s connection proved difficult. I rebooted several times and reinstalled the app a couple of times before the Q mysteriously began streaming the same music it had effortlessly played with the ethernet connection. Even after that, the app intermittently would show the Q as being unavailable one minute and available the next. I live next to several high-rise apartment buildings in downtown San Francisco, and my guess is that the difficulties I encountered relate to 2.4GHz network overcrowding. You also need a router that can handle Wi-Fi multicasting so that the Q can connect to your router while other devices can connect to the Q; Google’s documentation already shows several incompatible routers. Mine wasn’t among them, but I suspect that it was too difficult for the network to sustain the multiple Wi-Fi connections required. I’ll repeat what I said in my earlier post: Google should have included 5GHz 802.11n support. Still, Mike and I were at a loss to explain why he couldn’t play any of his music on the Q–even when my collection and the Q both showed up as available, the Play Music app never displayed the Q as a streaming destination. Hopefully Google will work on these issues before it begins selling the Nexus Q to the general public. But even if you’re an Android fan willing to spend the $299 on a device with fairly limited functionality (it could at least have supported streaming media from other local network devices), I wouldn’t recommend the Q to anyone who is planning on Wi-Fi only connections in a city or a neighborhood with lots of Wi-Fi networks in range. That’s just asking for trouble.


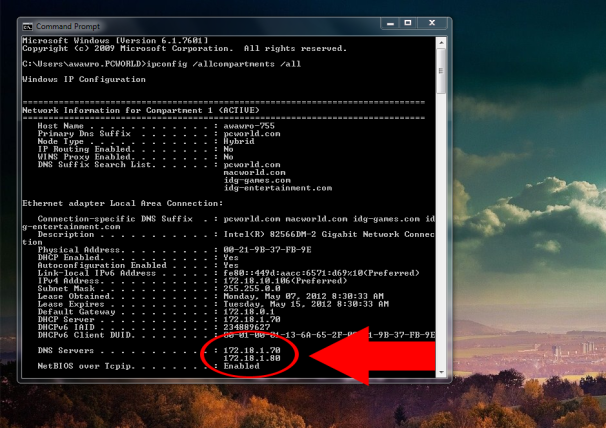
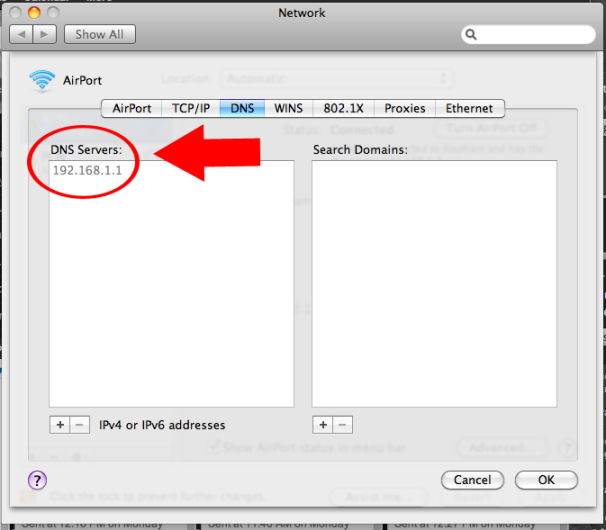


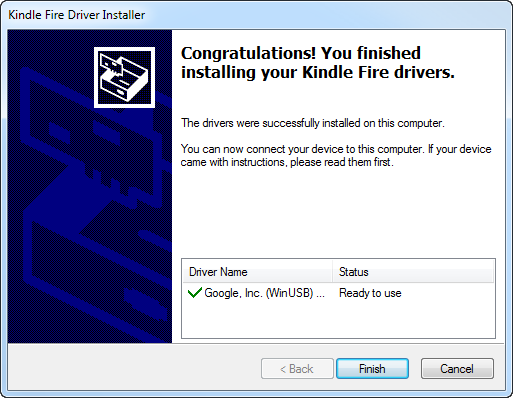 Kindle Fire driver installation confirmation.
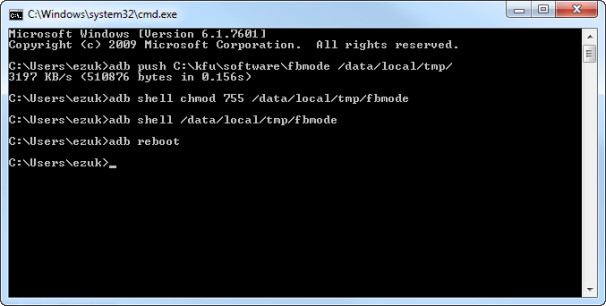 Command prompt window after switch to fastboot mode.
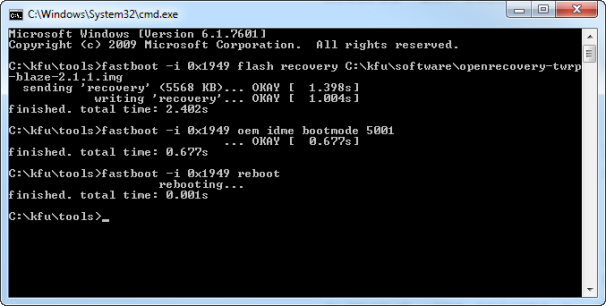 Command prompt window after installation of recovery image.
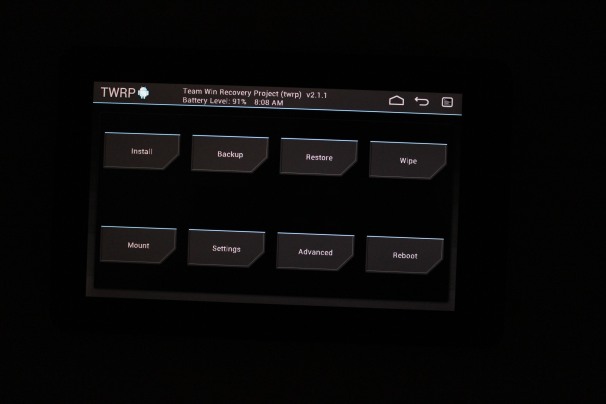 Kindle Fire screen after installation of recovery image
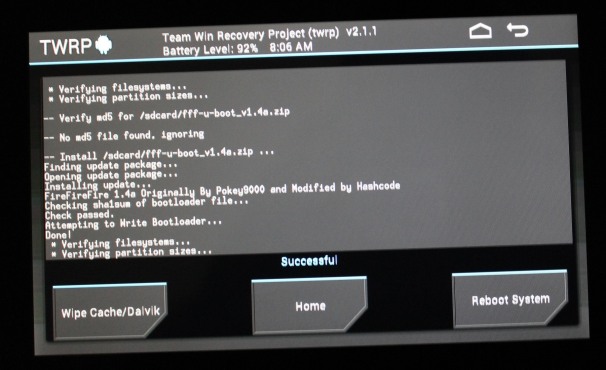 Custom bootloader success message.
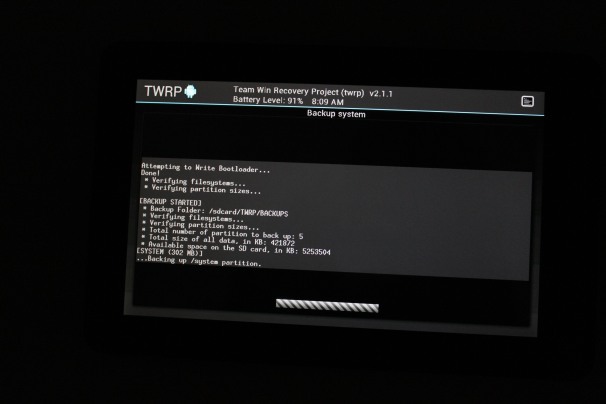 Backing up the stock OS can take a while.
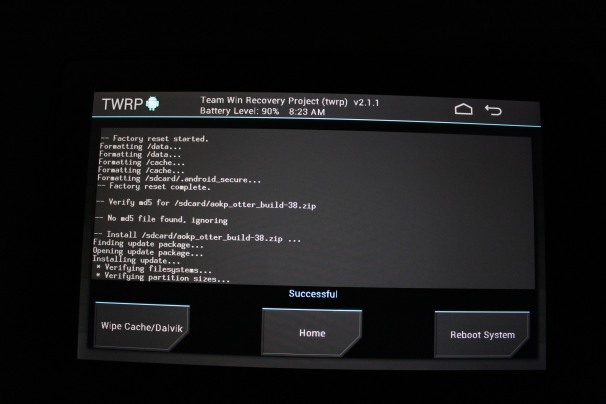 Installing the Ice Cream Sandwich ROM.


 Skyhook developed the first hybrid location system to use Wi-Fi positioning, GPS, and cell-tower triangulation to determine the coordinates of a device, even indoors. Since then, Apple (Skyhook’s biggest customer) and Google (Skyhook’s biggest competitor) have emulated the hybrid approach for their respective mapping apps.
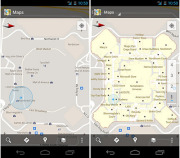 The main thing you need to know here is that Skyhook is suing Google currently.
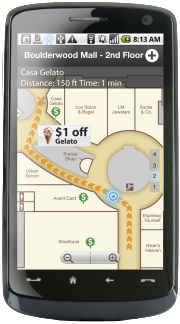 Wifarer is another company using IPS. Unlike Google, which so far provides only indoor maps and location awareness to users, Wifarer wants to give its users heaps of content, discounts, and deals related to where they are located.
 Phone maker Nokia is also working on an interesting way to determine location in an indoor environment.
 Before the end of the year, a new chip made by Broadcom, called the


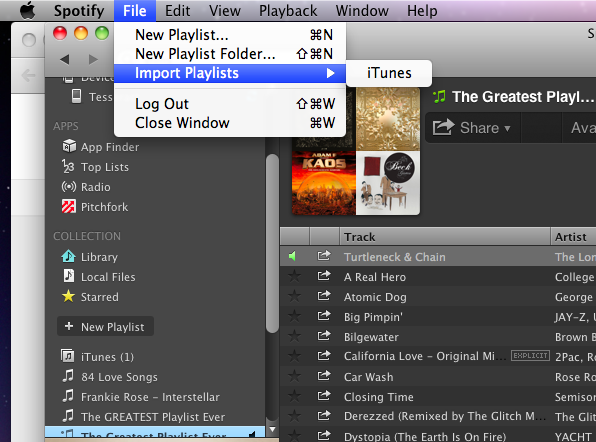

 On rare occasions, Spotify won’t be able to find a match for your DRM-protected music in its online library.


 In Chrome, Google Drive operates as the local file system, said Clay Bavor, director of product management for Google Drive. He showed how a user can search through a folder of scanned receipts and find a particular receipt using a keyword search. The receipts are stored as image files, but the Drive application uses optical character recognition to index the text in the receipts.
 You can add songs to the Q’s queue (pun unavoidable) or play them immediately by tapping on options in a menu that appears when you tap a track listing. You can fiddle with the queue, moving or deleting tracks, by tapping an option in Play Music. To play YouTube videos, you go through much the same routine after tapping the Android’s YouTube app. You are already signed in to your Google account, so accessing favorites and new videos on channels you’ve subscribed to is a breeze. Quality was good, at least while the Nexus Q was connected to the network using the ethernet cable and powerline switch. I didn’t download any movies or TV shows to check out how well the device works with the Google Play movie and TV app.
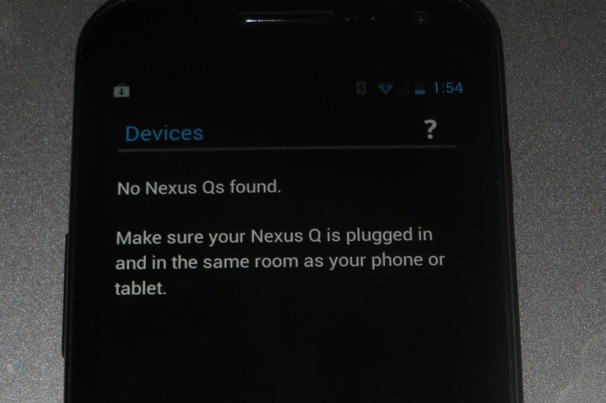
 Hopefully Google will work on these issues before it begins selling the Nexus Q to the general public. But even if you’re an Android fan willing to spend the $299 on a device with fairly limited functionality (it could at least have supported streaming media from other local network devices), I wouldn’t recommend the Q to anyone who is planning on Wi-Fi only connections in a city or a neighborhood with lots of Wi-Fi networks in range. That’s just asking for trouble.
)
)
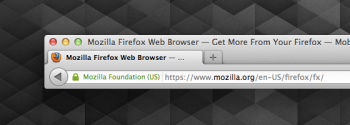
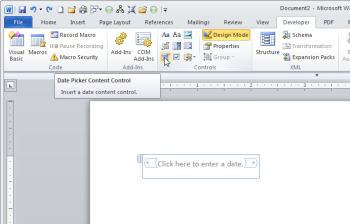
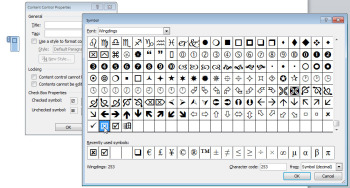
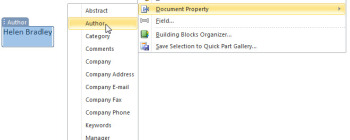
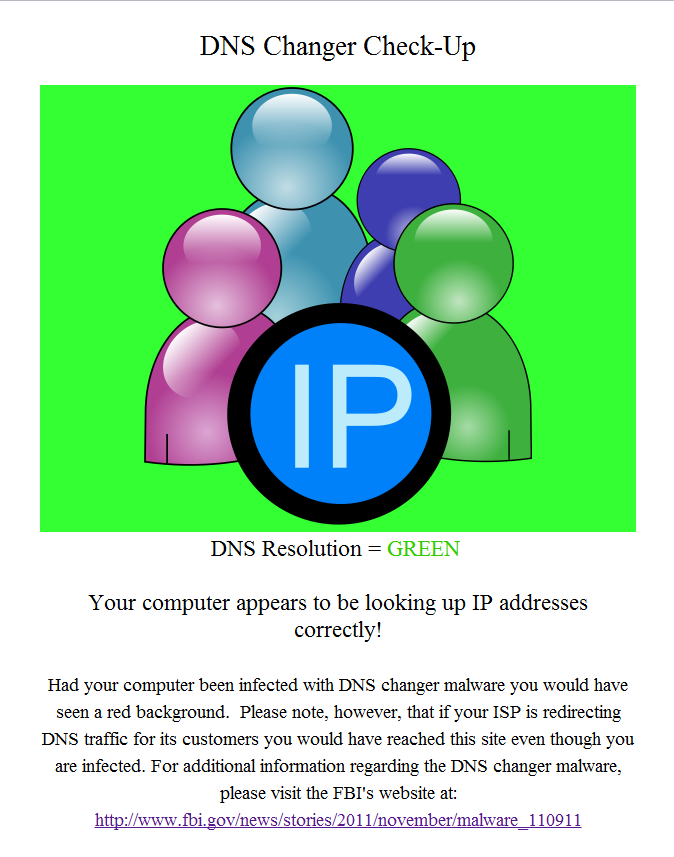
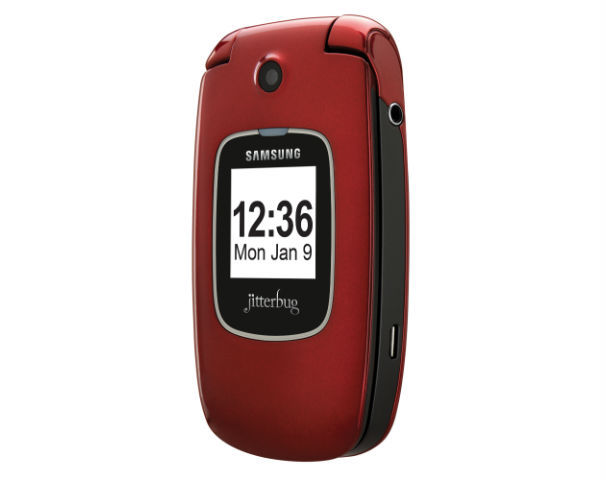
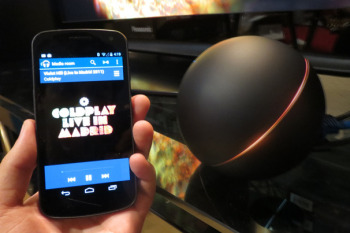