We participate in marketing programs, our editorial content is not influenced by any commissions. To find out more, please visit our Term and Conditions page.
We participate in marketing programs, our editorial content is not influenced by any commissions. To find out more, please visit our Term and Conditions page.
Many times we need to unblock certain websites to gain access to some important stuffs. We all know many ways to do that. But how about actually learning to block one? Have you even been in a situation when you have to block certain websites from your computer for any reason? Well, I am not sure about any body else but certainly I have been many times in such situation. Parents may also want to prevent access to certain websites on their computer so that children can’t get to them from internet. So what’s the solution? Aaaah… It’s very simple.
1.) Open “Run” from the start menu (or press WinKey + r). Just copy paste the following path and hit ENTER. notepad %windir%system32driversetchosts
Alternately, go to C:WindowsSystem32DriversEtc and find the file “hosts”. Open that file in Notepad. 2.) When this hosts file is opened in Notepad, at the end of the file you will see something like “127.0.0.1 localhost”. 3.) Under “127.0.0.1 localhost” just add another website URL that you want to block. For Example:- 127.0.0.1 localhost 127.0.0.2 www.rakshitk.com 127.0.0.3 www.whoismadhur.com 4.) Make sure every time you add another website, the last digit of the address 127.0.0.x should not be the same.
5.) Save the file and exit. So, here you go. Restart your browser if it is opened and changes will take place immediately. The good thing is that no message, no pop ups nothing will be displayed when someone tries to open a blocked website. Your browser will just fail to open those websites without any error messages.
Each one of us must have tried many softwares for locking their private files and folders. Few must have bought a licensed copy of one while others are better of using a free version. However, you can achieve the same level of privacy without any software. This tutorial will make things crystal clear of what I am trying to say. Few months back, Madhur had written a similar article on locking folders without any software but this article is a step forward to what he has described at that time. The trick which I am going to tell here will make a virtual folder by the name “Locker” where you can put as many files and folders you want and after locking, this “Locker” folder will disappear.
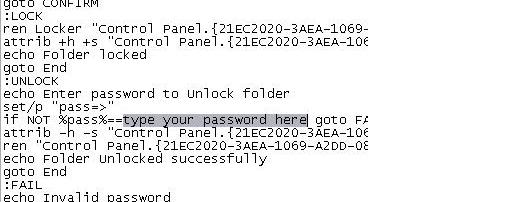
Here is step-by-step guide to achieve that. 1. Download or Copy the following text file which contains the program code:- Text File -> LockCode.txt 2. Paste the above code in notepad or create a new text document by right clicking on your desktop and selecting New->Text Document. 3. Replace “type your password here” with your password in the code you just pasted on the notepad. DON’T FORGET THIS.
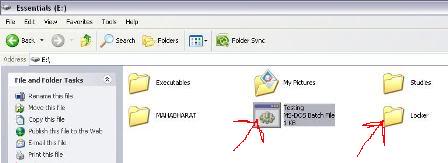
4. Save the above file as BATCH file (by extension .bat). Choose any filename but make sure that it ends with .bat (Open My Computer. Goto Tools -> Folder Options -> View. Scroll down and UNCHECK Hide extensions for known file types. Now rename your file with .bat extension) 5. Now you can see a MS-DOS BATCH file you just created. See the picture below:-
6. Double click on it to create a new folder named “Locker“. 7. Now put all files and folders you want to protect in to this new folder “Locker“. 8. Double click that BATCH file again to lock the folder “Locker”. It will disappear as soon as it gets locked. 9. If you want to unlock that folder, double click the BATCH file again. You will be prompted for the password, enter the correct password and that folder “Locker” will then be appear which is easily accessible by you. That’s it. You are done. You have just learnt how to protect your important files and folders without any software. Isn’t it amazing? What’s your take on this? Do you know any other technique? Update:- As pointed out my Mayank in the comment section, the safety of that BATCH file is also very important. So it’s better that you store it in some other directory or completely remove it. Then later on when you want to unblock your files and folder, just copy that batch file to same directory as your “Locker” folder and follow the above mentioned process.
Your Firefox address bar can not only be used for opening websites but also for searching as well. Yes, you can configure the Firefox address bar with various search engines like Google, Yahoo, Microsoft’s Live, and Wikipedia etc. By default, whenever you type anything in address bar and hit enter or press the GO button, Firefox checks whether the entered string is valid address or not. If it’s a valid address Firefox tries to load corresponding site for you. Now, if the entered string is an invalid URL, it will be submitted to Google Search and search results are returned.
What if you want to change the Default search engine? Of course, Google is everybody’s first choice search but having said that it depends on person to person. Or, if you have Google Toolbar (that provides inbuilt google search box) installed then you may want to configure the address bar with some other Search Engine. The following steps will guide you how to configure your Firefox address bar with Search Engines of your choice. 1- Open Mozilla Firefox and type in the address bar about:config. 2- Next type keyword.URL in the Filter box which is appeared after the first step is completed successfully. As you type the above text, the long list will be trimmed down to one line. (You will see only 1 entry (keyword.URL) under the Preference Name section) 3- Now right click that single entry and select modify. A box will appear. Refer the image given below. 4- Choose your Search Engine type and accordingly enter the string value of various Search Engines given below. 5- There is no 5th step. Enjoy!!!
List of Various Search Engines is as follows:- (Copy any of the below strings and paste it into the box that appear in STEP 3 above) Default Google Search
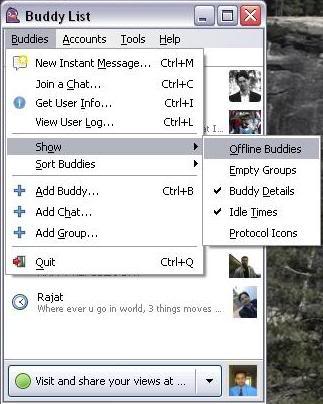
There is a great little instant messaging utility, Pidgin that helps to find who has blocked you in Google Talk. If you not sure how to configure Pidgin with Google Talk, I advice you to first visit this page. Ok, now when you are aware of how to configure Pidgin to work with Google Talk, I’ll guide how to make smart use of Pidgin to identify who has blocked you on Google Talk. It’s very simple. Just follow the steps:-
1- Log in to your Gmail account on Pidgin. 2- Go to “Buddies” -> “Show Offline Buddies“. (A person who has blocked you must be showing offline to you. So you need to make all offline friends visible) 3- Now all your contacts are visible to you. Pick any one of those.
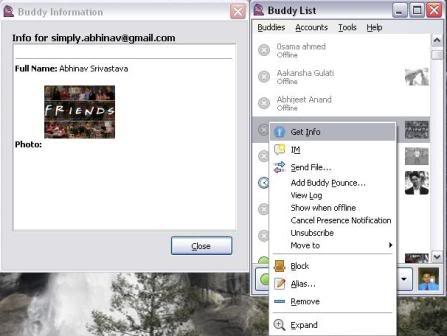
4- Right Click on your chosen contact name and select “Get Info“.
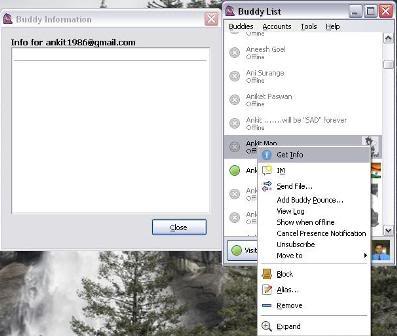
It will show you the brief information of your contact. Now, if any of your contact has blocked you on Google Talk, you will not be able to see his/her profile. 6- Select a contact who you think may have blocked you. Again, Right Click on his/her name and select “Get Info“. You will not see anything. Not even the contact’s name.
This goes to show that this particular contact has blocked you on Google Talk and don’t want to talk to you and so it appears to be offline always. Hope, you like this article. This is the only way I could able to find out to determine who has blocked you on Google Talk. What’s your comment on this?
Few days back, a friend of mine has accidently deleted quite a few recent pics from my Nokia N97 Memory Card and she was feeling pretty much disgraced about that. We recently went for an excellent trip, captured all those fun moments in the camera and yes if those memories get deleted, everyone will feel disgusted about that. It is at that time, I googled and finally found a recovery software that not only recovered ALL THE PICTURES from my memory card but also it was absolutely FREE to use as well. Amazing right?
PC Inspector Smart Recovery is just the right software that can do wonders for you. Believe me, it works perfectly fine although takes a bit of time (when I say “bit of time” that means hours and hours…) to recover all those accidently deleted pictures and files. The software is very easy to use and even if you are not a computer savvy person, you can use it without much discomfort. PC INSPECTOR Smart Recovery works with Flash Card™, Smart Media™, SONY Memory Stick™, IBM™ Micro Drive, Multimedia Card, Secure Digital Card or any other data carrier for Digital Cameras. I have tried this software on my Phone Memory Card as well and it recovered all the pictures that got accidently deleted. If you have unintentionally deleted or formatted pictures, videos or sound files on your data carrier or have pulled it out during a write operation, no matter – PC INSPECTOR smart recovery can easily, quickly and absolutely reliably reconstruct the lost data. It supports the following picture formats: .jpg, .amr, .tif, .bmp, .gif, Canon .crw , Fuji .raf , RICOH .raw, Olympus .orf (E-XX), Olympus .orf (C5050), Nokia 3gp, Kodak .dcr, Minolta .mrw, Nikon .nef (D1H/D1X), Nikon .nef (D2H/D2X), Nikon .nef (E5000/E5700), Sigma – Foveon .x3f, mp4, QuickTime .mov (Konica Minolta). Video files in .avi, QuickTime .mov format and audio files in .wav, .dss format can also be recovered. A Word of Caution – If you have deleted the files by mistake and want to recover most of those, PLEASE STOP TAKING ANY MORE PICTURES from your digital camera or mobile phone. That’s because the more you write new data on your memory card, the chances of recovering old and deleted data becomes less. Please let us know if you face any problem in using this software or if you are aware of any other better software for recovering lost data from memory cards, please share that with us in Comments Section below. Also, if you are the one among many who got benefited by this great little utility, please share your thoughts as well. Awaiting reply… Download it for FREE(File Size – 5.8 MB)
After a great success of my previous article about setting background images to the USB drives, here comes another USB related tutorial which I am sure many would love to try. So many times we encounter a situation when data once deleted from a USB drives cannot be recovered back simply because the deleted data does not move into the Recycle Bin instead it is deleted permanently.
But don’t worry I got a solution to this problem. If we can mount our USBs to a windows folder then not only all deleted data can be recovered easily but also it will be lot easy to organize multiple USB drives. Just follow the simple steps described below:-
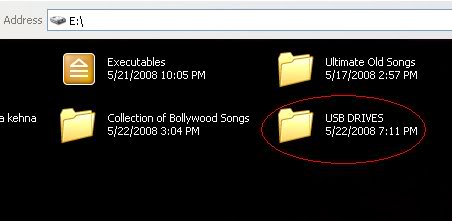
Create a folder named “USB DRIVES” in any of windows partition (Desktop is the best option).
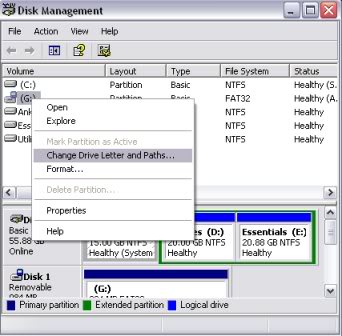
1.) Next create any number of subfolders inside the main folder “USB DRIVES” and give them proper names. Suppose you want to mount two of your USB drives, so it advisable to create two subfolders with the exact name of your USB drives. 3.) Press Win+R to open the Run window or alternatively go to Start->Run. 4.) Type in the location field diskmgmt.msc and hit enter to open Disk Management.
5.) Select your USB drive, right click on it and select Change Drive Letter and Paths… from the menu. 6.) Click on the Add button, select Mount into the following empty NTFS folder and click on browse. Now navigate to the subfolder that you want to assign the USB drive to and confirm the process. That’s it you are done.
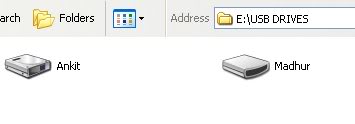
From now on, the USB drive will be accessible from the folder “USB DRIVES” as well when it is connected to the computer. Hope you liked the tutorial. Any feedback is whole heartedly appreciated. P.S. – When moving data around the mounted USB in folders setup will completely move the data, not copy it to your USB device. Make sure to copy and paste if you want source data to remain on your PC.
USB (Universal Serial Bus) is an industry standard that allows data exchange and power delivery between many types of electronics. Wikipedia
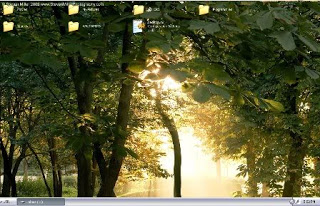
I suppose we all have tried to give background images to our desktop folders. How about setting the same background to our USB devices (Pen drive, Portable Hard Disks etc.) as well? That background image will be seen on every computer you plug in that USB device. It’s really a 3 step process. Let’s begin:-
Steps in changing the background of your USB device:
The inrtoduction of internet to the modern age has really made this age a real “information and technology age”. An age where someone can simply find answers to most problem without lifting a foot.
Since answers do not show up without being asked search engines plays major role in every person who is searching for answers on the internet hence putting webmasters and bloggers alike in good position to provide those answers.
Fortunately for this generation, hundreds of websites are been added to the web everyday, making it difficult for search engines to locate and index all this pages in a short period of time. However, you can help the three major search engines locate and index your website quicker by following the links below.
You just created a new website, business or brand? It is time to create awareness. The web over the years have been somewhat populated with various contents from different website and business owners, therefore keeping young bloggers and business starters off the spotlight, many of the well-to-do starters go as far as even paying internet marketers web scammers for advert and social media followers/share and end up profiting scam.
My Experience?
You can actually get upto 500 hits per day, 1000 twitter followers, more than 1000 facebook shares to any website/post of your choice, over 50 facebook likes for all your blog/website post (you will need to verify your site to activate this feature), maybe 50 shares on tumblr and stumbleupon (for some reason people seems not to be using this feature often) and Page Rank 4 backlink. This is just too good to believe, but however, it is far from being exaggerated, the above stats is a friends testimony but I do have a testimony of my own: Started using linkcollider yesterday (10th May, 2013) and I already had a total of 19 Tweets 8 Facebook Shares 3 Tumblr Posts 257 Web Traffic. I had to disable the web traffic and I haven’t yet enabled the Facebook Like, Pinterest Followers, Twitter Followers and Youtube Subscribe. Below contains the screen shot of my overall stats in one day.
Getting Started Getting started is a breeze! All you need to do is to create a free account on LinkCollider and add your website details. Free Offers Buy a cheap domain name even cheaper click here. Grab bing ads coupon code click here.
Was this post helpful to you? Do give your feedback in the comments section below. And remember: please keep your comments relevant, and avoid spamming and/or promoting your own blog/business. Thank you 🙂
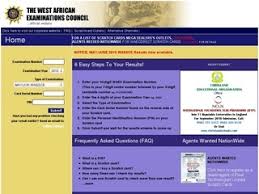
The West African Certificate Examination Council (WAEC) is responsible for conducting the annual West African Senior School Certificate Examination (WASSCE) for students in senior secondary school (SSS) or senior high school (SHS). The examination is written in five English-speaking West African countries, Nigeria, Ghana, Sierra Leone, The Gambia, and Liberia.
Excruciating suspense follows the end of each WAEC examination. Even after the results are out, it’s not always a welcome idea to rush to the next cyber cafe to check your WAEC result. This guide is provided to help you check your WAEC result from the comfort of your bed using your mobile phone.
Before we proceed, you should consider the types of WAEC examinations below to avoid mismatching dates.
Types of WASSCE IN WAEC
The examination is written in two different batch.
The WASSCE (November/December): Also known as the G.C.E. by its old name (General Certificate Examinations), students from government and private schools can take this exam. Uniforms are not needed, but the students must obey other rules. This exam is only taken in the fall season (November/December), and the grades are available by December.
The WASSCE (May/June): Also known as the S.S.C.E. by its old name (Senior School Certificate Examinations), this exam is ideally made for students who go to government schools. Students from private schools, that are well known in the country, can only sit for this exam in any government schools. They must also wear a type of uniforms as the teachers want them to wear. This exam is only taken in the spring season, and the grades are usually available on or before August of the same year.
Depending on the type of WASSCE examination you wrote, your grades should be available by January or July for November/December and May/June batch respectively.
How to check WAEC result on phone
Time needed: 1 minute
To check your WAEC result through SMS simply, send an SMS in the format below:
Open your SMS/Messaging App
Open the SMS application on your mobile phone.
Create a new message
Create a new message, like you would send a message to a friend.
Enter your WAEC info
In the new SMS window, type WAEC*ExamNo*PIN*ExamYear
Send SMS
Send the SMS to the short-code 32327 (MTN, Airtel & Glo subscribers). For example: WAEC*4250101001*123456789012*2007
Ensure you adhere strictly to the format above . There should be no space in the message. Wait for your result to be delivered to your phone via SMS. (SMS cost N30 only)
Frequently Asked Questions (FAQ)
What is an e-PIN and where do I find it?
The e-PIN stands for Electronic Personal Identification Number. In WAECDIRECT, it is a unique 10-digit or 12-digit number that is required to access the service. The service enables direct access to a candidate’s results via multiple channels. The e-PIN is found in a valid WAEC Voucher.
Where can I buy a valid WAEC Voucher?
An Electronic PIN may be purchased at the National office of WAEC and at any of its Zonal and Branch Offices across Nigeria. From time to time it may become available at any other outlets so designated by WAEC. The reviewed price for the e-PIN is now N700.
Is there a limit to a number of times I can check my WAEC result?
No, you can check your WAEC result as many times as you like, however, you may only check your result up to a maximum of 5 (five) times with the use of 1 (one) e-PIN. In order to check further after exhausting the allowed 5 (five) times, you will need to purchase another e-PIN which will entitle you to another 5 (five) result checks.
I have a problem in checking my WAEC result Please help?
Kindly send the following details to [email protected] for verification and assistance – Error message displayed – Your examination number – Type of Exam – Year of Exam. – Visit http://www.waecdirect.org/ or the nearest WAEC office for Further enquirers
WASSCE Grades and Meaning
The grades below are given on the WASSCE certificates for the students who finished their exams. They also depend on how well the students did in their exams.
Grade
Meaning
A1
Excellent
B2
Very good
B3
Good
C4
Credit
C5
Credit
C6
Credit
D7
Pass
E8
Pass
F9
Fail
You may only use one e-PIN voucher to check one result. To check another result of interest, you will require a new e-PIN voucher. If you misuse a e-PIN voucher by attempting to check another result different from the first one checked, you will be penalised as having used the e-PIN, and will be presented with the appropriate error message.


")


