Finally, Bloggers can keep readers to their site by using this fantastic recommendation bar.
It’s designed to display additional recommended articles right after readers have finished reading an article or spent some time on your blog. It will collapse on page load and expand once a reader has reached a specific location on your blog or finished reading the post.
Only those articles are displayed that are previously liked or shared on Facebook. The number of likes are displayed under each article along with page title and a thumbnail. It also contains a like button and previously contained an Add to Timeline button that has been removed now.
Unlike Facebook Recommendations box which offered related stories but with lack of user friendly interface and engagement, Facebook bar will force readers to stay longer on your site leading to increased pageviews, page impressions and thus traffic.
HOW TO INSTALL ON BLOGGER
This widget works on both blogger blogs and wordpress blogs. Now i’m going to take you true on how to add it on your blogger blog, the amounts of comment i get will determine if i’m going to show the wordpress tutorial. follow this simple steps to add on blogger:
Step1: Create a Facebook Application
For this plugin to work you will need to create a Facebook App in seconds. The below method is the standard and correct method for creating any FB App you like.
- Log into Facebook Apps
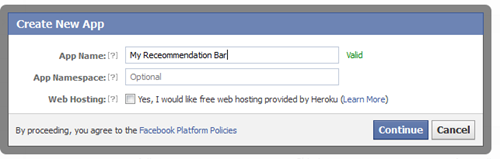
- Click on Create New App button towards Top-right

- In the box that pops up, type “My Recommendation Bar” inside the App name field and leave other options as default. Click continue.
4. Enter the captcha security code. Click Submit
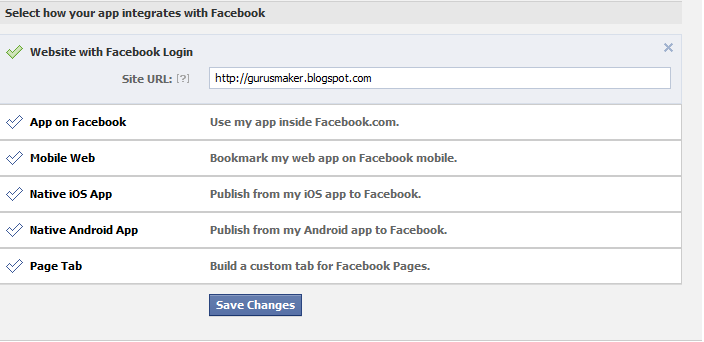
5. You are app is almost complete. Just click Website with Facebook Login tab and inside the box input your blog URL. See the screenshot below. Do not touch remaining options and click Save Changes.
6. You will see two strings of alpha-numerical characters. One is App ID and the other is App secret. Just copy the App ID code and keep it save in a notepad. We will need it later.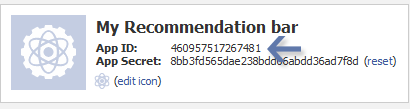
Congrats App finally created! Lets proceed to step2.
Step2: Add “Recommendations Bar” To Your Blog
Follow these steps to add the bar to Blogger:
- Go to Blogger > Template
- Backup your template
- Click Edit HTML > Proceed
- Search For this : <html
Replace it with this code:
xmlns:fb=’http://ogp.me/ns/fb#’
This will make the plugin compatible in older versions of internet explorer also. Since blogger templates are coded in XML therefore inserting this XML namespace will enhance the plugin performance and compatibility.
5. Next search for <body> and just below this tag paste the following code:
Note: If you are using the new blogger templates like Simple, Awesome Inc., Travel, Watermark or Picture window then please search <body for instead. Make sure to paste the code below the entire body tag.
</p> <div id=’fb-root’></div> <p> <b:if cond=’data:blog.pageType == “item”‘></b:if><b:if cond=’data:blog.pageType != “static_page”‘></p> <div style=’z-index:999999; position:absolute;’> <fb:recommendations -bar action=’like’ max_age=’0′ num_recommendations=’3′ read_time=’10’ side=’right’ site=’https://ewtnet.com’ trigger=’40%’></fb:recommendations></div> <p></b:if>
You are almost done. Make these changes:
- Replace *************** with your 15 digit App Id that you saved in step1.
- Replace http://www.gurusmaker.blogspot.com with your blog link
6. Save your template and you are all done!
Visit your blog and scroll down about 50% of your page and wait for 10 seconds for the plugin to expand. Enjoy the new way of free pageviews juice! 🙂
Optional Steps
Below are optional customization and control options. You can skip them if you want max_age: will decide the age limit of articles. Sometimes you don’t want to display too old articles so you can set it to display up to 1-180 days old posts. But if you don’t want to take age into account then let it be 0 as default. num_recommendations: You can set how many articles to display. By increasing or decreasing the value 3
read_time: As soon as the user reaches a specified location, the plugin would expand and before expanding it will take some time. I have kept it equal to 10 seconds, you can increase it to 30 or more as you wish. side: You can decide the location of plugin. By default it shows up towards the bottom right corner of your page. You set it to float to left trigger: On page load the plugin collapses and as soon as it reaches a specified location it expands. You can choose that location in three ways i.e. onvisible, X% or manual. I prefer locating the trigger point by percentage for better pageviews. The widget will expand as soon as the user scroll downs 40% of your page. You can increase or decrease this value. If you wish that the plugin must expand as soon as the reader reaches the end of your article then instead of pasting the code between the purple lines paste it just below data:post.body tag and use the value onvisible instead of 40%. The widget will display only on post pages and not on homepage or static pages. To display it on all pages, then simply delete the purple bolded lines