Ofcours, everyone wants to navigate more fluently on skype while using a computer but not everyone knows it’s “hotkeys”. The use of keyboard shortcuts helps you navigate easily and save time while using the VoIP service.

“It makes you a Ninja” but unfortunately, not everyone knows how to setup this all important keyboard shortcuts. In this tutorial, I’m going to take you on a walk-through on how to setup and personalize your keyboard shortcut for skype.
#1. Enabling Keyboard Shortcut in Skype
These are keyboard shortcuts for when you want to:
- Answer a call
- Answer a call with video
- Ignore a call
- End a call
- Take a snapshot during video calls
- Focus on Skype
- Search for people on Skype
- Mute your microphone
- Toggle mute (Push-to-talk)
- Switch view
If you have already enabled keyboard shortcut for your skype skip this part, otherwise:
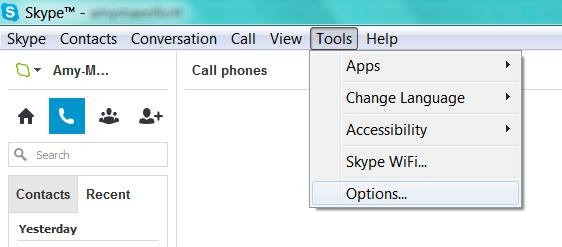
- Locate tools on your skype interface
- Click on options

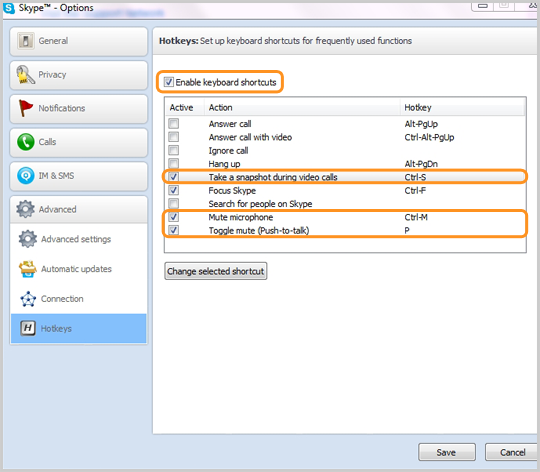
- At the bottom of the list, click on the advance tab and
- Select hotkeys (is represented with

- Check the box next to “Enable keyboard shortcuts.” Do not close the window.
- Check the actions you want to enable hotkeys for.

#2. Personalize your Keyboard Shortcuts
In the “hotkey” window you will find a couple of hotkey commands already set up, but you can personalize all the actions with shortcuts of your own preference.
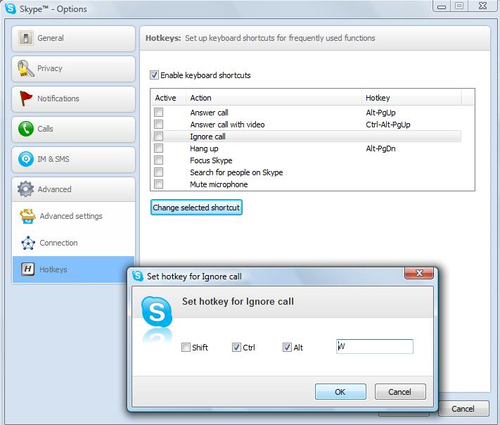
- Simply click on the check box next to an action,
- Click on Change selected shortcut
- Add your own shortcut key sequence into a pop-up window.

The number of shortcuts you want to setup depends on you, Avoid using complex key combination that will be difficult for you to remember, I suggest using hotkey commands that you’re already familiar with, e.g., “Control” + “F” for search. Once you’ve personalized the hotkeys to your taste, click “Save” at the bottom of the window.
- Finally, click save and enjoy skype like a ninja!