We participate in marketing programs, our editorial content is not influenced by any commissions. To find out more, please visit our Term and Conditions page.
We participate in marketing programs, our editorial content is not influenced by any commissions. To find out more, please visit our Term and Conditions page.
Over the years, there has been an observable increase in the size of a smartphone and tablet display. Smartphones and tablets have grown into gadgets that we can use to entertain ourselves using media content. Despite these observable increase in the size of smartphone and tablet display, there comes a time when you desire to project stuff from your smartphone or tablet display onto a bigger display. In this article, we explore a tutorial on how to connect your mobile phone to a smart TV, allowing you to view contents on your smartphones unto a bigger screen.
In this tutorial, we explore four different methods for connecting your mobile phone to your smart TV. This Tutorial covers how to connect Android mobile phones to smart TV’s and how to connect iPhone’s to smart TV’s.
How To Connect Your Mobile Phone To Your Smart TV Using HDMI Cable
Connecting your smartphone to your smart TV using an HDMI cable, is a universal method of connecting smartphones to a smart TV. It works for both Android and IOS devices. It is a very reliable method to project content from your mobile phone to a smart TV. It lets you transfer both audio and video from the same source.
Some smart TVs feature HDMI 2.1 while others feature HDMI 2.0. The minimum requirement to stream 8K content from your mobile phone to a smart TV is an HDMI 2.0 port.
Smartphones usually do not feature HDMI ports, so you are required to purchase an HDMI to USB C, Micro USB or Lightning ports. You connect one side of the HDMI cable to your smart TV and the other part housing the adapter to your mobile phone.
Connect Your Mobile Phone to Your Smart TV Using USB Cable
Just the way you connect pen drives to your smart TV, you can also connect your mobile phone to your smart TV using USB cables. Smartphones usually come with cables, with one end featuring either a USB A, USB C or lightning and the other end being USB A.
You are required to connect the USB A port to your smart TV and the other end of the cable to your mobile phone. Your smart TV will then read your mobile phone as a storage device. You will be able to view photos, audio files, and video from your mobile phone.
Connect Your Mobile Phone to With Wireless Casting on Android
Casting eliminates cords. Casting lets you connect your mobile phone to your smart TV without using cords. Casting is a process of wireless streaming content from your mobile phone or tablet, by connecting to the same WiFi network as your television.
Some mobile phones come with inbuilt casting features, while other mobile phones require you to download third-party apps. In case your mobile phones need third-party apps, Allcast is a highly recommended app for casting.
Apart from using casting apps on mobile phones, there are streaming devices you can use to add the functionality to your smart TV. Google Chromecast is an example of such streaming devices.
Using Apple Airplay
Similar to casting on Android, Airplay is a feature designed for devices running any OS designed by Apple. It lets you connect your iPhone to your Smart TV wirelessly.
Airplay only works between Apple devices. You are not allowed to wirelessly connect your iPhone to smart TV’s not made by apple. Similar to casting on Android, both the Apple TV and iPhone must be connected to the same network.
There you have it – a comprehensive tutorial connect your phone to your smart TV. If you have questions, feel free to drop them in the comment section below.
In this article, we explore a comprehensive tutorial featuring procedures to change wireless security on a laptop. Here we explore inevitable steps to take in changing the security/password of a wi-fi router using your laptop. You would also learn how to change your Wi-fi router’s security type here. The steps taken are listed below.
1. Open Your Router’s Configuration Page
You can access your Router configuration page if your laptop is connected to the router. You can connect your laptop to your router using an Ethernet cable or The Router password. In a situation where you have forgotten the password, using an Ethernet cable is preferable because you will not be required to input any password.
After you might have connected your laptop to your router, you are to input the IP address on your browser, to gain access to its software platform. The Standard Router Addresses are 192.168.1.1, 192.168.0.1, 192.168.2.1, or 10.0.1.1(Apple) or 10.0.0.1. Enter any of these Addresses and hit enter.
If you find it difficult to access your Router’s software platform using the already mentioned IP addresses, you can source for the exact I using the command prompt. Once Command prompt is opened, type ipconfig and hit enter. Now look for active connection in the list and find your Router Default Gateway address. The Default Gateway is your Router’s IP address.
If you are still finding difficult to source for your Router’s gateway address, you advised to reset your router for about 30 seconds, to restore it back to factory settings. After which you are to look up the default address for your Router’s model and enter it into your browser URL box
2. Enter Your Router’s Username and Password
Apart from the normal connection password, you are required to input a special username and password, to gain access to the admin platform. Please note that the default Username for most routers is “admin” or “userAdmin” and the default password is “admin”, “password” or your current Wi-Fi’s password. If you changed your the username and password before now, you are required to input the one you enrolled.
3. Open The Wireless Section
Once you have successfully gained entry to your Router’s software platform using your browser, you ate presented with different tabs that perform different functions. Since you want to change your Router’s wireless security, you are required to click on the Wireless tab.
4. Change the password
By now you should be in the Wireless tab on your Router’s admin page. In the Wireless tab, Look for the box labeled “Password”, “Passphrase” or “Shared Key”. Some Routers require you re-enter the admin password, for confirmation. You are advised to create a very strong password, featuring letters, numbers, and symbols.
5. Change Your Security Type
Please note that there are three main types of wireless encryption: WEP, WPA, and WPA2. If you desire the most secured network, you are required to make use of WPA2. Using this network type, you may experience problems connecting to older devices. If you run into these problems, you are advised to switch to WPA.
6. Change Your Network Name
If you desire to have a unique Router name, you have the option to set a unique name here. This will make discovery very easy, you won’t have to guess your Router’s name, in a situation where they are many similar Routers in the same space.
7. Save your Settings
After you might have successfully carried out all the steps listed above, the next step will be to save the changes you made to the security setting. This way all changes made will take effect. The save button is usually located on the top or bottom of the page. Locate it and click on it to save changes. You can now go ahead to test the new password.
There You have it – a comprehensive list of procedures to change wireless security on a laptop. If you have any questions, feel free to drop them in the comment section below.
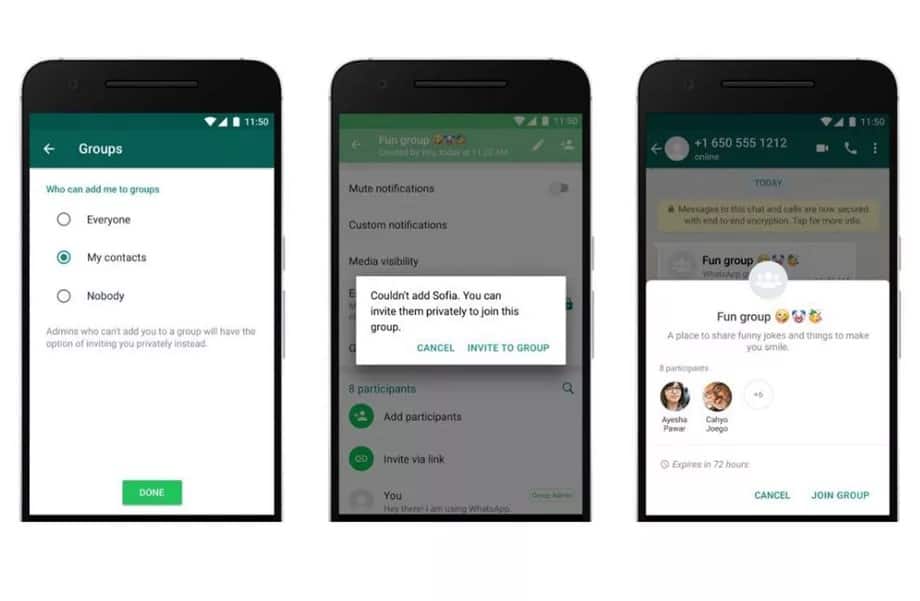
WhatsApp has added a new feature that will stop people from automatically adding you to groups.
The Facebook-owned company will now allow you to block randoms from adding you to annoying group chats and spare you from unnecessary notifications.
This new privacy feature is to give users more control over how they use group chats. Who is able to add them to a group and more importantly, who can’t.
How to enable this new WhatsApp feature
To enable it, go to Settings in your app, then tap Account > Privacy > Groups and select one of three options: “Nobody”, “My Contacts”, or “Everyone”.
“Nobody” means you’ll have to approve joining every group to which you’re invited, and “My Contacts” means only users you have in your address book can add you to groups.
In those cases, the person adding you to a group will be prompted to send a private invite through an individual chat, giving you the choice of joining the group. You will have three days to accept the invite before it expires.
With these new features, users will have more control over the group messages they receive. These new privacy settings will begin rolling out to some users starting today and will be available worldwide in the coming weeks to those using the latest version of WhatsApp. A statement from whatsApp official site.
Qatar is a rich Arab state occupying a small peninsula extending into the Persian Gulf to the north of Saudi Arabia, east of Bahrain and west of the United Arab Emirates.
It has plenty of attractions that are sure to make your time in Qatar a memorable one.
If you are in Qatar for a holiday, here’s a list of places to visit in Qatar.
Sealine Beach
The Sealine beach is known to be one of the top places to visit in Qatar. This resort is located amidst the dunes of the Arabian desert by the blue waters of the Arabian Sea.
One can go there to relax, sail surfing, horse riding or dune bashing, which remains a popular sport for both Qataris and travelers.
National Museum of Qatar
The National Museum of Qatar is located across from the Corniche in Doha.
The main highlight of the Museum is the display of local history. Exhibits at this museum also feature artifacts that give an insight on the history of Qatar.
The National Museum Qatar, pulls large masses of tourists that helps to promote tourism in Qatar.
It also showcase the beautiful art and architecture common around the region.
Corniche Qatar
The Doha Corniche is a waterfront promenade extending for seven kilometers along Doha Bay in the capital city of Doha, Qatar.
Annual celebrations of national holidays such as Qatar National Day and National Sports Day are centered on the Doha Corniche. It is a popular place in Doha.
The Corniche has cafes, restaurants, outdoor exercise facilities and a running track. You can choose to go relax, eat or do other fun things.
Souq Waqif
Souq Waqif is a wonderful place to shop and dine. The Souq is within walking distance from Doha Corniche.
The souq is noted for selling traditional garments, spices, handicrafts, and souvenirs. You can also find dozens of restaurants and Shisha lounges there.
The Pearl-Qatar
The Pearl in Doha, is the first land in Qatar to be available for freehold ownership by foreign nationals.
The Pearl offers luxurious living to a multitude of refined tastes.
A self-sustaining real estate development that includes all the amenities and lifestyle privileges any resident or guest could ask for.
The Pearl offers apartments, villas, townhouses, diverse leisure and entertainment facilities, award-winning marinas and beautiful serene beaches.
Aspire park Qatar
Aspire Park is located in Aspire Zone, in the southern district of Al Waab in Doha, Qatar. It covers an area of 88 hectares and it is Doha’s biggest park.
It is a great place to have picnics and family outdoors while overlooking the Aspire Tower, especially at night.
It has wide variety of facilities, which includes smooth paths going in and around the park on which kids can bike and scoot around safely.
It has a lake, two playgrounds, running tracks, open spaces and much more—a perfect place for you to relax. With its three cafés.
The term ” Gaming Laptop” is used to describe laptops with very powerful hardware, that allows users to play high-end games, do intense video editing, as well as other power-intensive tasks. Despite the fact that Gaming Laptops feature High-end specs, the fact that they usually feature poor battery life is unarguable. This fact is attributed to the power consumed by their high-end components. Despite the fact that most gaming laptops have been characterized by poor battery life, there are some gaming laptops that feature impressive battery life, despite their power consuming components. In this article, we explore a comprehensive list of best gaming laptops with strong battery life .
1. Dell Inspiron 15 7000
Seeking for a very good gaming laptop, that features a long-lasting battery and an affordable price, the Dell Inspiron 15 7000 may just be the laptop you have been looking for. It houses all the essentials you will need for gaming, without being too flashy.
The Inspiron 15 7000 features an Intel Core i5-73000 processor, 8GB RAM, 256GB SSD, 1TB hard drive storage and an Nvidia GTX 1060 graphics card, with 6GB of VRAM. These specs put together makes the Inspiron 15 7000 a very awesome laptop to game on, and also an excellent machine for video editing and graphics design. In addition, the Inspiron 15 7000 is VR ready. You can buy from Amazon or Jumia ng.The Inspiron 15 7000 features a battery rated for 7 and a half hours.
2. Acer Predator Helios 300
The Helios 300, is a laptop that offers powerful hardware for gaming, without sacrificing battery life. It was designed to allow gamers game for long without plugging their power brick into an outlet. It lets users game on the go.
The Helios 300 features an Intel Core i7-700 Processor, 16GB RAM, 256GB SSD, A Nvidia GTX 1060 graphics card. The Helios 300 is VR ready, allowing you to play VR titles. These specs put together allows users to play favorite games seamlessly. You also have the option of increasing Ram and storage, to suit your needs. Buy from Amazon or Jumia ng.The Helios 300 offers 8 hours of battery life.
3. MSI GS65 THIN
The MSI GS65 thin is a gaming laptop that provides users with an entirely different feeling. Unlike most gaming laptops, the MSI GS65 offers a more professional look. It is one of those gaming laptops you can take into a conference room, without looking odd.
It features a relatively thin chassis that makes carriage easy. The MSI GS65 features an 8th gen core-i7 processor, 16GB RAM, 1 TB HDD, 512GB SSD, an Nvidia GTX 1060 MAX Q graphics card. This Graphics card allows MSI to achieve a lot using a thin chassis, avoiding overheating problems. With the MSI GS65 you are getting 5 hours 40 minutes of battery life.
4. GIGABYTE AERO 15X
Still, on the topic of best gaming laptops with a strong battery, the Aero 15X is yet another awesome gaming laptop that offers an impressive battery life. The Aero 15X is one of those gaming laptops that offers excellent gaming hardware, without sacrificing battery life.
The Aero 15X is powered by an Intel Core – i7 87050H, 16GB of RAM, 512GB SSD, an Nvidia GTX 1070 max Q graphics card. The Aero 15X features a 144 Hz 4k display, that makes gameplay smoother. The Aero 15X features a 94WH battery, which will power it up to 10 hours.
5. Razer Blade Stealth 13.3
Razer is one of the highly sought after brands we have today when it comes to gaming laptop choice. Their products have shown high efficiency, in offering quality gaming experience, allowing gamers to game seamlessly. The Razer Blade stealth 13.3 is no exception.
The Razer blade stealth 13.3 was built to allow gamers to game on the Go, without being restricted by the size and weight of the laptop or Battery life. The Razer blade stealth 13.3 is a 13-inch laptop that is powered by a 7th gen intel processor Core – i7, 8GB Ram, 256 SSD. The Balde stealth 13.3 offers approximately 8 hours of battery life.
6. Acer Nitro 5
Last but not least, the Acer Nitro 5 is yet another highly recommended gaming laptop with a strong battery. It is another stealth gaming laptop, that fits into a conference room and works excellently
The Acer Nitro 5 is powered by an Intel Core i5-7300HQ processor, A Nvidia 1050Ti graphics card with 5GB of VRAM, 8GB of DDR4 RAM and 256GB SSD. It features a 15.6-inch display with a screen resolution of 1920 X 1080 resolution. The Acer Nitro 5 features a 48WH battery.
There you have it – a comprehensive list of best gaming laptops with strong battery life. As already mentioned these laptops offer quality gaming hardware without sacrificing excellent battery life.
Smart TVs generally are advanced television sets, that possess more functions when compared to ordinary TV sets. Xiaomi Mi smart TV 4 is one of the Smart TVs that allow users surf the internet, allow the installation of apps supported on the OS they feature, and most importantly smart TVs allow users to stream content from a wide range of streaming services available today. In the presence of these smart TV essentials, it is very obvious that purchase facilitators have gone beyond screen size and resolution.
But if you have a digital TV and you want to convert it to a smart TV, you can check out on how to go about it.
In this article on what to watch out when buying your Smart TV set, we look at the different parameters to look out for when purchasing a Smart TV. These parameters determine the power of a Smart TV. These parameters are listed below.
Size (screen resolution)
One obvious detail you should consider is your preferred screen resolution (size) of a smart TV which most of the time is affected by your budget. Most standard Tv sets come with a 3840 by 2160pixel resolution and a screen is made up of dots or pixels and the more the pixel, the sharper the screen displays detail. The 3840 X 2160pixels is a 4k display or an ultra HD display. Please note that if you desire to enjoy 4k resolution in its full glory, you will need a larger inches smart TV.
The Fact that Ultra HD resolution A.K.A 4K resolution has become a standard is unarguable. Major streaming platforms today support 4K streaming, Streaming platforms like Netflix, Amazon Video including Youtube support 4k Streaming. This indicates the importance of having a Smart TV. In a bid to future proof your Smart TV, you are strongly advised to purchase a Smart TV with support for 4K content.
Display Technology
For display technology, we have two good options: the LED LCD and OLED l. You must note that the OLED screen technology is more expensive compared to LED LCD but the good thing is they are both use the same technology for LED illumination but their graphics are tweaked differently and that gives an advantage over the other depending on your choice and your budget
Software platform
The main difference between Smart TV’s and Ordinary TV’s is software. Smart TV feature a software platform not present in ordinary TV’s. The software platform featured on Smart TV’s make all their features come alive. Just picture a Smart TV, as a big tablet on your wall. A big tablet, that doesn’t make calls, but can be used to access the internet, play media files and stream media content from streaming platforms available.
Just the way tablets, smartphones, and laptops have different operating system, Smart TVs have different operating systems. Samsung Smart TVs feature the Tizen operating system, LG smart TVs feature WEB OS, the list goes on and on. When purchasing a smart TV, you should make sure the operating system on the Smart TV, has support for major streaming platforms, and also have a wide range of supported apps.
Refresh Rate
The refresh rate is a parameter that describes how many times per second a picture is refreshed on your screen. The refresh rate is expressed in Hertz (Hz). Please note that the standard refresh rate is 60 Hertz. Having a Smart Tv with a low refresh rate, usually output blurry images, in scenes of rapidly moving objects.
A Smart TV with 60 Hertz refresh rate won’t give you the very best, but you are gonna be satisfied, as long as you do not set your eyes on a Smart Tv with refresh rate more than 60 Hertz.
Some Smart TV’s feature High-Frame Rate support (HFR). Smart TVs with HFR have higher frame rates, and also added support for content higher than 60Hz. If your money isn’t a constraint, I advise you for TVs with HFR support. Also, you should take note of TVs with effective frame rates. Effective frame rate means the actual frame rate is half the stated frame rate. If a Smart TV has an effective frame rate of 60Hz, it means you will be able to stream content with 30 frames per seconds.
HDMI and Connections
Availability of connection ports is another important parameter, you should pay attention to when purchasing a Smart TV. Apart from being able to stream content, surf the internet, A good Smart TV should feature a generous amount of ports, for connections. These ports allow users to connect Speakers, decoders, game console and lots more. A good Smart TV should also feature an HDMI port, for the connection of external streaming devices. Make sure the HDMI ports on the Smart TV, is HDMI 2.0, and also make sure the Smart TV has at least 4 HDMI ports.
As already mentioned, if you desire to purchase a Smart TV, you should consider the parameters listed above. Take note of the minimum requirements for each parameter. You shouldn’t purchase Smart TVs with specs lower than the mentioned.
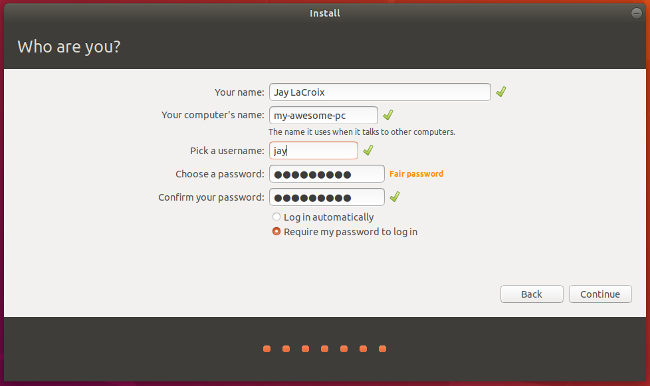
i Dual booting Linux with Windows 10 on your PC, means having both operating systems installed on your PC. This process involves you partitioning your hard disk and installing the operating systems on different partitions, This way you will able to use both operating systems on your PC simultaneously. In this article we explore a tutorial on How to Dual Boot Linux with Windows 10 on your PC
Requirements
1. Two USB flash drives or DVD-Rs
Since we will be installing tow operating systems on our computer, you are required to purchase DVDs of both operating systems. You are required to purchase a Windows operating system DVD and a DVD containing the Linux Ubuntu operating system.
Apart from installing the operating systems using DVD, you could also install them from a bootable flash drive, which is a way faster. If your laptop doesn’t support booting from USB, you are advised to install the operating systems using DVDs, as mentioned earlier.
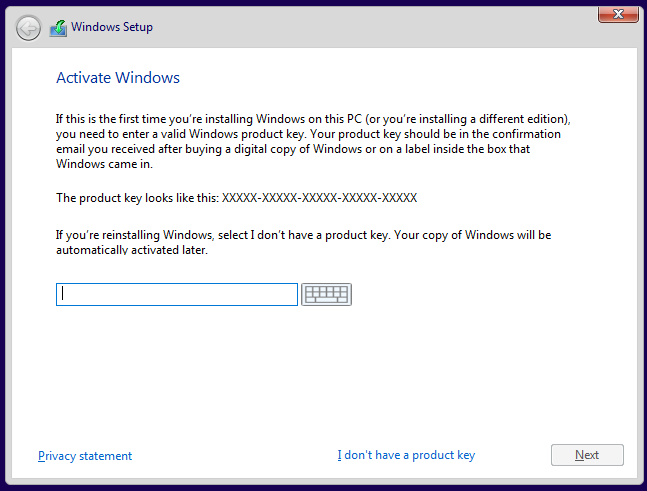
2. A Windows 10 license
Installing the Windows 10 OS on a computer that didn’t come with Windows 10 OS on default, requires a Windows license key, so if your computer didn’t come with the Windows 10 operating system on default, you will be required to input a license key. If your computer came with the Windows 10 operating system, you won’t be required to input any. The Windows 10 license key, will be provided to you by the retailer.
3. Windows 10 Creation Tool
If you are installing the Windows 10 operating system from a bootable flash drive, you are required to download a windows 10 media creation tool. The Windows 10 media creation tool provides a step by step guide to creating a Windows 10 media on a USB. You can also use to create windows media on DVDs.
4. Etcher Software
Similar to the Windows Media Creation tool, The Etcher software lets you load a Ubuntu media unto a bootable flash drive or DVD. The Etcher software is supported on Linux, MacOS, and Windows.
Please Note that you are required to download the Ubuntu ISO Image, you will load in the bootable flash drive. Once it has been downloaded, you are required to launch the Etcher software, next click on Select image and then point to the already downloaded Ubuntu ISO image downloaded. Now Select your flash drive, from the list of storage locations provided. Click flash and the Etcher software will convert your bootable flash drive, into a Ubuntu installer.
After you have successfully met all the requirements above, purchased or created a bootable device for both operating systems, you proceed to install both operating systems on your computer. The steps to installing the operating system are listed below:
How to Install Windows and Ubuntu on Your PC
Just as a reminder, before we get started with the installation, you should have already created windows installation media, created a Ubuntu installation media and made a backup of your important files.
Creating a dual boot of Linus and Windows OS can be done in two ways. Its either you install the windows 10 OS first, and then using a ubuntu installer to resize the partition and installation will proceed in the empty space. Or you install Ubuntu first and then install the Windows 10 OS in the smaller partition on your hard disk.
Installing Windows
If you already installed Windows OS on your PC, you are required to skip this step and move straight to installing Ubuntu on your PC, otherwise, continue with the steps listed below:
1. Insert the Windows Installation in you have: As mentioned earlier, its either you use a DVD with the Windows 10 OS inside or you use a bootable flash containing windows 10. If you have a windows 10 DVD, insert it in your DVD player, If you have a bootable flash drive, plug it into your USB port and follow the steps below.
2. Click on the boot menu key: PC’s have different boot menu keys, you have to look out for the boot menu key assigned to your PC. The boot menu key is usually displayed on the bottom of your screen when you power your PC on. If you are unable to locate the boot menu key for your computer, you advised to search it on Google, to make things faster.
3. Change Boot order: Changing boot order means changing the device your PC boots, On default, your PC is set to boot from your hard disk. If you using a Windows 10 DVD, you are required to set your PC to boot from your disk drive. If you are booting from a bootable flash drive, you are required to set your PC to boot from the bootable flash drive. IF you don’t know how to do this, you advised to research on Google or contact your manufacturer.
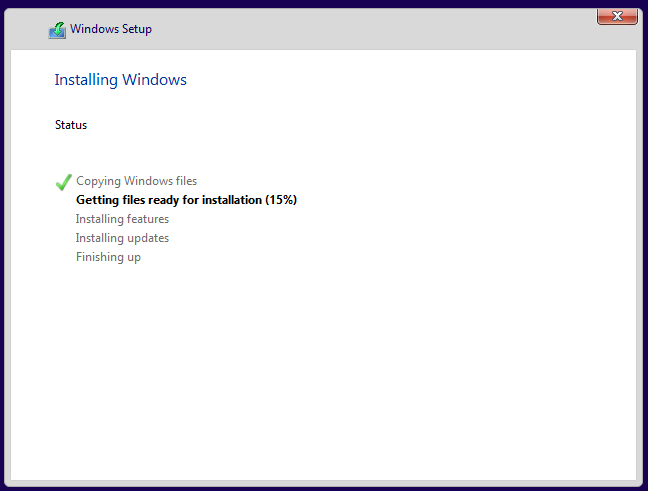
4. Press any key on your keyboard and proceed with the installation: After you might have successfully booted your installation media, you will be prompted to press any key on your keyboard, to proceed with the installation.
5. Follow the on-screen prompts: You will be presented with different on-screen prompts. Prompts that will require you select your preferred language, inserting your product key and lots more. These are basic steps that do not require any expertise.
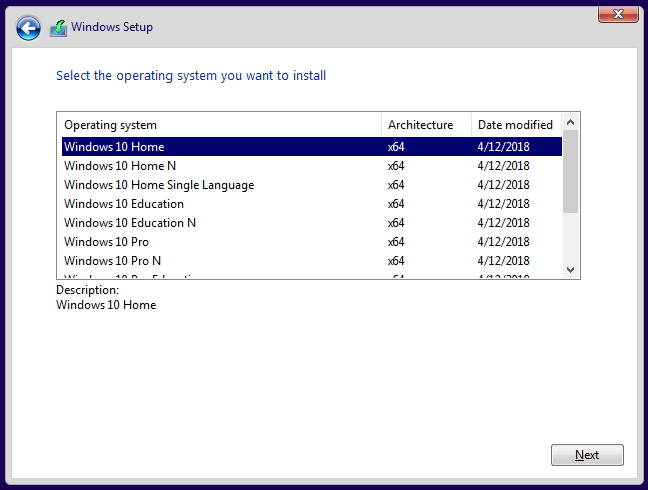
6. Select the version of Windows 10 you wish to install:
During the installation process, you will be required to select the version of Windows 10 you wish to install. Here you will be provided with the option to install windows 10 x64 and Windows 10 x86. Please note that installing windows 10 x86 is the same thing as installing windows 10 32 bit and installing windows 10 x64 is the same thing as installing windows 10 64 bit. Here you will also be required to select windows 10 home, professional and other versions. Please, note that the windows 10 pro is the most powerful version of Windows 10.
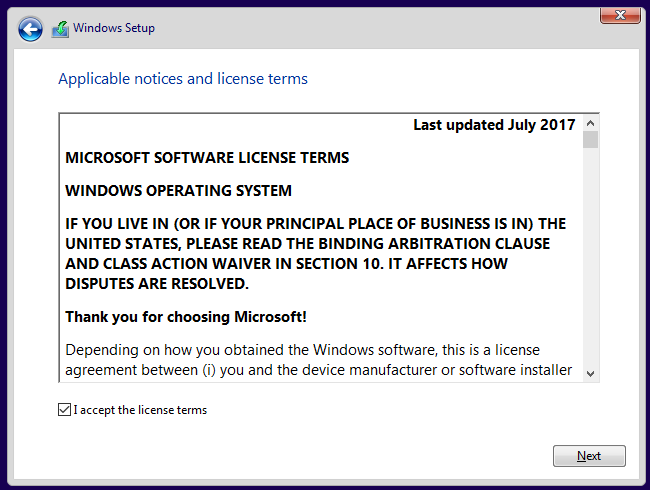
7. Review License terms and click next
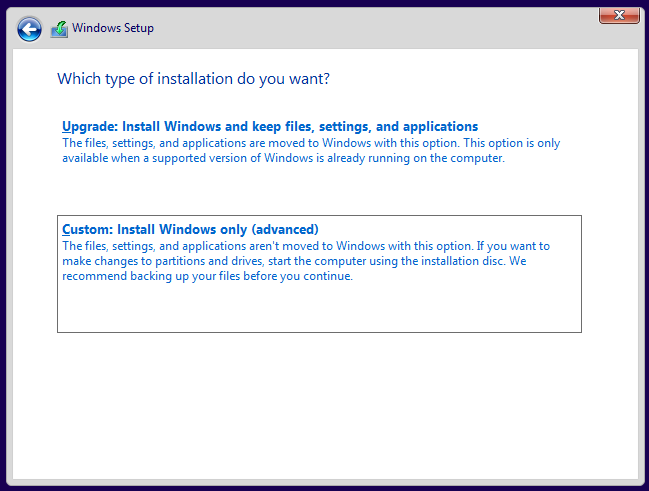
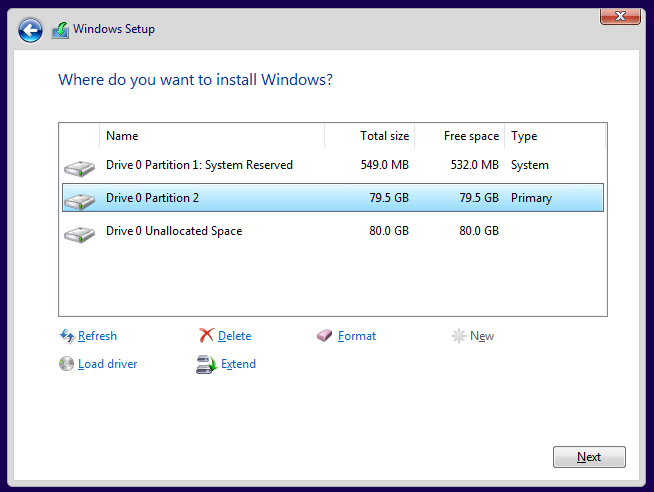
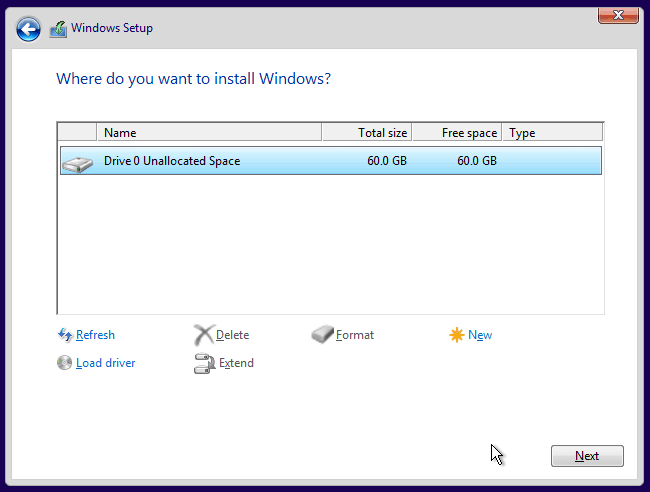
8. Click on custom install: After reading the license information, you are required to select the type of installation you want. You have options to upgrade, keeping all your files or doing a custom advanced install. You are advised to do a custom install. You will able to select the drive you want to install the windows 10 OS.
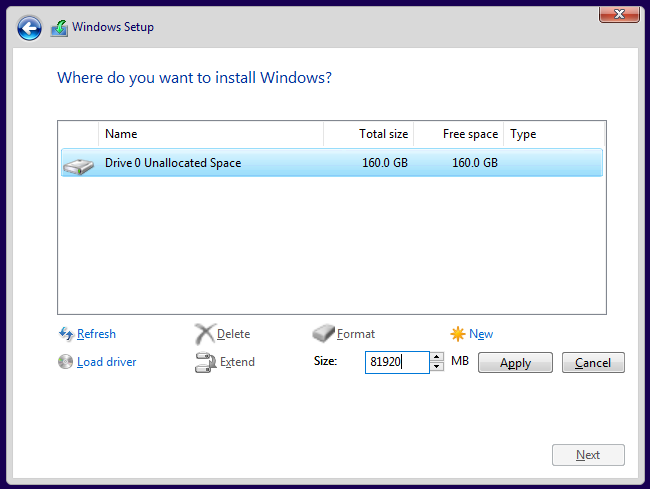
9. Allocate Storage For Installation of Windows 10
Our sample hard drive has not been allocated or partitioned before. If your hard drive isn’t like this or has been partitioned before, you are required to highlight all the partitions and delete them. Your entire hard drive will be unallocated. Click continue to create a new partition.
You are advised to create a partition with up to 80GB to accommodate the windows operating system.
10. Click Next, to confirm partitioning and to begin windows installation.
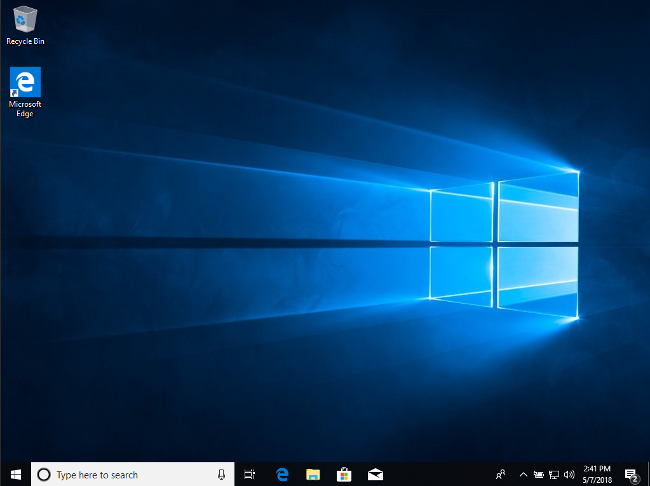
Now that you have successfully installed the Windows 10 operating system on one of the partitions, the next step is to install Ubuntu on your hard drive.
Installing Ubuntu
At this point, we assume you already have the Windows 10 operating system installed on your hard drive. The next step is to install Ubuntu on the other partition you created. Installing Ubuntu will be done using the installation media you created earlier.
1. Insert Installation Media into your Computer: You are to insert the installation media in your computer. If the installation media was created on a DVD, you are to insert it into your CD ROM, if the installation media is on a bootable flash drive, you insert it via your USB port.
2. Click on the boot menu key: PC’s have different boot menu keys, you have to look out for the boot menu key assigned to your PC. The boot menu key is usually displayed on the bottom of your screen when you power your PC on. If you are unable to locate the boot menu key for your computer, you advised to search it on Google, to make things faster.
3. Give priority to Your Installation Media: After you must have successfully entered the boot menu on your computer, the next step is to give priority to your installation media. If you are booting from a DVD plate, you are to give priority to your CD ROM, select boot from CD ROM. If you are booting from a bootable flash drive, you are required to give priority to your flash drive, select boot from flash drive.
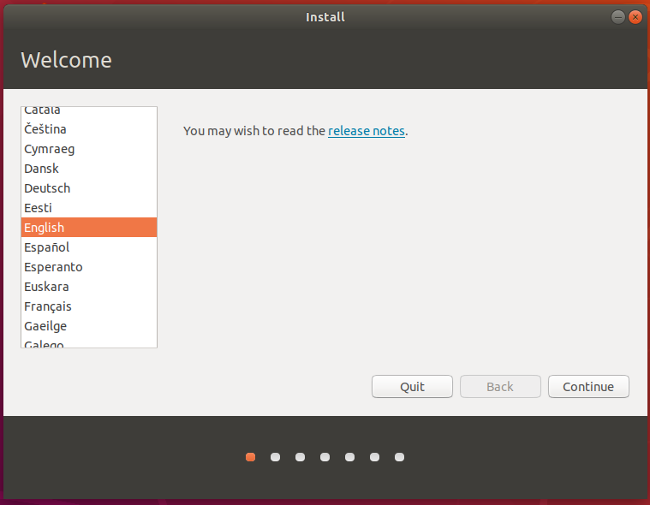
4. Install Ubuntu: After you have successfully prioritized your Boot device, your computer will be booted into the Ubuntu installation interface. Here you are provided with the option to either try ubuntu or install Ubuntu.
5. Select Your Preferred Language: After you might have clicked the install Ubuntu button, you will be required to select your preferred language. Here you are to select the language you understand.
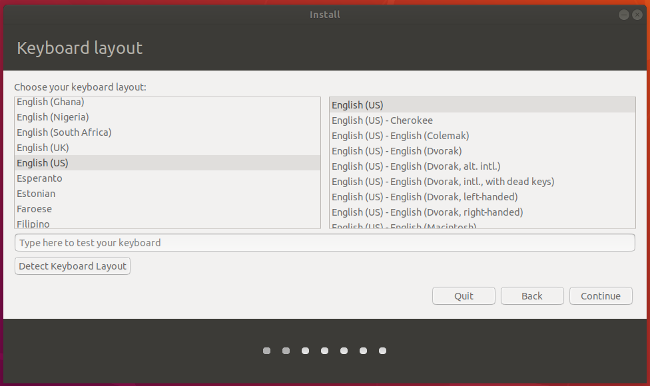
6. Select Your keyboard layout: Despite being an output component of the computer, the layout configuration software plays a huge role, in key placement. Here you have options to choose from the different layout assigned to different languages. After you have selected your preferred keyboard layout, you are advised to click continue.
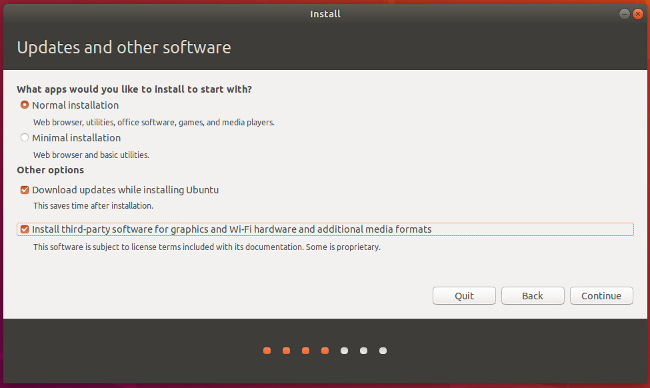
7. Select Installation Type: Installing Ubuntu, you provided with Normal Install Option, as well as Minimal installation option. If you select normal installation, Ubuntu will be installed alongside a web browser, utilities, office software, games, and wallpapers. Minimal Installation installs Ubuntu alongside a web browser and utility software.
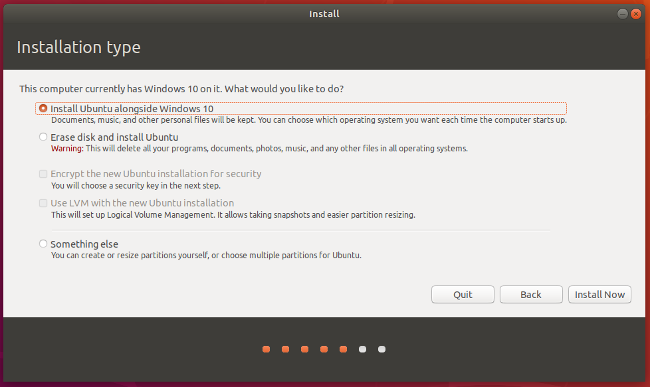
8. Install Ubuntu Alongside Windows 10: You are provided with the option to either install Ubuntu alongside Windows 10 or erase the hard disk and install Ubuntu.
9. Follow in the On-Screen prompts provided: You will be required to confirm Ubuntu installation, select time zone and fill in your Particulars, to setup login security.
10. Reboot Your PC: After you might have successfully installed Ubuntu on your PC, You will be provided with the option to continue testing or restart. You are required to click the restart button, to begin using Ubuntu.
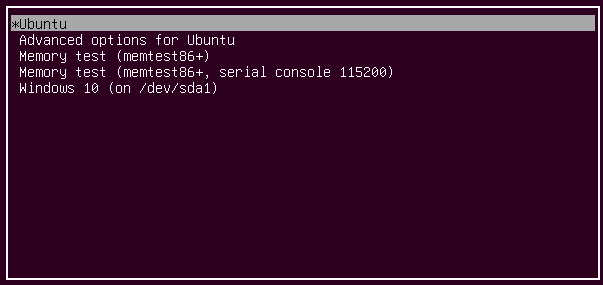
Note: After you might have successfully followed all the steps provided in this tutorial, you will be provided with the dual boot screen, where you will be given the option to either boot into windows or boot into Ubuntu.
There you have it – A complete and comprehensive tutorial on How to Dual Boot Linux with Windows 10 on your PC. If you have questions, feel free to drop them in the comment section below.
The presence of a yellow exclamation mark on your windows connectivity icon means just one thing, your network connection has issues. As simple as resolving it may sound, there may be some occasions where resolving such network issues becomes very difficult. This is where the Network Diagnostics tool comes into play. The network diagnostic helps windows users troubleshoot network problems, and also provides solutions to fixing them. In this article, we explore a tutorial on how to run Windows Network Diagnostics.
The windows diagnostics tool is a highly recommended tool, in troubleshooting fixing the network problem. It is very effective in fixing DNS problems and also helping users find the cause of network termination.
The procedures for using the Windows Network diagnostics tool is a very easy and straight forward. These steps are listed below.
1. Click the start button on your keyboard, and type ”fix network” in the search box provided.
2. From the list of search results provided, click ” Find and fix networking and connection problems “
3. In the Network diagnostics window, click on the advanced option and run the program as an administrator. There is an option to apply repairs automatically here, you tick it if you want repairs to be applied automatically.
4. Choose the type of connection you want to diagnose for troubleshooting and click on the next. here windows will try to locate the network connectivity problem.
Note: Once the problem has been detected by the windows network diagnostics tool, you have the options of solving the problem yourself, contacting Microsoft online support, to get the problem solved remotely or restoring your windows machine to its default settings. You can also seek the help of a local technician, to help you fix the network problem.
There you have it – a complete and comprehensive tutorial on how to run Windows Network Diagnostics. if you have other questions, feel free to drop them in the comment section below.
As a windows OS user, there are times where you will be faced with the unidentified network error. The Error appears sometimes when you try to connect to a network, using your windows machine. There is no actual method of solving this problem, as this Error may be caused by a lot of things. In this article on how to fix unidentified network access on windows, we shall explore a list of troubleshooting steps you should follow when trying to fix this error on your windows machine. This these steps are listed below.
1. Turn Off Airplane Mode
The first step in the troubleshooting process is to disable Airplane mode. As you might already know, Airplane mode when activated, disable all network access, this means you will not be able to access any network on your windows machine. In turn, this may result in the unidentified network no network access error on your windows machine. To turn off the airplane on your windows machine, please follow the steps listed below:
Press Windows key + A. This opens the ‘Action Center’.
Toggle off the airplane mode button.
2. Update Network Card Drivers
Outdated network card drivers could also facilitate the unidentified network error in windows operating system. If you already toggled off the Airplane mode switch, and you are still experiencing the problem, you are advised to update your network card drivers. Steps to update your network card drivers are listed below.
Press Windows + X or right-click on the Start button.
Click on Device Manager to open it.
Look for ‘Network Adapters’ and click on the forward pointing arrow to expand the list. Right click on all the Network drivers and update them one by one.
3. Disable the Security software temporarily
In the quest to giving your computer absolute protection, security software may disable your internet connectivity. This is common with Anti-virus software or Firewall software. In solving the unidentified network error, you also advised troubleshooting your security software, by temporarily disabling it, to see if the problems stop. To disable your security software, you are to right click on the Anti-virus icon located in your system tray icon section. Once you have disabled it, you are to try connecting to a network to see if it worked. If it didn’t, you can continue with the next step in troubleshooting
4. Switch off the Fast Startup feature
Microsoft has been able to make booting on the Windows operating system faster, using the fast startup feature. The fast startup feature is found on a recent version of the Windows operating system. The fast startup features is another facilitator of the unidentified network access error. Having tried the steps listed above, with no positive results, you are advised to turn off the fast startup feature on a windows machine., using the steps listed below:
Search for ‘Power Options’ in the Windows search bar. Open the Power Options window and among the tabs on the left, click on choose what the power button does.
Click on ‘Change settings that are currently unavailable’.
Uncheck ‘Turn on fast startup’. Shut down the system and reboot after 30 seconds.
5. Change your DNS servers
Your current DNS server may just be the reason your windows machine is plagued with the unidentified network access error. To change your DNS servers, follow the steps listed below:
Press Windows + X or right-click on the start button.
Click on ‘Network Connections’.
Right-click on your network connection (Ethernet or Wifi) and click on properties. It might prompt for administrator credentials.
Double-click on Internet Protocol Version 4.
Select ‘Use the following DNS server addresses’ and set but the preferred and alternate DNS server address as follows to use Google Public DNS:
Preferred DNS server: 8.8.8.8
Alternate DNS server: 8.8.4.4
6. Use Command Prompt
Already tried the steps listed above, and nothing seems to be changing, there are some commands you can run in command prompt, to salvage the situation. You are required to try the commands listed below, one by one, one at a time. Once you have successfully ran all the commands, you are to restart your windows machine.
ipconfig /release
ipconfig /renew
netsh winsock reset
netsh int ip reset
ipconfig /flushdns
ipconfig /registerdns
netsh int tcp set heuristics disabled
netsh int tcp set global autotuninglevel=disabled
netsh int tcp set global rss=enabled
netsh int tcp show global
7. Diagnose The Network
The network Diagnose feature, is another handy tool, that helps troubleshoot the problem of your network. You can diagnose the network using the features listed below:
Press Windows + X or right-click on the start button.
Click on ‘Network Connections’.
Right-click on your network connection (Ethernet or Wifi) and click on ‘Diagnose‘. It will start an automatic troubleshooter.
8. Change the Ethernet cable
Tried troubleshooting with the steps already listed above, and nothing seems to be changing? Your Ethernet cable may just be faulty. You are also advised to troubleshoot your ethernet cable. Try using another one. If the problem persists, you can proceed to the next step.
9. Set a static IP address
Press Windows + X or right-click on the start button.
Click on ‘Network Connections’.
Right-click on your network connection (Ethernet or Wifi) and click on properties. It might prompt for administrator credentials.
Double-click on Internet Protocol Version 4.
Select the radio button at ‘Use the following IP address’.
Check the IP address settings for others using the same network as yours and change your settings to the same.
Click OK to save the settings and exit.r
10. Use an external Network Adapter
Your Network chip may just be the facilitator of the problem. Having a faulty network chip on your windows machine can crumble your internet connection, you are advised to troubleshoot your network chip, using an external network adapter.
11. Restart your modem and router
Switch off both your modem and router keeping them physically connected.
Start the modem. Wait for 30 seconds after all the lights turn green.
Start the router.
This is called power-cycling.
12. Upgrade the router firmware
Having an outdated router firmware can also crumble your network connection, leading to the unidentified network error on your windows machine. You are advised to update the firmware on your router and try connecting again.
13. Disable Virtual Network Adapters
Launch Device manager on your windows machine
Navigate to Network Adapters and expand it
Right-click and disable them
14. Run the built-in troubleshooters
Having exhausted the troubleshooting steps listed above, and nothing seems to change, running the built-in troubleshooters on your windows machine, may just be the answer to your problem. Here are the steps to running the built-in troubleshooters on your windows machine. To activate the run box on your windows machine, simply hold windows key and R together i.e windows key + R.
In the run box, you are to run each of the commands independently.
msdt.exe -id NetworkDiagnosticsWeb
To open the Incoming Connections Troubleshooter
msdt.exe -id NetworkDiagnosticsInbound
To open the Network Adapter Troubleshooter:
msdt.exe -id NetworkDiagnosticsNetworkAdapter
Conclusion: Upon troubleshooting your device, with the steps listed in this article on how to fix unidentified network access on windows , there is a high chance you might solve the unidentified error on your windows machine. If the problem persists, you are advised to contact windows support theme or visit a technician.
Apple announced that it would partner with Goldman Sachs and MasterCard to offer its own credit card. The Card is built into the Apple Wallet app on iPhone, offering customers a familiar experience with Apple Pay and the ability to manage their card right on iPhone.
The Apple Card will come without any late fees, annual fees, over-limit fees, or international fees. Apple Card will be available this summer.
Daily Cash is added to customers’ Apple Cash card.Every time customers use Apple Card with Apple Pay, they will receive 2 percent cash back on purchases made with Apple Pay and 3 percent cash back on purchases made on Apple products.
Apple Card provides weekly and monthly spending summaries, to help customers better understand their spending.
Privacy and Security
Apple said a unique card number is created on iPhone for Apple Card and stored safely in the device’s Secure Element, a special security chip used by Apple Pay.
Every purchase is secure because it is authorized with Face ID or Touch ID and a one-time unique dynamic security code. The unique security and privacy architecture created for Apple Card means Apple doesn’t know where a customer shopped, what they bought or how much they paid.
The physical Card
Apple has also designed a titanium Apple Card for shopping at locations where Apple Pay is not accepted yet. Apple has eliminated a lot of the weak points that allow hackers to steal card information.
The card has no card number, CVV security code, expiration date or signature on the card. All this information is easily accessible in Wallet to use in apps and on websites. For purchases made with the titanium Apple Card, customers will get 1 percent Daily Cash. Apple explains.
Apple is partnering with Goldman Sachs to make its own credit card due out this summer — no plastic required. An optional physical card is available, but it’s a laser-etched titanium rectangle. https://t.co/WrG7GAIlmxpic.twitter.com/GVDHXxTdhn
Partitioning hard drives, with a functioning operating system, is carried out using some built-in features. You can partition your hard drive or SSD using the command prompt, Windows disk management or a third party software. However, partitioning a new hard drive or SSD without OS is an entirely different thing. Here you do not have the luxury you have on a fully functioning OS. There is no software installed, you are given a plane slate, with no tools.
Despite the fact that it sounds impossible, Partitioning hard drives or SSDs without OS is actually possible. In this article, we explore a tutorial on how to partition a new SSD or Hard drive without OS.
Please note that for you to partition the hard drive or SSD without OS, you will need a bootable device, to boot the hard drive or SSD without an operating system. In this article, I will demonstrate how to partition a new hard drive or SSD using a bootable device containing windows OS. The steps are listed below.
How to Partition a new SSD or hard drive without OS, During Windows Setup
when installing windows OS, you are provided with the option to manage your hard drive or SSD space. Here you will be able to manage the partitions on your hard drive or SSD. You can create partitions or delete already existing partitions. As already mentioned, you will need a bootable device containing windows OS.
1 Insert the boot device into your computer. If your boot device is a disc, you are required to place it in your CD ROM. If it’s a bootable flash drive, you should plug it to any of the USB ports on your computer.
2. Follow all on-screen prompts until you are landed in the page where you can manage your storage space.
3. Once you are on the windows storage management page, press shift+F10 simultaneously to open a command prompt.
4. Type “diskpart” and press enter
5. At Diskpart>, run a few lines of commands to create a new partition:
List disk
Select disk [disk number]
Create partition primary [size=n]
Disk number and size is dependent on the configuration of your hard drive or SSD. Below is an example of how to use the above command line.
List disk
Select disk 0
Create primary partition size=60000
Note: Creating a partition of 6000MB means you are creating a partition of 60GB and also disk 0 is the name of the default partition that your hard drive or SSD has.
5. Hit enter
Note: You are advised to allocate more than 100GB to your new partition, because Windows update, installed programs, and other system files will keep consuming space on system partition
After you might have successfully carried out all the steps listed above, you will have a well partitioned hard drive. Steps listed above should be followed in order, to prevent complications.
The Internet has over the years metamorphosed into a very essential part of our lives. The internet is a source of information, it keeps us in tune with the happenings in the world. Being absent from the internet for an hour can be very torturing. In this article, we explore a tutorial on how to hack wifi passwords using Android apps. This will help you gain access to wifi networks in your surrounding, without prior knowledge of the password.
1. How To Hack Wi-Fi Password Using Wi-Fi WPS WPA Tester Android App
Seeking to make a quick wifi network hack? The Wi-Fi WPS WPA Tester may just be what you need. The Wi-Fi WPS WPA Tester app works on both rooted and nonrooted devices. Despite its compatibility with non-rooted devices, it requires root access, to hack tougher wifi networks. Steps to hacking Wi-Fi networks using the Wi-Fi WPS WPA Tester app are listed below.
Download and install the Wi-Fi WPS WPA Tester App from the Google Play Store
Launch the Wi-Fi WPS WPA Tester app on your Andriod device
Locate the Wi-Fi connection you wish to hack.
Tap on the Wi-Fi network
Select ”connect” and then select no root methods to hack Wi-Fi password.
Note: If the color of the Lock icon is green, it means the chances of hacking the network is high. Red or Orange color lock indicates the chances of hacking the network is low.
2. How To Hack Wi-Fi Password Using Android Dumper Android App
Still on the topic of how to how to hack wifi passwords using Android apps, Androdumper is a free app that lets use hack Wi-Fi networks seamlessly. Androdumper doesn’t require root access to function. It is available in the Google Play store for downloads. Steps to hacking Wi-Fi networks using the Androdumpper app are listed below.
Download and Install the AndroDumper app from the Google Play Store
Launch the AndroDrumper app on your Android device
Click on the refresh button in the second top left corner of the app. This will allow the app to search for available Wi-Fi connections.
Click on the Wi-Fi network of your choice, and then click on the “Try to connect” button.
Select the hack method. You have the option to choose between Root way or No Root.
Wait for Androiddumper to hack Wi-Fi network
How To Hack Wi-Fi Password Using Android Bcmon Android App
Last but certainly not least, is the Bcmon app. Unlike the already mentioned wifi hacking apps, Bcmon requires root access. It is compatible with rooted devices. Bcmon is a more effective app, in hacking Wi-Fi network. Steps to using the Bcmon app is listed below.
Download and Install the Bcmon app from the Google Play Store
Click on the ” Refresh” icon to view available Wi-Fi network
Click on the desired Wi-Fi network
Navigate to settings and uncheck “use Bcmon” checkbox
Navigate back to the network screen and click the “ok” button to hack the Wi-Fi network
Conclusion: Despite the fact that apps featured in this article are highly recommended, there is a high chance that they won’t be able to hack all the Wi-fi connections you come across. This is due to the different levels of fortification Wi-Fi connections possess. In cases where the Wi-Fi connection security isn’t strong, you should be able to gain access using the apps listed above.
Android Apps to watch full TV episodes: Over the years, smartphones have managed to make our lives easier than they were before their existence. It has made us independent of a lot of things. For example, before smartphones and tablets existed, the only option we had to watch movies was our Television set. We had to stay glued to them until the movie ended. Thanks to smartphones, we can now watch movies on the Go using our smartphones. This has made leisure time a lot better.
This article explores a comprehensive list of the best Android apps to watch TV episodes. These apps allow users to stream their favorite TV episodes on their smartphones. These apps are listed below.
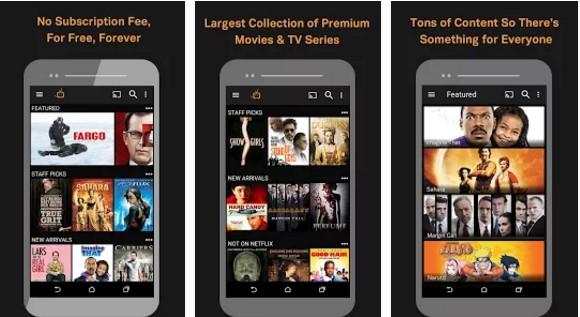
1. Showbox Apps
Looking to watch full TV episodes on your Android device? Showbox may just be the app you have been searching for. Despite not be available in the Google PlayStore, Showbox is unarguably one of the most used media and video stream apps available on the Android platform.
Showbox lets users stream movies and TV series for free on their Android device. There are no hidden charges, you don’t have to pay any monthly or annual fee. Apart from allowing users stream media content, Showbox also lets users download movies and TV series to be watched later. Showbox offers movies and TV series in high definition quality, giving uses crisp and clear content to stream. As earlier mentioned, the Showbox app is not available in the Google Play store for download, to download the Showbox app, click here
2. Netflix Android Apps
Netflix is undoubtedly the most popular streaming platform we have today. From Movies to TV Episodes, Netflix is the most sought after app streaming app we have today. Despite offering a subscription for service, the top-notch content they have set them apart from others.
The Netflix app bears a very intuitive interface, designed to make navigation as easy as possible. Locating your favorite movies is as easy as possible here. Chances of you running out of content to watch is very low here because Netflix is loaded with a lot of exciting contents to stream. The Netflix app can be downloaded from the Google Play Store.
3. Stremio
Stremio offers a platform for users to stream movies, TV series and TV shows directly on their smartphone. The Stremio app features a very intuitive interface, making navigation very easy. It was designed to help users find their favorite movies easily.
Stremio lets users streaming videos from a lot of services, which includes the popular ones we are familiar with. Example of such services includes Netflix, iTunes, HBO, Youtube, Twitch and lots more. With support for these streaming services, you are assured of seamless streaming of movies, series and lots more.
4. Tubi
Tubi is a legal streaming service, that allows users stream movies, TV series on their Android smartphones, without having to pay any fee. Tubi services are absolutely free of charge. You are not required to pay any monthly fee or annual fee. It’s simple, select the movie you want to watch, and start streaming.Streaming with Tubi, you are offered content from Comedy, Drama, Kiddies show, Korean movies, Anime, British series and lots more. Tubi is constantly updated, delivering the latest content to its users. The Tubi app is available for downloads on the Google Play store.
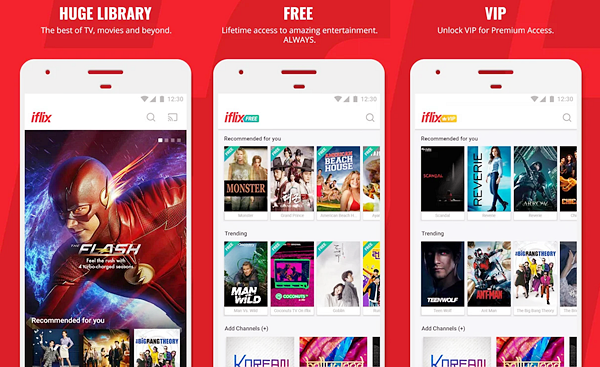
5. iFlix
iFlix is an Android app, designed to provide top-notch streaming experience to users. iFlix houses loads of exciting and popular TV Series and moves, for free streaming. If you desire to continue watching your favorite TV episodes on the go, iFlix is the app you need.
It also has a section that lets you discover new movies, TV series and lots more. Unlike the already mentioned apps, iFlix requires a pay a monthly fee, to enjoy streaming. The iFlix app is available on the Google Play store for downloads.
6. Showmax
Still on the topic of best Android Apps to watch full Tv episodes, Showmax is yet another awesome app, that allows users to stream TV episodes and movies on their Android devices. Showmax offers a huge selection of TV show, TV episodes, kids shows and documentaries for a monthly fee. It is supported on devices running Android operating system, including Android TV.
Apart from streaming, Showmax also allows users to download movies to their devices, to be watched later. Showmax features a bandwidth capping feature that reduces data consumption when streaming. The Showmax app is available on the Google Play store for downloads.
7. Amazon Prime Video
Amazon Prime Video lets you stream and download popular movies and TV shows, including Amazon exclusives, like the Grand tour, The Man in the High Castle, and Emmy award winner Tumble Leaf and lots more. This app also lets you stream content from special channels like HBO, SHOWITIMEm STARZ, and CINEMAX. The Amazon prime video app is available for downloads on the Google Play Store.
8. ZEE5
ZEE5 is a streaming app dedicated to providing the best from Bollywood. ZEE5 lets users stream TV shows, Web series, International shows, Acclaimed plays, from the comfort of their smartphones. ZEE5 features over 80 live TV channels and 00,000+ hours of video content.
Video content on the ZEE5 Video content dubbed in 5 languages including Hindi, Bengali, Malayalam, Tamil, and Telugu. Apart from allowing users stream media content, ZEE5 also allows users to download content for offline viewing. The ZEE5 app can be downloaded from the Google Play Store.
9. SnagFilms
SnagFilms is yet another app that lets users stream movies and TV episodes from the comfort of their Android smartphones. Snagfilm is a free app. All movies and TV episodes featured in their library can be accessed for free, without paying any subscription fee.
Snagfilm features over 5,000 Independent movies, TV Shows and documentaries. In their library, you will find content under comedy, action-filled and documentaries categories. The Snagfilms can be downloaded from the Google Play Store.
10. IROKOtv
Last but not least, is is the IROKO TV app. IROKO TV is a Nigerian based channel, that offers content from Nigeria’s media sector.
IROKO TV serves users with the best from Nollywood, and Nigerian TV series. You will also find Ghanian Films and TV series here. Apart from allowing users stream content via the internet, IROKO TV also lets users download content to be viewed offline. The IROKO TV app can be downloaded from the Google PlayStore.
There you have it – The best Android Apps to watch full Tv episodes. If you have other favorites, feel free to drop them in the comment section below.
Famous for its smartphones, Xiaomi is a technology company that offers so much for so little. This fact has played a significant role in the success of their company. Price tags featured on their products facilitate questions, regarding the price worth of products from other manufacturers. Still Speaking on offering so much for so little, the Xiaomi Mi smart tv 4, is an example of products manufactured by Xiaomi, that provides so much, for a price tag not relative. The TV is Xiaomi’s first foray into the smart TV market. For a newbie in the Smart TV market, Xiaomi isn’t doing poorly at all.
The smart TV meets all the requirements of a modern TV, that suits its generation. It features a modern design, as well as top-notch hardware specs and software, that facilitates top-notch user experience.
In this article, we explore the features, specs, and pricing of the Mi TV, giving you a clearer insight into why the Xiaomi Mi smart tv 4 is a must-have.
Xiaomi TV Build
As earlier mentioned, it was designed to meet all the requirements of a modern smart TV. It features a very modern design that is going to keep you staring. With a thickness of 4.9 mm, the Xiaomi Mi 4 is a fragile device. The Smart TV 4 claimed the Red Dot Award last year for having a thickness of 4.9 mm.
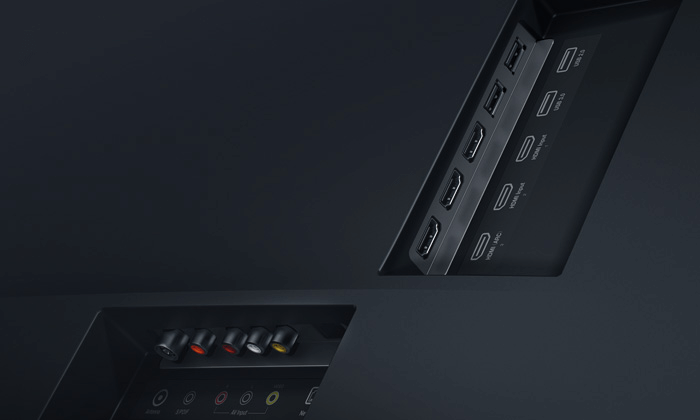
Having a thickness of 4.9mm doesn’t limit the ports of the Xiaomi Mi smart Tv 4. The Xiaomi 4 comes with a good number of ports for connectivity. The Xiaomi smart tv 4 features three HDMI ports, two USB A ports, one of them is a USB 3.0 port, the other is not. Still on ports, the Xiaomi Mi 4 smart Tv features port for audio video input, Ethernet port, and an Antenna port.
To provide users with an immersive experience when streaming, the Xiaomi Mi smart tv 4 features an integrated Mi TV bar with ten speakers a subwoofer and two wireless rear satellite speakers. It also supports Dolby Atmos audio technology with two up-firing speakers for an unbeatable audio experience.
Xiaomi Mi Smart TV 4 Display
The Xiaomi Mi Smart TV features a 55 inch 4k HDR 10-bit display panel, with a screen resolution of 3840 x 2160. The display has a 60Hz refresh rate, with a response time of 8ms. To feat into the modern smart TV market, this smart tv features a near bezels display, the bezels on this tv is very thin, it’s difficult to see to when watching content on it. The Xiaomi Mi Smart TV blends into your surrounding, creating the illusion that its a wallpaper.
Xiaomi Mi Smart TV 4 Hardware Specs
Being a smart TV, you should expect all the essentials needed for streaming and functioning of supported apps. The Xiaomi Mi smart tv does justice to that.
The Xiaomi Mi Smart TV is powered by a 64-bit quad-core Mlogic processor, a Mali-T830 MP2 GPU, 2GB RAM, and 8GB of Ram. The Xiaomi Mi Smart TV 4 features blue 4.0 with low energy, 2GHz / 5GHz wifi for internet connectivity.
Software / Interface
The primary reason Smart TVs were created, is to provide users with a powerful TV software, that allows users to stream content, use supported apps and surf the net. The ease using these features is hinged on the type of software the TV features and the fluidity of the interface.
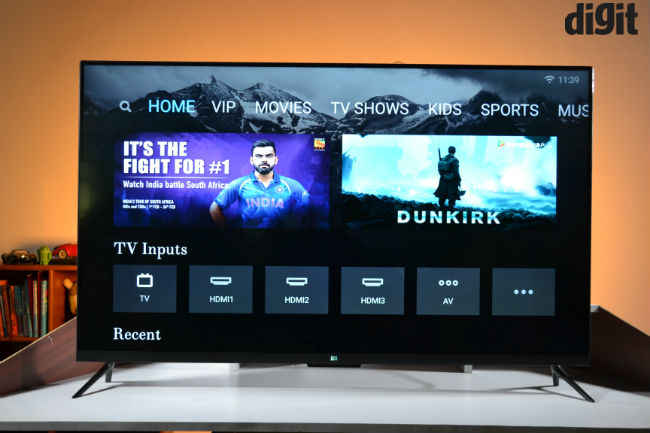
The Xiaomi Mi TV 4 features on the PatchWall interface. The PatchWall interface is an Android-based user-interface, that does away with a lot of Android essentials. This TV doesn’t come with Google PlayStore and Youtube and doesn’t support them. The PatchWall interface was designed to be as fluid as possible, doing away with all the features that slow down Android-based Smart TV.
Launching the home screen on the PatchWall UI, you are presented with a tile interface for the channels. When you search for a show, you are provided with the content, as well as information on when scheduled shows will be aired. The patchWall UI also suggests contents based on your viewing habits.
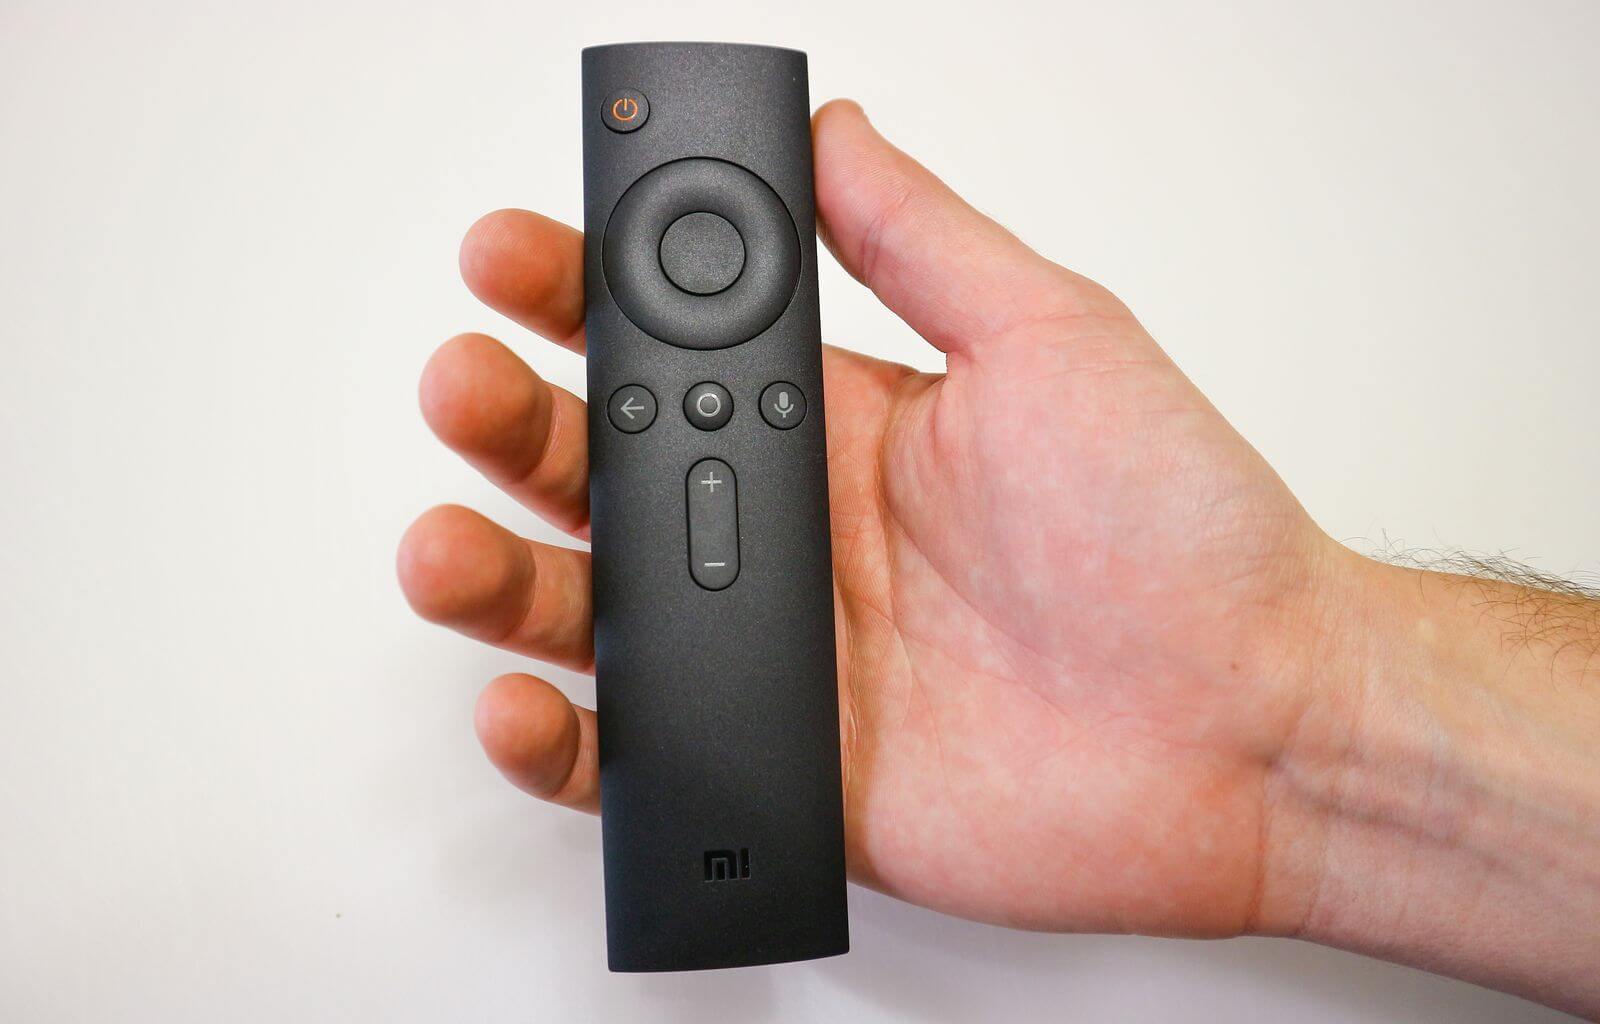
Remote Control
Just like any TV would, the Xiaomi Smart TV 4 does come with remote control. I am giving you remote access to the TV. The Remote features minimalistic buttons that are very easy to understand. This is similar to what we get on most high-end TVs today. On the remote, you will find the standard Android Home, Return and menu button. You will also find volume controller buttons, the Navigation button, and the power button. This remote connects to the TV through Bluetooth. It allows you to control the TV, without directly pointing the remote at it. Apart from being able to control this smart TV, this remote can control your Set Top Box, Mi Android Box, and some other devices.
Conclusion
Despite being a foray, the Xiaomi Mi Smart TV 4 actually packs a lot of impressive features, from its display to hardware specs, to software, there is hardly a thing you would miss when using this smart TV. Although it doesn’t measure shoulders with the top smart TVs we have today, with a price tag for Rs 39,999, the Xiaomi Mi Smart TV 4 is a good buy, with excellent value for the money.
Charges against Juventus star Cristiano Ronaldo is facing disciplinary action for his celebration after one of the three goals he scored in last week’s 3-2 aggregate win, over Atlético Madrid in the Champions League.
The 34-year-old forward has become the subject of a disciplinary investigation by European football’s governing body.
Ronaldo made a similar gesture to Atlético coach Diego Simeone, who celebrated his team’s opening goal in the first leg by turning to the crowd and putting his hands on his trousers.
Simeone was fined €20,000 for the incident but escaped a touchline ban for the return match.
Charges against Juventus star.A statement from the UEFA site: “Following a disciplinary investigation conducted by a UEFA ethics and disciplinary inspector, according to Article 55 of the UEFA Disciplinary Regulations, disciplinary proceedings have been opened following the Champions League round of 16 match between Juventus and Atlético Madrid,” played on March 12 in Italy.
Charges against Juventus Football Club:
– Improper conduct of player Cristiano Ronaldo – Art. 11 (2) (b) and Art. 11 (2) (d) of the UEFA Disciplinary Regulations
The UEFA Control, Ethics and Disciplinary Body will deal with this case at its next meeting on 21st March.
It is no news that Facebook doesn’t allow users to download photo and videos from its platform. Uploading photos and videos may be straightforward, but downloading them is nearly impossible. This has lead to the development of several means of downloading media contents from Facebook.
Most of the methods available today, to download photos and videos from Facebook, requires you to download a browser extension, or you download special software. Downloading these browser extensions and software may be harmful to your computer because most of them come with malware, that can ruin your operating system and make your leak your information.
In this article, we explore a tutorial on how to download facebook videos without using browser extensions. We are going to explore three different methods.
How to Download Facebook Videos without Browser Extensions Using Downvid.net
Downvid.net is a website that allows users to download facebook videos, by pasting copied URLs in a special box provided. It features a very simple and minimal interface. Steps to downloading Facebook videos using Downvid.net is listed below.
Log in your facebook account
Navigate to the post containing the facebook video you wish to download
Copy the URL to the post
Launch downvid.net on your computer, using your browser
Paste the link in the box provided
Select the video quality you desire
Click on download
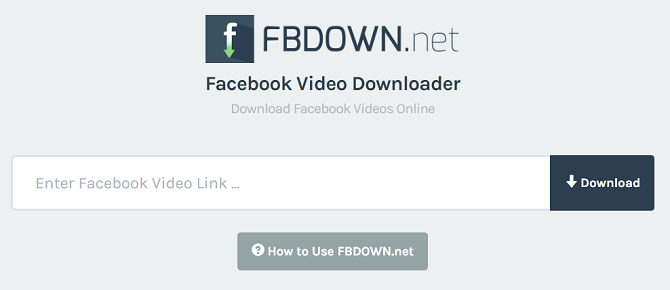
How to Download Facebook Videos without Browser Extensions Using FBDOWN.NET
Similar to downvids.net, FBdown.net is another website that allows users to download facebook videos seamlessly. Steps to downloading Facebook videos using this platform are very similar to that of downvids.net. They are listed below.
Log in your facebook account
Navigate to the post containing the facebook video you wish to download
Copy the URL to the post
Launch fbdown.net on your computer, using your browser
Paste the link in the box provided
Select the video quality you desire
Click on download
How to Download Facebook Videos Using Savefrom.NET
Famous for Youtube video downloads, savefrom.net is yet another platform that lets people download facebook videos easily. It offers a very simple and minimal interface. Similar to the method used in downloading youtube videos on this platform, downloading facebook videos here, requires copying and pasting the Video URL. The steps are listed below.
Log in your facebook account
Navigate to the post containing the facebook video you wish to download
Copy the URL to the post
Launch savefrom.net on your computer, using your browser
Paste the link in the box provided
Select the video quality you desire
Click on download
As you might have already observed in the steps listed in methods presented in this tutorial, downloading Facebook videos with browser extensions, is a straightforward thing. All you have to do is select one of the methods listed here and follow the steps given.
Avengers Endgame will complete the story that began in Avengers infinity war.
Where the Avengers and the Guardians of the Galaxy attempt to stop Thanos from amassing the all-powerful Infinity Stones.
His goal is to collect all six Infinity Stones, artifacts of unimaginable power, and use them to inflict his twisted will on all of reality. Everything the Avengers have fought for has led up to this moment, the fate of Earth and existence has never been more uncertain.
The heroes risked everything to stop Thanos from achieving his insane goal of erasing half the life in the universe, and they ultimately failed. Thanos got the final Infinity Stone, and the Avengers watched friends and loved ones crumble to dust.
Avengers endgame release date
Marvel revealed that Avengers endgame will be out April 26th, 2019.
Avengers endgame trailer
In Avengers: Endgame, MCU is set to pick up the pieces of the devastating ending of Avengers: Infinity War, where Thanos snapped half of the universe out of existence.
Adrift in space with no food or water, Tony Stark sends a message to Pepper Potts as his oxygen supply starts to dwindle. Meanwhile, the remaining Avengers — Thor, Black Widow, Captain America and Bruce Banner — must figure out a way to bring back their vanquished allies for an epic showdown with Thanos — the evil demigod who decimated the planet and the universe.
Avengers endgame cast
The core cast of AVENGERS ENDGAME: Chris Evans (Captain America), Jeremy Renner (Hawkeye), Black Widow (Scarlett Johansson), Iron Man (Robert Downey Jr.), Thor (Chris Hemsworth), Bruce Banner/Hulk (Mark Ruffalo), Nebula (Karen Gillan) and Rocket (voiced by Bradley Cooper). Captain Marvel, Ant-Man (Paul Rudd). Danai Gurira, Don Cheadle and Josh Brolin.
Avengers: Endgame wraps all that happen in INFINITY WAR.
The fact that Smart TV Boxes are the best ways to convert ordinary TVs into smart tv is unarguable. Smart TV Boxes lets offers a wide range of channels for free; they allow users to stream a lot of premium content for free. This is facilitated by their support for Add-ons. Apart from letting you stream contents, Smart TV boxes also have support for apps that run on its operating system, allow users to play games and use other nonstreaming applications on it.
Despite its usefulness, a lot of people tend to stick with their ordinary TVs. This is due to the discouraging price tags, some of these Smart TV boxes offer. In this article, we explore a list of top affordable Android smart TV box. There are listed as follows:
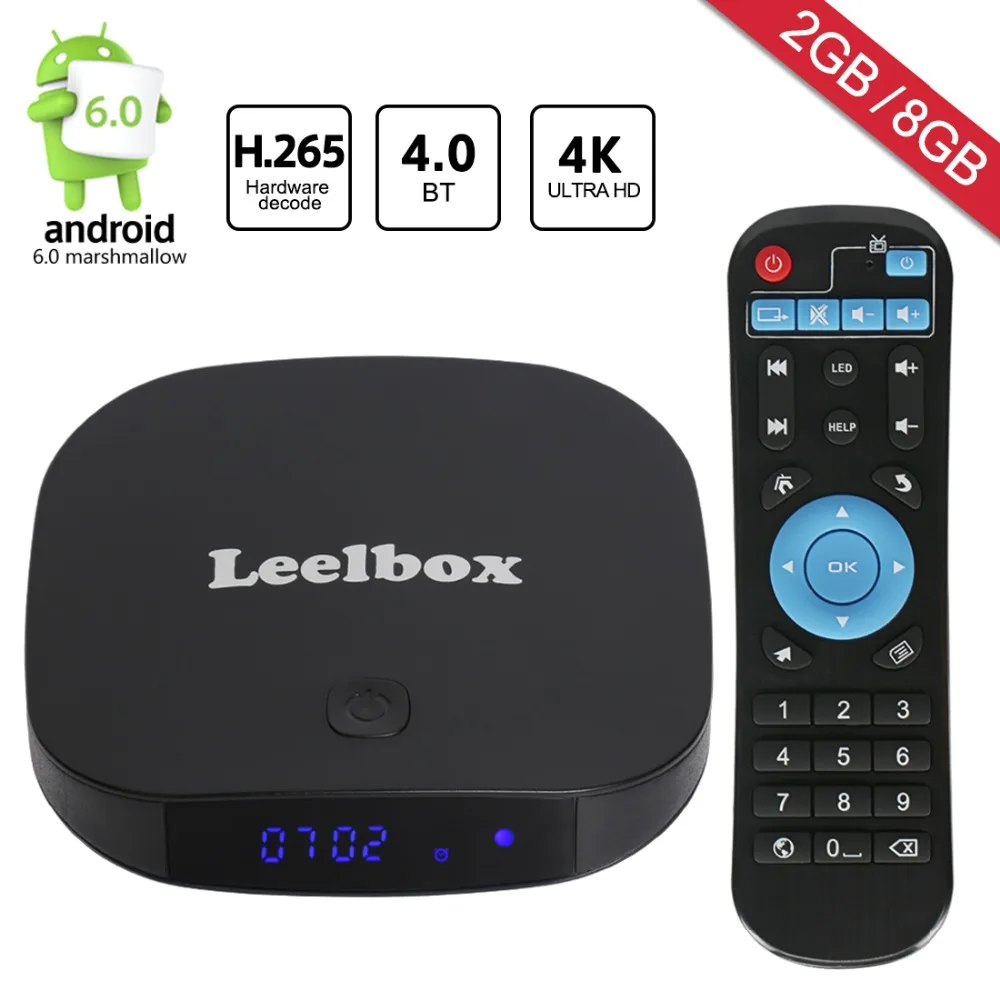
1. Leelbox Q2 Mini
Leelbox Q2 mini is an Android TV smart box, that makes the price tag featured on other smart boxes capable. It offers so much for so little, without cutting corners. With a price tag of $40, Leelbox offers users premium streaming experience.
The Leelbox Q2 mini is powered by a quad-core Cortex A7 processor, a Penta Core GPU, 2GB Ram, 8GB EMMC Flash storage. It features integrated Wifi and Bluetooth 4.0. The Leebox Q2 comes with Kodi preinstalled.
On default, the Leelbox Q2 Mini is set with a configuration that allows handling is streaming without stress. The Leelbox Q2 is capable of streaming high-resolution videos without buffering or lag. You are assured of hitch free streaming of content with the Leelbox Q2 mini. The Leelbox Q2 comes with a 12-month warranty, allowing users to get free repair within the first year.
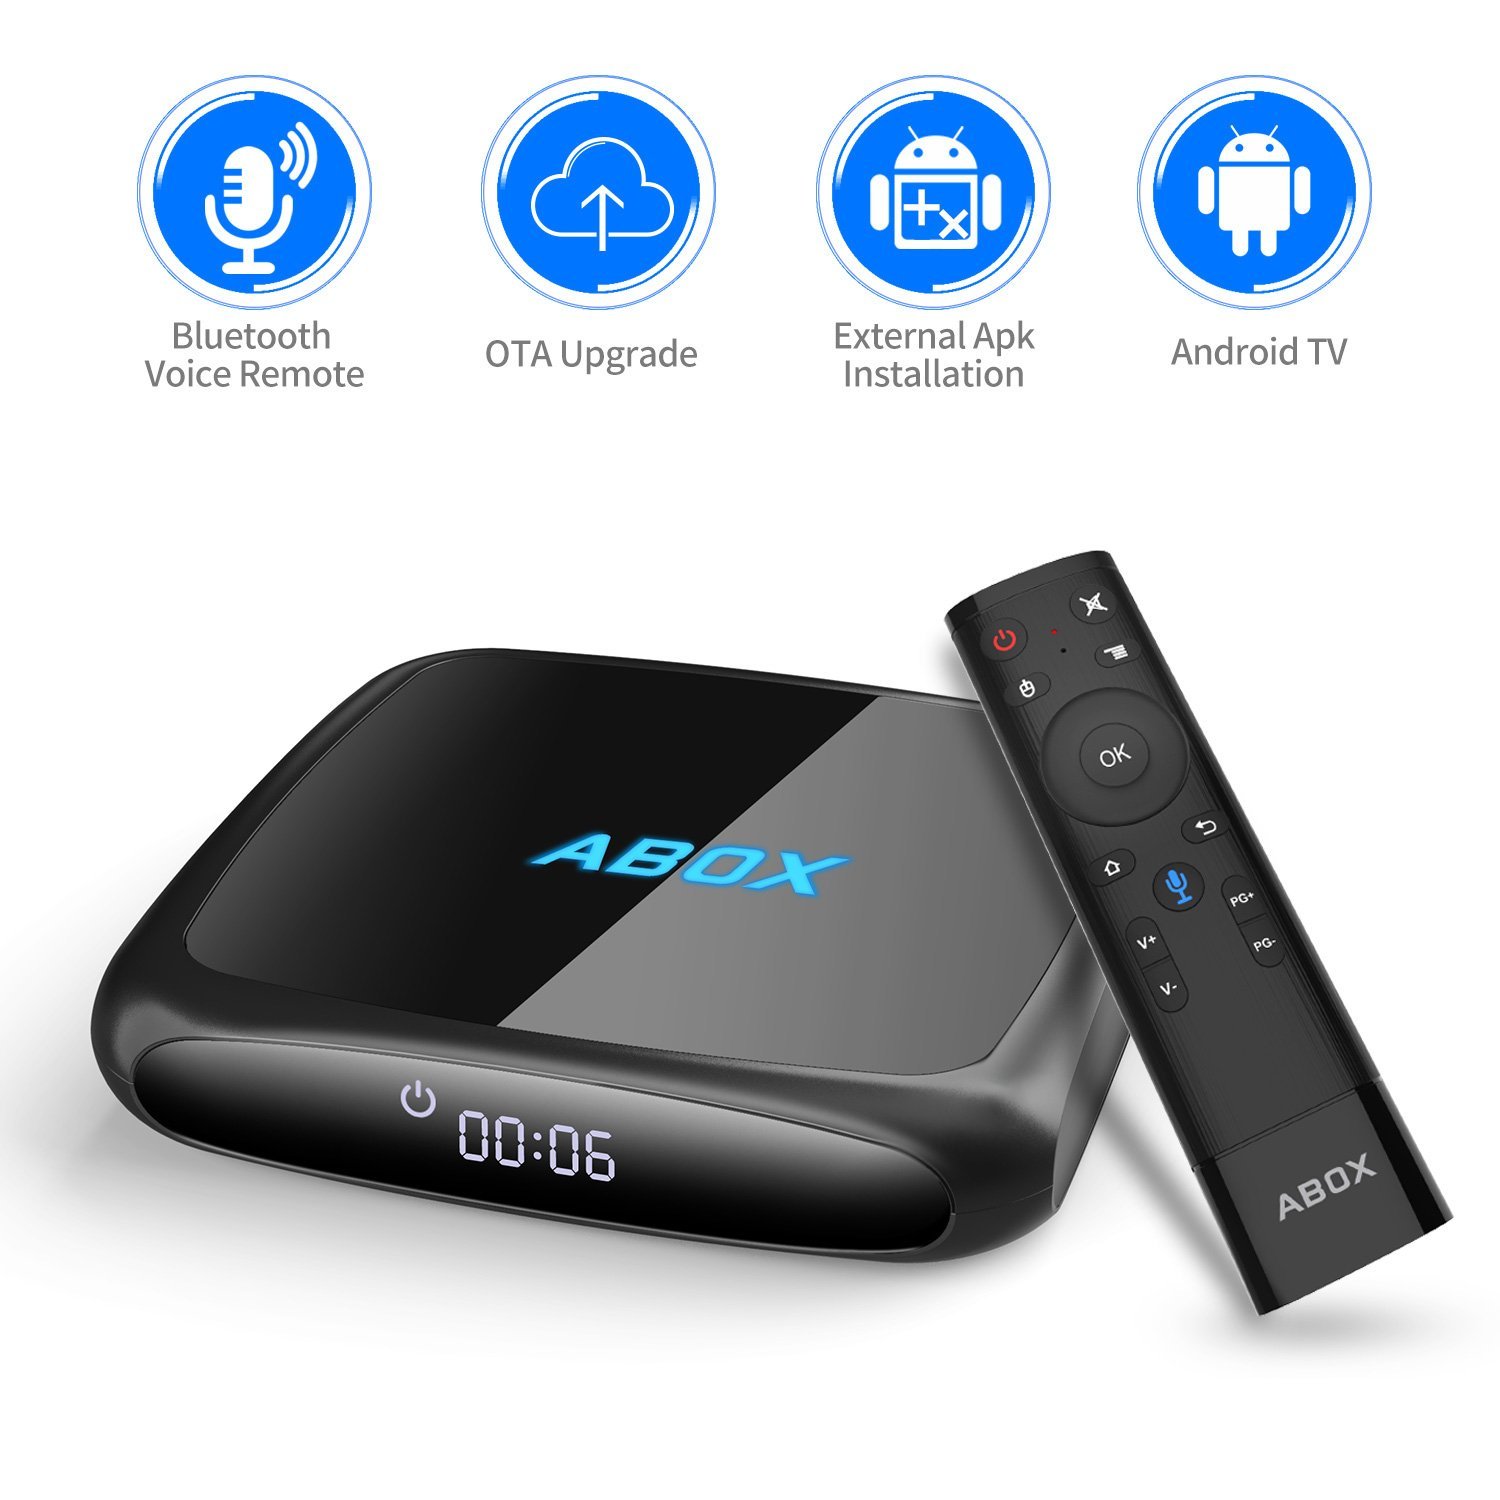
2. Goodbang Doo Abox
Goodbang Doo Abox is another Android TV Box that offers so much for so little. It even has a cheaper price tag, when compared to the Leelbox Q2 mini. It lets users stream TV Shows, movies, music, and other entertaining content seamlessly — all for a price tag of $37.
The Goodbang doo Abox Android TV features an Amlogic 2GHz Quad-Core S905X processor, Mali-450 Penta core CPU, IGB RAM and 8GB of internal storage. Similar to the Leelbox Q2 mini, The Goodbang doo Abox Android TV runs onAndroid 6.0. It also comes with Kodi Pre-installed.
3. MXQ Pro 4K
The MXQ Pro offers provides users with top-notch 4k streaming, for a price tag that seems very little. The MXQ Pro can stream 4k content for long, without any form of lag or buffers. It offers all its features for a price tag of $31.
The MXQ Pro 4k is powered by Quad-Core Amlogic S905X processor, a Penta-core Mali-450 GPU, IGB Ram and 8GB of internal storage. The MXQ Pro 4k Android TV features stable Wi-Fi and also supports Ethernet. The MXQ Pro Android TV also has HDMI support and comes with support for many languages.
4. A95X TV BOX
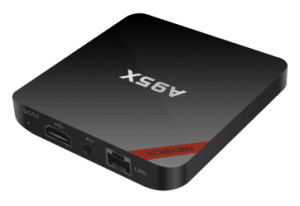
Still, on the topic of top affordable Android TV smart box, the A95X TV box is yet another affordable Android TV smart box. With a price tag of $41, the A95X TV box fits perfectly in this list. It lets users stream 4k content seamlessly.
The A95X TV box does 4k video playback without buffering or any form of lag. It houses a 2.4GHz WiFi and Ethernet, Bluetooth. The A95X TV box has VP9 decoding and H.265 support. This allows it to run faster than most of the low-end TV Box we have today. It also supports DR Vivid world, which allows for improved video clarity, color, contrast and high definition pictures.
5. X96 Mini Android TV Box
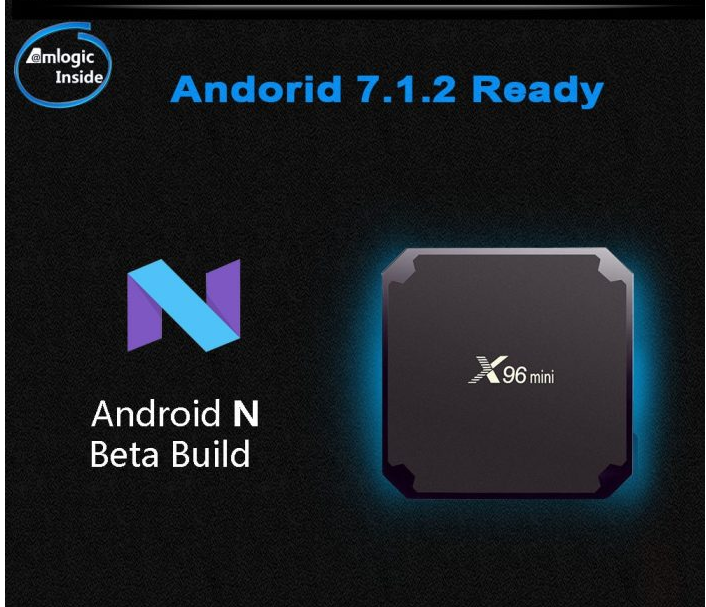
Last but certainly not least is the X96 Mini Android TV Box. With a price tag of $26, the X96 mini Android TV box is the cheapest smart tv box in this list. Again have a meager price tag, doesn’t facilitate a denial in quality specs. The X96 Mini is the cheapest and most powerful Android smart TV Box featured in this article.
The X96 Mini Android TV box features an octa-core Amlogic S912 processor, 3GB ram, ARM-Mali T820MP3 GPU. It operates on 1000M ethernet. It houses Bluetooth 4.1, HDMI support. Supports 4k video up to 60 FPS. It comes with Kodi pre-installed and runs on Android 7.1 operating system.
There you have it – A comprehensive list of top affordable Android Smart TV box. Smart TV Boxes featured in this article, have different price tags, it is now left for you to choose the one that suits your budget. If you have other recommendations, please do let us know in the comment section below.
Viruses on Android devices may not be common, but they do exist. Spotting viruses on Android devices may be very difficult for some, but to the enlightened, it is a straightforward thing. When Your Android device is infected, Your Android device begins to malfunction. Browsing through the web, you begin to see add pop-ups, you may; It to porn sites on different occasions. These are some of the signs that a virus has infected your Android device.
Clearing viruses for Android device, you are provided two options. Its either you perform a full system wipe, or you make use of an Antivirus app, to treat the viruses. Using Antivirus apps is a more natural option. There are many Antivirus apps available in the Google PlayStore today. In this article, we explore a comprehensive list of best free antivirus applications for Android devices.
1. Kaspersky
Kaspersky is unarguably one of the best and also one of the most used Antivirus applications we have today. A lot of apparent reasons facilitates this fact. The Kaspersky Antivirus app helps users keep their Android devices safe from Malware and viruses. Kaspersky lets users can use their Android devices for Malware and Viruses free of charge. Upgrading to its premium package, Kaspersky provides real-time protection, anti-theft, anti-phishing, and an app locker. Kaspersky Also features a call filter, find my phone feature and lots more. The Kaspersky app can be downloaded from the Google Play Store.
2. Avast Mobile Security
Avast mobile security is yet another famous Antivirus app. Over the years, the Avast Mobile security app has been able to build a reputation for itself. The Avast mobile security app lets users scan their smartphone for dangerous or infected apps and trojans. Avast antivirus provides total protection against spyware and viruses.
Unlike the Kaspersky antivirus app, Avast mobile security offers all its essential feature for free. Although Avast offers its features for free, it features in-app purchases. These in-app purchases remove ads and provide users with the app lock feature, ass well sim security, camera tap and lots more. The Avast mobile security app can be downloaded from the Google Play Store.
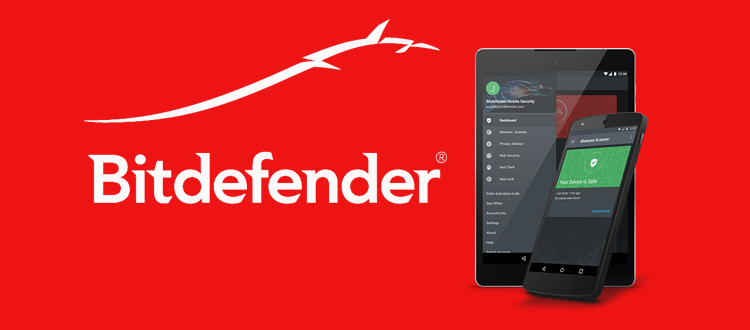
3. Bitdefender Antivirus Free
Bitdefender Antivirus is an app designed to secure your Android devices from all malware and Antiviruses. Bitfender makes use of cloud scanning technology, to offer users top-notch security on their Android devices. Bitdefender Antivirus is one of the Antivirus apps that don’t slow down or drain your battery when functioning.
Still, on the features of Bitdefender Antivirus, it features an Integrated VPN for accessing blocked websites, features a smart unlock for unlocking apps when connected to trusted wifi, it features web protection for scanning adware, malware when browsing. The Bitdefender Antivirus app can be downloaded from the Google PlayStore.
4. Norton Security & Anti-Virus
Famous for its efficiency in detecting malware and spyware, and Viruses, Norton Security is yet another credible Antivirus app for Android devices. Apart from detecting and treating viruses, Norton security can also be used to find missing Android devices. You can use the app to trigger an alarm on the lost device remotely. You can also use this app to remotely lock the missing device, to prevent data theft.
Still, on the features of the Norton Security app, It can be used to scan wi-fi connections, allowing you to detect unsecured wi-fi connections. Norton security can be used for safe Search for flagging unsafe websites during browsing, It can also be used as a call blocker, to block spam and unwanted calls.
5. Sophos Mobile Security
Sophos Mobile security is yet another free Antivirus application that offers all the essentials for free. Sophos mobile security is one of the few free Antivirus apps that doesn’t show in-app ads. Sophos mobile security protects Android devices from malware and viruses. It features loss and theft protection, an app locker, security adviser, which gives you useful security tips, call blocker and lots more.
Still, on the features of the Sophos Mobile security app, the Mobile Sophos security app features a web filter for blocking malicious websites, it houses an app locker, wi-fi security to protect you from snooping.
6. Security Master
As its name depicts, the Security master app is an app designed to give its users optimal security of their smartphones. Security master is the upgraded version of the CM security app. The Security master app keeps your smartphone safe from malware and viruses. The free version of the app offers awesome features like app locker, scanner, message security, Wi-Fi security, junk cleaner, notification cleaner, phone booster, CPU cooler, battery saver, call blocker and lots more.
Still, on the features of this app, the Security master app lets users browse their favorite sites safely within the app. This way, you rest assured of not getting your information leaked or your location tracked. The Security master app houses a safe-connect VPN for accessing websites that are blocked in your region, Anti-theft alarm, message security for hiding notification previews and intruder selfie or capturing intruders. Similar to the already mentioned apps, the security master app can be downloaded from the Google PlayStore.
7. McAfee Mobile Security & Lock
Still, on the topic of Best Free Antivirus Application for Android Devices, McAfee is yet another highly recommended antivirus app for Android device. It is a famous antivirus app that has been able to live up to the hype.
The McAfee Mobile security app houses anti-theft features, security lock, wi-fi security, a battery optimizer, memory cleaner and lots more. Still, on the characteristics of this app, the McAfee mobile security app allows users to remote wipe of data on their smartphone, in case of theft, it also has a feature that prevents a thief from uninstalling the McAfee antivirus app from your phone.
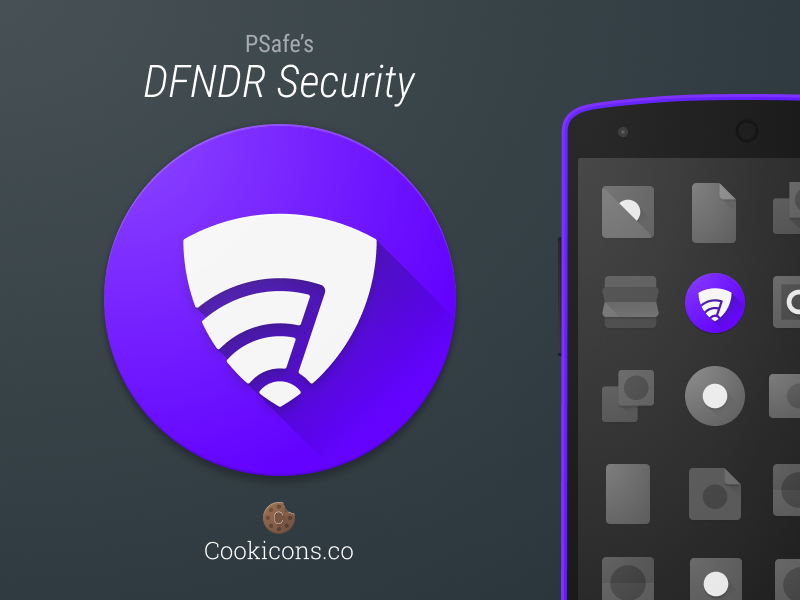
8. DFNDR Security
DFNDR Security is one of the top antivirus apps we have today on Android, with top ratings from AV-Test institute, you rest assured of optimal security of your Android device.
The DFNDR security app provides total protection fro viruses. It also has houses anti-hacking and anti-phishing features. DFNDR security can be used to speed up internet connection by closing background apps that compete for bandwidth. The DFNDR security app is available for download from the Google play store.
9. Avira Antivirus Security
Avira Antivirus security is yet another reliable Antivirus app, that can be used to secure your Android device against spyware, malware, and Viruses. Avira Antivirus scans external storage unit and shows how each app rates on a private scale.
The Avira Antivirus security app can be used as a phone tracker, to track missing smartphones. The premium version of the Avira Antivirus security app offers camera & Mic protection, additional browser security and lots more. The Avira Antivirus security app can be downloaded from the Google PlayStore.
10. AVG Antivirus
Last but certainly not least is the AVG Antivirus app for Android. AVG Antivirus is a sturdy security app, that offers users total protection of their devices. Similar to the already mentioned apps, AVG features all the essentials needed in securing your Android device. It features periodic scan feature, Wi-Fi security, junk cleaner, ram booster, call blocker, power saver and lots more.
The AVG Antivirus app features a dual-engine antivirus for removing viruses and other malicious content; it features a performance booster, photo vault for locking photographs and lots more. AVG Antivirus can be downloaded from the Google PlayStore.
There you have it – a Comprehensive list of Best Free Antivirus Application for Android Devices. If you have other recommendations, feel free to drop them in the comment section below.
Real Madrid have announced the signing of Eder Militao from Porto on a contract until 2025.
Eder Gabriel Militao (Sertãozinho, Sao Paulo, 18-01-1998) is officially a new Real Madrid player, signing until 2025. The 21-year-old defender will join the club next season and is already a full Brazil international.
He comes to the Whites from Porto, where he has quickly become a star of the team in only his first year in the Portuguese League. He has been named the best defender in the league for the last five months in a row. Real Madrid official website reports.
It is the first transfer since Zinedine Zidane returned to manage the club.The 21-year-old has caught the attention of Europe’s biggest clubs with his performances for Porto.
If by July 15, Los Blancos couldn’t complete the deal. Militao’s 50-million euro buyout clause would rise to 75 million euros ,that’s 25 percent. Marca reports.
A statement on the club’s website said: “Real Madrid CF and FC Porto have agreed the transfer of the player Eder Militao, who will be linked to the club during the next six seasons, until June 30, 2025.